Page 105 of 318

Tail lamps
LightsBulb type
:High-mounted brake
lampLED
;License plate lampLED
=Rear fog lamp (driver's
side)P 21 W
?Backup lampP 21 W
ABrake lamp/tail lamp/
standing lamp/turn sig-
nalP 21 W
Side marker lampLED
Tail lamps
Installing/removing the tail lamp
!Remove the tail lamps with care so as not to
damage the paintwork.
Because of the installation position,
Mercedes-Benz recommends that you have
the tail lamp bulbs changed at a qualified spe-
cialist workshop.
Tail lamp
XTo remove: switch off the lighting system.
XOpen the tailgate/rear door.
iThe vehicle tool kit contains a screwdriver
(Ypage 270).
XUnscrew two side screws :.
XPress tail lamp;out as far as bolts =.
XRemove tail lamp;out from bolts =.
XPull the connector off the bulb holder of the
tail lamp.
XTo install:press the connector into the bulb
holder of the tail lamp.
XPress the tail lamp sideways onto bolts =
and slide onto the vehicle.
XTighten two side screws :.
Standard tail lamp
XRemove the tail lamp (Ypage 103).
XUnscrew three screws:and remove bulb
holder ;from the tail lamp.
Bulb holder
=
Turn signals/brake lamps/tail lamps/
standing lamps
?Backup lamps
ARear fog lamp (driver's side only)
XApply light pressure to the corresponding
bulb, turn it counter-clockwise and remove it
from the bulb holder.
XPress the new bulb into the socket and screw
it in clockwise.
XInsert bulb holder ;into the tail lamp and
tighten all three screws :.
XInstall the tail lamp (Ypage 103).
Replacing bulbs103
Lights and windshield wipers
Z
Page 106 of 318

Windshield wipers
Switching the windshield wiper
on/off
!
Do not operate the windshield wipers when
the windshield is dry, as this could damage
the wiper blades. Moreover, dust that has col-
lected on the windshield can scratch the glass
if wiping takes place when the windshield is
dry.
If it is necessary to switch on the windshield
wipers in dry weather conditions, always use
washer fluid when operating the windshield
wipers.
!If the windshield wipers leave smears on the
windshield after the vehicle has been washed
in an automatic car wash, wax or other resi-
dues may be the reason for this. Clean the
windshield using washer fluid after washing
the vehicle in an automatic car wash.
!Intermittent wiping with rain sensor: due to
optical influences and the windshield becom-
ing dirty in dry weather conditions, the wind-
shield wipers may be activated inadvertently.
This could then damage the windshield wiper
blades or scratch the windshield.
For this reason, you should always switch off
the windshield wipers in dry weather.
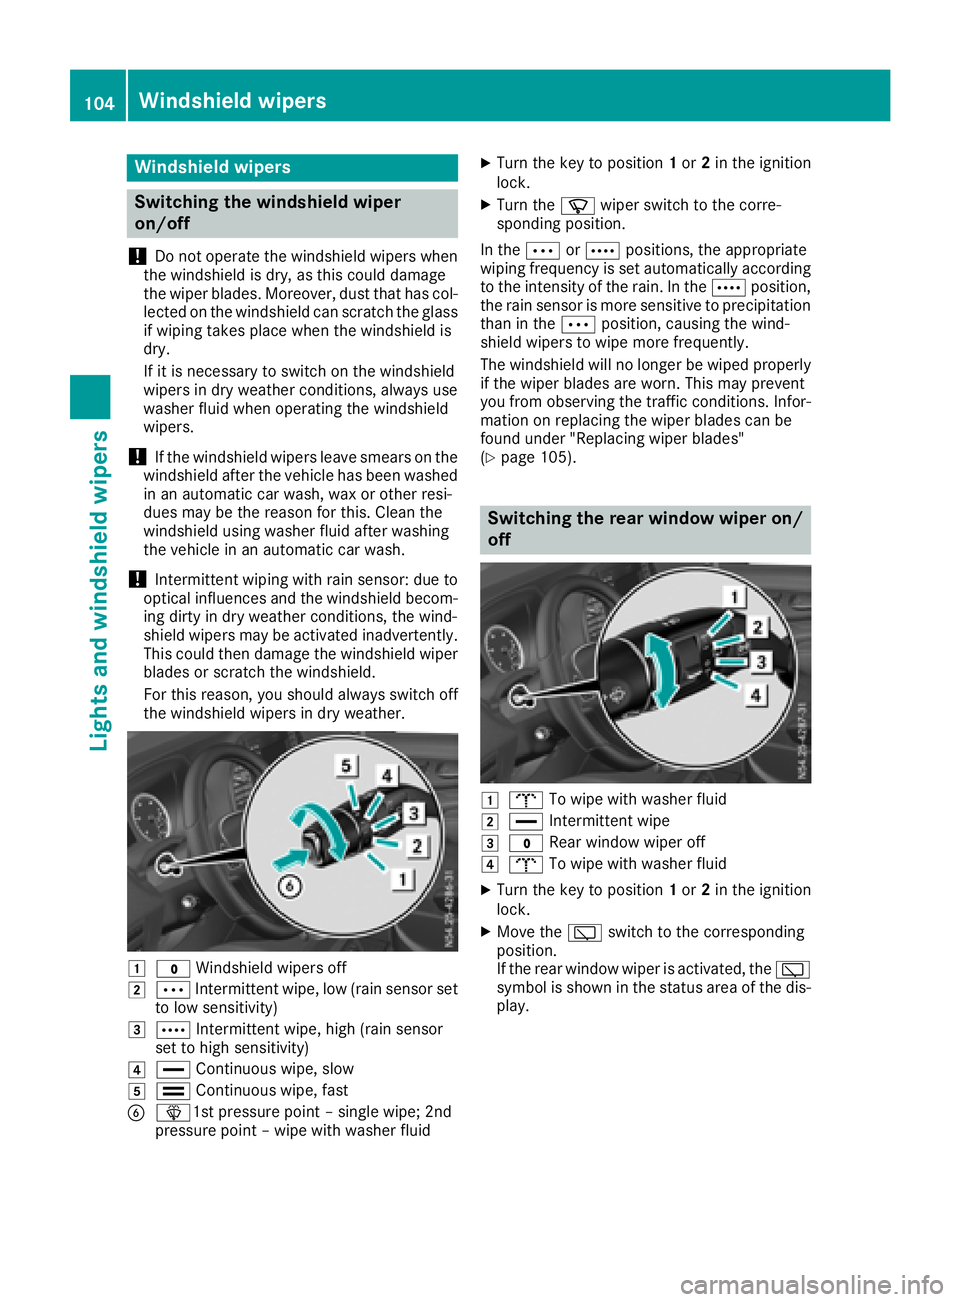
1$ Windshield wipers off
2ÄIntermittent wipe, low (rain sensor set
to low sensitivity)
3Å Intermittent wipe, high (rain sensor
set to high sensitivity)
4° Continuous wipe, slow
5¯Continuous wipe, fast
Bî1st pressure point – single wipe; 2nd
pressure point – wipe with washer fluid
XTurn the key to position 1or 2in the ignition
lock.
XTurn the íwiper switch to the corre-
sponding position.
In the ÄorÅ positions, the appropriate
wiping frequency is set automatically according
to the intensity of the rain. In the Åposition,
the rain sensor is more sensitive to precipitation
than in the Äposition, causing the wind-
shield wipers to wipe more frequently.
The windshield will no longer be wiped properly
if the wiper blades are worn. This may prevent
you from observing the traffic conditions. Infor-
mation on replacing the wiper blades can be
found under "Replacing wiper blades"
(
Ypage 105).
Switching the rear window wiper on/
off
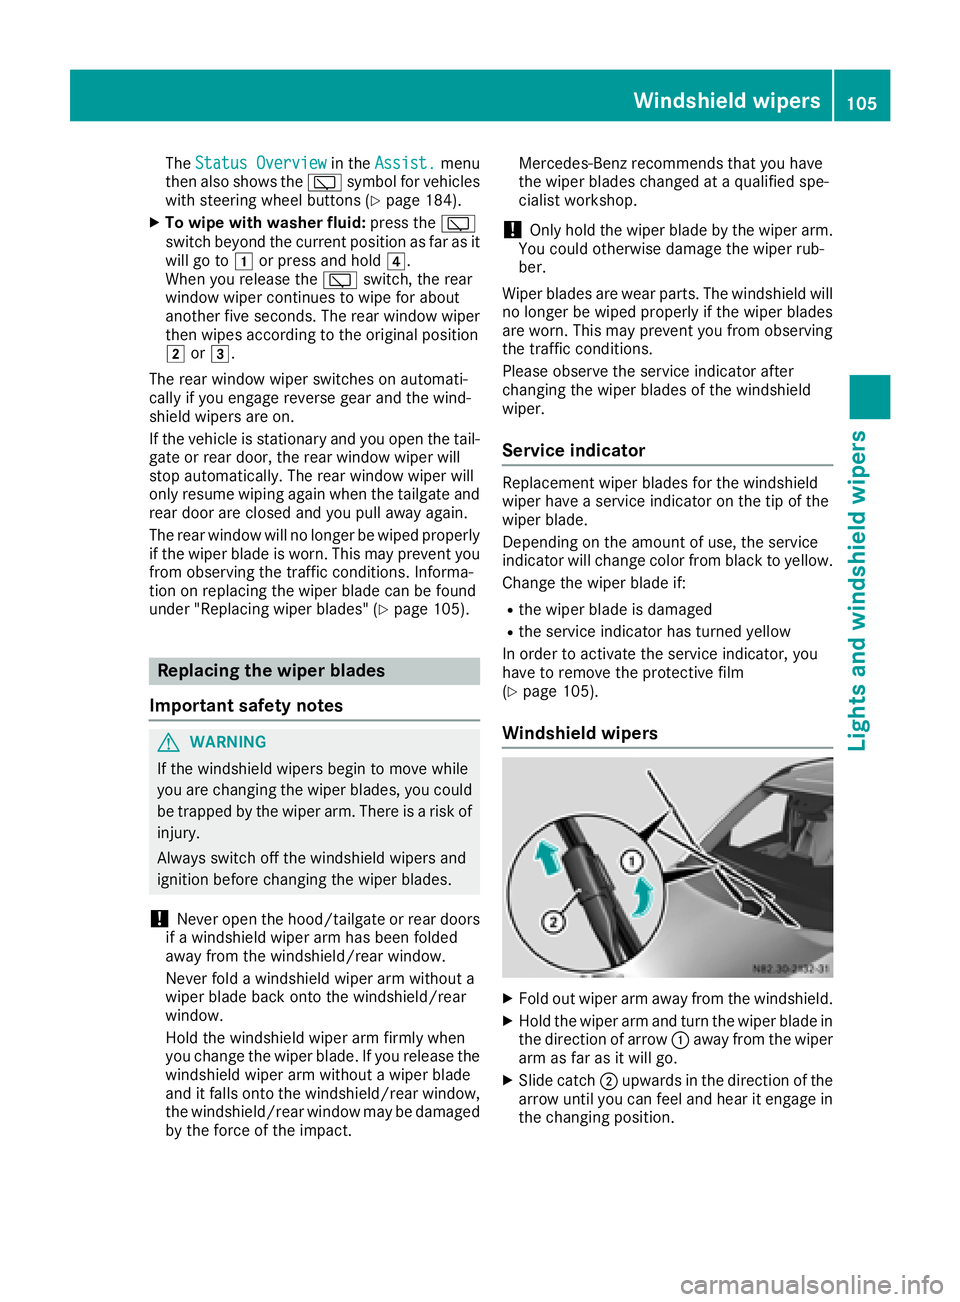
1b To wipe with washer fluid
2°Intermittent wipe
3$Rear window wiper off
4bTo wipe with washer fluid
XTurn the key to position 1or 2in the ignition
lock.
XMove the èswitch to the corresponding
position.
If the rear window wiper is activated, the è
symbol is shown in the status area of the dis-
play.
104Windshield wipers
Lights and windshield wipers
Page 107 of 318

TheStatus Overviewin the Assist.menu
then also shows the èsymbol for vehicles
with steering wheel buttons (
Ypage 184).
XTo wipe with washer fluid: press theè
switch beyond the current position as far as it
will go to 1or press and hold 4.
When you release the èswitch, the rear
window wiper continues to wipe for about
another five seconds. The rear window wiper
then wipes according to the original position
2 or3.
The rear window wiper switches on automati-
cally if you engage reverse gear and the wind-
shield wipers are on.
If the vehicle is stationary and you open the tail-
gate or rear door, the rear window wiper will
stop automatically. The rear window wiper will
only resume wiping again when the tailgate and
rear door are closed and you pull away again.
The rear window will no longer be wiped properly if the wiper blade is worn. This may prevent you
from observing the traffic conditions. Informa-
tion on replacing the wiper blade can be found
under "Replacing wiper blades" (
Ypage 105).
Replacing the wiper blades
Important safety notes
GWARNING
If the windshield wipers begin to move while
you are changing the wiper blades, you could be trapped by the wiper arm. There is a risk of
injury.
Always switch off the windshield wipers and
ignition before changing the wiper blades.
!Never open the hood/tailgate or rear doors
if a windshield wiper arm has been folded
away from the windshield/rear window.
Never fold a windshield wiper arm without a
wiper blade back onto the windshield/rear
window.
Hold the windshield wiper arm firmly when
you change the wiper blade. If you release the
windshield wiper arm without a wiper blade
and it falls onto the windshield/rear window,
the windshield/rear window may be damaged
by the force of the impact. Mercedes-Benz recommends that you have
the wiper blades changed at a qualified spe-
cialist workshop.
!Only hold the wiper blade by the wiper arm.
You could otherwise damage the wiper rub-
ber.
Wiper blades are wear parts. The windshield will
no longer be wiped properly if the wiper blades
are worn. This may prevent you from observing
the traffic conditions.
Please observe the service indicator after
changing the wiper blades of the windshield
wiper.
Service indicator
Replacement wiper blades for the windshield
wiper have a service indicator on the tip of the
wiper blade.
Depending on the amount of use, the service
indicator will change color from black to yellow.
Change the wiper blade if:
Rthe wiper blade is damaged
Rthe service indicator has turned yellow
In order to activate the service indicator, you
have to remove the protective film
(
Ypage 105).
Windshield wipers
XFold out wiper arm away from the windshield.
XHold the wiper arm and turn the wiper blade in
the direction of arrow :away from the wiper
arm as far as it will go.
XSlide catch ;upwards in the direction of the
arrow until you can feel and hear it engage in
the changing position.
Windshield wipers105
Lights and windshield wipers
Z
Page 108 of 318

XRemove wiper blade=from wiper arm by
pullin git in th edirection of th earrow.
XInser tne wwiper blade =intoth ewiper arm
in th edirection of th earrow.
Pleas etak eth ediffering lengths of th etwo
wiper blade sint oaccount:
RDriver's side -lon gwiper blade
RFront-passenger side -short wiper blade
XSlide catch ;downwards in th edirection of
th earrow until you can fee land hear it
engage .
XFold thewiper arm bac konto th ewindshield.
XRemove protective film ?from th eservic e
indicator on th etip of th ewiper blades.
Rear window wiper
Tailgate
XFold wiper arm :away from th erear window
until you hear it engage .
XHold wiper arm:and pull wiper blade ;in
th edirection of th earrow away from th ewiper
arm .
XPlac ene wwiper blade ;onto wiper arm :.
XHold wiper arm:and push wiper blade ;in
th eopposit edirection to th earrow until it
engages.
XMak esur ethat wiper blade ;is in th ecor-
rec tposition .
XFold wiper arm :bac konto th erear window.
106Windshield wipers
Lights and windshield wipers
Page 109 of 318

Rear doors
Rear window wipers (example: left rear door)
XFold wiper arm=away from the rear window.
XPress both retaining clips ;together in the
direction of the arrow and swing wiper
blade :away from wiper arm =.
XPull wiper blade:up and out of the retainer
on wiper arm =.
XSlide new wiper blade :into the retainer on
wiper arm =.
XPress new wiper blade :onto wiper arm =
until you hear retaining clips ;engage.
XFold wiper arm =back onto the rear window.
Problems with the windshield wipers
ProblemPossible causes/consequences and MSolutions
The windshield wiper
jams.Leaves or snow, for example, may be obstructing the windshield wiper
movement. The wiper motor has switched off.
XStop the vehicle as soon as possible, paying attention to road and
traffic conditions.
XFor safety reasons, you should remove the key from the ignition
lock.
XRemove the cause of the obstruction.
XSwitch on the windshield wipers again.
The windshield wiper
does not move at all.There is a malfunction in the windshield wiper drive.
XSelect another wiper speed on the combination switch.
XHave the windshield wipers checked at a qualified specialist work-
shop.
The windshield washer
fluid from the spray noz-
zles no longer hits the
center of the wind-
shield/rear window.The spray nozzles are misaligned.
XHave the spray nozzles checked at a qualified specialist workshop.
Windshield wipers107
Lights and windshield wipers
Z
Page 110 of 318

Useful information
This Operator's Manual describes all models as
well as standard and optional equipment of your
vehicle that were available at the time of going
to print. Country-specific variations are possi-
ble. Note that your vehicle may not be equipped
with all of the described functions. This also
applies to systems and functions relevant to
safety.
Read the information on qualified specialist
workshops (
Ypage 31).
Overview of climate control systems
Important safety notes
Observe the recommended settings on the fol-
lowing pages. Otherwise, the windows could fog
up.
To prevent the windows from fogging up:
Ronly switch off climate control briefly
Ronly switch on air-recirculation mode briefly
Rfor vehicles with air-conditioning system or
dual-zone automatic climate control, switch
on the "Cooling with air dehumidification"
function
Rfor vehicles with dual-zone automatic climate
control, switch on the windshield defrosting
function briefly, if requiredClimate control regulates the temperature and
the humidity in the vehicle interior and filters
undesirable substances from the air.
Climate control is only operational when the
engine is running. The system only functions
optimally when the side windows are closed.
Ventilate the vehicle for a brief period during
warm weather. In order to cool the vehicle more
rapidly, switch climate control to air-recircula-
tion mode briefly. This will speed up the cooling
process and the desired interior temperature
will be reached more quickly.
The integrated filter can filter out most particles
of dust and completely filters out pollen. In vehi-
cles with dual-zone automatic climate control,
gaseous pollutants and odors will also be
reduced. A clogged filter reduces the airflow into
the vehicle interior. For this reason, you should
always observe the interval for replacing the fil- ter, which is specified in the Maintenance Book-
let. As the interval between changes depends on
environmental conditions, e.g. heavy air pollu-
tion, the interval may be shorter than stated in
the Maintenance Booklet.
108Overview of climate control systems
Climate control
Page 111 of 318

Control panel for the air-conditioning system
:Sets the temperature (Ypage 113)
z Defrosts the windshield (
Ypage 115)
;/Switches the rear-compartment air conditioning on/off (Ypage 111)
=_Sets the air distribution (Ypage 114)
¯ Defrosts the windshield (
Ypage 115)
?hActivates/deactivates air-recirculation mode (Ypage 116)
AKSets the airflow (Ypage 114)
z Defrosts the windshield (
Ypage 115)
B¿Switches the cooling with air dehumidification function on/off (Ypage 112)
C¤Switches the rear window defroster and mirror heating on/off (Ypage 116)
Optimum use of the air-conditioning
system
Below, you can find a number of notes and rec-
ommendations to help you use the air-condi-
tioning system optimally.
RSwitch on the cooling with air dehumidifica-
tion function. The indicator lamp in the
¿ switch comes on when the function is
switched on.
RSet the temperature to 72 ‡ (22 †).Only
ch ange the temperature in small increments.
ROnly use the settings for defrosting the wind-
shield briefly, until the windshield is clear
again.
ROnly use air-recirculation mode briefly, e.g. if
there are unpleasant outside odors or when in a tunnel. The windows could otherwise fog up
as no fresh air is drawn into the vehicle in air-
recirculation mode. The indicator lamp in the
h
switch comes on when the function is
switched on.
During automatic engine switch-off, the climate
control system only operates at a reduced capa-
city. Further information on the automatic
engine switch-off can be found under "ECO
start/stop function" (
Ypage 123).
Overview of climate control systems109
Climate control
Page 112 of 318

Control panel for dual-zone automatic climate control
:Sets temperature to the left and at rear (only for vehicles with rear air conditioning)
(Ypage 113)
;ÃActivates automatic mode – controls the climate control automatically (Ypage 113)
=¬Defrosts the windshield (Ypage 115)
?KIncreases the airflow (Ypage 114)
AÄSets the air distribution (Ypage 114)
BDisplay
ChSwitches air-recirculation mode on or off (Ypage 116)
D/Switches operation to rear air conditioning (2nd menu level) (Ypage 111)
ESets temperature to the right and at rear (only for vehicles with rear air conditioning)
(Ypage 113)
F0Switches synchronization on or off (Ypage 115)
G¿Switches the cooling with air dehumidification function on or off (Ypage 112)
HIReduces the airflow (Ypage 114)
I¤Switches the rear window defroster and mirror heating on or off (Ypage 116)
JÌSwitches the residual heat utilization on or off (Ypage 117)
Optimum use of dual-zone automatic
climate control
Below, you can find a number of notes and rec-
ommendations to help you use dual-zone auto-
matic climate control optimally.
RActivate automatic mode. All basic functions
are controlled automatically. The indicator
lamp in the Ãswitch comes on when the
function is switched on.
RSwitch on the cooling with air dehumidifica-
tion function. The indicator lamp in the
¿ button comes on when the function is
switched on.
RSet the temperature to 72 ‡ (22 †) for both
sides. Only change the temperature in small
increments.
ROnly use the "Windshield defrosting" function
briefly until the windshield is clear again. The
indicator lamp in the ¬button comes on
when the function is switched on.
ROnly use air-recirculation mode briefly, e.g. if
there are unpleasant outside odors or when in
a tunnel. The windows could otherwise fog up
as no fresh air is drawn into the vehicle in air-
recirculation mode. The indicator lamp in the
h button comes on when the function is
switched on.
110Overview of climate control systems
Climate control