2017 MERCEDES-BENZ GLA SUV tow
[x] Cancel search: towPage 283 of 369
The route calculation includes roads which
require you to pay a usage fee (toll).
R Use vignette roads Use vignette roads (not available in all
countries)
The route calculation includes roads which
require you to pay a time-based fee (vignette).
A vignette allows temporary use of the route
network, e.g. 10 days or 1 year.
Entering an address Multimedia system:
X Select Navi NaviQNavigation Navigation.
The map displays the current vehicle position.
X Slide 6the controller.
X Select Destination
Destination QAddress entryAddress entry.
Enter an address, e.g. as follows:
R town or postcode, street, house number
R country, town or postcode
R town or postcode, centre
R street, town or postcode, junction
X Select Town
Town.
The town in which the vehicle is currently
located (current vehicle position) is at the top.
Below this, you will see locations for which
route guidance has already been carried out.
X Enter the town.
The Gsymbol: the location is contained on
the digital map multiple times.
X To switch to the list: slide5the control-
ler.
X Select the location.
If available, the postcode is shown. If there
are different postcodes available for the loca-
tion, the corresponding digits are displayed
with an X
X.
X Enter the street and house number.
The address is in the menu.
Further options for destination entry:
R search for a keyword
The keyword search finds destinations using
fragments of words.
R select the last destination
R select a contact
R select a POI
You can search for a POI by location, name or
telephone number.
R select destination on the map
R enter intermediate destination You can map the route to the destination
yourself with up to four intermediate destina-
tions.
R select travel guide destination (only available
for selected European countries)
R select destinations from Mercedes-Benz
Apps
R select geo-coordinates
Calculating the route Requirement: the address has been entered and
is in the menu.
X Select Start StartorContinue
Continue.
The route is calculated with the selected route
type and the selected route options.
If route guidance has already been activated,
a prompt will appear asking whether you wish to end the current route guidance.
X Select Cancel Cancel current
current route
route guidance
guidance or
Set as intermediate destination
Set as intermediate destination .
Cancel current route guidance
Cancel current route guidance cancels
the current route guidance and starts route
calculation to the new destination.
Set as intermediate destination
Set as intermediate destination adds
the new destination in addition to the existing destination and opens the intermediate des-
tinations list. Connecting a mobile phone (COMAND
Online)
Requirements For telephony via the Bluetooth
®
interface, a
Bluetooth ®
-capable mobile phone is required.
The mobile phone must support Hands-Free
Profile 1.0 or above.
Multimedia system:
X Select Vehicle
VehicleQSystem set‐ System set‐
tings tingsQActivate Bluetooth Activate Bluetooth.
X Activate Bluetooth ®
O.
Mobile phone:
X Activate Bluetooth ®
and, if necessary, Blue-
tooth ®
visibility for other devices (see the
manufacturer's operating instructions).
The Bluetooth ®
device names for all of one man-
ufacturer's products might be identical. To
make it possible to clearly identify your mobile 280
Operating systemMultimedia system
Page 286 of 369
to two minutes to be displayed (see the man-
ufacturer's operating instructions).
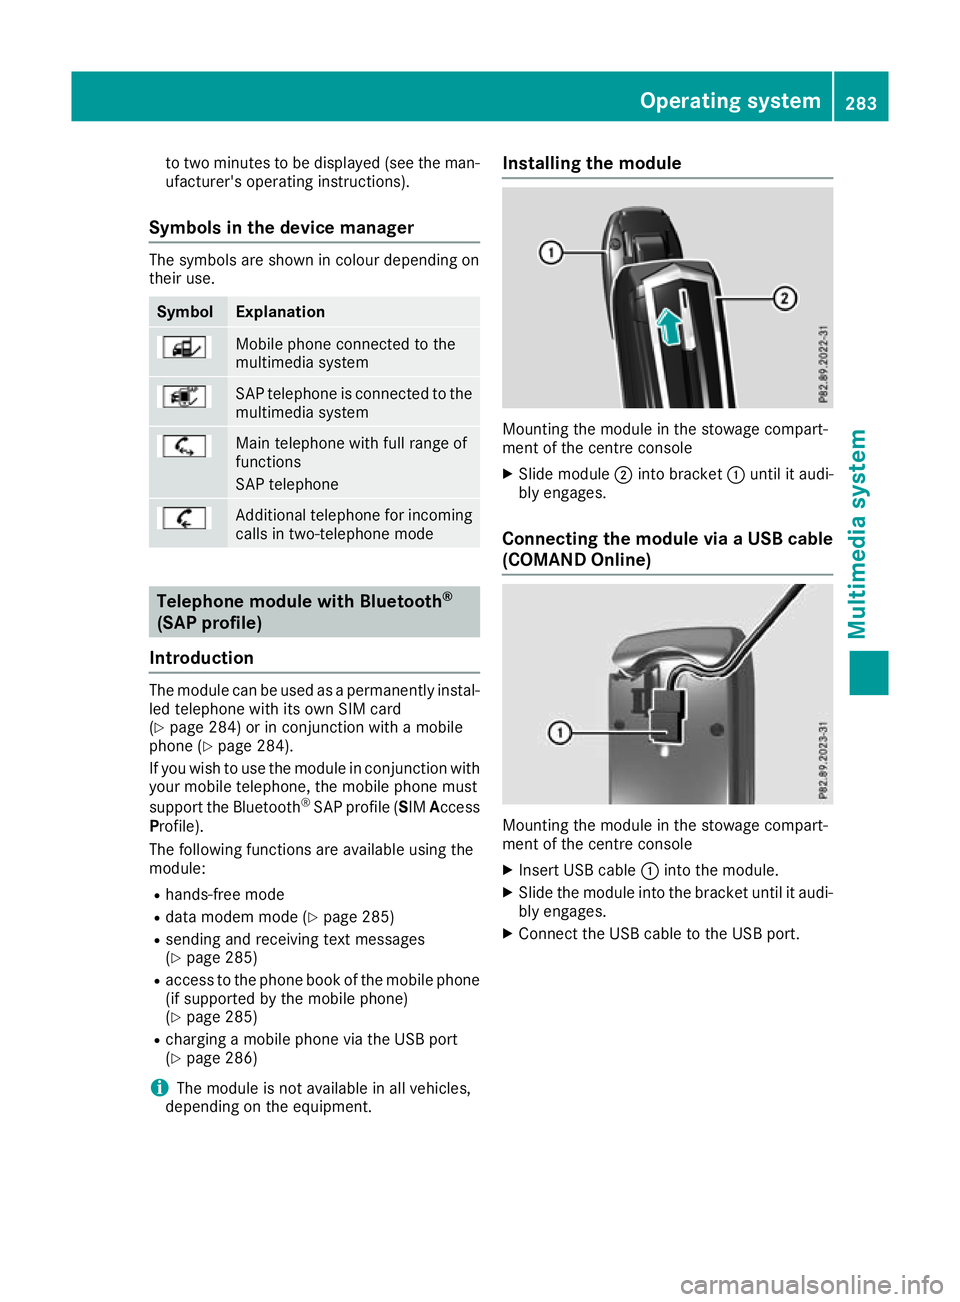
Symbols in the device manager The symbols are shown in colour depending on
their use. Symbol Explanation
Mobile phone connected to the
multimedia system
SAP telephone is connected to the
multimedia system Main telephone with full range of
functions
SAP telephone
Additional telephone for incoming
calls in two-telephone mode Telephone module with Bluetooth
®
(SAP profile)
Introduction The module can be used as a permanently instal-
led telephone with its own SIM card
(Y page 284) or in conjunction with a mobile
phone (Y page 284).
If you wish to use the module in conjunction with
your mobile telephone, the mobile phone must
support the Bluetooth ®
SAP profile (SIM Access
Profile).
The following functions are available using the
module:
R hands-free mode
R data modem mode (Y page 285)
R sending and receiving text messages
(Y page 285)
R access to the phone book of the mobile phone
(if supported by the mobile phone)
(Y page 285)
R charging a mobile phone via the USB port
(Y page 286)
i The module is not available in all vehicles,
depending on the equipment. Installing the module
Mounting the module in the stowage compart-
ment of the centre console
X Slide module ;into bracket :until it audi-
bly engages.
Connecting the module via a USB cable (COMAND Online) Mounting the module in the stowage compart-
ment of the centre console
X Insert USB cable :into the module.
X Slide the module into the bracket until it audi-
bly engages.
X Connect the USB cable to the USB port. Operating system
283Multimedia system Z
Page 290 of 369
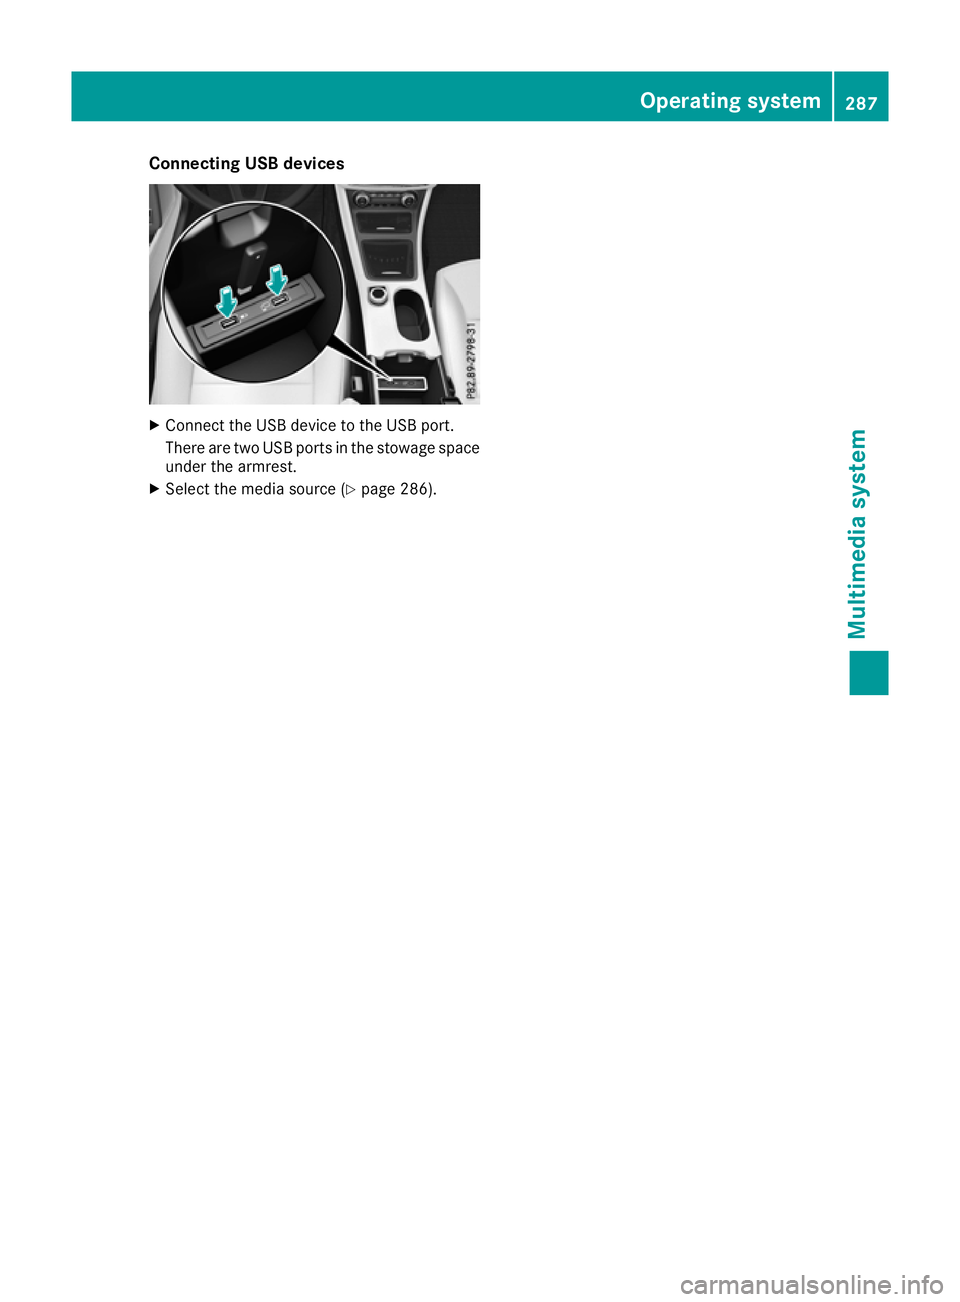
Connecting USB devices
X
Connect the USB device to the USB port.
There are two USB ports in the stowage space under the armrest.
X Select the media source (Y page 286). Operating system
287Multimedia system Z
Page 291 of 369

Loading guidelines
G
WARNING
If objects, luggage or loads are not secured or not secured sufficiently, they could slip, tip
over or be flung around and thereby hit vehicle
occupants. There is a risk of injury, especially when braking or abruptly changing directions.
Always store objects so that they cannot be
flung around. Secure objects, luggage or
loads against slipping or tipping before the
journey. G
WARNING
Combustion engines emit poisonous exhaust
gases such as carbon monoxide. If the tailgate is open when the engine is running, particu-
larly if the vehicle is moving, exhaust fumes
could enter the passenger compartment.
There is a risk of poisoning.
Turn off the engine before opening the tail-
gate. Never drive with the tailgate open. G
WARNING
The exhaust tail pipe and tail pipe trim can
become very hot. If you come into contact
with these parts of the vehicle, you could burn
yourself. There is a risk of injury.
Always be particularly careful around the
exhaust tail pipe and the tail pipe trim. Allow
these components to cool down before touch-
ing them.
The handling characteristics of a laden vehicle
are dependent on the distribution of the load
within the vehicle.
Observe the following notes on loading and
transporting a load:
R never exceed the maximum permissible gross
vehicle weight or the permissible axle loads
for the vehicle (including occupants).
R the luggage compartment is the preferred
place to store objects.
R position heavy loads as far forwards as pos-
sible and as low down in the luggage com-
partment as possible. R
the load must not protrude above the upper
edge of the seat backrests.
R always place the load against the rear or front
seat backrests. Make sure that the seat
backrests are securely locked into place.
R always place the load behind unoccupied
seats if possible.
R use the lashing eyelets and the luggage nets
to transport loads and luggage.
R only use lashing eyelets and fastening com-
ponents that are suitable for the weight and
size of the load.
R the maximum load capacity of the stowage
well under the luggage compartment floor is
25 kg.
R secure the load with sufficiently strong and
wear-resistant lashing material. Pad sharp
edges for protection.
! Do not position the load on one part of the
folding luggage compartment floor only. The
maximum load capacity of the folding luggage compartment floor is 100 kg. Spread the
weight evenly to avoid damaging the luggage
compartment floor. Place a solid board under the load if necessary. Please note that the
load on the luggage compartment floor will be increased when the load is lashed down. Stowage areas
Stowage compartments
Important safety notes G
WARNING
If you transport objects in the vehicle interior and these are not adequately secured, they
could slip or be flung around and thereby
strike vehicle occupants. In addition, cup
holders, open stowage spaces and mobile
phone brackets may not always be able to
hold the objects placed in them in the event of an accident. There is a risk of injury, particu-
larly in the event of sharp braking or sudden
changes of direction. 288
Stowage areasStowing and features
Page 292 of 369
R
Always stow objects in such a way that they
cannot be tossed about in these or similar
situations.
R Always make sure that objects do not proj-
ect from stowage spaces, luggage nets or
stowage nets.
R Ensure that closable stowage spaces are
shut before beginning your journey.
R Always stow and secure heavy, hard, poin-
ted, sharp-edged, fragile or outsize objects in the load compartment.
Observe the loading guidelines (Y page 288).
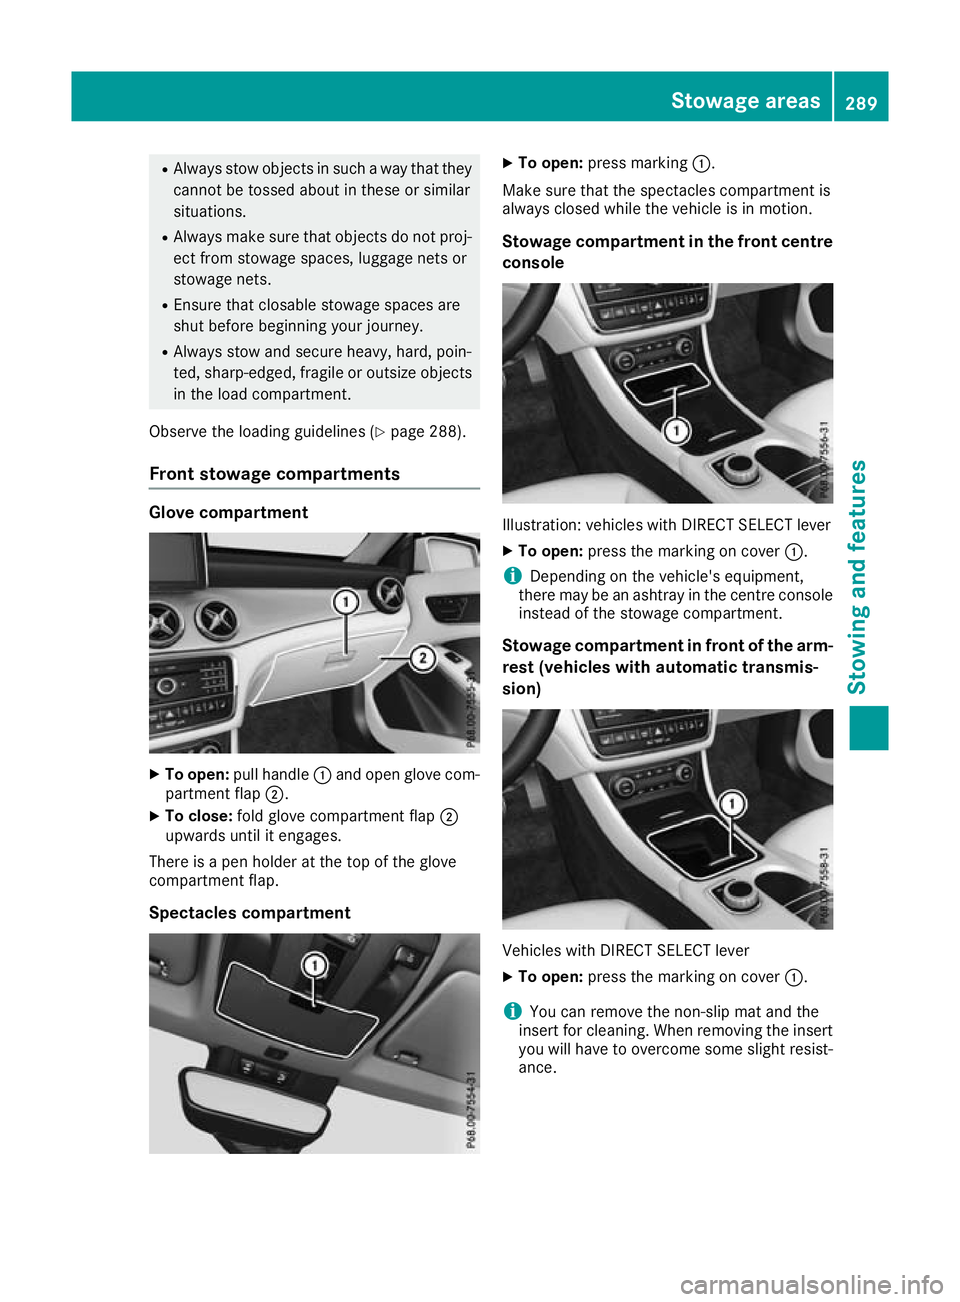
Front stowage compartments Glove compartment
X
To open: pull handle :and open glove com-
partment flap ;.
X To close: fold glove compartment flap ;
upwards until it engages.
There is a pen holder at the top of the glove
compartment flap.
Spectacles compartment X
To open: press marking :.
Make sure that the spectacles compartment is
always closed while the vehicle is in motion.
Stowage compartment in the front centre
console Illustration: vehicles with DIRECT SELECT lever
X To open: press the marking on cover :.
i Depending on the vehicle's equipment,
there may be an ashtray in the centre console
instead of the stowage compartment.
Stowage compartment in front of the arm-
rest (vehicles with automatic transmis-
sion) Vehicles with DIRECT SELECT lever
X To open: press the marking on cover :.
i You can remove the non-slip mat and the
insert for cleaning. When removing the insert
you will have to overcome some slight resist-
ance. Stowage areas
289Stowing an d features Z
Page 293 of 369
Stowage compartment/telephone com-
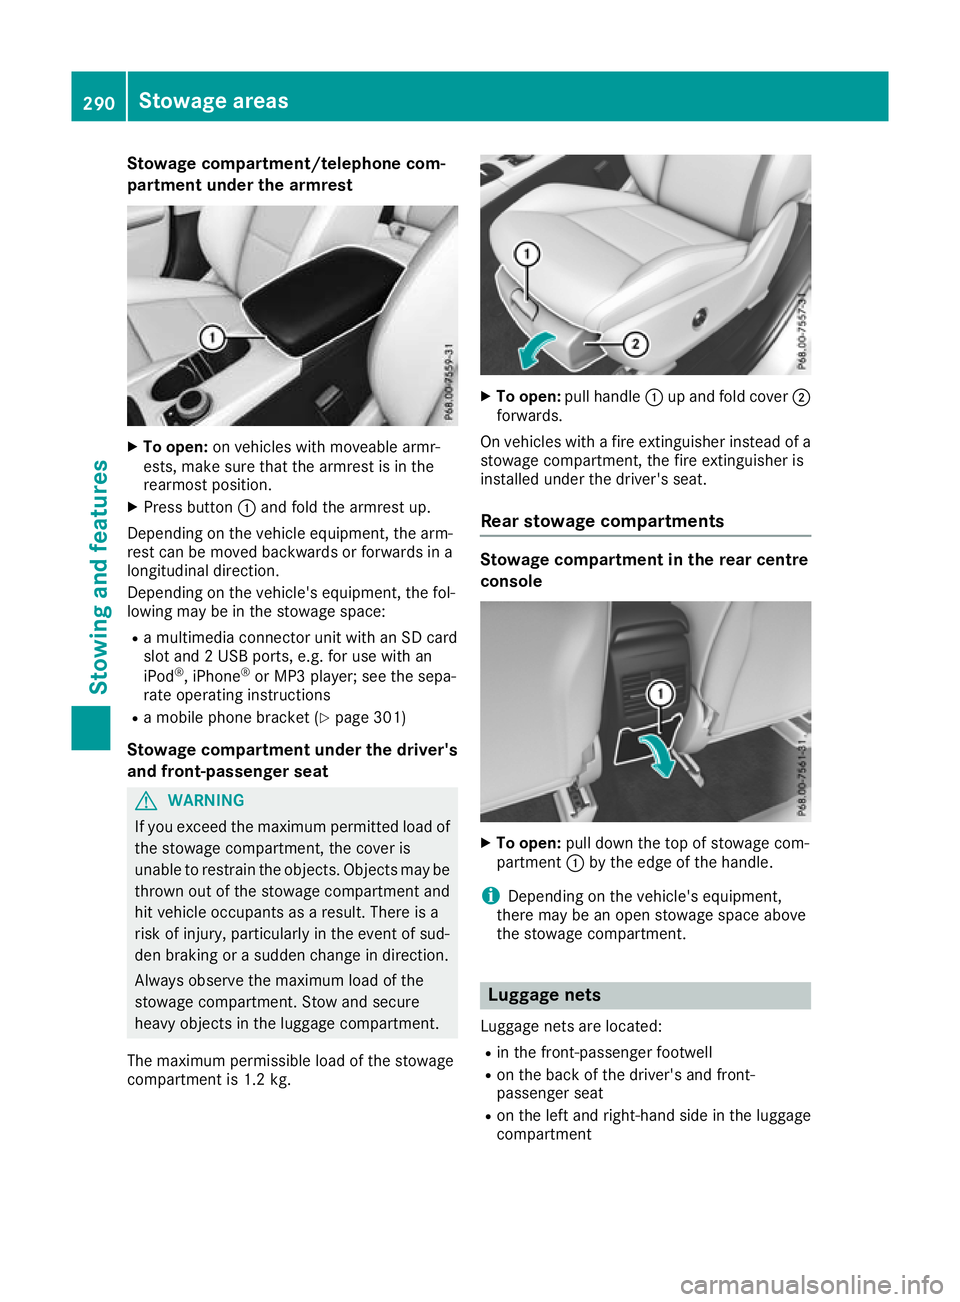
partment under the armrest X
To open: on vehicles with moveable armr-
ests, make sure that the armrest is in the
rearmost position.
X Press button :and fold the armrest up.
Depending on the vehicle equipment, the arm-
rest can be moved backwards or forwards in a
longitudinal direction.
Depending on the vehicle's equipment, the fol-
lowing may be in the stowage space:
R a multimedia connector unit with an SD card
slot and 2 USB ports, e.g. for use with an
iPod ®
, iPhone ®
or MP3 player; see the sepa-
rate operating instructions
R a mobile phone bracket (Y page 301)
Stowage compartment under the driver's and front-passenger seat G
WARNING
If you exceed the maximum permitted load of the stowage compartment, the cover is
unable to restrain the objects. Objects may be
thrown out of the stowage compartment and
hit vehicle occupants as a result. There is a
risk of injury, particularly in the event of sud-
den braking or a sudden change in direction.
Always observe the maximum load of the
stowage compartment. Stow and secure
heavy objects in the luggage compartment.
The maximum permissible load of the stowage
compartment is 1.2 kg. X
To open: pull handle :up and fold cover ;
forwards.
On vehicles with a fire extinguisher instead of a
stowage compartment, the fire extinguisher is
installed under the driver's seat.
Rear stowage compartments Stowage compartment in the rear centre
console
X
To open: pull down the top of stowage com-
partment :by the edge of the handle.
i Depending on the vehicle's equipment,
there may be an open stowage space above
the stowage compartment. Luggage nets
Luggage nets are located:
R in the front-passenger footwell
R on the back of the driver's and front-
passenger seat
R on the left and right-hand side in the luggage
compartment 290
Stowage areasStowing and features
Page 294 of 369
Observe the loading guidelines (Y
page 288)
and the safety notes regarding stowage spaces
(Y page 288). Folding backrest on the front-
passenger seat
G
WARNING
If the backrest of the co-driver's seat is folded forward, passengers in the rear compartment
could collide with parts of the seat mecha-
nism, particularly in the event of an accident,
heavy braking or sudden changes of direction.
There is a risk of injury.
If another person is travelling in the vehicle
when the backrest of the co-driver's seat is
folded forward, this person must sit on the
rear seat behind the driver.
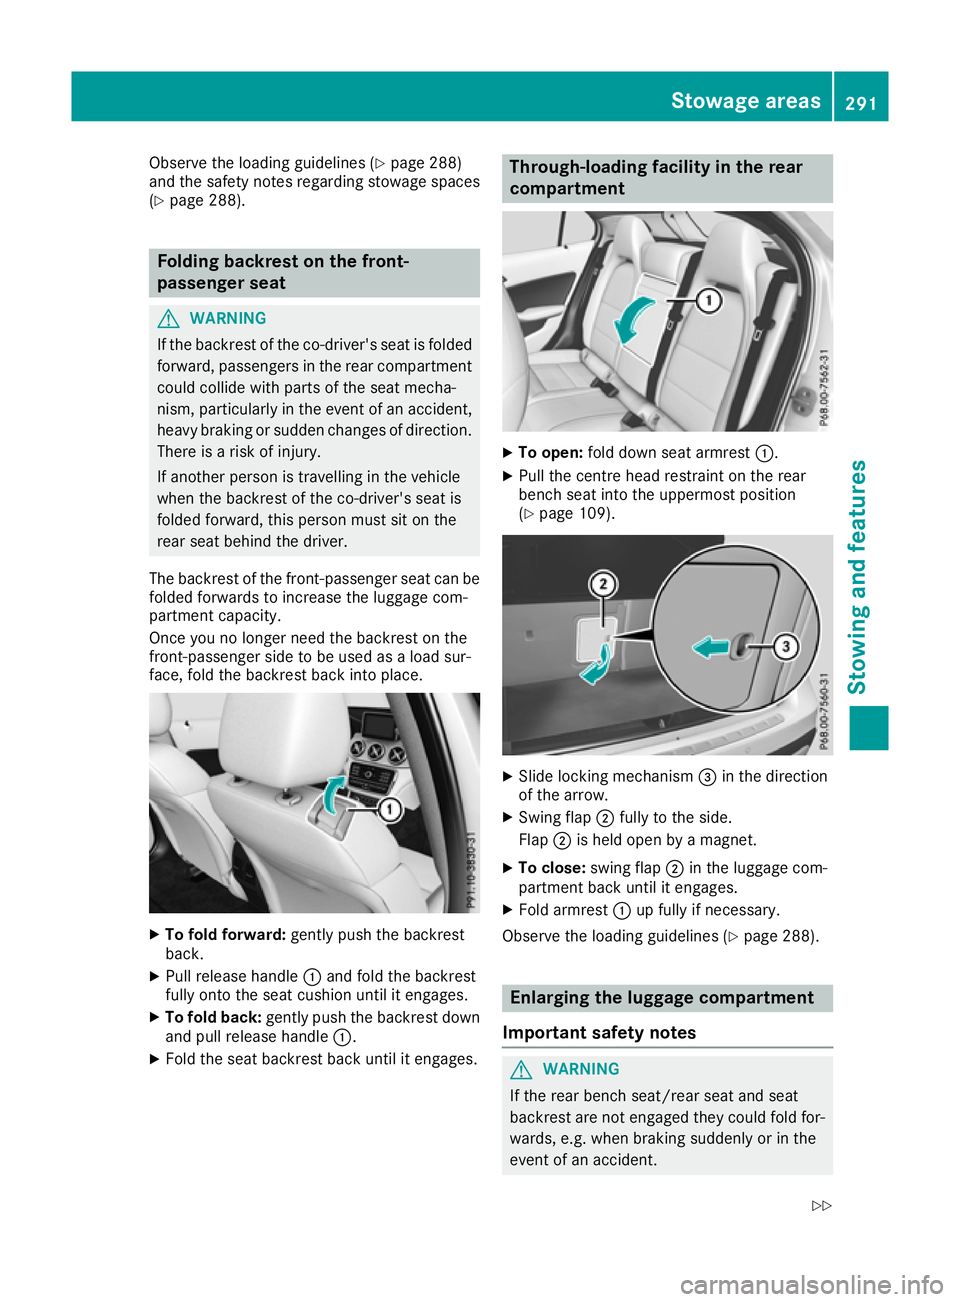
The backrest of the front-passenger seat can be
folded forwards to increase the luggage com-
partment capacity.
Once you no longer need the backrest on the
front-passenger side to be used as a load sur-
face, fold the backrest back into place. X
To fold forward: gently push the backrest
back.
X Pull release handle :and fold the backrest
fully onto the seat cushion until it engages.
X To fold back: gently push the backrest down
and pull release handle :.
X Fold the seat backrest back until it engages. Through-loading facility in the rear
compartment
X
To open: fold down seat armrest :.
X Pull the centre head restraint on the rear
bench seat into the uppermost position
(Y page 109). X
Slide locking mechanism =in the direction
of the arrow.
X Swing flap ;fully to the side.
Flap ;is held open by a magnet.
X To close: swing flap ;in the luggage com-
partment back until it engages.
X Fold armrest :up fully if necessary.
Observe the loading guidelines (Y page 288). Enlarging the luggage compartment
Important safety notes G
WARNING
If the rear bench seat/rear seat and seat
backrest are not engaged they could fold for- wards, e.g. when braking suddenly or in the
event of an accident. Stowage areas
291Stowing and features
Z
Page 295 of 369
R
The vehicle occupant would thereby be
pushed into the seat belt by the rear bench
seat/rear seat or by the seat backrest. The
seat belt cannot protect as intended and
could result in additional injury.
R Objects or loads in the boot/luggage com-
partment cannot be restrained by the seat
backrest.
This poses an increased risk of injury.
Before every trip, make sure that the seat
backrests and the rear bench seat/rear seat
are engaged before every trip.
! Before folding the backrest in the rear com-
partment forwards, make sure that the rear
compartment armrest and the cupholder are
folded in. They may otherwise be damaged.
Observe the loading guidelines (Y page 288).
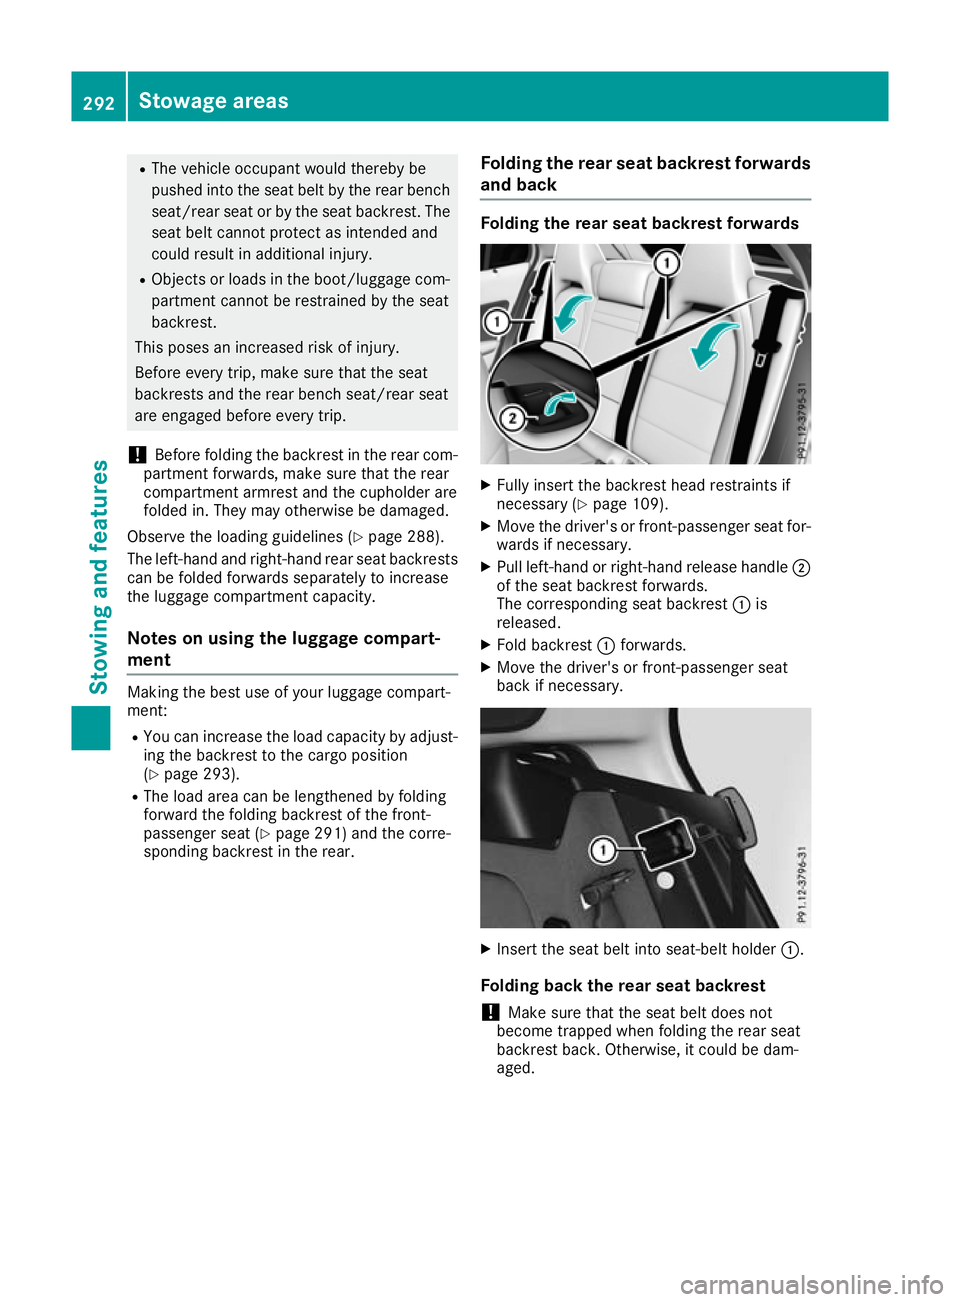
The left-hand and right-hand rear seat backrests can be folded forwards separately to increase
the luggage compartment capacity.
Notes on using the luggage compart-
ment Making the best use of your luggage compart-
ment:
R You can increase the load capacity by adjust-
ing the backrest to the cargo position
(Y page 293).
R The load area can be lengthened by folding
forward the folding backrest of the front-
passenger seat (Y page 291) and the corre-
sponding backrest in the rear. Folding the rear seat backrest forwards
and back Folding the rear seat backrest forwards
X
Fully insert the backrest head restraints if
necessary (Y page 109).
X Move the driver's or front-passenger seat for-
wards if necessary.
X Pull left-hand or right-hand release handle ;
of the seat backrest forwards.
The corresponding seat backrest :is
released.
X Fold backrest :forwards.
X Move the driver's or front-passenger seat
back if necessary. X
Insert the seat belt into seat-belt holder :.
Folding back the rear seat backrest
! Make sure that the seat belt does not
become trapped when folding the rear seat
backrest back. Otherwise, it could be dam-
aged. 292
Stowage areasStowing and features