2017 MERCEDES-BENZ GLA SUV fuel
[x] Cancel search: fuelPage 177 of 369
Observe the following notes:
R Stop the vehicle before driving off-road. If
necessary, activate the off-road program
(Y page 151).
R To avoid damaging the vehicle, make sure
there is always sufficient ground clearance.
R Make sure that items of luggage and loads are
stowed safely and are well secured
(Y page 293).
R Always keep the engine running and in gear
when driving on a downhill gradient. Activate
DSR (Y page 190).
R Drive slowly and evenly, if necessary at walk-
ing pace.
R Ensure that the wheels are in contact with the
ground at all times.
R Drive with extreme care on unknown off-road
routes where visibility is poor. For safety rea-
sons, get out of the vehicle first and survey
the off-road route.
R Check the depth of water before fording rivers
and streams.
R Watch out for obstacles.
R Take care when turning on an uphill or down-
hill slope or when driving across a slope. The
vehicle could otherwise tip over.
R Always keep the side windows and the pano-
rama sliding sunroof closed during the jour-
ney.
R Do not deviate from marked routes.
R Do not use the HOLD function when driving
off-road, on steep uphill or downhill gradients
or on slippery or loose surfaces. The HOLD
function cannot hold the vehicle on such sur- faces.
Checklist before off-road driving X
Engine oil level: check the engine oil and top
it up if necessary.
When driving on steep gradients, the oil level must be sufficiently high to ensure a correct
oil supply in the vehicle.
X Wheels and tyres: check the tyre tread
depth and tyre pressure.
X Check for damage and remove any foreign
objects, e.g. small stones, from the wheels/
tyres.
X Replace any missing valve caps. X
Replace dented or damaged wheels.
X Wheels: dented or bent wheels can lead to a
loss of tyre pressure and damage to the tyre
bead. Before driving off-road, check the
wheels and replace them if necessary.
Checklist after off-road driving !
If you detect damage to the vehicle after
driving off-road, have the vehicle checked
immediately at a qualified specialist work-
shop.
X Deactivate the off-road program
(Y page 151).
X Deactivate DSR (Y page 190).
X Clean the headlamps and rear lights and
check for damage.
X Clean the front and rear licence plates.
X Clean the wheels and tyres with a water jet
and remove any foreign objects.
X Clean the wheels, wheel arches and the vehi-
cle underside with a water jet; check for any
foreign objects and damage.
X Check whether twigs or other parts of plants
have become trapped. These increase the risk
of fire and can damage fuel pipes, brake
hoses or the air bellows of the axle joints and propeller shafts.
X After the trip, examine without fail the entire
undercarriage, wheels, tyres, brakes, body-
work structure, steering, chassis and exhaust
system for damage.
X After driving in sand, mud, gravel, water or
similar dirty conditions, have the following
checked and cleaned:
R brake discs
R wheels
R brake pads
R axle joints
X If you detect strong vibrations after driving
off-road, check for foreign objects in the
wheels and drive train and remove them if
necessary. Foreign objects can disturb the
balance and cause vibrations.
Driving over poor road surfaces places greater
demands on your vehicle than driving on normal roads. After driving off-road, check the vehicle.
This allows you to detect damage promptly and
reduce the risk of an accident to yourself and
other road users. 174
Driving tipsDriving and parking
Page 216 of 369
Only release the ball coupling if the pivoting
range is unobstructed. Always make sure that the ball coupling engages when folding in.
When reversing the towing vehicle, make sure
there is nobody between the trailer and the vehi- cle.
Couple and uncouple the trailer carefully. If youdo not couple the trailer to the towing vehicle
correctly, the trailer could become detached.
When towing a trailer, your vehicle's handling
characteristics will be different to when driving
without a trailer.
The vehicle/trailer combination:
R is heavier
R is restricted in its acceleration and gradient-
climbing capability
R has an increased braking distance
R is affected more by strong crosswinds
R demands more sensitive steering
R has a larger turning circle
This can impair the vehicle's handling charac-
teristics. Adapt your driving style accordingly.
Maintain a safe distance. Drive carefully.
When towing a trailer, always adjust your speed to the current road and weather conditions. Do
not exceed the maximum permissible speed for
your vehicle/trailer combination. Notes on towing a trailer
General notes Trailer towing is not possible on the following
models:
R Mercedes‑AMG GLA 45 4MATIC
Items of optional equipment may influence the
effective trailer loads for the vehicle. Please find the applicable trailer loads for your vehicle on
the registration certificate.
When towing a trailer, set the tyre pressure on
the rear axle of the towing vehicle for a maxi-
mum load. Further information on the tyre pres-
sure table in the fuel filler flap (Y page 337).
Please note that when towing a trailer, the fol-
lowing driving systems have limited availability
or are not available at all:
R Parking Assist PARKTRONIC (Y page 193)
R Blind Spot Assist (Y page 209) The height of the ball coupling changes with the
load of the vehicle. If necessary, use a trailer
with a height-adjustable drawbar.
You will find fitting dimensions and loads under"Technical data" (Y page 359).
Driving tips Observe the information on ESP
®
trailer stabili-
sation (Y page 75).
The maximum permissible speed for vehicle/
trailer combinations depends on the type of
trailer. Before beginning the journey, check the
trailer's documents to see what the maximum
permitted speed is. Observe the legally prescri-
bed maximum speed in the relevant country.
For certain Mercedes-Benz vehicles, the maxi-
mum permissible rear axle load is increased
when towing a trailer. See the "Technical data"
section to find out whether this applies to your
vehicle. If when towing, the rear axle load is
increased even partly, the vehicle/trailer com-
bination may not exceed a maximum speed of
100 km/h for reasons concerning the operating
permit. This also applies in countries in which
the permissible maximum speed for vehicle/
trailer combinations is above 100 km/h.
When towing a trailer, your vehicle's handling
characteristics will be different to when driving
without a trailer and the vehicle will consume
more fuel.
Shift to a lower gear in good time on long and
steep downhill gradients. For vehicles with auto-
matic transmission, you need to have selected
manual drive program M(Y page 161).
This also applies if you have activated cruise
control, the speed limiter or Distance Pilot
DISTRONIC.
This will use the braking effect of the engine, so less braking will be required to maintain the
vehicle speed. This relieves the load on the
brake system and prevents the brakes from
overheating and wearing too quickly. If you need
additional braking, depress the brake pedal
repeatedly rather than continuously.
Briefly depressing the accelerator pedal on
downhill gradients while the manual drive pro-
gram Mis temporarily activated (vehicles with
automatic transmission): the automatic trans-
mission may switch back to the last active auto-
matic drive program Eor S. The automatic trans-
mission may shift to a higher gear. This can
reduce the engine's braking effect. Towing a trailer
213Driving and parking Z
Page 224 of 369
Trip menu
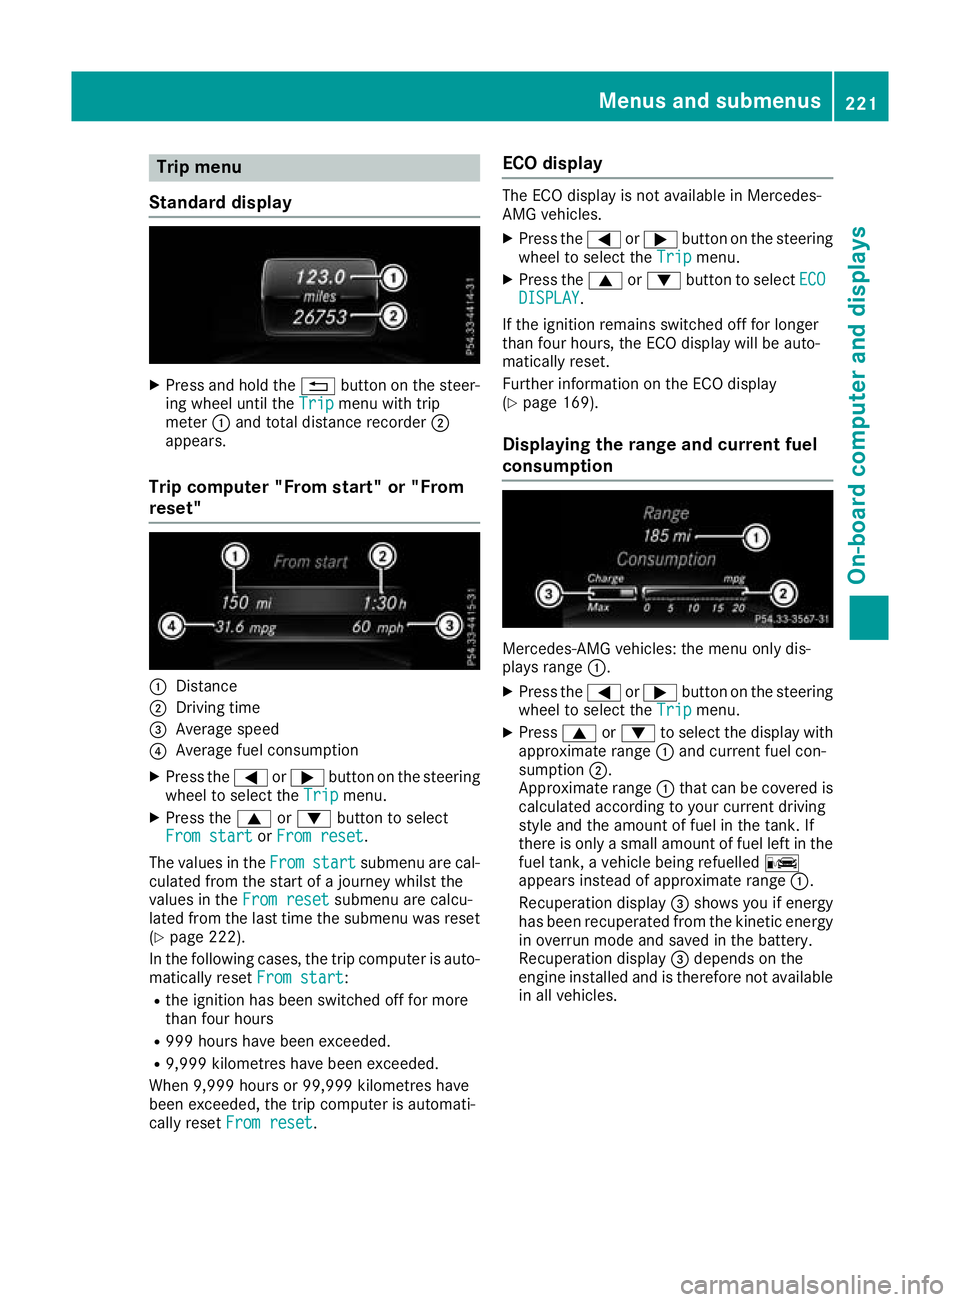
Standard display X
Press and hold the %button on the steer-
ing wheel until the Trip
Tripmenu with trip
meter :and total distance recorder ;
appears.
Trip computer "From start" or "From
reset" :
Distance
; Driving time
= Average speed
? Average fuel consumption
X Press the =or; button on the steering
wheel to select the Trip
Trip menu.
X Press the 9or: button to select
From start From start orFrom reset
From reset.
The values in the From
From start
start submenu are cal-
culated from the start of a journey whilst the
values in the From reset
From reset submenu are calcu-
lated from the last time the submenu was reset
(Y page 222).
In the following cases, the trip computer is auto-
matically reset From start
From start:
R the ignition has been switched off for more
than four hours
R 999 hours have been exceeded.
R 9,999 kilometres have been exceeded.
When 9,999 hours or 99,999 kilometres have
been exceeded, the trip computer is automati-
cally reset From reset
From reset. ECO display The ECO display is not available in Mercedes-
AMG vehicles.
X Press the =or; button on the steering
wheel to select the Trip Tripmenu.
X Press the 9or: button to select ECO
ECO
DISPLAY
DISPLAY.
If the ignition remains switched off for longer
than four hours, the ECO display will be auto-
matically reset.
Further information on the ECO display
(Y page 169).
Displaying the range and current fuel
consumption Mercedes-AMG vehicles: the menu only dis-
plays range :.
X Press the =or; button on the steering
wheel to select the Trip Tripmenu.
X Press 9or: to select the display with
approximate range :and current fuel con-
sumption ;.
Approximate range :that can be covered is
calculated according to your current driving
style and the amount of fuel in the tank. If
there is only a small amount of fuel left in the
fuel tank, a vehicle being refuelled C
appears instead of approximate range :.
Recuperation display =shows you if energy
has been recuperated from the kinetic energy in overrun mode and saved in the battery.
Recuperation display =depends on the
engine installed and is therefore not available in all vehicles. Menus and submenus
221On-board computer and displays Z
Page 231 of 369
Activating/deactivating Lane Keeping
Assist X
Press the =or; button on the steering
wheel to select the Assist.
Assist.menu.
X Press the 9or: button to select
Lane Keeping Assist
Lane Keeping Assist .
X Press ato confirm.
The current selection appears.
X Press aagain to confirm.
X Press the :or9 button to set Off
Off ,
Standard
Standard orAdaptive
Adaptive.
X Press the abutton to save the setting.
When Lane Keeping Assist is activated, the
multifunction display shows the lane mark-
ings as bright lines in the assistance graphic.
For further information about Lane Keeping
Assist, see (Y page 210). Service menu
Depending on the equipment fitted in the vehi-
cle, you have the following options in the Serv.
Serv.
menu:
R Calling up display messages in the message
memory (Y page 234)
R Restarting the tyre pressure loss warning sys-
tem (Y page 339)
R Calling up the service due date
(Y page 307) Settings menu
Introduction Depending on the equipment fitted in the vehi-
cle, in the Settings
Settings menu you have the follow-
ing options:
R Changing the instrument cluster settings
R Changing the light settings
R Changing the vehicle settings
R Changing the heating settings
R Changing the convenience settings
R Restoring the factory settings Instrument cluster Selecting the unit of measurement for dis-
tance
The Display unit Speed-/odometer:
Display unit Speed-/odometer: func-
tion allows you to choose whether certain dis-
plays appear in kilometres or miles in the mul-
tifunction display.
X Press the =or; button on the steering
wheel to select the Settings
Settings menu.
X Press the :or9 button to select the
Instrument cluster Instrument cluster submenu.
X Press ato confirm.
X Press the :or9 button to select the
Display unit Speed-/odometer
Display unit Speed-/odometer function.
You will see the selected setting: km
kmormiles
miles.
X Press the abutton to save the setting.
The selected unit of measurement for distance
applies to the following:
R digital speedometer in the Trip Tripmenu
R total distance recorder and the trip meter
R trip computer
R current fuel consumption and approximate
range
R navigation instructions in the Navi Navimenu
R cruise control
R speed limiter
R Distance Pilot DISTRONIC
R ASSYST PLUS service interval display
Switching the additional speedometer
on/off United Kingdom: this function is unavailable.
If the additional speedometer is switched on,
the speed is shown in the status bar of the mul-tifunction display instead of the outside tem-
perature.
The speed display is inverse to your speedome-
ter.
X Press the =or; button on the steering
wheel to select the Settings Settingsmenu.
X Press the :or9 button to select the
Instrument cluster
Instrument cluster submenu.
X Press ato confirm.
X Press the :or9 button to select the
Dig. speedo [mph]
Dig. speedo [mph] function.
You will see the selected setting: on
onoroff
off .
X Press ato save the setting. 228
Menus and sub
menusOn-board computer and displays
Page 253 of 369
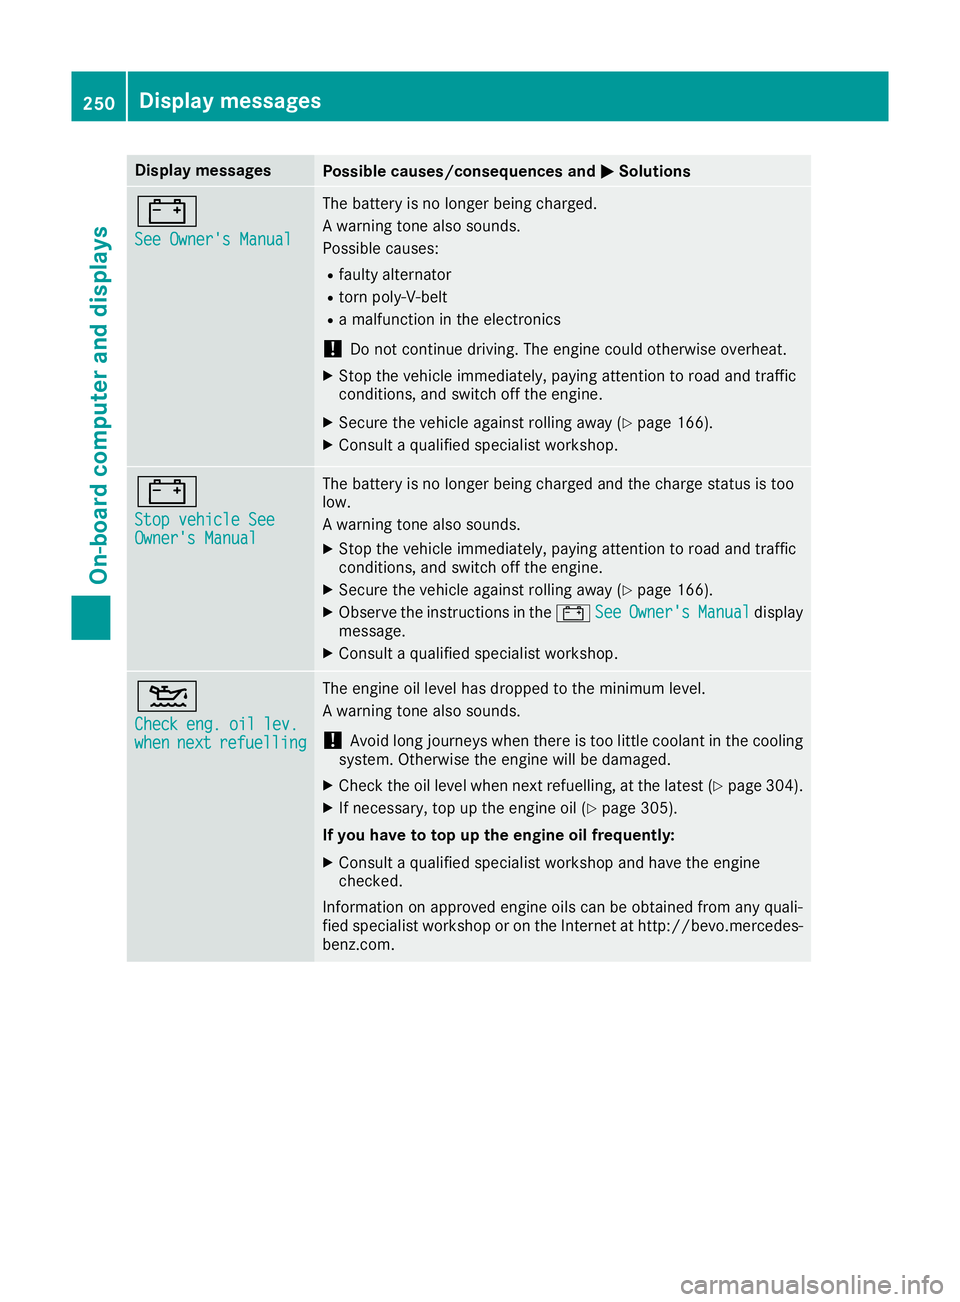
Display messages
Possible causes/consequences and
M
MSolutions #
See Owner's Manual See Owner's Manual The battery is no longer being charged.
A warning tone also sounds.
Possible causes:
R faulty alternator
R torn poly-V-belt
R a malfunction in the electronics
! Do not continue driving. The engine could otherwise overheat.
X Stop the vehicle immediately, paying attention to road and traffic
conditions, and switch off the engine.
X Secure the vehicle against rolling away (Y page 166).
X Consult a qualified specialist workshop. #
Stop vehicle See Stop vehicle See
Owner's Manual Owner's Manual The battery is no longer being charged and the charge status is too
low.
A warning tone also sounds.
X Stop the vehicle immediately, paying attention to road and traffic
conditions, and switch off the engine.
X Secure the vehicle against rolling away (Y page 166).
X Observe the instructions in the #See SeeOwner's
Owner's Manual
Manualdisplay
message.
X Consult a qualified specialist workshop. 4
Check Check
eng.
eng.oil
oillev.
lev.
when
when next
nextrefuelling
refuelling The engine oil level has dropped to the minimum level.
A warning tone also sounds.
! Avoid long journeys when there is too little coolant in the cooling
system. Otherwise the engine will be damaged.
X Check the oil level when next refuelling, at the latest (Y page 304).
X If necessary, top up the engine oil (Y page 305).
If you have to top up the engine oil frequently:
X Consult a qualified specialist workshop and have the engine
checked.
Information on approved engine oils can be obtained from any quali-
fied specialist workshop or on the Internet at http://bevo.mercedes-
benz.co m. 250
Display messagesOn-board computer and displays
Page 254 of 369
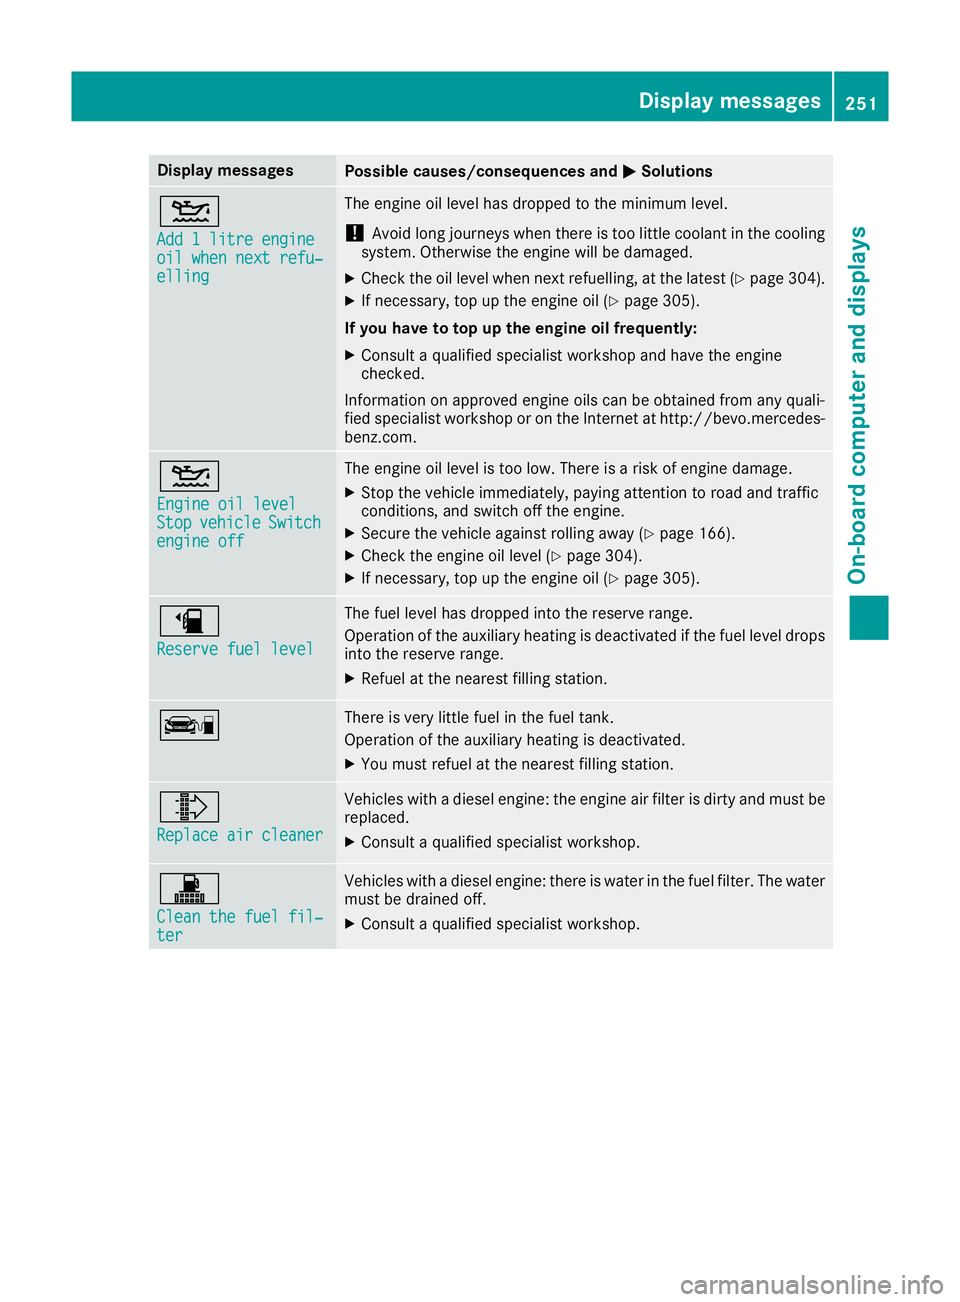
Display messages
Possible causes/consequences and
M
MSolutions 4
Add 1 litre engine Add 1 litre engine
oil when next refu‐ oil when next refu‐
elling elling The engine oil level has dropped to the minimum level.
! Avoid long journeys when there is too little coolant in the cooling
system. Otherwise the engine will be damaged.
X Check the oil level when next refuelling, at the latest (Y page 304).
X If necessary, top up the engine oil (Y page 305).
If you have to top up the engine oil frequently:
X Consult a qualified specialist workshop and have the engine
checked.
Information on approved engine oils can be obtained from any quali-
fied specialist workshop or on the Internet at http://bevo.mercedes-
benz.co m. 4
Engine oil level Engine oil level
Stop Stop
vehicle
vehicle Switch
Switch
engine off
engine off The engine oil level is too low. There is a risk of engine damage.
X Stop the vehicle immediately, paying attention to road and traffic
conditions, and switch off the engine.
X Secure the vehicle against rolling away (Y page 166).
X Check the engine oil level (Y page 304).
X If necessary, top up the engine oil (Y page 305).æ
Reserve fuel level Reserve fuel level The fuel level has dropped into the reserve range.
Operation of the auxiliary heating is deactivated if the fuel level drops
into the reserve range.
X Refuel at the nearest filling station. ç There is very little fuel in the fuel tank.
Operation of the auxiliary heating is deactivated.
X You must refuel at the nearest filling station. ¸
Replace air cleaner Replace air cleaner Vehicles with a diesel engine: the engine air filter is dirty and must be
replaced.
X Consult a qualified specialist workshop. !
Clean the fuel fil‐ Clean the fuel fil‐
ter ter Vehicles with a diesel engine: there is water in the fuel filter. The water
must be drained off.
X Consult a qualified specialist workshop. Display messages
251On-board computer and displays Z
Page 265 of 369
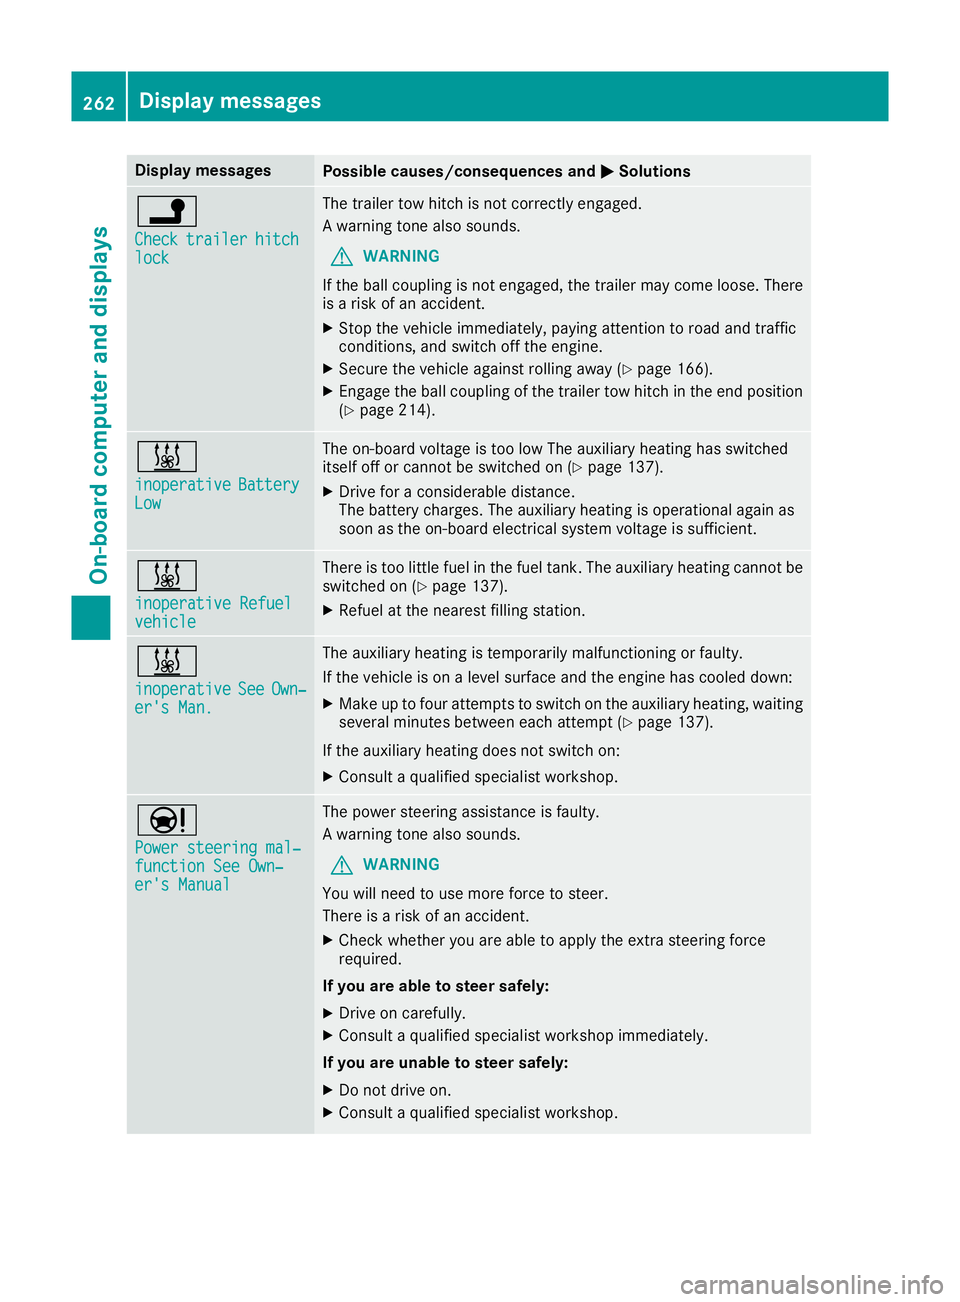
Display messages
Possible causes/consequences and
M
MSolutions j
Check Check
trailer
trailer hitch
hitch
lock
lock The trailer tow hitch is not correctly engaged.
A warning tone also sounds.
G WARNING
If the ball coupling is not engaged, the trailer may come loose. There
is a risk of an accident.
X Stop the vehicle immediately, paying attention to road and traffic
conditions, and switch off the engine.
X Secure the vehicle against rolling away (Y page 166).
X Engage the ball coupling of the trailer tow hitch in the end position
(Y page 214). &
inoperative inoperative
Battery
Battery
Low
Low The on-board voltage is too low The auxiliary heating has switched
itself off or cannot be switched on (Y page 137).
X Drive for a considerable distance.
The battery charges. The auxiliary heating is operational again as
soon as the on-board electrical system voltage is sufficient. &
inoperative Refuel inoperative Refuel
vehicle vehicle There is too little fuel in the fuel tank. The auxiliary heating cannot be
switched on (Y page 137).
X Refuel at the nearest filling station. &
inoperative inoperative
See
SeeOwn‐
Own‐
er's Man.
er's Man. The auxiliary heating is temporarily malfunctioning or faulty.
If the vehicle is on a level surface and the engine has cooled down:
X Make up to four attempts to switch on the auxiliary heating, waiting
several minutes between each attempt (Y page 137).
If the auxiliary heating does not switch on:
X Consult a qualified specialist workshop. Ð
Power steering mal‐ Power steering mal‐
function See Own‐ function See Own‐
er's Manual er's Manual The power steering assistance is faulty.
A warning tone also sounds.
G WARNING
You will need to use more force to steer.
There is a risk of an accident.
X Check whether you are able to apply the extra steering force
required.
If you are able to steer safely:
X Drive on carefully.
X Consult a qualified specialist workshop immediately.
If you are unable to steer safely:
X Do not drive on.
X Consult a qualified specialist workshop. 262
Display
messagesOn-board computer and displays
Page 275 of 369
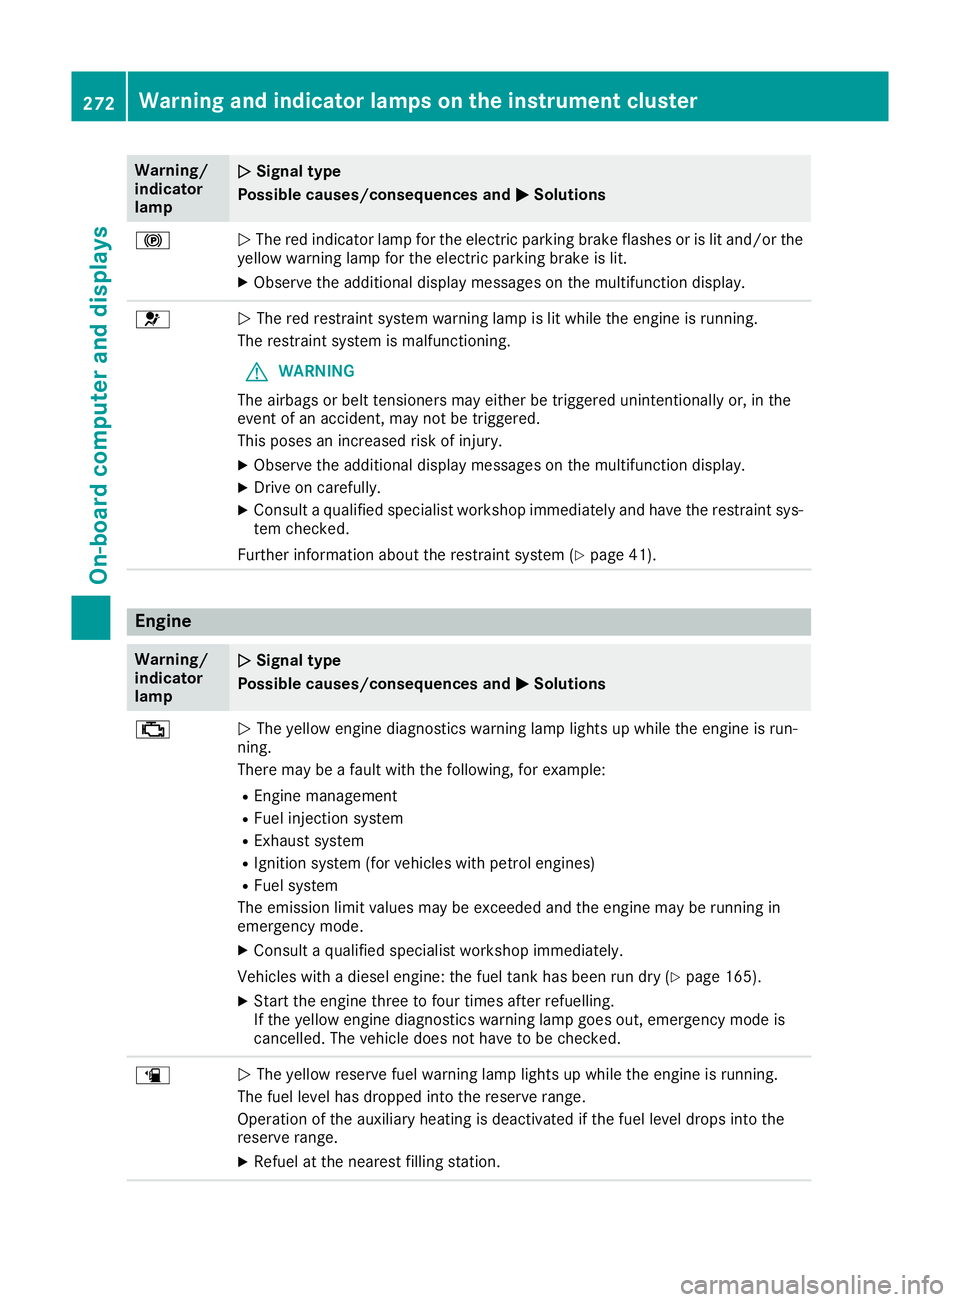
Warning/
indicator
lamp
N N
Signal type
Possible causes/consequences and M
M Solutions !
N
The red indicator lamp for the electric parking brake flashes or is lit and/or the
yellow warning lamp for the electric parking brake is lit.
X Observe the additional display messages on the multifunction display. 6
N
The red restraint system warning lamp is lit while the engine is running.
The restraint system is malfunctioning.
G WARNING
The airbags or belt tensioners may either be triggered unintentionally or, in the
event of an accident, may not be triggered.
This poses an increased risk of injury.
X Observe the additional display messages on the multifunction display.
X Drive on carefully.
X Consult a qualified specialist workshop immediately and have the restraint sys-
tem checked.
Further information about the restraint system (Y page 41).Engine
Warning/
indicator
lamp
N N
Signal type
Possible causes/consequences and M
M Solutions ;
N
The yellow engine diagnostics warning lamp lights up while the engine is run-
ning.
There may be a fault with the following, for example:
R Engine management
R Fuel injection system
R Exhaust system
R Ignition system (for vehicles with petrol engines)
R Fuel system
The emission limit values may be exceeded and the engine may be running in
emergency mode.
X Consult a qualified specialist workshop immediately.
Vehicles with a diesel engine: the fuel tank has been run dry (Y page 165).
X Start the engine three to four times after refuelling.
If the yellow engine diagnostics warning lamp goes out, emergency mode is
cancelled. The vehicle does not have to be checked. æ
N
The yellow reserve fuel warning lamp lights up while the engine is running.
The fuel level has dropped into the reserve range.
Operation of the auxiliary heating is deactivated if the fuel level drops into the
reserve range.
X Refuel at the nearest filling station. 272
Warning and indicator lamps on the instrument clusterOn-board computer and displays