2017 MERCEDES-BENZ GLA SUV fuel
[x] Cancel search: fuelPage 33 of 369
Qualified specialist workshop
A qualified specialist workshop has the neces-
sary special skills, tools and qualifications to
correctly carry out any necessary work on your
vehicle. This particularly applies to work rele-
vant to safety.
Observe the notes in the Service Booklet.
Always have the following work carried out at a
qualified specialist workshop:
R work relevant to safety
R service and maintenance work
R repair work
R modifications, installations and conversions
R work on electronic components
Mercedes-Benz recommends that you use a
Mercedes-Benz Service Centre. Vehicle registration
Mercedes-Benz may ask its Service Centres to
carry out technical inspections on certain vehi-
cles. The quality or safety of the vehicle is
improved as a result of the inspection.
Mercedes-Benz can only inform you about vehi-
cle checks if it has your registration data.
It is possible that your vehicle has not yet been
registered in your name in the following cases:
R if your vehicle was not purchased at an
authorised specialist dealer
R if your vehicle has not yet been inspected at a
Mercedes-Benz Service Centre
It is advisable to register your vehicle with a
Mercedes-Benz Service Centre.
Inform Mercedes-Benz as soon as possible
about any change in address or vehicle owner-
ship. You can do this at a Mercedes-Benz Ser-
vice Centre, for example. Correct use
If you remove any warning stickers, you or oth-
ers could fail to recognise certain dangers.
Leave warning stickers in position.
Observe the following information when driving
your vehicle:
R the safety notes in this manual
R technical data for the vehicle R
traffic rules and regulations
R laws and safety standards pertaining to motor
vehicles Implied warranty
! Follow the instructions in this manual about
the proper operation of your vehicle as well as
about possible vehicle damage. Damage to
your vehicle that arises from culpable contra- ventions against these instructions are not
covered either by Mercedes-Benz implied
warranty or by the New or Used-Vehicle War- ranty. QR code for rescue card
The QR code is secured in the fuel filler flap and
on the opposite side on the B-pillar. In the event
of an accident, rescue services can use the QR
code to quickly find the appropriate rescue card for your vehicle. The current rescue card con-
tains, in a compact form, the most important
information about your vehicle, e.g. the routing
of the electric cables.
You can find more information under
www.mercedes-benz.de/qr-code. Data stored in the vehicle
Many of the electronic components in your vehi- cle can store data.
These data memories temporarily or perma-
nently store technical information about:
R the vehicle's operating state
R events
R faults
In general, this technical information docu-
ments the state of a component, a module, a
system or the surroundings.
This includes, for example:
R operating conditions of system components.
For example, fluid levels.
R status messages concerning the vehicle and
its individual components, e.g. number of
wheel revolutions/speed, deceleration in
movement, lateral acceleration, accelerator
pedal position. 30
Data stored in the vehicleIntroduction
Page 37 of 369
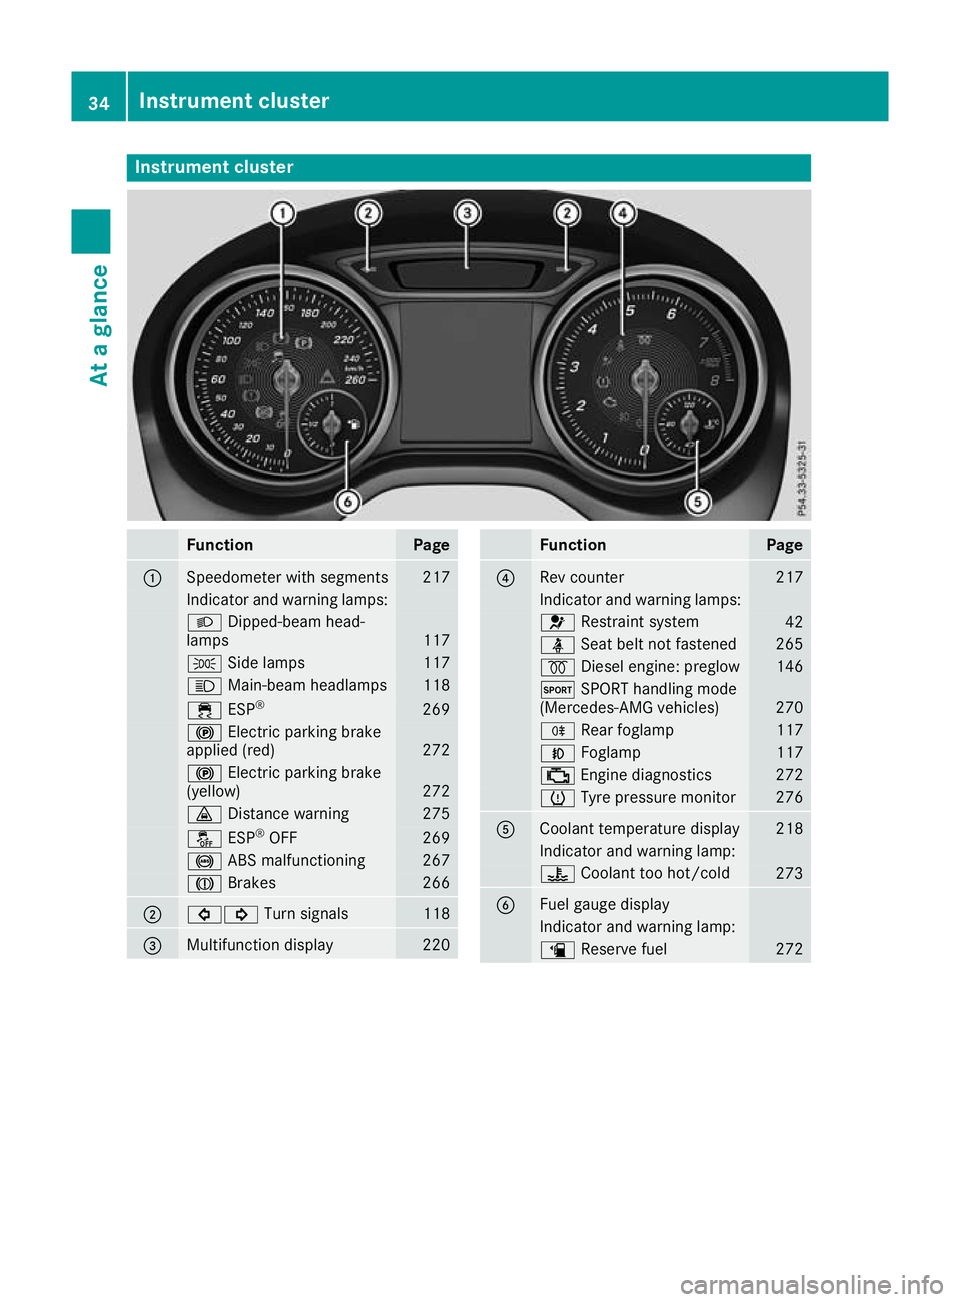
Instrument cluster
Function Page
:
Speedometer with segments 217
Indicator and warning lamps:
L
Dipped-beam head-
lamps 117
T
Side lamps 117
K
Main-beam headlamps 118
÷
ESP® 269
!
Electric parking brake
applied (red) 272
!
Electric parking brake
(yellow) 272
·
Distance warning 275
å
ESP®
OFF 269
!
ABS malfunctioning 267
J
Brakes 266
;
#!
Turn signals 118
=
Multifunction display 220 Function Page
?
Rev counter 217
Indicator and warning lamps:
6
Restraint system 42
ü
Seat belt not fastened 265
%
Diesel engine: preglow 146
M
SPORT handling mode
(Mercedes-AMG vehicles) 270
R
Rear foglamp 117
N
Foglamp 117
;
Engine diagnostics 272
h
Tyre pressure monitor 276
A
Coolant temperature display 218
Indicator and warning lamp:
?
Coolant too hot/cold 273
B
Fuel gauge display
Indicator and warning lamp:
æ
Reserve fuel 27234
Instrument clusterAt a glance
Page 59 of 369
about the convenience function can be found
under "Belt adjustment" (Y page 45).Automatic measures after an acci-
dent
Immediately after an accident, the following
measures may be implemented, depending on
the type and severity of the impact:
R the hazard warning lamps are activated
R the emergency lighting is activated
R the vehicle doors are unlocked
R the front side windows are lowered
R the engine is switched off and the fuel supply
is cut off
R vehicles with the Mercedes-Benz emergency
call system: automatic emergency call Children in the vehicle
Important safety notes
Accident statistics show that children secured
on the rear seats are safer than children secured
on the front-passenger seat. For this reason,
Mercedes-Benz strongly advises that you install the child restraint system on a rear seat. Chil-
dren are generally better protected there.
If a child younger than twelve years old and
under 1.50 m in height is travelling in the vehi-
cle:
R always secure the child in a child restraint
system suitable for Mercedes-Benz vehicles.
The child restraint system must be appropri-
ate to the age, weight and size of the child.
R be sure to observe the instructions and safety
notes in this section in addition to the child
restraint system manufacturer's installation
instructions.
R be sure to observe the instructions and safety
notes on the automatic front-passenger front
airbag deactivation system (Y page 49). G
WARNING
If you leave children unattended in the vehi-
cle, they may be able to set the vehicle in
motion if, for example, they:
R release the parking brake
R shift the automatic transmission out of park
position Por shift manual transmission into
neutral
R start the engine
In addition, they may operate vehicle equip-
ment and become trapped. There is a risk of
an accident and injury.
When leaving the vehicle, always take the key with you and lock the vehicle. Never leave
children unattended in the vehicle. G
WARNING
If persons (particularly children) are exposed
to heat or cold for a prolonged period, there is a risk of serious or even fatal injuries. Never
leave persons (particularly children) unatten-
ded in the vehicle. G
WARNING
If the child restraint system is placed in direct sunlight, the parts could become very hot.
Children could be suffer burns by touching
these parts, in particular on the metallic parts
of the child restraint system. There is a risk of injury.
If you and your child leave the vehicle, always
make sure that the child restraint system is
not in direct sunlight. Cover it with a blanket, for example. If the child restraint system has
been exposed to direct sunlight, leave it to
cool down before securing the child in it.
Never leave children unattended in the vehi-
cle.
Always ensure that all vehicle occupants have
their seat belts fastened correctly and are sitting
properly. Particular attention must be paid to
children.
Observe the safety notes on the seat belt
(Y page 43) and the information on the correct
use of the seat belt (Y page 44).56
Children in the vehicleSafety
Page 83 of 369
If you do not open the vehicle within approx-
imately 40 seconds of unlocking:
R the vehicle locks again
R protection against theft is reactivated
X To lock: press the &button.
The key centrally locks/unlocks:
R the doors
R the tailgate
R the fuel filler flap
During unlocking, the turn signals flash once.
During locking, they flash three times.
When the locator lighting is activated via the
multimedia system, it lights up when it is dark
after the vehicle is unlocked with the remote
control; see the separate operating instructions.
You can also set an audible signal to confirm
that the vehicle has been locked. The audible
signal can be activated or deactivated using the
on-board computer (Y page 229).
X To open the tailgate automatically from
outside the vehicle: press and hold theF
button until the tailgate opens (Y page 95).
Vehicles with KEYLESS-GO or KEYLESS-GO
start function: X To close the tailgate automatically from
outside the vehicle:
if the key is located in
the immediate vicinity of the vehicle, press
the F button on the key (Y page 90).
When the tailgate closes, you can then
release the button. KEYLESS-GO
General notes Bear in mind that the engine can be started by
any of the vehicle occupants if there is a key in
the vehicle.
Locking and unlocking You can start, lock or unlock the vehicle using
KEYLESS-GO. To do this, you need to carry the
key with you. You can combine the KEYLESS-GO
functions with the functions of a conventional
key. Unlock the vehicle using KEYLESS-GO, for
instance, and lock it using the &button on
the key.
The driver's door and the door on which the
handle is used must both be closed. The key must be outside the vehicle. When locking or
unlocking with KEYLESS-GO, the distance
between the key and the corresponding door
handle must not be greater than one metre.
A check that periodically establishes a radio
connection between the vehicle and the key
determines whether a valid key is in or in the
direct vicinity of the vehicle. This occurs, for
example:
R while starting the engine
R while driving
R when the external door handles are touched
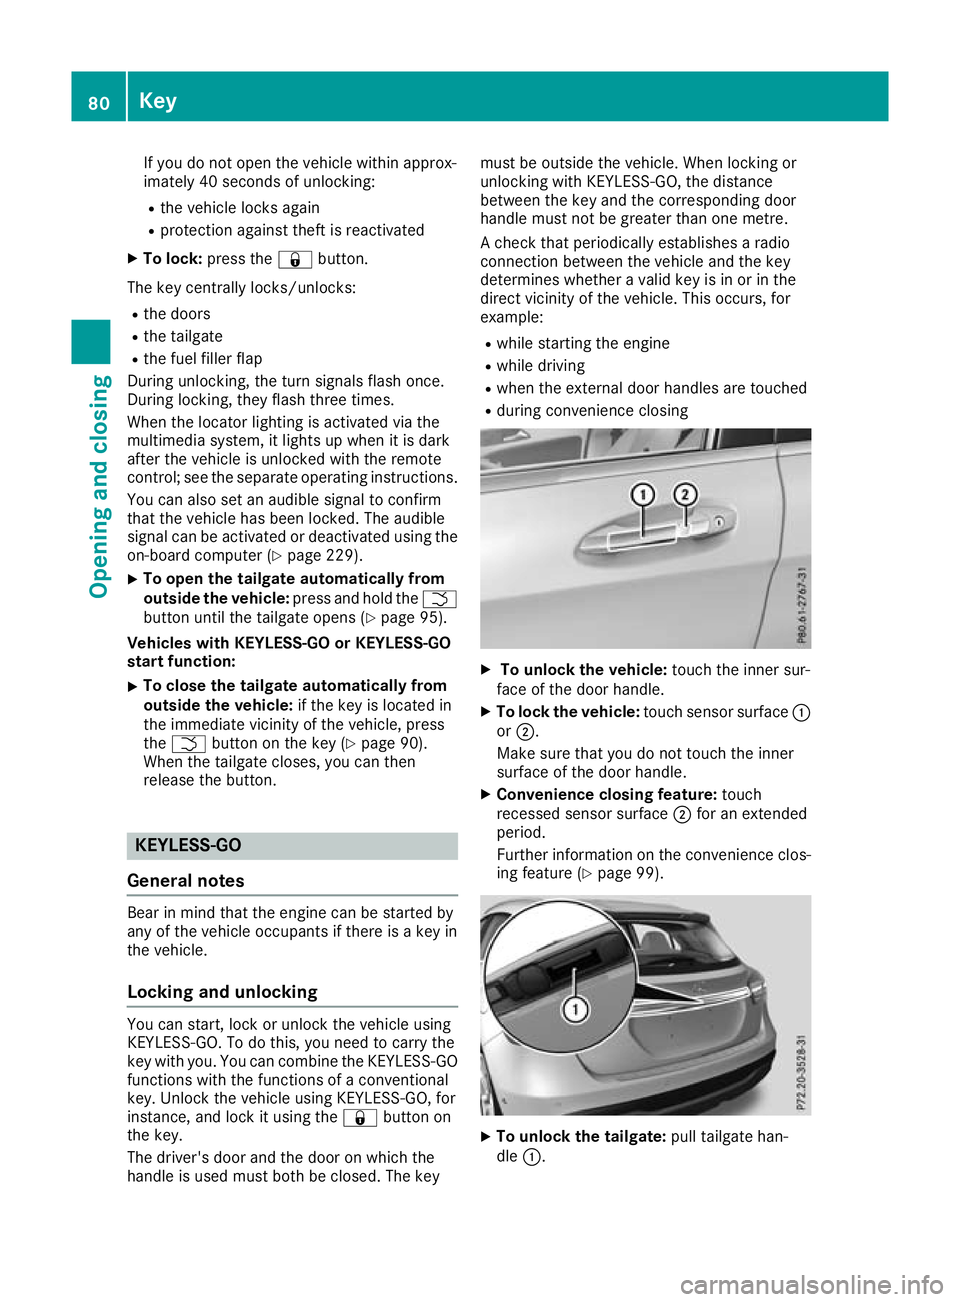
R during convenience closing X
To unlock the vehicle: touch the inner sur-
face of the door handle.
X To lock the vehicle: touch sensor surface :
or ;.
Make sure that you do not touch the inner
surface of the door handle.
X Convenience closing feature: touch
recessed sensor surface ;for an extended
period.
Further information on the convenience clos-
ing feature (Y page 99). X
To unlock the tailgate: pull tailgate han-
dle :. 80
KeyOpening and closing
Page 84 of 369
Deactivating and activating
If you do not intend to use the vehicle for an
extended period of time, you can deactivate
KEYLESS-GO. The key will then use very little
power, thereby conserving battery power. For
the purposes of activation or deactivation, the
vehicle does not have to be nearby.
X To deactivate: press the&button on the
key twice in rapid succession.
The battery check lamp of the key flashes
twice briefly and lights up once, then KEY-
LESS-GO is deactivated (Y page 82).
X To activate: press any button on the key.
or X Insert the key into the ignition lock.
KEYLESS-GO and all its associated features
are available again. Changing the settings of the locking
system
You can change the settings of the locking sys-
tem. This means that only the driver's door and
the fuel filler flap are unlocked when the vehicle is unlocked. This is useful if you frequently travelalone.
X To change the setting: press and hold down
the % and& buttons simultaneously
for about six seconds until the battery indica-
tor lamp flashes twice (Y page 82).
If the setting of the locking system is changed
within the signal range of the vehicle, pressing
the & or% button:
R locks or
R unlocks the vehicle
The key now functions as follows:
X To unlock: press the%button once.
X To unlock centrally: press the%button
twice.
X To lock centrally: press the&button. The KEYLESS-GO function is changed as fol-
lows:
X To unlock the driver's door: touch the inner
surface of the door handle on the driver's
door.
X To unlock centrally: touch the inner surface
of the door handle on the front-passenger
door or the rear door.
X To lock centrally: touch the outer sensor
surface on one of the door handles.
X To restore the factory settings: press and
hold down the %and& buttons simul-
taneously for approximately six seconds until
the battery check lamp flashes twice
(Y page 82). Emergency key element
General notes If the vehicle can no longer be unlocked with the
key or KEYLESS-GO, use the emergency key ele-
ment.
If you use the emergency key element to unlock
and open the driver's door or the tailgate, the
anti-theft alarm system will be triggered
(Y page 76).
There are several ways to deactivate the alarm:
X To deactivate the alarm with the key: press
the % or& button on the key.
or X Insert the key into the ignition lock.
or X To deactivate the alarm with KEYLESS-GO:
press the Start/Stop button in the ignition
lock. The key must be in the vehicle.
or X Lock or unlock the vehicle using KEYLESS-
GO. The key must be outside the vehicle.
If you unlock the vehicle using the emergency
key element, the fuel filler flap will not be
unlocked automatically. X To unlock the fuel filler flap: insert the key
into the ignition lock. Key
81Opening and closing Z
Page 90 of 369
If the vehicle has been locked from the outside,
the double lock function is activated as stand-
ard. It is then not possible to open the doors
from inside the vehicle. You can deactivate the
double lock function by deactivating the interior
motion sensor (Y page 78). The doors can then
be opened from the inside after the vehicle has
been locked from the outside. You can open the rear doors from inside the vehicle if they are not
secured by the child-proof locks (Y page 67).
The anti-theft alarm system is triggered if the
door is opened from the inside. Switch off the
alarm (Y page 76). Centrally locking and unlocking the
vehicle from the inside
You can centrally lock or unlock the vehicle from
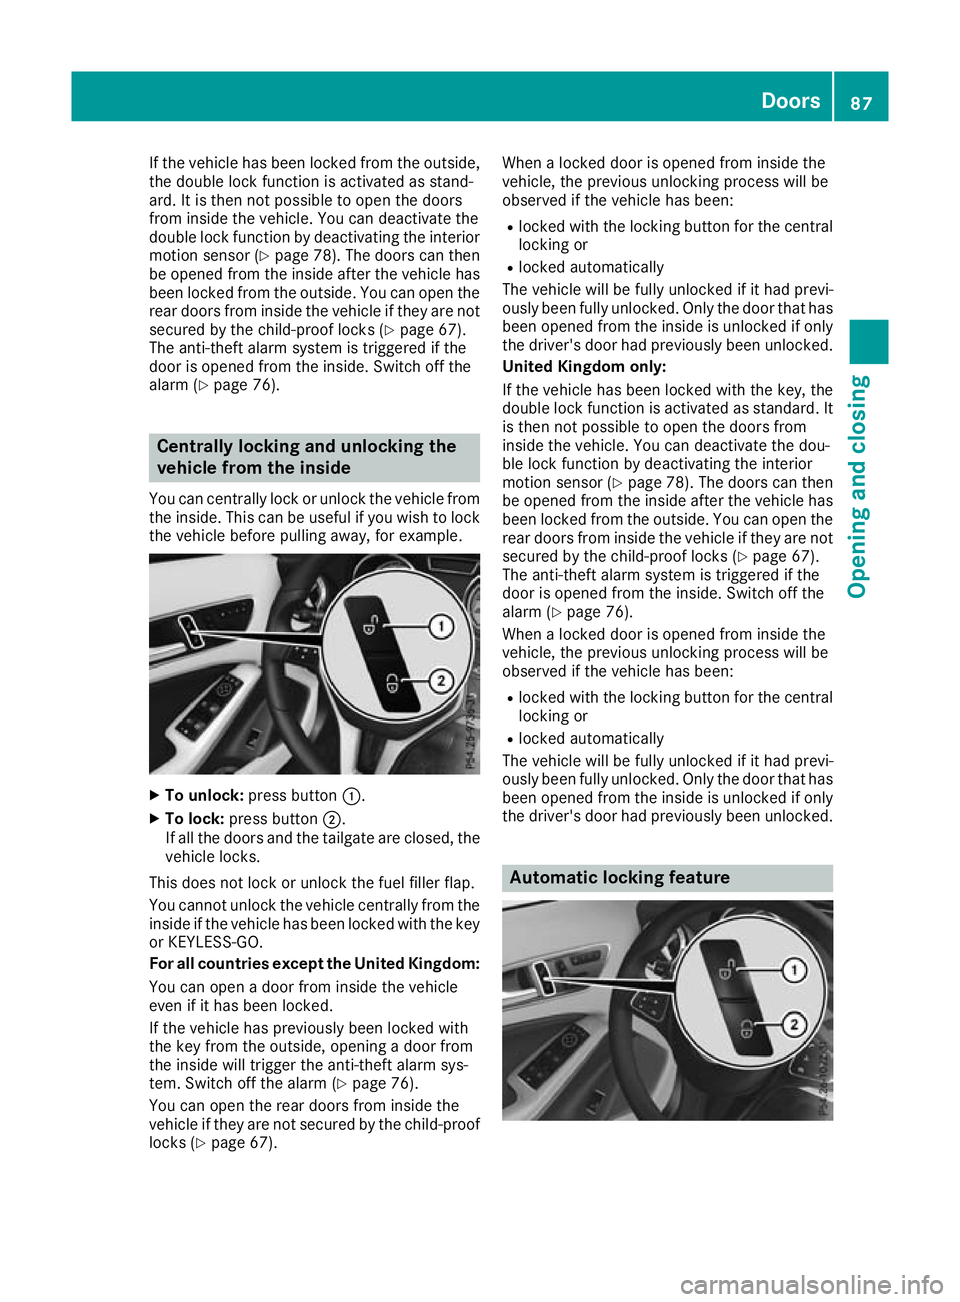
the inside. This can be useful if you wish to lock the vehicle before pulling away, for example. X
To unlock: press button :.
X To lock: press button ;.
If all the doors and the tailgate are closed, the
vehicle locks.
This does not lock or unlock the fuel filler flap.
You cannot unlock the vehicle centrally from the
inside if the vehicle has been locked with the key or KEYLESS-GO.
For all countries except the United Kingdom:
You can open a door from inside the vehicle
even if it has been locked.
If the vehicle has previously been locked with
the key from the outside, opening a door from
the inside will trigger the anti-theft alarm sys-
tem. Switch off the alarm (Y page 76).
You can open the rear doors from inside the
vehicle if they are not secured by the child-proof locks (Y page 67). When a locked door is opened from inside the
vehicle, the previous unlocking process will be
observed if the vehicle has been:
R locked with the locking button for the central
locking or
R locked automatically
The vehicle will be fully unlocked if it had previ-
ously been fully unlocked. Only the door that has
been opened from the inside is unlocked if only the driver's door had previously been unlocked.
United Kingdom only:
If the vehicle has been locked with the key, the
double lock function is activated as standard. It
is then not possible to open the doors from
inside the vehicle. You can deactivate the dou-
ble lock function by deactivating the interior
motion sensor (Y page 78). The doors can then
be opened from the inside after the vehicle has
been locked from the outside. You can open the rear doors from inside the vehicle if they are not
secured by the child-proof locks (Y page 67).
The anti-theft alarm system is triggered if the
door is opened from the inside. Switch off the
alarm (Y page 76).
When a locked door is opened from inside the
vehicle, the previous unlocking process will be
observed if the vehicle has been:
R locked with the locking button for the central
locking or
R locked automatically
The vehicle will be fully unlocked if it had previ-
ously been fully unlocked. Only the door that has been opened from the inside is unlocked if only
the driver's door had previously been unlocked. Automatic locking feature Doors
87Opening and closing Z
Page 92 of 369

i
If you lock the vehicle as described above,
the fuel filler flap is not locked. The anti-theft
alarm system is not primed. Luggage compartment
Important safety notes
G
WARNING
Parts of the body could become trapped dur-
ing automatic closing of the tailgate. More-
over, people, e.g. children, may be standing in the closing area or may enter the closing area
during the closing process. There is a risk of
injury.
Make sure that nobody is in the vicinity of the closing area during the closing process.
Use one of the following options to stop the
closing process:
R press the Fbutton on the key.
R pull or press the remote operating switch
on the driver's door.
R press the close button or STOP button on
the tailgate.
R pull the handle on the tailgate. G
WARNING
Combustion engines emit poisonous exhaust
gases such as carbon monoxide. If the tailgate is open when the engine is running, particu-
larly if the vehicle is moving, exhaust fumes
could enter the passenger compartment.
There is a risk of poisoning.
Turn off the engine before opening the tail-
gate. Never drive with the tailgate open. G
WARNING
If objects, luggage or loads are not secured or not secured sufficiently, they could slip, tip
over or be flung around and thereby hit vehicle
occupants. There is a risk of injury, especially when braking or abruptly changing directions.
Always store objects so that they cannot be
flung around. Secure objects, luggage or loads against slipping or tipping before the
journey.
! The tailgate swings upwards and to the rear
when opened. Therefore, make sure that
there is sufficient clearance above and behind
the tailgate.
You will find details on the tailgate opening
dimensions in the "Vehicle data" section
(Y page 358).
Stow luggage or loads preferably in the luggage compartment. Observe the loading guidelines
(Y page 288).
Do not leave the key in the luggage compart-
ment. If you do so, you could lock yourself out.
The tailgate can be:
R opened and closed manually from outside
R vehicles with EASY-PACK tailgate:
opened/closed automatically from the out-
side
R vehicles with EASY-PACK tailgate:
opened/closed automatically from the inside
R vehicles with EASY-PACK tailgate and
KEYLESS-GO or KEYLESS-GO start func-
tion: closed with the remote operating switch
on the key
R emergency released from the inside. Tailgate obstruction detection with
reversing function
On vehicles with EASY-PACK tailgate, the tail-
gate is equipped with automatic obstacle rec-
ognition with a reversing feature. If a solid object
blocks or restricts the tailgate when automati-
cally opening or closing, the tailgate is stopped.
If the tailgate is stopped during the closing proc- ess, the tailgate automatically opens again
slightly. The automatic obstacle detection with
reversing function is only an aid. It is not a sub- stitute for your attention when opening and
closing the tailgate. G
WARNING
The reversing function does not react:
R to soft, light and thin objects, e.g. fingers
R over the last 8 mm of the closing path Luggage compartment
89Opening and closing
Z
Page 141 of 369
Switch the auxiliary heating on regularly – once
a month – for about ten minutes.
The auxiliary heating timer function calculates
the switch-on time according to the outside
temperature so that the vehicle is preheated by the departure time. When the departure time is
reached, the auxiliary heating continues to heat for a further five minutes and then switches off.
The auxiliary heating heats the air in the vehicle interior to the set temperature. This occurs with-out using the heat of the running engine. The
auxiliary heating is operated directly using the
vehicle's fuel. For this reason, the fuel tank must
be at least Õfull to ensure that the auxiliary
heating functions.
The auxiliary heating/ventilation automatically
adjusts to changes in temperature and weather conditions. For this reason, the auxiliary heating
could switch from ventilation mode to heating
mode or from heating mode to ventilation mode.
The auxiliary heating switches off when the
engine is switched off. The auxiliary ventilation
switches off when you turn the key to key posi-
tion 2(Ypage 144).
The auxiliary heating switches off automatically
after 50 minutes.
You cannot use the auxiliary ventilation to cool
the vehicle interior to a temperature lower than
the outside temperature.
Before switching on X
Turn the key to position 2in the ignition lock
(Y page 144).
X Set the desired temperature.
Auxiliary heating or ventilation can also be
switched on if the manually set climate control is
activated. Optimum comfort is attained by set-
ting the system to automatic mode. Set the tem-
perature to 22 †.
The auxiliary heating or auxiliary ventilation can be switched on/off using the button on the
centre console or the remote control.
The on-board computer can be used to specify
up to three departure times, one of which may
be preselected (Y page 230). Switching the auxiliary heating/venti-
lation on or off using the button on the
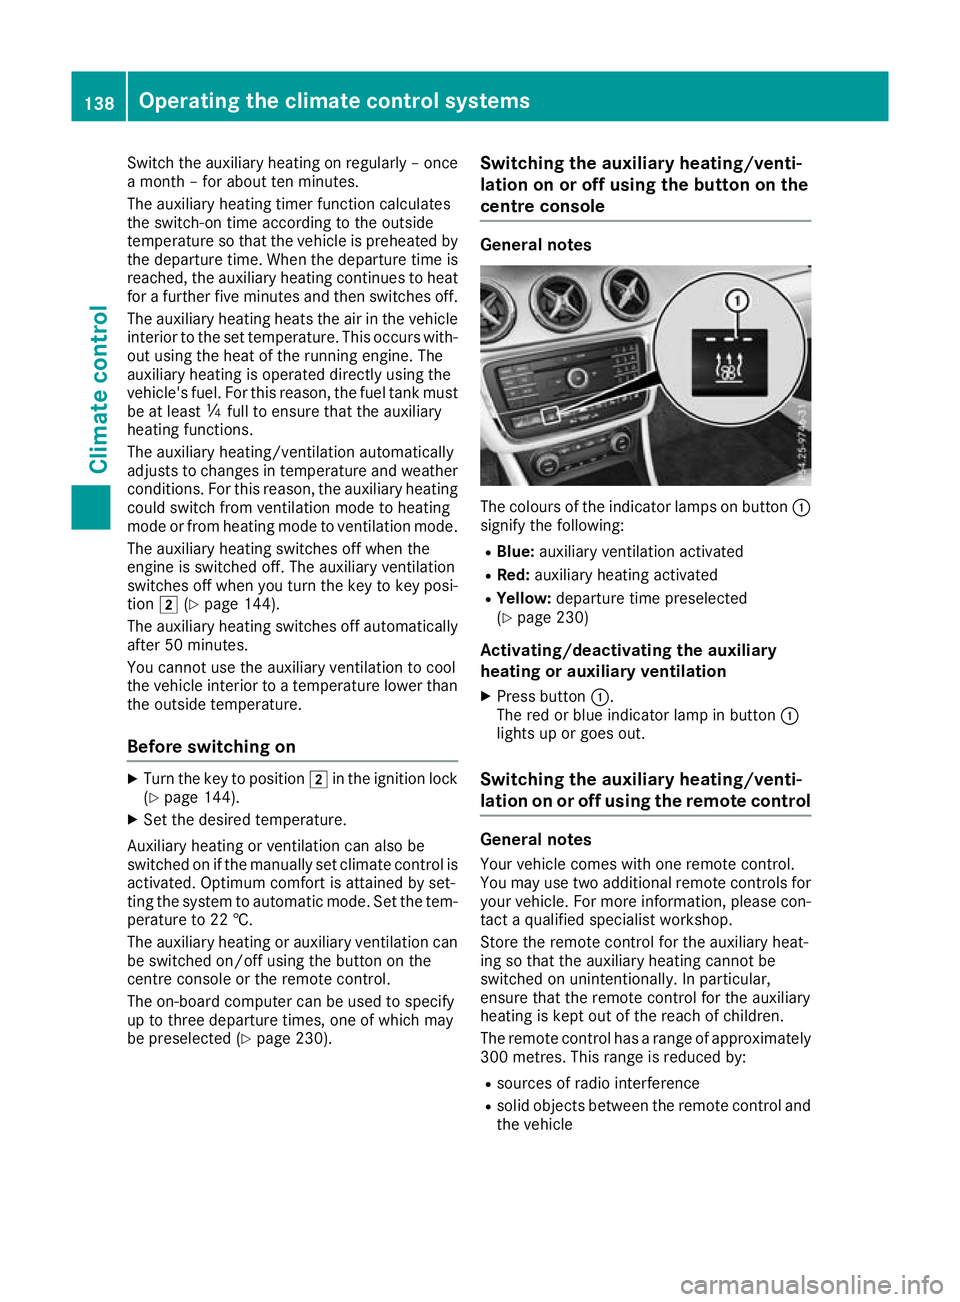
centre console General notes
The colours of the indicator lamps on button
:
signify the following:
R Blue: auxiliary ventilation activated
R Red: auxiliary heating activated
R Yellow: departure time preselected
(Y page 230)
Activating/deactivating the auxiliary
heating or auxiliary ventilation
X Press button :.
The red or blue indicator lamp in button :
lights up or goes out.
Switching the auxiliary heating/venti-
lation on or off using the remote control General notes
Your vehicle comes with one remote control.
You may use two additional remote controls for
your vehicle. For more information, please con-
tact a qualified specialist workshop.
Store the remote control for the auxiliary heat-
ing so that the auxiliary heating cannot be
switched on unintentionally. In particular,
ensure that the remote control for the auxiliary
heating is kept out of the reach of children.
The remote control has a range of approximately
300 metre s. Thisrange is reduced by:
R sources of radio interference
R solid objects between the remote control and
the vehicle 138
Operating the climate control systemsClimate control