Page 300 of 369
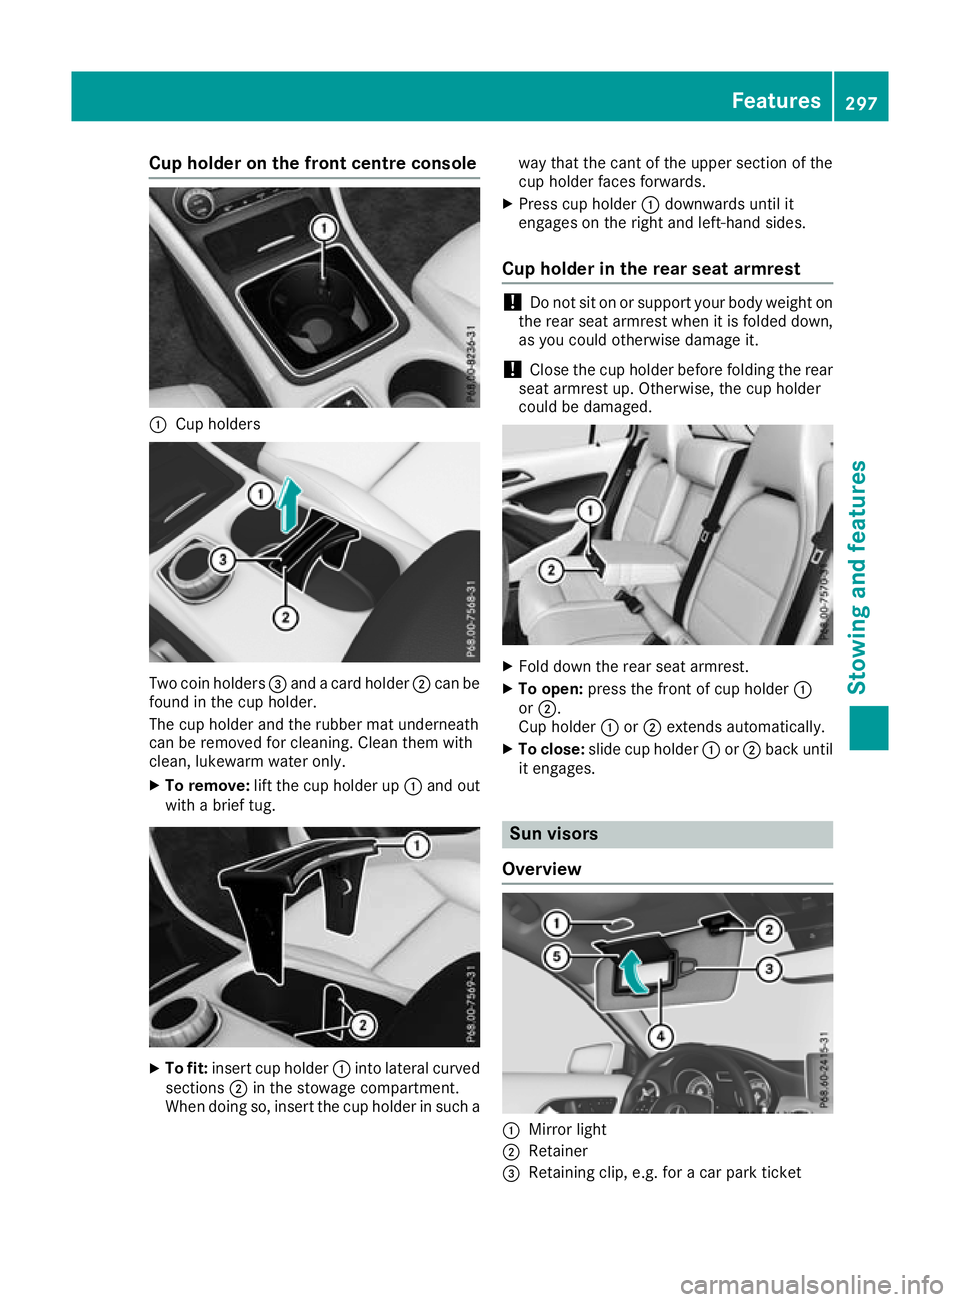
Cup holder on the front centre console
:
Cup holders Two coin holders
=and a card holder ;can be
found in the cup holder.
The cup holder and the rubber mat underneath
can be removed for cleaning. Clean them with
clean, lukewarm water only.
X To remove: lift the cup holder up :and out
with a brief tug. X
To fit: insert cup holder :into lateral curved
sections ;in the stowage compartment.
When doing so, insert the cup holder in such a way that the cant of the upper section of the
cup holder faces forwards.
X Press cup holder :downwards until it
engages on the right and left-hand sides.
Cup holder in the rear seat armrest !
Do not sit on or support your body weight on
the rear seat armrest when it is folded down,
as you could otherwise damage it.
! Close the cup holder before folding the rear
seat armrest up. Otherwise, the cup holder
could be damaged. X
Fold down the rear seat armrest.
X To open: press the front of cup holder :
or ;.
Cup holder :or; extends automatically.
X To close: slide cup holder :or; back until
it engages. Sun visors
Overview :
Mirror light
; Retainer
= Retaining clip, e.g. for a car park ticket Features
297Stowing and features Z
Page 330 of 369
X
Connect negative terminal ?of donor battery Bto earth point Aof your vehicle using the jump
lead. Connect the jump lead to donor battery Bfirst.
X if the battery is fully discharged, leave the battery that is being used to jump-start connected for
a few minutes before attempting to start. This charges the empty battery a little
X Start the engine.
X Before disconnecting the jump leads, let the engines run for several minutes.
X First, remove the jump leads from earth point Aand negative terminal ?, then from positive
clamp ;and positive terminal =. Each time, begin at the contacts on your own vehicle.
X Close cover :of positive clamp ;after removing the jump leads.
X Close the bonnet.
X Have the battery checked at a qualified specialist workshop.
i Jump-starting is not considered to be a normal operating condition.
i Jump-starting cables and further information regarding jump-starting can be obtained at any
qualified specialist workshop. Towing away and tow-starting
Important safety notes
G
WARNING
Safety relevant functions are restricted or no
longer available if:
R the engine is not running
R the brake system or power steering is mal-
functioning
R there is a malfunction in the voltage supply
or the vehicle's electrical system
When your vehicle is towed away or towed
started, you may require considerably more
effort to steer and brake. There is a risk of an
accident.
In such cases use a rigid towing bar. Before
being towed away or tow started, make sure
the steering moves freely. G
WARNING
If the steering wheel lock is engaged, the vehi- cle can no longer be steered. There is a risk of
an accident.
Always switch on the ignition when towing
with a tow rope or a towing bar. G
WARNING
When towing or tow-starting another vehicle
and its weight is greater than the permissible gross weight of your vehicle, the:
R towing eye may be torn off
R car/trailer combination may swerve or
even overturn
There is a risk of an accident.
When towing or tow-starting another vehicle,
its weight should not be greater than the per- missible gross weight of your vehicle.
Details on the permissible gross vehicle weight
of your vehicle can be found on the vehicle iden-
tification plate (Y page 351).
! When Active Brake Assist, Distance Pilot
DISTRONIC or the HOLD function is activated, the vehicle brakes automatically in certain
situations.
To avoid damage to the vehicle, deactivate
these systems in the following or similar sit-
uations:
R when towing away
R in a car wash
! Make sure that the electric parking brake is
released. If the electric parking brake is faulty, visit a qualified specialist workshop.
! Only secure the tow cable or tow bar to the
towing eyes or, if available, to the trailer tow Towing away and tow-starting
327Breakdown assistance Z
Page 354 of 369
tion of aftermarket radio frequency transmitting
equipment") when retrofitting RF transmitters.
Comply with the legal requirements for add-on
parts.
If your vehicle has fittings for two-way radio
equipment, use the power supply or aerial con-
nections intended for use with the basic fittings.
Be sure to observe the manufacturer's addi-
tional instructions when installing.
Deviations in respect of wavebands, maximum
transmission outputs or aerial positions must be approved by Mercedes-Benz.
The maximum transmission output (PEAK) at the base of the aerial must not exceed the followingvalues: Waveband Maximum
transmission output Short wave
3–54 MHz 100 W
4 m waveband
74 - 88 MHz 30 W
2 m waveband
144–174 MHz 50 W
Trunked radio/Tetra
380–460 MHz 10 W
70 cm waveband
400–460 MHz 35 W
Mobile communications
(2G/3G/4G) 10 W
The following can be used in the vehicle without
restrictions:
R RF transmitters with a maximum transmis-
sion output of up to 100 mW
R RF transmitters with transmitter frequencies
in the 380 - 410 MHz waveband and a maxi-
mum transmission output of up to 2 W
(trunked radio/Tetra)
R Mobile phones (2G/3G/4G)
There are no restrictions when positioning the
aerial on the outside of the vehicle for the fol-
lowing wavebands:
R Trunked radio/Tetra
R 70 cm waveband
R 2G/3G/4G Identification plates
Vehicle identification plate with vehi-
cle identification number (VIN)
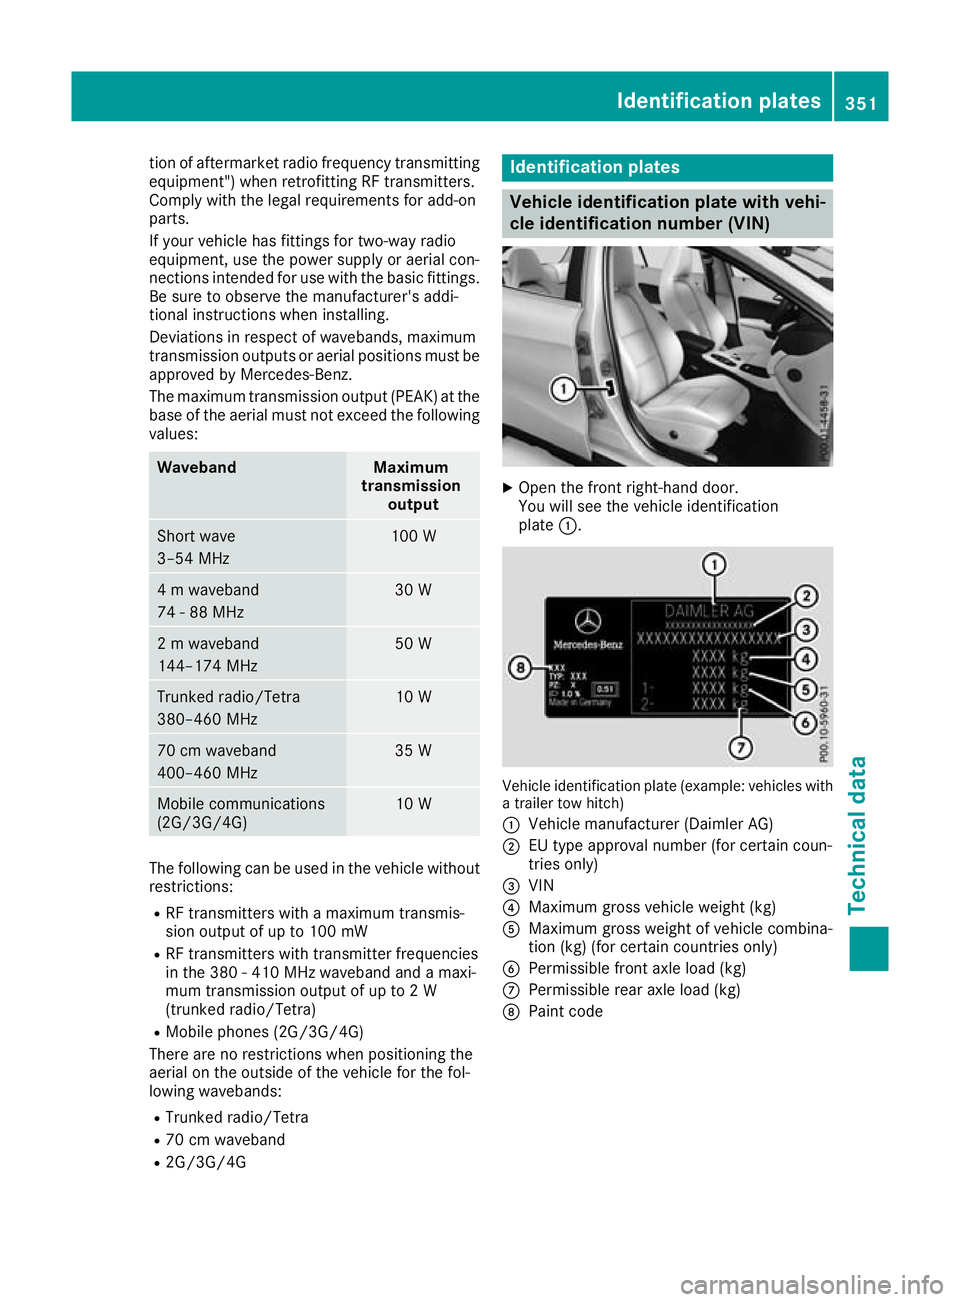
X
Open the front right-hand door.
You will see the vehicle identification
plate :. Vehicle identification plate (example: vehicles with
a trailer tow hitch)
: Vehicle manufacturer (Daimler AG)
; EU type approval number (for certain coun-
tries only)
= VIN
? Maximum gross vehicle weight (kg)
A Maximum gross weight of vehicle combina-
tion (kg) (for certain countries only)
B Permissible front axle load (kg)
C Permissible rear axle load (kg)
D Paint code Identification plates
351Technical data Z
Page 361 of 369
Vehicle data
General notes
Please note that for the specified vehicle data: R the heights specified may vary as a result of:
- tyres
- load
- condition of the suspension
- items of optional equipment
R items of optional equipment reduce the max-
imum payload
R vehicle-specific weight information can be
found on the vehicle identification plate
(Y page 351)
R for certain countries only: you can find vehi-
cle-specific vehicle data in the COC docu-
ments (CERTIFICATE OF CONFORMITY).
These documents are delivered with your
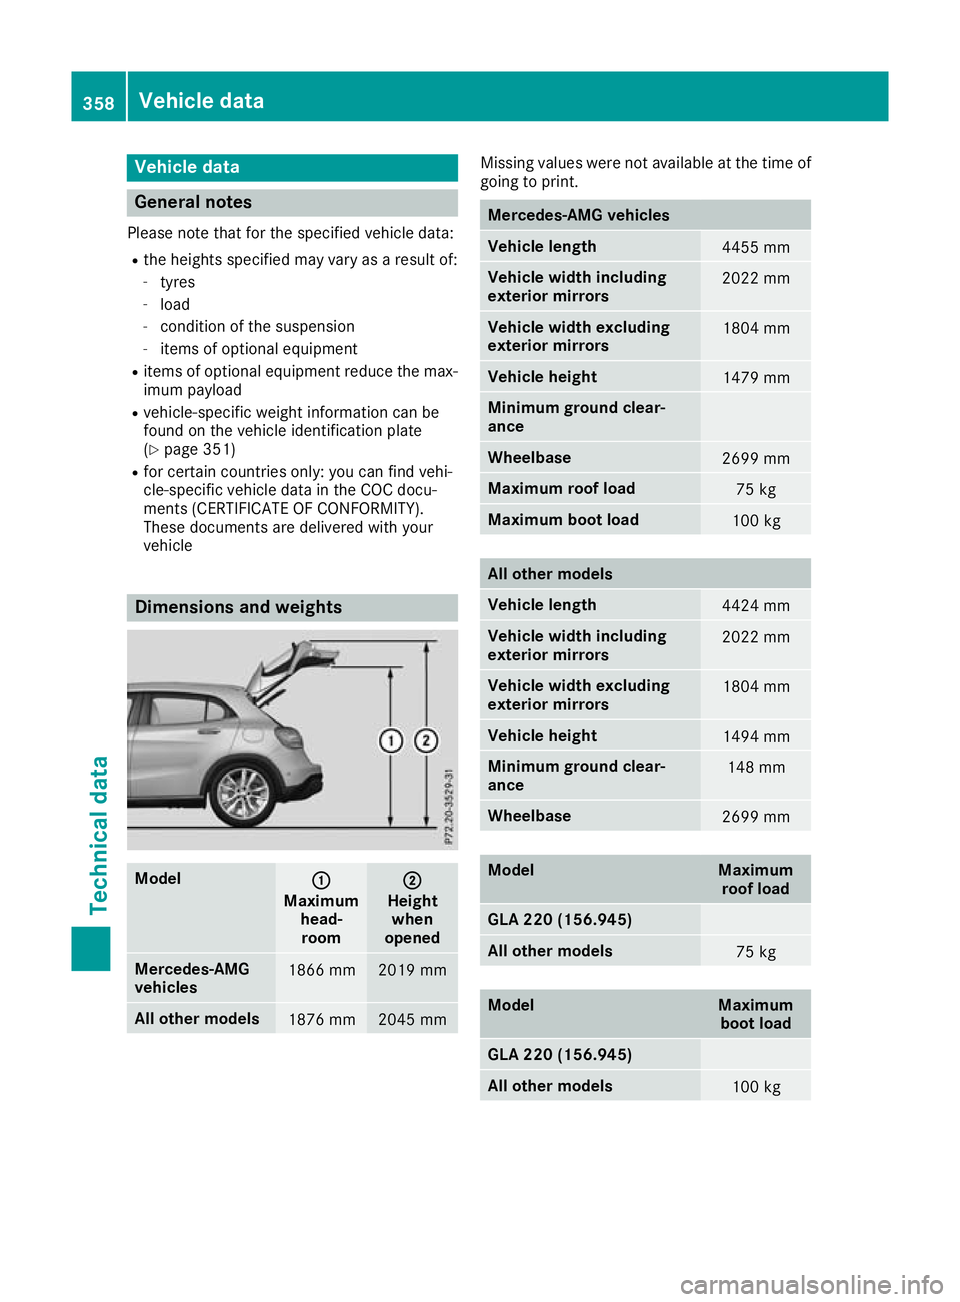
vehicle Dimensions and weights
Model
: :
Maximum head-room ;
;
Height when
opened Mercedes-AMG
vehicles
1866 mm 2019 mm
All other models
1876 mm 2045 mm Missing values were not available at the time of
going to print. Mercedes-AMG vehicles
Vehicle length
4455 mm
Vehicle width including
exterior mirrors
2022 mm
Vehicle width excluding
exterior mirrors
1804 mm
Vehicle height
1479 mm
Minimum ground clear-
ance
Wheelbase
2699 mm
Maximum roof load
75 kg
Maximum boot load
100 kg
All other models
Vehicle length
4424 mm
Vehicle width including
exterior mirrors
2022 mm
Vehicle width excluding
exterior mirrors
1804 mm
Vehicle height
1494 mm
Minimum ground clear-
ance
148 mm
Wheelbase
2699 mm
Model Maximum
roof load GLA 220 (156.945)
All other models
75 kg
Model Maximum
boot load GLA 220 (156.945)
All other models
100 kg358
Vehicle dataTechnical data
Page 364 of 369
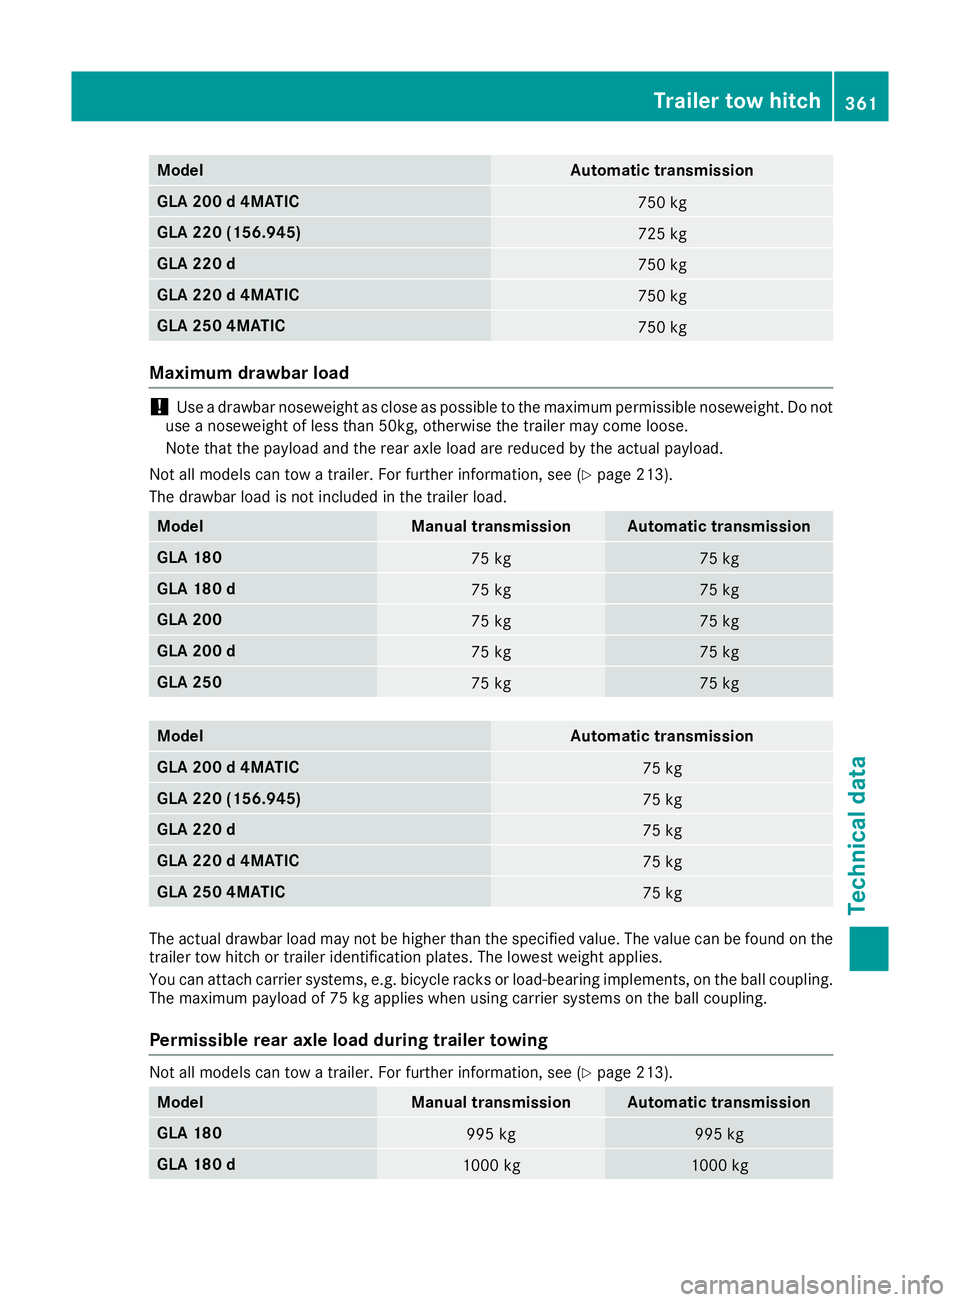
Model Automatic transmission
GLA 200 d 4MATIC
750 kg
GLA 220 (156.945)
725 kg
GLA 220 d
750 kg
GLA 220 d 4MATIC
750 kg
GLA 250 4MATIC
750 kg
Maximum drawbar load
!
Use a drawbar noseweight as close as possible to the maximum permissible noseweight. Do not
use a noseweight of less than 50kg, otherwise the trailer may come loose.
Note that the payload and the rear axle load are reduced by the actual payload.
Not all models can tow a trailer. For further information, see (Y page 213).
The drawbar load is not included in the trailer load. Model Manual transmission Automatic transmission
GLA 180
75 kg 75 kg
GLA 180 d
75 kg 75 kg
GLA 200
75 kg 75 kg
GLA 200 d
75 kg 75 kg
GLA 250
75 kg 75 kg
Model Automatic transmission
GLA 200 d 4MATIC
75 kg
GLA 220 (156.945)
75 kg
GLA 220 d
75 kg
GLA 220 d 4MATIC
75 kg
GLA 250 4MATIC
75 kg
The actual drawbar load may not be higher than the specified value. The value can be found on the
trailer tow hitch or trailer identification plates. The lowest weight applies.
You can attach carrier systems, e.g. bicycle racks or load-bearing implements, on the ball coupling.
The maximum payload of 75 kg applies when using carrier systems on the ball coupling.
Permissible rear axle load during trailer towing Not all models can tow a trailer. For further information, see (Y
page 213).Model Manual transmission Automatic transmission
GLA 180
995 kg 995 kg
GLA 180 d
1000 kg 1000 kgTrailer tow hitch
361Technical data Z
Page:
< prev 1-8 9-16 17-24