2017 MERCEDES-BENZ GLA SUV light
[x] Cancel search: lightPage 40 of 369
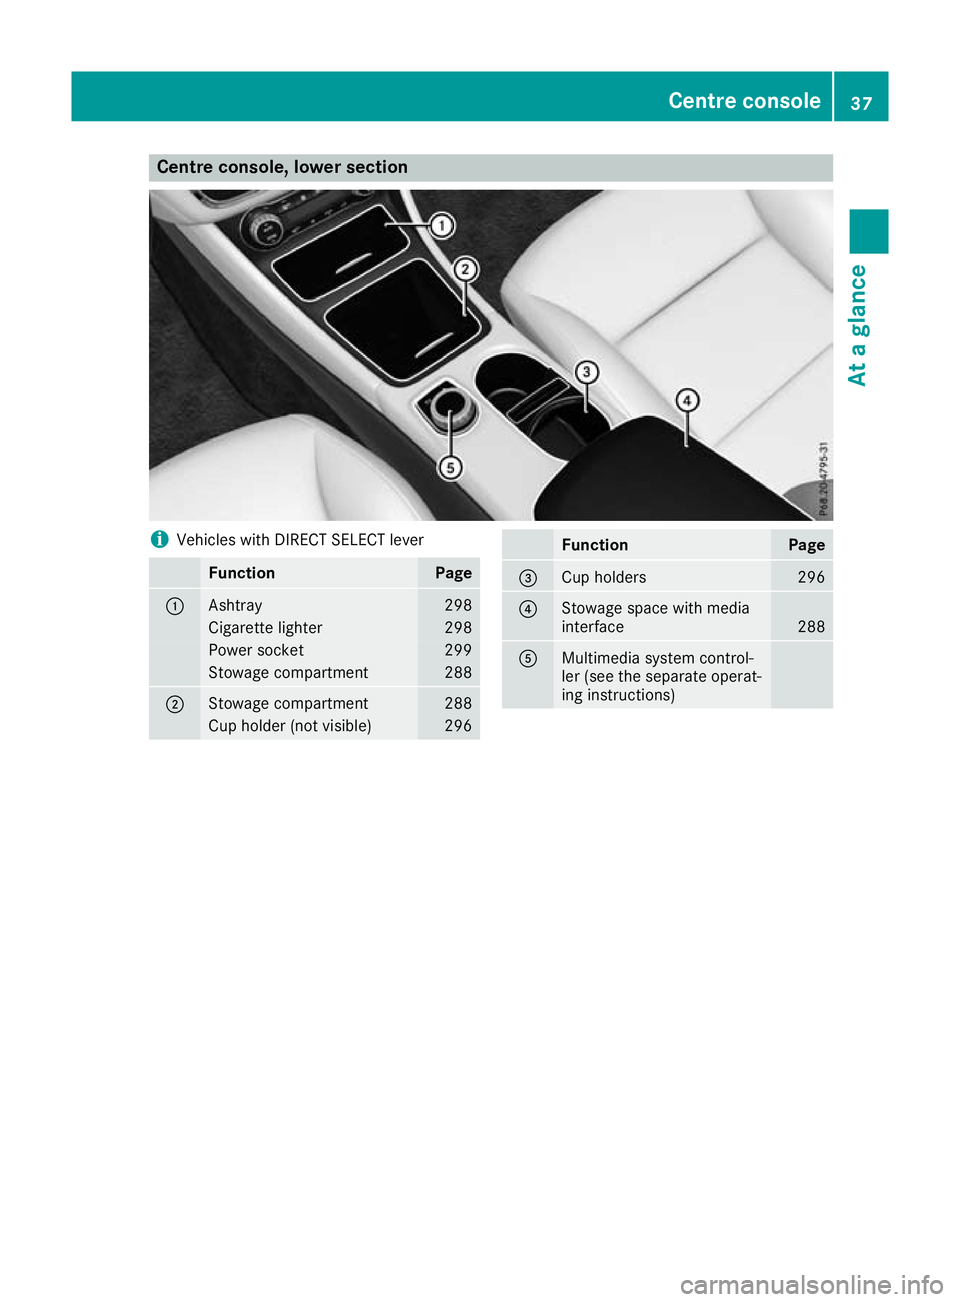
Centre console, lower section
i
Vehicles with DIRECT SELECT lever Function Page
:
Ashtray 298
Cigarette lighter 298
Power socket 299
Stowage compartment 288
;
Stowage compartment 288
Cup holder (not visible) 296 Function Page
=
Cup holders 296
?
Stowage space with media
interface
288
A
Multimedia system control-
ler (see the separate operat-
ing instructions) Centre console
37At a glance
Page 41 of 369
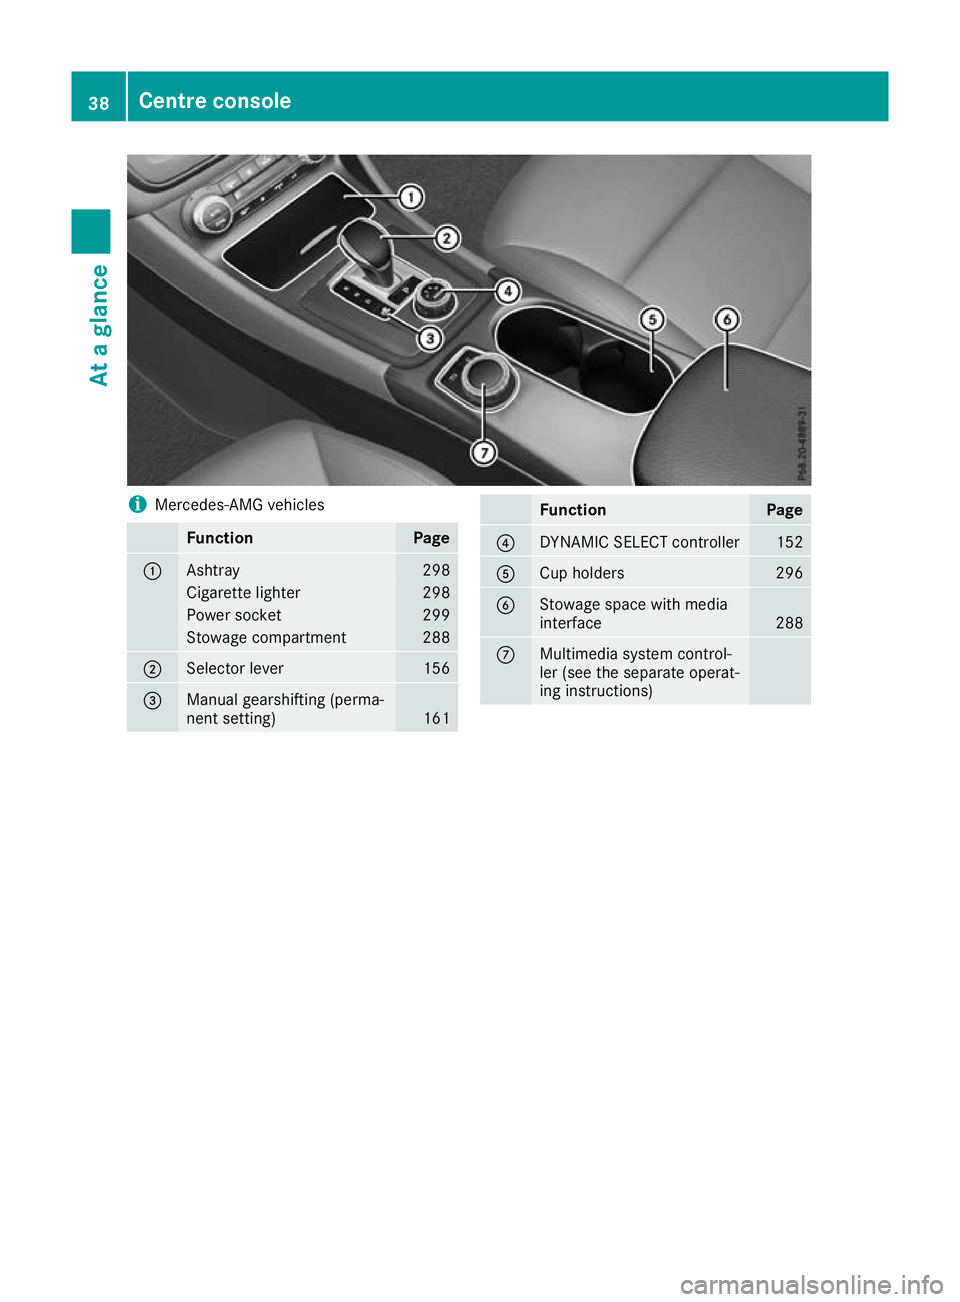
i
Mercedes-AMG vehicles Function Page
:
Ashtray 298
Cigarette lighter 298
Power socket 299
Stowage compartment 288
;
Selector lever 156
=
Manual gearshifting (perma-
nent setting)
161 Function Page
?
DYNAMIC SELECT controller 152
A
Cup holders 296
B
Stowage space with media
interface
288
C
Multimedia system control-
ler (see the separate operat-
ing instructions)38
Centre consoleAt a glance
Page 43 of 369
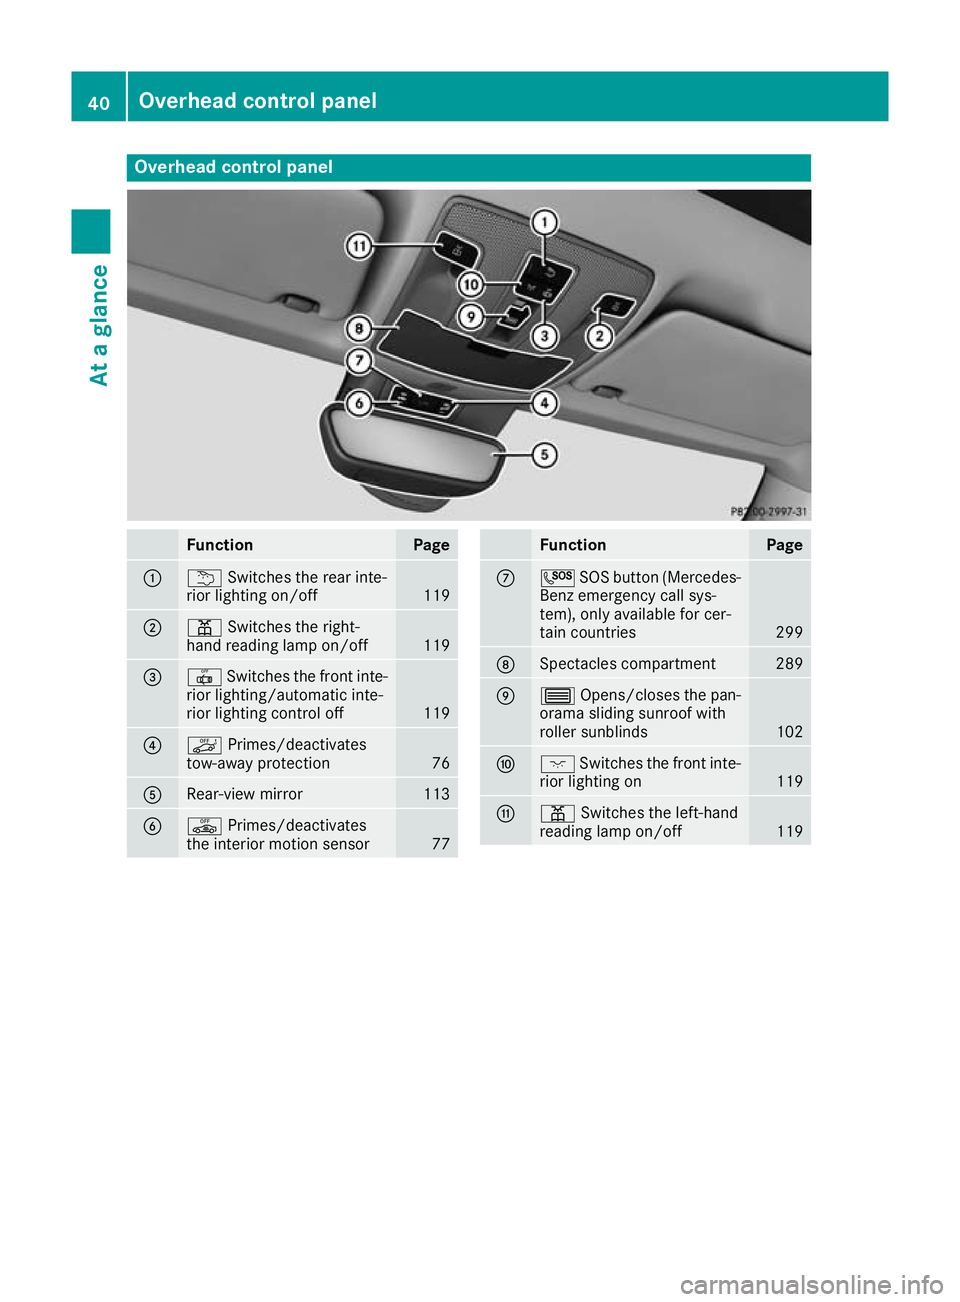
Overhead control panel
Function Page
:
u
Switches the rear inte-
rior lighting on/off 119
;
p
Switches the right-
hand reading lamp on/off 119
=
|
Switches the front inte-
rior lighting/automatic inte-
rior lighting control off 119
?
ë
Primes/deactivates
tow-away protection 76
A
Rear-view mirror 113
B
ê
Primes/deactivates
the interior motion sensor 77 Function Page
C
G
SOS button (Mercedes-
Benz emergency call sys-
tem), only available for cer-
tain countries 299
D
Spectacles compartment 289
E
3
Opens/closes the pan-
orama sliding sunroof with
roller sunblinds 102
F
c
Switches the front inte-
rior lighting on 119
G
p
Switches the left-hand
reading lamp on/off 11940
Overhead control panelAt a glance
Page 45 of 369
Mercedes-Benz recommends that you only use
driving aids which have been approved specifi-
cally for your vehicle by Mercedes-Benz. Restraint system warning lamp
The functions of the restraint system are
checked after the ignition is switched on and at regular intervals while the engine is running.
Therefore, malfunctions can be detected in
good time.
The 6 restraint system warning lamp on the
instrument cluster lights up when the ignition is
switched on. It goes out no later than a few sec- onds after the vehicle is started. The compo-
nents of the restraint system are in operational
readiness.
A malfunction has occurred if the 6restraint
system warning lamp:
R does not light up after the ignition is switched
on
R does not go out after a few seconds with the
engine running
R lights up again while the engine is running G
WARNING
If the restraint system is malfunctioning,
restraint system components may be trig-
gered unintentionally or may not deploy as
intended during an accident. This may affect
the seat belt tensioner or airbag, for example. This poses an increased risk of injury or even
fatal injury.
Have the restraint system checked and
repaired immediately at a qualified specialist
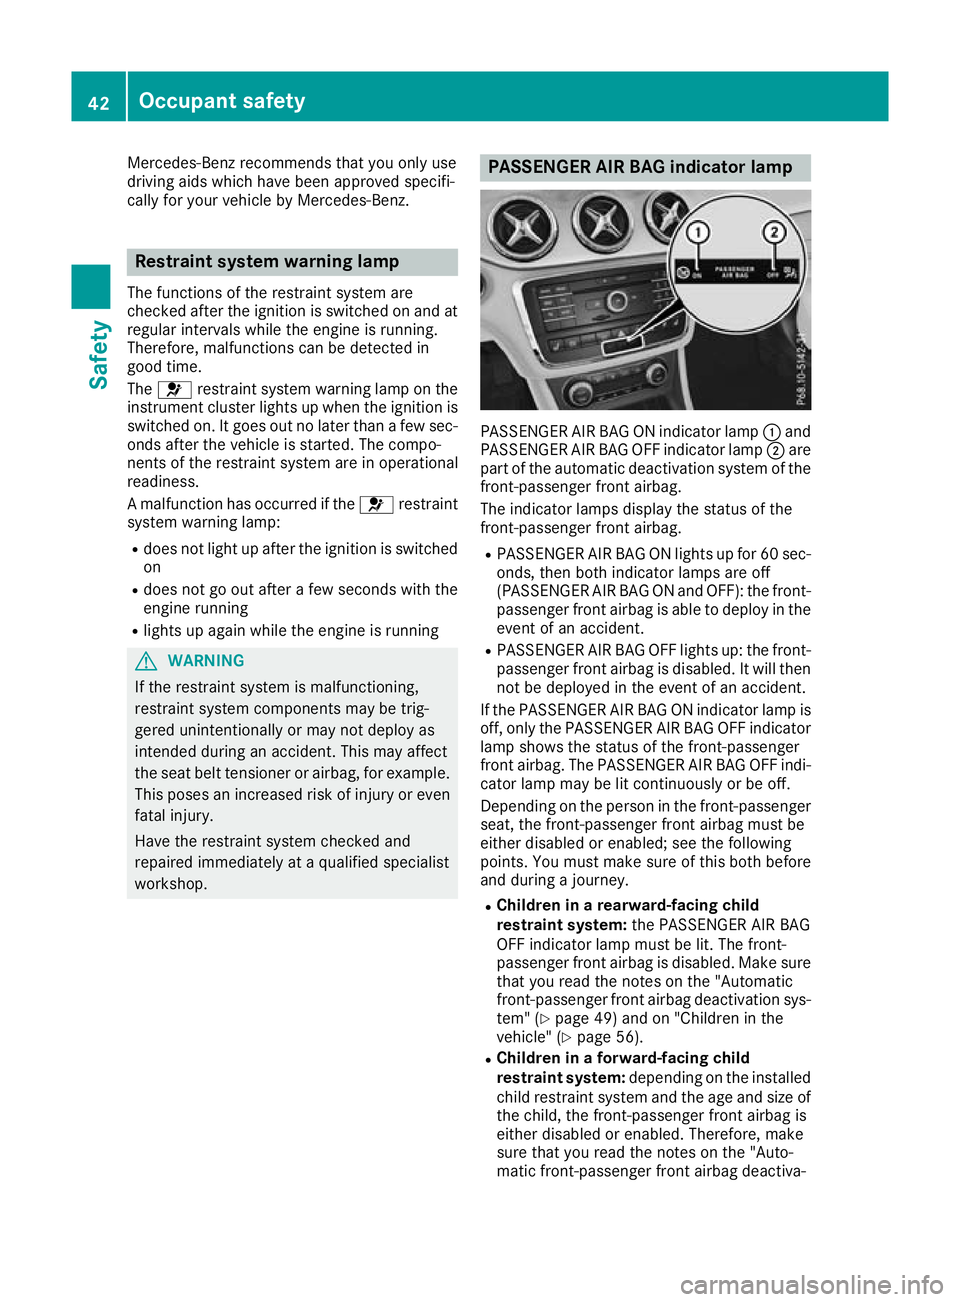
workshop. PASSENGER AIR BAG indicator lamp
PASSENGER AIR BAG ON indicator lamp
:and
PASSENGER AIR BAG OFF indicator lamp ;are
part of the automatic deactivation system of the front-passenger front airbag.
The indicator lamps display the status of the
front-passenger front airbag.
R PASSENGER AIR BAG ON lights up for 60 sec-
onds, then both indicator lamps are off
(PASSENGER AIR BAG ON and OFF): the front-
passenger front airbag is able to deploy in the event of an accident.
R PASSENGER AIR BAG OFF lights up: the front-
passenger front airbag is disabled. It will then
not be deployed in the event of an accident.
If the PASSENGER AIR BAG ON indicator lamp is off, only the PASSENGER AIR BAG OFF indicator
lamp shows the status of the front-passenger
front airbag. The PASSENGER AIR BAG OFF indi-
cator lamp may be lit continuously or be off.
Depending on the person in the front-passenger seat, the front-passenger front airbag must be
either disabled or enabled; see the following
points. You must make sure of this both before
and during a journey.
R Children in a rearward-facing child
restraint system: the PASSENGER AIR BAG
OFF indicator lamp must be lit. The front-
passenger front airbag is disabled. Make sure
that you read the notes on the "Automatic
front-passenger front airbag deactivation sys-
tem" (Y page 49) and on "Children in the
vehicle" (Y page 56).
R Children in a forward-facing child
restraint system: depending on the installed
child restraint system and the age and size of
the child, the front-passenger front airbag is
either disabled or enabled. Therefore, make
sure that you read the notes on the "Auto-
matic front-passenger front airbag deactiva- 42
Occupant safetySafety
Page 46 of 369
tion system" (Y
page 49) and on "Children in
the vehicle" (Y page 56).
R All other persons: the PASSENGER AIR BAG
OFF indicator lamp must be off. The front-
passenger front airbag is enabled. Depending
on the build of the person on the front-
passenger seat, the PASSENGER AIR BAG
OFF indicator lamp may light up. The front-
passenger front airbag is disabled. It will then
not be deployed in the event of an accident. In this case, the front-passenger seat should not
be used.
Make sure that you read the notes on the
"Automatic front-passenger front airbag
deactivation system" (Y page 49) as well as
on "Seat belts" (Y page 43) and "Airbags"
(Y page 46). There, you can also find infor-
mation on the correct seat position. Seat belts
Introduction A correctly worn seat belt is the most effective
means of restraining the movement of vehicle
occupants in the event of a collision or if the
vehicle overturns. This reduces the risk of vehi-
cle occupants coming into contact with parts of
the vehicle interior or being ejected from it. The seat belt also helps to keep the vehicle occu-
pants in the best position in relation to the air-
bag being deployed.
The seat belt system consists of:
R seat belts
R belt tensioners for the front seat belts and the
outer seat belts in the rear
R belt force limiters for the front seat belts and
the outer seat belts in the rear
If the seat belt is pulled quickly or sharply from
the belt outlet, the inertia reel locks. The belt
strap cannot be pulled out any further.
The belt tensioner tightens the seat belt in the
event of a collision so that it fits tightly across
your body. However, it does not pull the vehicle
occupants back in the direction of the seat
backrest.
The belt tensioner does not, however, correct an
incorrect seat position or correct the routing of a seat belt that is worn incorrectly.
When triggered, seat belt force limiters help to
reduce the peak force exerted by the seat belt
on the vehicle occupant. The belt force limiters on the front seats are
synchronised with the front airbags, which take
on a part of the deceleration force. This can
reduce the forces to which the vehicle occu-
pants are subjected during an accident.
! If the front-passenger seat is not occupied,
do not engage the seat belt tongue in the
buckle on the front-passenger seat. Other-
wise, the belt tensioner and sidebag could be
triggered in the event of an accident and
would need to be replaced.
Important safety notes G
WARNING
If the seat belt is worn incorrectly, it cannot
perform its intended protective function. Fur- thermore, an incorrectly worn seat belt can
cause additional injuries, e.g. in the event of
an accident, heavy braking or sudden
changes of direction. There is an increased
risk of injury, possibly even fatal.
Always ensure that all vehicle occupants have their seat belts fastened correctly and are sit-
ting properly.
The components of the restraint system work in
conjunction with each other. They can only offer protection if all vehicle occupants always:
R have the seat belt correctly fastened
(Y page 44)
R have the seat and head restraint adjusted
properly (Y page 106) G
WARNING
The seat belt does not offer the intended level of protection if you have not moved the back-
rest to an almost vertical position. When brak-
ing or in the event of an accident, you could
slide underneath the seat belt and sustain
abdomen or neck injuries, for example. This
poses an increased risk of injury or even fatal injury.
Adjust the seat properly before beginning
your journey. Always ensure that the backrest
is in an almost vertical position and that the
shoulder section of your seatbelt is routed
across the centre of your shoulder. Occupant safety
43Safety Z
Page 48 of 369
arm or behind your back. If possible, adjust
the seat belt to the appropriate height.
R the lap belt is taut and passes across the lap
as low down as possible
The lap belt must always be routed across
your hip joints and never across your abdo-
men. This applies particularly to pregnant
women. If necessary, press the lap belt down
into your hip joints and pull tight with the
shoulder section of the belt.
R the seat belt is not routed across sharp, poin-
ted or fragile objects
If you have such items located on or in your
clothing, e.g. pens, keys or spectacles, store
these in a suitable place.
R only one person is using a seat belt
Infants and children must never travel sitting
on the lap of a vehicle occupant. In the event of an accident, they could be crushed
between the vehicle occupant and seat belt.
R objects are never secured with a seat belt if
the seat belt is also being used by one of the
vehicle's occupants
Also ensure that no objects are placed
between a person and the seat. e.g. a cush-
ion.
Seat belts are intended only to secure and
restrain vehicle occupants. Always observe the
"Loading guidelines" for securing objects, lug-
gage or loads (Y page 288).
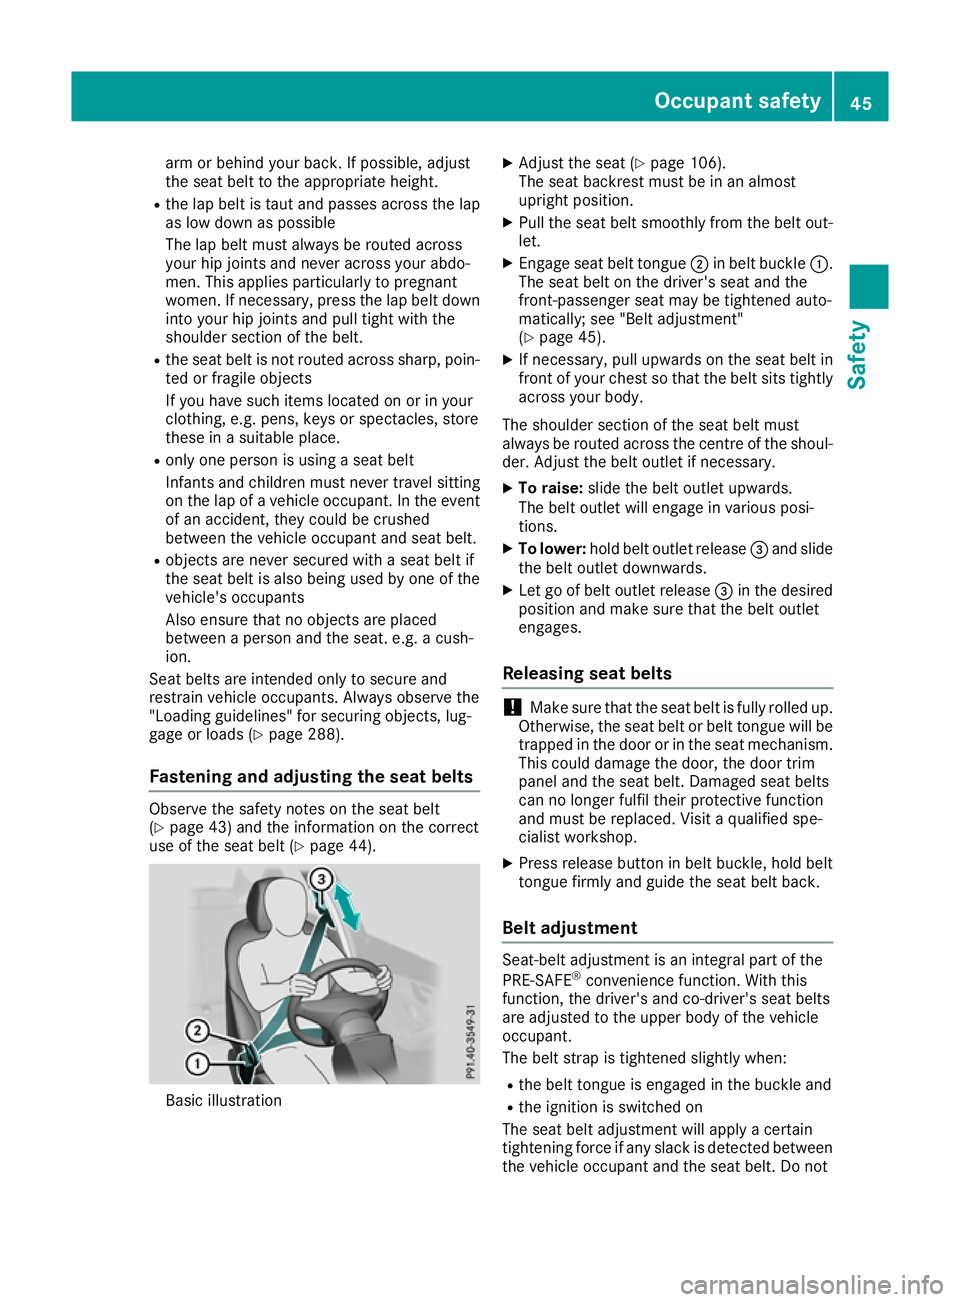
Fastening and adjusting the seat belts Observe the safety notes on the seat belt
(Y
page 43) and the information on the correct
use of the seat belt (Y page 44). Basic illustration X
Adjust the seat (Y page 106).
The seat backrest must be in an almost
upright position.
X Pull the seat belt smoothly from the belt out-
let.
X Engage seat belt tongue ;in belt buckle :.
The seat belt on the driver's seat and the
front-passenger seat may be tightened auto-
matically; see "Belt adjustment"
(Y page 45).
X If necessary, pull upwards on the seat belt in
front of your chest so that the belt sits tightly
across your body.
The shoulder section of the seat belt must
always be routed across the centre of the shoul- der. Adjust the belt outlet if necessary.
X To raise: slide the belt outlet upwards.
The belt outlet will engage in various posi-
tions.
X To lower: hold belt outlet release =and slide
the belt outlet downwards.
X Let go of belt outlet release =in the desired
position and make sure that the belt outlet
engages.
Releasing seat belts !
Make sure that the seat belt is fully rolled up.
Otherwise, the seat belt or belt tongue will be
trapped in the door or in the seat mechanism. This could damage the door, the door trim
panel and the seat belt. Damaged seat belts
can no longer fulfil their protective function
and must be replaced. Visit a qualified spe-
cialist workshop.
X Press release button in belt buckle, hold belt
tongue firmly and guide the seat belt back.
Belt adjustment Seat-belt adjustment is an integral part of the
PRE-SAFE
®
convenience function. With this
function, the driver's and co-driver's seat belts
are adjusted to the upper body of the vehicle
occupant.
The belt strap is tightened slightly when:
R the belt tongue is engaged in the buckle and
R the ignition is switched on
The seat belt adjustment will apply a certain
tightening force if any slack is detected between
the vehicle occupant and the seat belt. Do not Occupant safety
45Safety Z
Page 49 of 369
hold on to the seat belt tightly while it is adjust-
ing.
You can switch the seat belt adjustment on and off in the on-board computer (Y page 231).
Seat belt warning for the driver and
front-passenger The
7 seat belt warning lamp in the instru-
ment cluster is a reminder that all vehicle occu-
pants must wear their seat belts. It may light up
continuously or flash. In addition, a warning tone may sound.
The 7 seat belt warning lamp goes out and
the warning tone ceases when the driver and the
front passenger have fastened their seat belts.
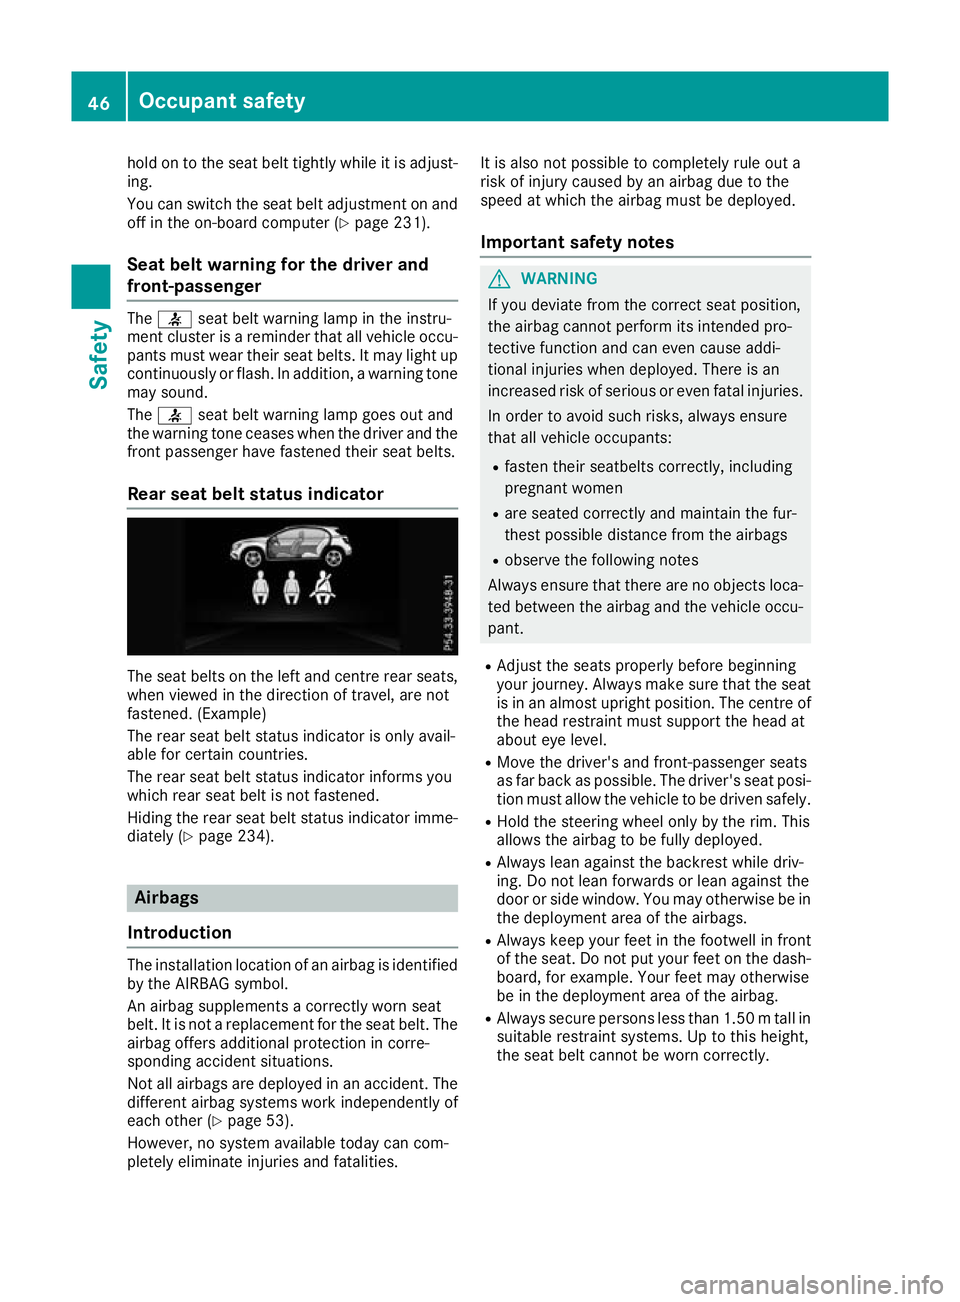
Rear seat belt status indicator The seat belts on the left and centre rear seats,
when viewed in the direction of travel, are not
fastened. (Example)
The rear seat belt status indicator is only avail-
able for certain countries.
The rear seat belt status indicator informs you
which rear seat belt is not fastened.
Hiding the rear seat belt status indicator imme- diately (Y page 234). Airbags
Introduction The installation location of an airbag is identified
by the AIRBAG symbol.
An airbag supplements a correctly worn seat
belt. It is not a replacement for the seat belt. The
airbag offers additional protection in corre-
sponding accident situations.
Not all airbags are deployed in an accident. The
different airbag systems work independently of
each other (Y page 53).
However, no system available today can com-
pletely eliminate injuries and fatalities. It is also not possible to completely rule out a
risk of injury caused by an airbag due to the
speed at which the airbag must be deployed.
Important safety notes G
WARNING
If you deviate from the correct seat position,
the airbag cannot perform its intended pro-
tective function and can even cause addi-
tional injuries when deployed. There is an
increased risk of serious or even fatal injuries.
In order to avoid such risks, always ensure
that all vehicle occupants:
R fasten their seatbelts correctly, including
pregnant women
R are seated correctly and maintain the fur-
thest possible distance from the airbags
R observe the following notes
Always ensure that there are no objects loca-
ted between the airbag and the vehicle occu-
pant.
R Adjust the seats properly before beginning
your journey. Always make sure that the seat
is in an almost upright position. The centre of
the head restraint must support the head at
about eye level.
R Move the driver's and front-passenger seats
as far back as possible. The driver's seat posi-
tion must allow the vehicle to be driven safely.
R Hold the steering wheel only by the rim. This
allows the airbag to be fully deployed.
R Always lean against the backrest while driv-
ing. Do not lean forwards or lean against the
door or side window. You may otherwise be in the deployment area of the airbags.
R Always keep your feet in the footwell in front
of the seat. Do not put your feet on the dash-
board, for example. Your feet may otherwise
be in the deployment area of the airbag.
R Always secure persons less than 1.50 mtall in
suitable restraint systems. Up to this height,
the seat belt cannot be worn correctly. 46
Occupant safetySafety
Page 52 of 369
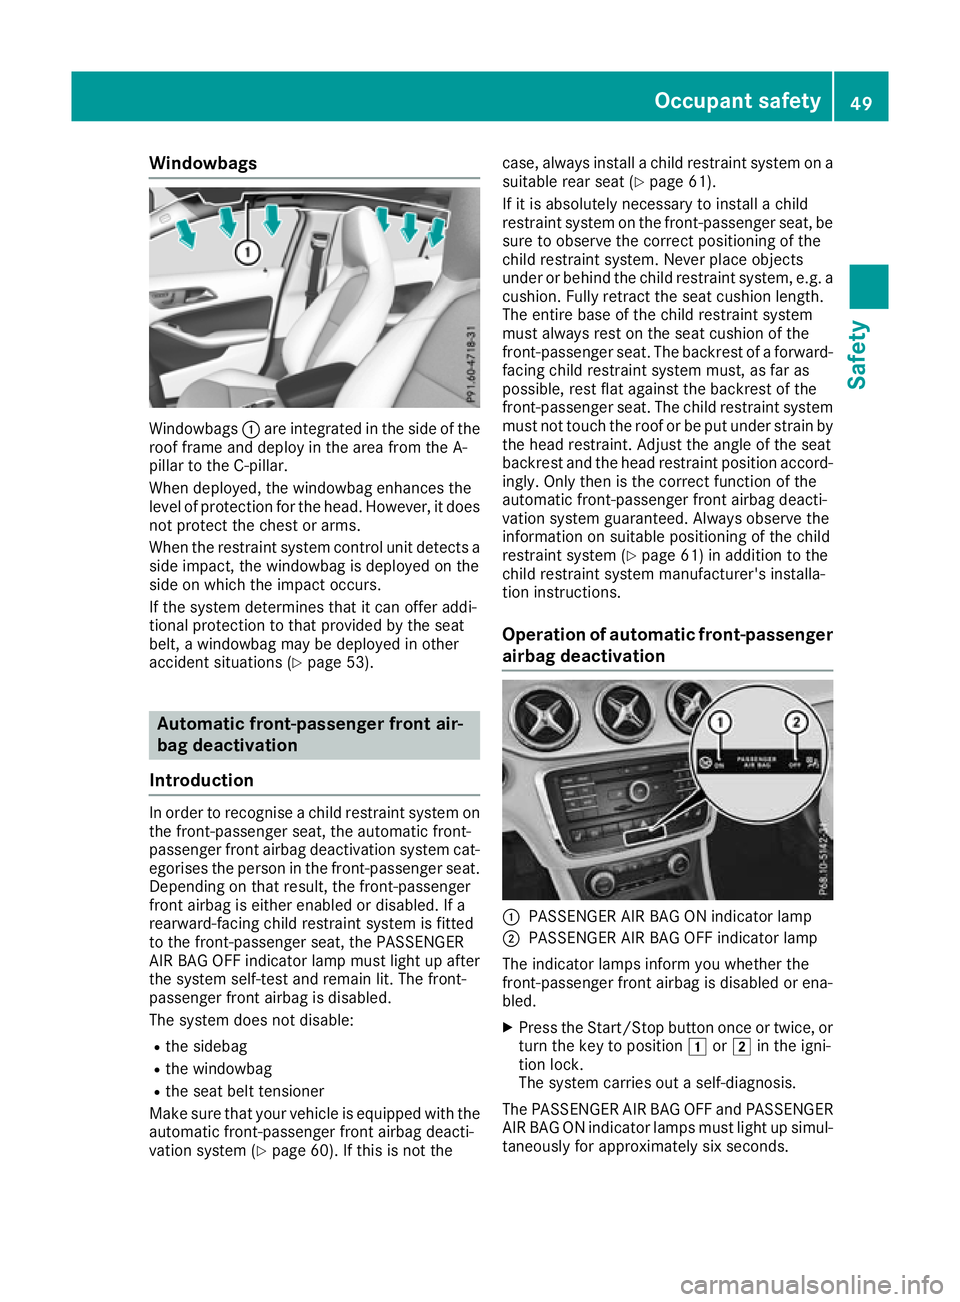
Windowbags
Windowbags
:are integrated in the side of the
roof frame and deploy in the area from the A-
pillar to the C-pillar.
When deployed, the windowbag enhances the
level of protection for the head. However, it does
not protect the chest or arms.
When the restraint system control unit detects a side impact, the windowbag is deployed on the
side on which the impact occurs.
If the system determines that it can offer addi-
tional protection to that provided by the seat
belt, a windowbag may be deployed in other
accident situations (Y page 53).Automatic front-passenger front air-
bag deactivation
Introduction In order to recognise a child restraint system on
the front-passenger seat, the automatic front-
passenger front airbag deactivation system cat- egorises the person in the front-passenger seat.Depending on that result, the front-passenger
front airbag is either enabled or disabled. If a
rearward-facing child restraint system is fitted
to the front-passenger seat, the PASSENGER
AIR BAG OFF indicator lamp must light up after
the system self-test and remain lit. The front-
passenger front airbag is disabled.
The system does not disable:
R the sidebag
R the windowbag
R the seat belt tensioner
Make sure that your vehicle is equipped with the automatic front-passenger front airbag deacti-
vation system (Y page 60). If this is not the case, always install a child restraint system on a
suitable rear seat (Y page 61).
If it is absolutely necessary to install a child
restraint system on the front-passenger seat, be
sure to observe the correct positioning of the
child restraint system. Never place objects
under or behind the child restraint system, e.g. a
cushion. Fully retract the seat cushion length.
The entire base of the child restraint system
must always rest on the seat cushion of the
front-passenger seat. The backrest of a forward-
facing child restraint system must, as far as
possible, rest flat against the backrest of the
front-passenger seat. The child restraint system must not touch the roof or be put under strain bythe head restraint. Adjust the angle of the seat
backrest and the head restraint position accord-
ingly. Only then is the correct function of the
automatic front-passenger front airbag deacti-
vation system guaranteed. Always observe the
information on suitable positioning of the child
restraint system (Y page 61) in addition to the
child restraint system manufacturer's installa-
tion instructions.
Operation of automatic front-passenger
airbag deactivation :
PASSENGER AIR BAG ON indicator lamp
; PASSENGER AIR BAG OFF indicator lamp
The indicator lamps inform you whether the
front-passenger front airbag is disabled or ena-
bled.
X Press the Start/Stop button once or twice, or
turn the key to position 1or2 in the igni-
tion lock.
The system carries out a self-diagnosis.
The PASSENGER AIR BAG OFF and PASSENGER
AIR BAG ON indicator lamps must light up simul- taneously for approximately six seconds. Occupant safety
49Safety Z