2017 MERCEDES-BENZ GLA SUV change wheel
[x] Cancel search: change wheelPage 30 of 369
Have accessories retrofitted at a qualified
specialist workshop.
You could jeopardise the operating safety of
your vehicle if you use parts, tyres and wheels as
well as accessories relevant to safety that have not been approved by Mercedes-Benz. This
could lead to malfunctions in safety-relevant
systems, e.g. the brake system. Use only genu-
ine Mercedes-Benz parts or parts of equal qual- ity. Use only tyres, wheels and accessories that
have been specifically approved for your vehi-
cle.
Mercedes-Benz tests genuine parts and conver-
sion parts and accessories that have been spe-
cifically approved for your vehicle for their reli-
ability, safety and suitability. Despite ongoing
market research, Mercedes-Benz is unable to
assess other parts. Mercedes-Benz therefore
accepts no responsibility for the use of such
parts in Mercedes-Benz vehicles, even if they
have been officially approved or independently
approved by a testing centre.
In Germany, certain parts are officially approved for installation or modification only if they com-
ply with legal requirements. This also applies to some other countries. All genuine Mercedes-
Benz parts meet the approval requirements. The
use of non-approved parts may invalidate the
vehicle's general operating permit.
This is the case:
R if they cause a change of the vehicle type from
that for which the vehicle's general operating permit was granted
R if other road users could be endangered
R if the emission or noise levels are adversely
affected
Always specify the vehicle identification number (VIN) (Y page 351) when ordering genuine
Mercedes-Benz parts. Owner's Manual
Vehicle equipment
i This Owner's Manual describes all models
and all standard and optional equipment
available for your vehicle at the time of pub-
lication of the Owner's Manual. Country-spe-
cific differences are possible. Note that your
vehicle may not be fitted with all features
described. This is also the case for systems
and functions relevant to safety. Therefore, the equipment on your vehicle may differ from
that in the descriptions and illustrations.
The original purchase contract documentation
for your vehicle contains a list of all the systems in your vehicle.
Should you have any questions concerning
equipment and operation, please consult a
Mercedes-Benz Service Centre.
The Owner's Manual and Service Booklet are
important documents and should be kept in the
vehicle. Operating safety
Declarations of conformity
Wireless vehicle components The following information applies to all compo-
nents of the vehicle and the information sys-
tems and communication devices integrated
into the vehicle that receive and/or transmit
radio waves:
The components of this vehicle that receive
and/or transmit radio waves are compliant with
the basic requirements and all other relevant
conditions of Directive 1999/5/EC. You can
obtain further information from any Mercedes-
Benz Service Centre.
Electromagnetic compatibility The electromagnetic compatibility of the vehicle
components has been checked and certified
according to the currently valid version of Reg-
ulation ECE-R 10.
Jack Copy and translation of the original declaration
of conformity:
EC declaration of conformity
1. The signatory, as a representative
Manufacturer:
BRANO a.s.
74741 Hradec nad Moravicí, Opav-
ská 1000,
Czech Republic
ID no.: 64-387-5933
VAT ID no.: CZ64-387-5933 Operating safety
27Introduction Z
Page 33 of 369
Qualified specialist workshop
A qualified specialist workshop has the neces-
sary special skills, tools and qualifications to
correctly carry out any necessary work on your
vehicle. This particularly applies to work rele-
vant to safety.
Observe the notes in the Service Booklet.
Always have the following work carried out at a
qualified specialist workshop:
R work relevant to safety
R service and maintenance work
R repair work
R modifications, installations and conversions
R work on electronic components
Mercedes-Benz recommends that you use a
Mercedes-Benz Service Centre. Vehicle registration
Mercedes-Benz may ask its Service Centres to
carry out technical inspections on certain vehi-
cles. The quality or safety of the vehicle is
improved as a result of the inspection.
Mercedes-Benz can only inform you about vehi-
cle checks if it has your registration data.
It is possible that your vehicle has not yet been
registered in your name in the following cases:
R if your vehicle was not purchased at an
authorised specialist dealer
R if your vehicle has not yet been inspected at a
Mercedes-Benz Service Centre
It is advisable to register your vehicle with a
Mercedes-Benz Service Centre.
Inform Mercedes-Benz as soon as possible
about any change in address or vehicle owner-
ship. You can do this at a Mercedes-Benz Ser-
vice Centre, for example. Correct use
If you remove any warning stickers, you or oth-
ers could fail to recognise certain dangers.
Leave warning stickers in position.
Observe the following information when driving
your vehicle:
R the safety notes in this manual
R technical data for the vehicle R
traffic rules and regulations
R laws and safety standards pertaining to motor
vehicles Implied warranty
! Follow the instructions in this manual about
the proper operation of your vehicle as well as
about possible vehicle damage. Damage to
your vehicle that arises from culpable contra- ventions against these instructions are not
covered either by Mercedes-Benz implied
warranty or by the New or Used-Vehicle War- ranty. QR code for rescue card
The QR code is secured in the fuel filler flap and
on the opposite side on the B-pillar. In the event
of an accident, rescue services can use the QR
code to quickly find the appropriate rescue card for your vehicle. The current rescue card con-
tains, in a compact form, the most important
information about your vehicle, e.g. the routing
of the electric cables.
You can find more information under
www.mercedes-benz.de/qr-code. Data stored in the vehicle
Many of the electronic components in your vehi- cle can store data.
These data memories temporarily or perma-
nently store technical information about:
R the vehicle's operating state
R events
R faults
In general, this technical information docu-
ments the state of a component, a module, a
system or the surroundings.
This includes, for example:
R operating conditions of system components.
For example, fluid levels.
R status messages concerning the vehicle and
its individual components, e.g. number of
wheel revolutions/speed, deceleration in
movement, lateral acceleration, accelerator
pedal position. 30
Data stored in the vehicleIntroduction
Page 38 of 369
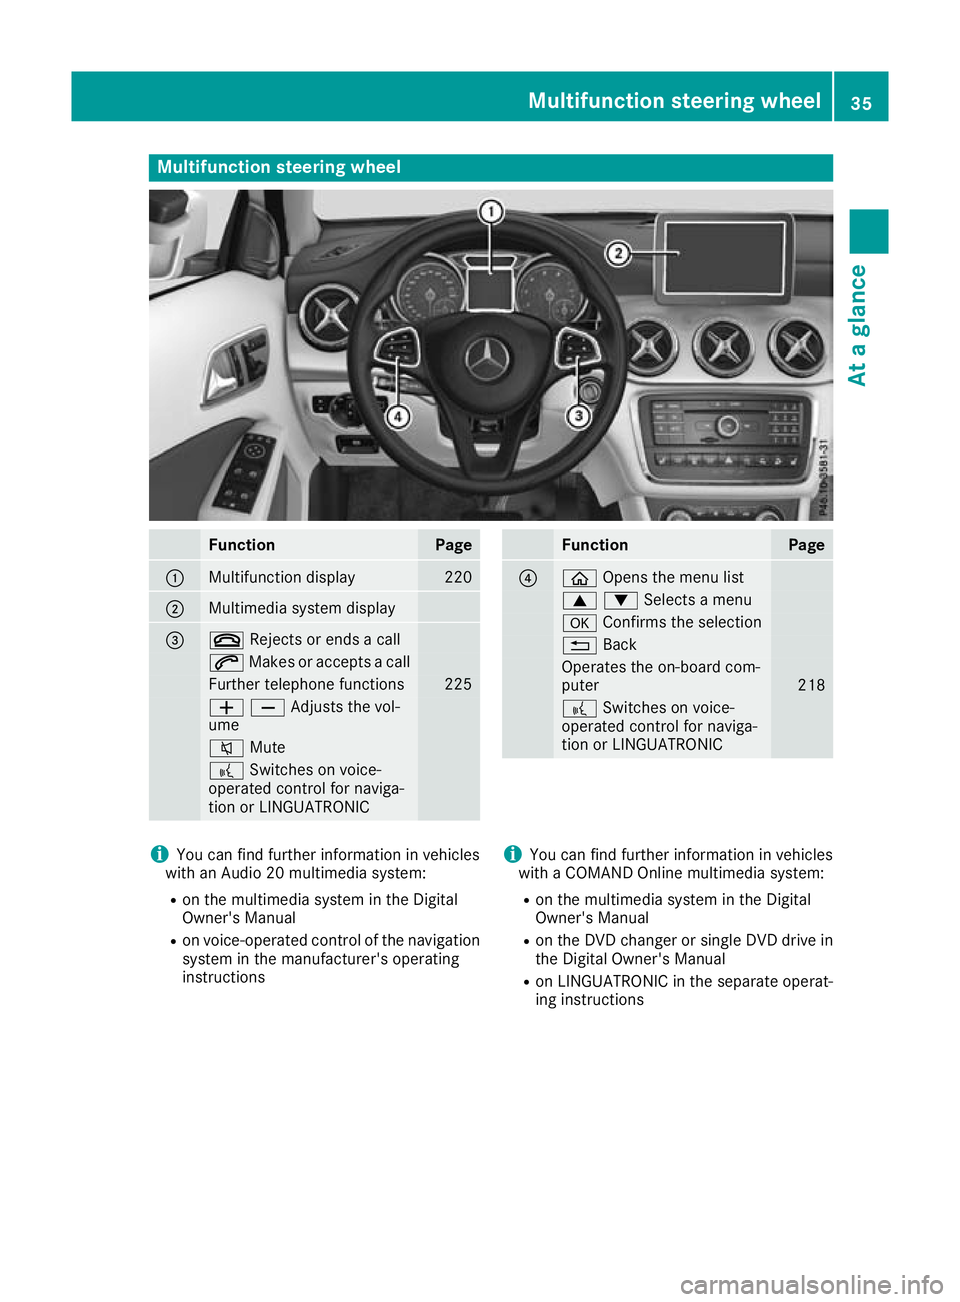
Multifunction steering wheel
Function Page
:
Multifunction display 220
;
Multimedia system display
=
~
Rejects or ends a call 6
Makes or accepts a call Further telephone functions 225
WXAdjusts the vol-
ume 8
Mute ?
Switches on voice-
operated control for naviga-
tion or LINGUATRONIC Function Page
?
ò
Opens the menu list 9:Selects a menu
a
Confirms the selection %
Back Operates the on-board com-
puter
218
?
Switches on voice-
operated control for naviga-
tion or LINGUATRONIC i
You can find further information in vehicles
with an Audio 20 multimedia system:
R on the multimedia system in the Digital
Owner's Manual
R on voice-operated control of the navigation
system in the manufacturer's operating
instructions i
You can find further information in vehicles
with a COMAND Online multimedia system:
R on the multimedia system in the Digital
Owner's Manual
R on the DVD changer or single DVD drive in
the Digital Owner's Manual
R on LINGUATRONIC in the separate operat-
ing instructions Multifunction steering wheel
35At a glance
Page 117 of 369
If you come into contact with the electrolyte,
observe the following:
R Rinse off the electrolyte from your skin
immediately with water.
R Immediately rinse the electrolyte out of
your eyes thoroughly with clean water.
R If the electrolyte is swallowed, immediately
rinse your mouth out thoroughly. Do not
induce vomiting.
R If electrolyte comes into contact with your
skin or hair or is swallowed, seek medical
attention immediately.
R Immediately change out of clothing which
has come into contact with electrolyte.
R If an allergic reaction occurs, seek medical
attention immediately.
The "Automatic anti-dazzle mirrors" function is
only available if the vehicle is equipped with the
"Mirror package".
The rear-view mirror and the exterior mirror on
the driver's side automatically go into anti-daz-
zle mode if:
R the ignition is switched on and
R incident light from headlamps strikes the sen-
sor in the rear-view mirror
The mirrors do not go into anti-dazzle mode if
reverse gear is engaged or if the interior lighting
is switched on. Parking position of the exterior mirror
on the front-passenger side
Setting and storing the parking position You can adjust the front-passenger-side exterior
mirror such that you can see the rear wheel on
that side as soon as you engage reverse gear.
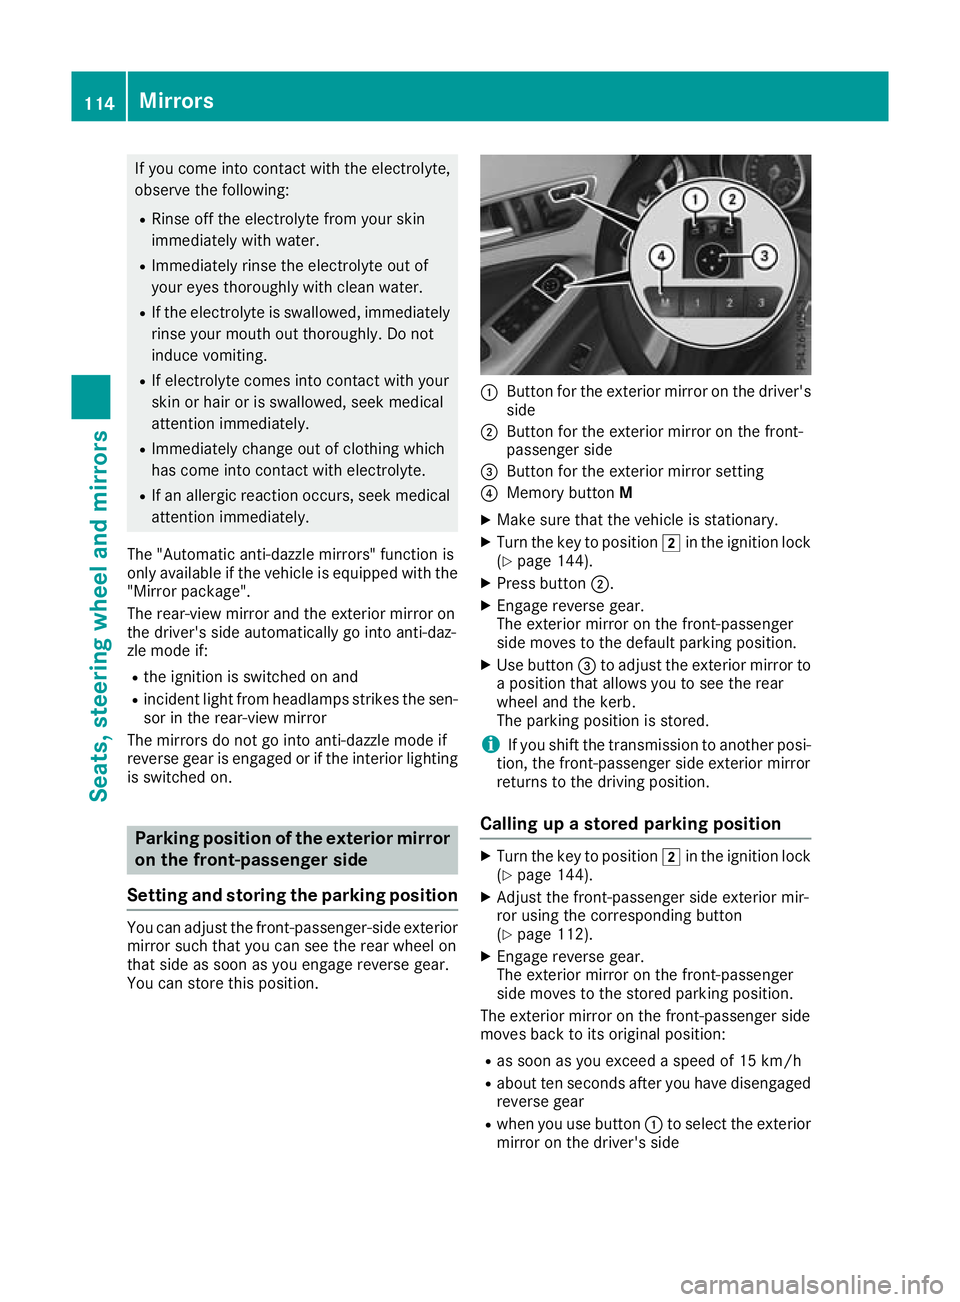
You can store this position. :
Button for the exterior mirror on the driver's
side
; Button for the exterior mirror on the front-
passenger side
= Button for the exterior mirror setting
? Memory button M
X Make sure that the vehicle is stationary.
X Turn the key to position 2in the ignition lock
(Y page 144).
X Press button ;.
X Engage reverse gear.
The exterior mirror on the front-passenger
side moves to the default parking position.
X Use button =to adjust the exterior mirror to
a position that allows you to see the rear
wheel and the kerb.
The parking position is stored.
i If you shift the transmission to another posi-
tion, the front-passenger side exterior mirror
returns to the driving position.
Calling up a stored parking position X
Turn the key to position 2in the ignition lock
(Y page 144).
X Adjust the front-passenger side exterior mir-
ror using the corresponding button
(Y page 112).
X Engage reverse gear.
The exterior mirror on the front-passenger
side moves to the stored parking position.
The exterior mirror on the front-passenger side
moves back to its original position:
R as soon as you exceed a speed of 15 km/h
R about ten seconds after you have disengaged
reverse gear
R when you use button :to select the exterior
mirror on the driver's side 114
MirrorsSeats, steering wheel and mirrors
Page 124 of 369
Protect bulbs from moisture during operation.
Do not allow bulbs to come into contact with
liquids.
Replace only the bulbs listed (Y page 121).
Have the bulbs that you cannot change yourself replaced at a qualified specialist workshop.
If you require assistance replacing bulbs, con-
sult a qualified specialist workshop.
If the new bulb still does not light up, consult a
qualified specialist workshop.
Headlamps and lights are an important aspect of
vehicle safety. You must therefore make sure
that these function correctly at all times. Have
the headlamp setting verified regularly.
Vehicles with LED headlamps: the front and
rear lamp clusters of your vehicle are equipped
with LED bulbs. Do not replace the bulbs your-
self. Contact a qualified specialist workshop
with the necessary specialist knowledge and
tools to carry out the work required. Overview of bulb types
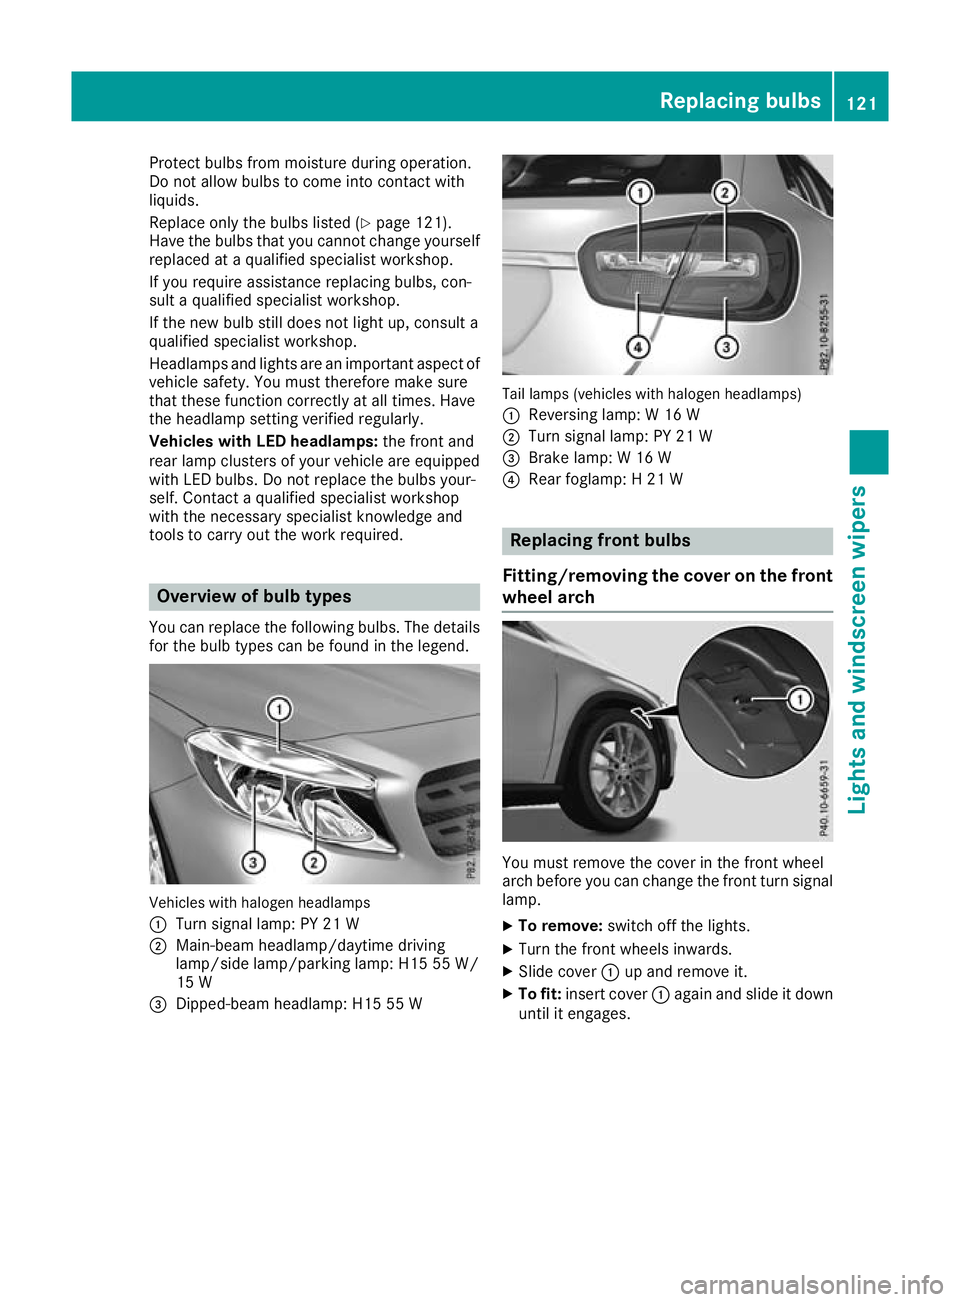
You can replace the following bulbs. The details for the bulb types can be found in the legend. Vehicles with halogen headlamps
:
Turn signal lamp: PY 21 W
; Main-beam headlamp/daytime driving
lamp/side lamp/parking lamp: H15 55 W/
15 W
= Dipped-beam headlamp: H15 55 W Tail lamps (vehicles with halogen headlamps)
: Reversing lamp: W 16 W
; Turn signal lamp: PY 21 W
= Brake lamp: W 16 W
? Rear foglamp: H 21 W Replacing front bulbs
Fitting/removing the cover on the front wheel arch You must remove the cover in the front wheel
arch before you can change the front turn signal
lamp.
X To remove: switch off the lights.
X Turn the front wheels inwards.
X Slide cover :up and remove it.
X To fit: insert cover :again and slide it down
until it engages. Replacing bulbs
121Lights and windscreen wipers Z
Page 150 of 369
position
Dor R, the vehicle may accelerate
suddenly. There is a risk of an accident.
When engaging transmission position Dor R,
always keep the brake pedal firmly depressed
and do not depress the accelerator pedal at
the same time.
! Vehicles with manual transmission:
change gear in good time and avoid spinning
the wheels. You could otherwise damage the
vehicle.
Depress the accelerator carefully when pulling
away.
The vehicle automatically locks centrally once
you have pulled away. The locking knobs in the
doors drop down.
You can open the doors from the inside at any
time.
You can also deactivate the automatic locking
feature (Y page 229).
Vehicles with automatic transmission: it is
possible to shift the transmission from position j to the desired position only if you depress
the brake pedal. Only then can the parking lock be deactivated.
All vehicles (except Mercedes-AMG vehi-
cles): if you do not depress the brake pedal, the
DIRECT SELECT lever can still be moved but the
parking lock remains engaged.
Mercedes-AMG vehicles: if you do not depress
the brake pedal, the selector lever can still be
moved but the parking lock remains engaged.
Vehicles with automatic transmission: at
transmission fluid temperatures below Ò20 †
you can only shift out of position jinto another
transmission position when the engine is run-
ning.
i Vehicles with automatic transmission:
upshifts take place at higher engine speeds
after a cold start. This helps the catalytic con- verter to reach its operating temperature
more quickly.
Vehicles with automatic transmission: infor-
mation on automatically releasing the electric
parking brake (Y page 168). Pulling away with a trailer
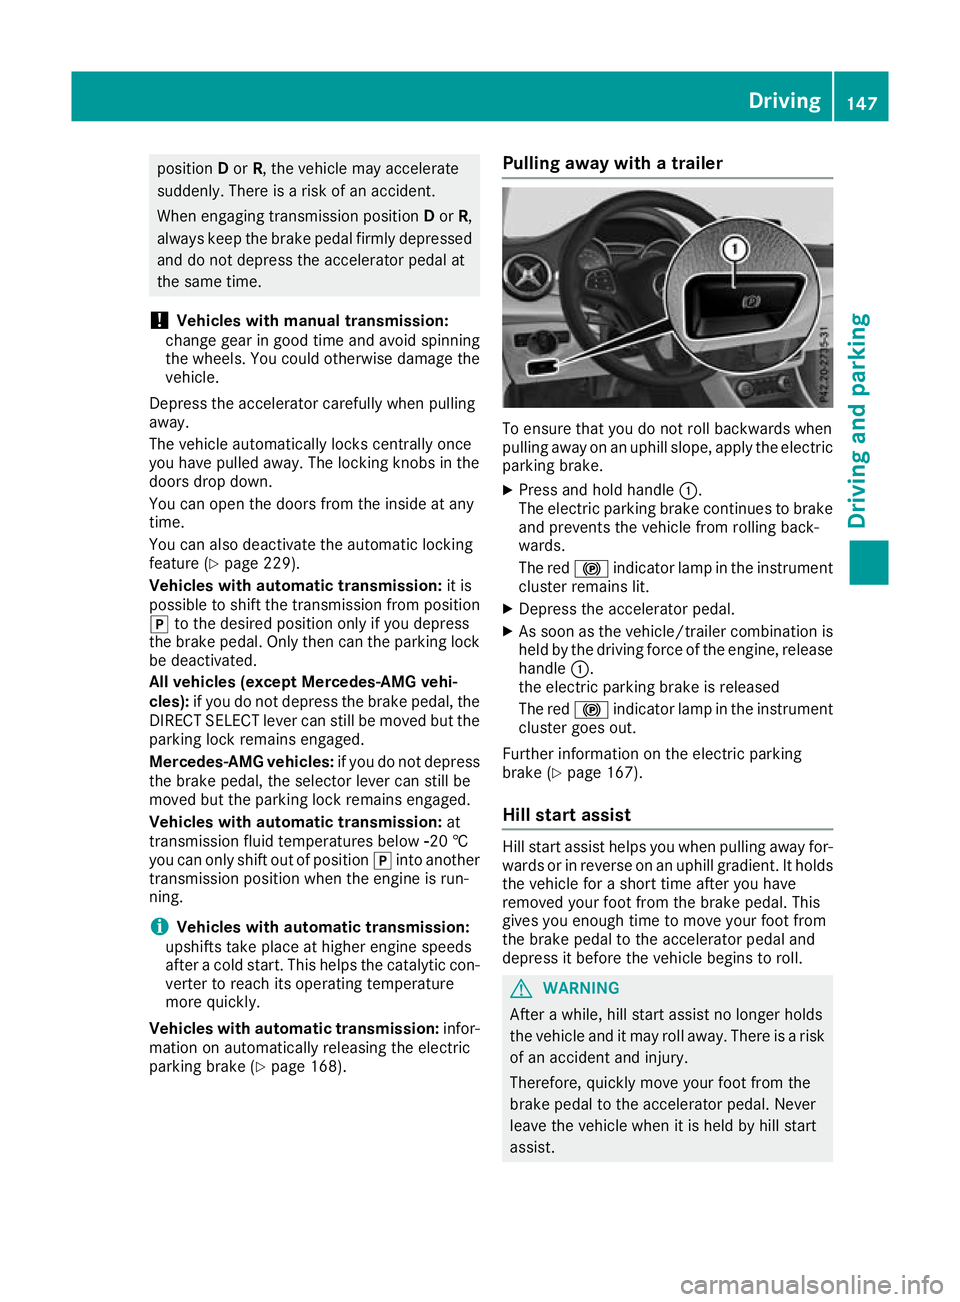
To ensure that you do not roll backwards when
pulling away on an uphill slope, apply the electric
parking brake.
X Press and hold handle :.
The electric parking brake continues to brake
and prevents the vehicle from rolling back-
wards.
The red !indicator lamp in the instrument
cluster remains lit.
X Depress the accelerator pedal.
X As soon as the vehicle/trailer combination is
held by the driving force of the engine, release
handle :.
the electric parking brake is released
The red !indicator lamp in the instrument
cluster goes out.
Further information on the electric parking
brake (Y page 167).
Hill start assist Hill start assist helps you when pulling away for-
wards or in reverse on an uphill gradient. It holds the vehicle for a short time after you have
removed your foot from the brake pedal. This
gives you enough time to move your foot from
the brake pedal to the accelerator pedal and
depress it before the vehicle begins to roll. G
WARNING
After a while, hill start assist no longer holds
the vehicle and it may roll away. There is a risk of an accident and injury.
Therefore, quickly move your foot from the
brake pedal to the accelerator pedal. Never
leave the vehicle when it is held by hill start
assist. Driving
147Driving and parking Z
Page 155 of 369
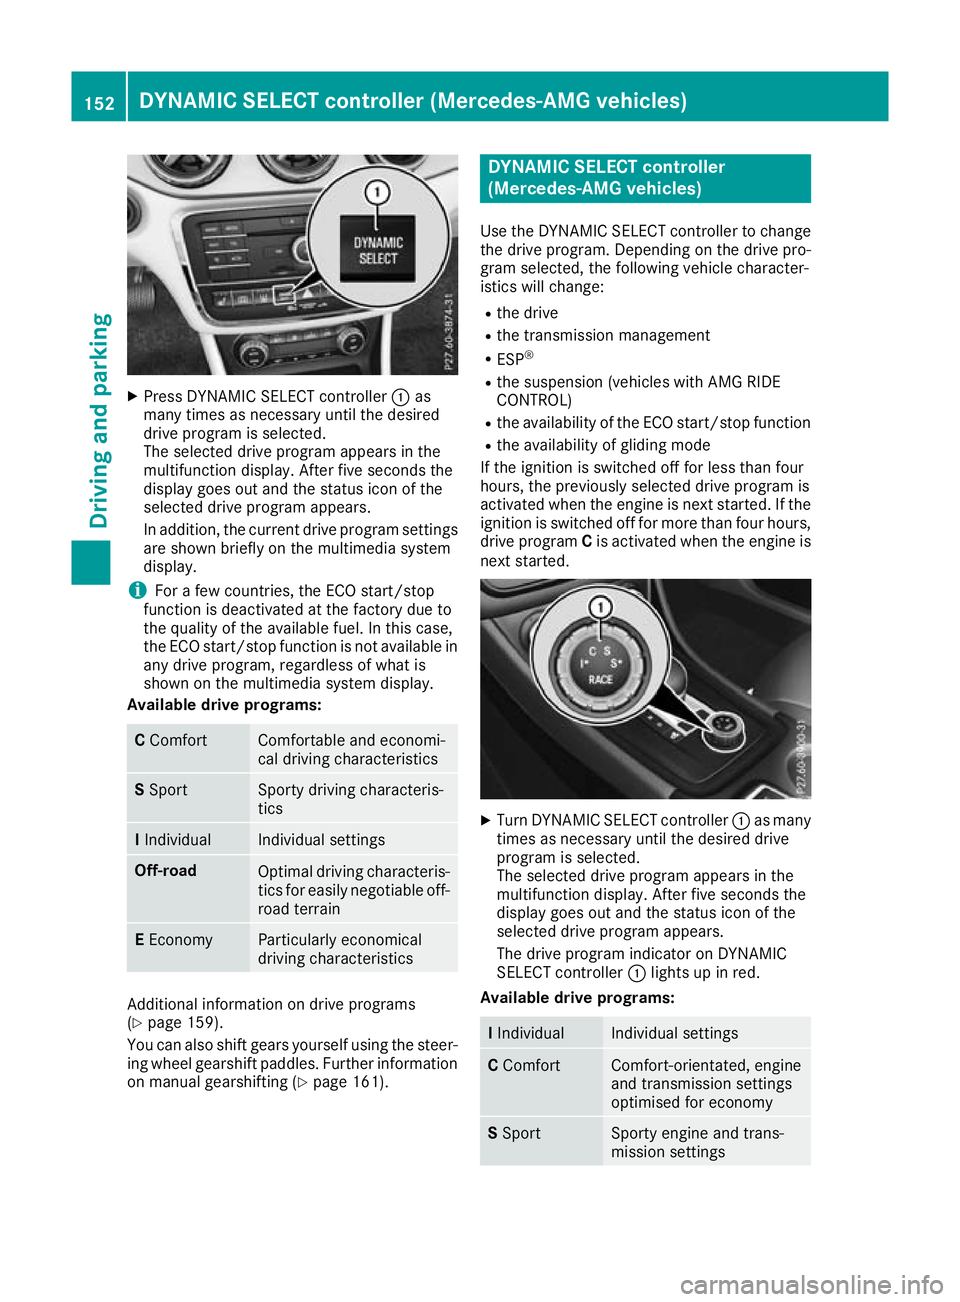
X
Press DYNAMIC SELECT controller :as
many times as necessary until the desired
drive program is selected.
The selected drive program appears in the
multifunction display. After five seconds the
display goes out and the status icon of the
selected drive program appears.
In addition, the current drive program settings are shown briefly on the multimedia system
display.
i For a few countries, the ECO start/stop
function is deactivated at the factory due to
the quality of the available fuel. In this case,
the ECO start/stop function is not available in
any drive program, regardless of what is
shown on the multimedia system display.
Available drive programs: C
Comfort Comfortable and economi-
cal driving characteristics
S
Sport Sporty driving characteris-
tics
I
Individual Individual settings
Off-road
Optimal driving characteris-
tics for easily negotiable off-
road terrain E
Economy Particularly economical
driving characteristics
Additional information on drive programs
(Y page 159).
You can also shift gears yourself using the steer- ing wheel gearshift paddles. Further information
on manual gearshifting (Y page 161). DYNAMIC SELECT controller
(Mercedes-AMG vehicles)
Use the DYNAMIC SELECT controller to change the drive program. Depending on the drive pro-
gram selected, the following vehicle character-
istics will change:
R the drive
R the transmission management
R ESP ®
R the suspension (vehicles with AMG RIDE
CONTROL)
R the availability of the ECO start/stop function
R the availability of gliding mode
If the ignition is switched off for less than four
hours, the previously selected drive program is
activated when the engine is next started. If the
ignition is switched off for more than four hours, drive program Cis activated when the engine is
next started. X
Turn DYNAMIC SELECT controller :as many
times as necessary until the desired drive
program is selected.
The selected drive program appears in the
multifunction display. After five seconds the
display goes out and the status icon of the
selected drive program appears.
The drive program indicator on DYNAMIC
SELECT controller :lights up in red.
Available drive programs: I
Individual Individual settings
C
Comfort Comfort-orientated, engine
and transmission settings
optimised for economy S
Sport Sporty engine and trans-
mission settings152
DYNAMIC SELECT controller (Mercedes-AMG vehicles)Driving and parking
Page 156 of 369
S+
Sport Plus Particularly sporty trans-
mission settings
RACE
Maximum sportiness and
engine and transmission
settings suitable for the
racetrack Additional information on drive programs
(Y
page 159).
You can also change gear yourself using the
steering wheel gearshift paddles. Further infor-
mation on manual gearshifting (Y page 161).Manual transmission
Gear lever
! Only engage gear when the clutch pedal is
depressed.
! When shifting to
5thand 6thgear, you must
press the shift lever to the right. Otherwise,
you could shift unintentionally into 3rdor4th
gear and damage the engine or transmission.
If you shift down at too high a speed (trans-
mission braking), this can cause the engine to
overrev, leading to engine damage.
Do not use the clutch bite point to keep the
vehicle stationary on uphill gradients. There is otherwise a risk of damaging the clutch.
! On long and steep downhill gradients, espe-
cially if the vehicle is laden or towing a trailer,
you must select gear 1,2or3 in good
time. By doing so, you will make use of the
braking effect of the engine. This relieves the
load on the brake system and prevents the
brakes from overheating and wearing too
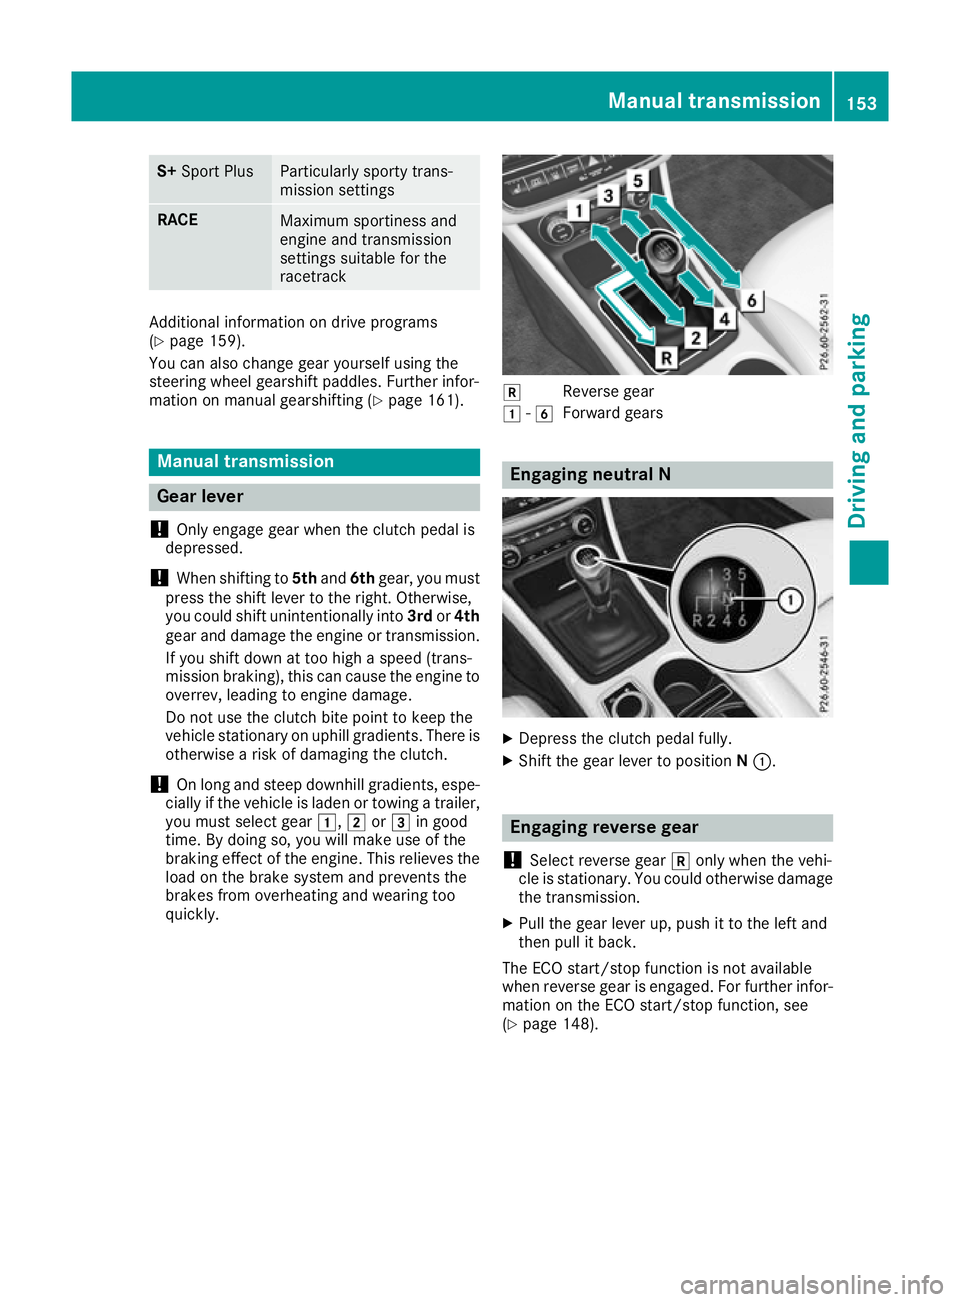
quickly. k
Reverse gear
1 -6
Forward gears Engaging neutral N
X
Depress the clutch pedal fully.
X Shift the gear lever to position N:. Engaging reverse gear
! Select reverse gear
konly when the vehi-
cle is stationary. You could otherwise damage the transmission.
X Pull the gear lever up, push it to the left and
then pull it back.
The ECO start/stop function is not available
when reverse gear is engaged. For further infor-
mation on the ECO start/stop function, see
(Y page 148). Manual transmission
153Driving and parking Z