2017 MERCEDES-BENZ GLA SUV transmission oil
[x] Cancel search: transmission oilPage 234 of 369
X
Press the :or9 button to set the
selected display.
X Press the abutton to store the entry.
The yellow indicator lamp on the auxiliary
heating button lights up.
Comfort Switching belt adjustment on/off
X Press the =or; button on the steering
wheel to select the Settings Settingsmenu.
X Press the :or9 button to select the
Convenience
Convenience submenu.
X Press ato confirm.
X Press the :or9 button to select the
Belt adjustment
Belt adjustment function.
When the Belt adjustment
Belt adjustment function is acti-
vated, the seat belt is displayed in orange in
the multifunction display.
X Press the abutton to save the setting.
Further information on belt adjustment
(Y page 45).
Switching the fold mirrors in when lock-
ing function on/off This function is only available when the vehicle is
equipped with the electrical fold-in function.
When you activate the Auto. fold-in mir‐
Auto. fold-in mir‐
rors
rors function, the exterior mirrors are folded in
when the vehicle is locked. When you unlock the vehicle and then open the driver's or front-
passenger door, the exterior mirrors fold out
again.
If you have switched on the Auto. fold-in
Auto. fold-in
mirrors
mirrors function and you fold in the exterior
mirrors using the button on the door
(Y page 113), they will not fold out automati-
cally. The exterior mirrors can then only be fol-
ded out using the button on the door.
X Press the =or; button on the steering
wheel to select the Settings
Settings menu.
X Press the :or9 button to select the
Convenience Convenience submenu.
X Press ato confirm.
X Press the :or9 button to select the
Auto. fold-in mirrors
Auto. fold-in mirrors function.
If the Auto. fold-in mirrors
Auto. fold-in mirrors function is
switched on, the multifunction display shows the exterior mirror in orange.
X Press ato save the setting. Resetting to factory settings X
Press the =or; button on the steering
wheel to select the Settings
Settingsmenu.
X Press the :or9 button to select the
Factory setting
Factory setting submenu.
X Press ato confirm.
The Reset all settings?
Reset all settings? function
appears.
X Press the :or9 button to select No
Noor
Yes
Yes.
X Press the abutton to confirm the selec-
tion.
If you have selected Yes Yes, the multifunction
display shows a confirmation message.
For safety reasons, not all functions are reset:
the Limit Limit speed
speed(winter
(winter tyres)
tyres)function of
the permanent speed limiter can only be set in
the Vehicle
Vehicle submenu.
If you want to reset the Daytime driving Daytime driving
lights
lights function in the Lights
Lightssubmenu, you
must turn the key to position 1in the ignition
lock. AMG menu (Mercedes-AMG vehicles)
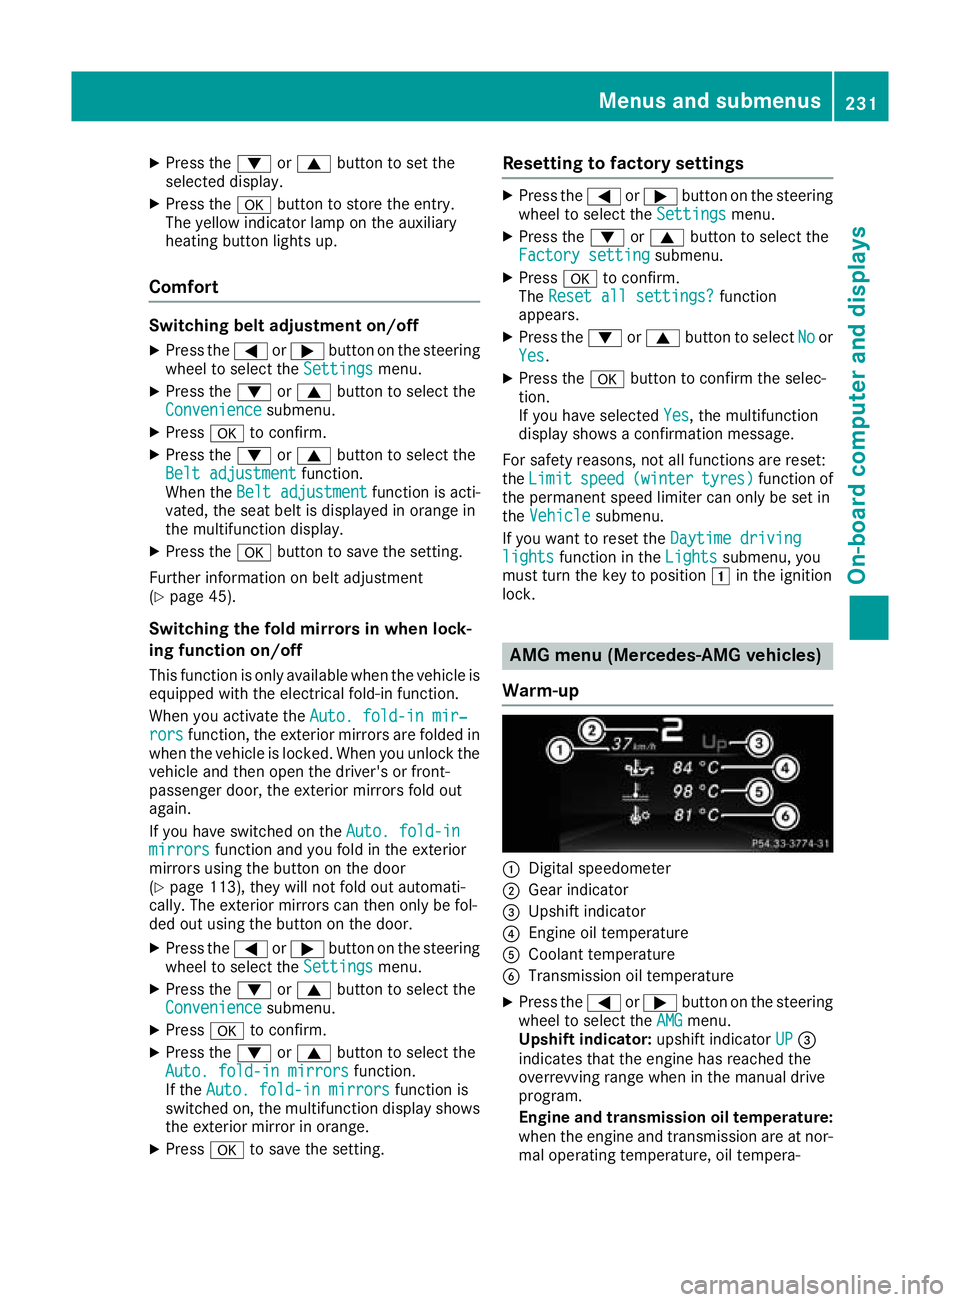
Warm-up :
Digital speedometer
; Gear indicator
= Upshift indicator
? Engine oil temperature
A Coolant temperature
B Transmission oil temperature
X Press the =or; button on the steering
wheel to select the AMG AMGmenu.
Upshift indicator: upshift indicatorUP UP=
indicates that the engine has reached the
overrevving range when in the manual drive
program.
Engine and transmission oil temperature: when the engine and transmission are at nor-
mal operating temperature, oil tempera- Menus and submenus
231On-board computer and displays Z
Page 235 of 369
ture
?and Bare displayed in white in the
multifunction display.
If the multifunction display shows oil temper- ature ?orB in blue, the engine or the
transmission are not yet at normal operating
temperature. Avoid using the full output of the engine during this time.
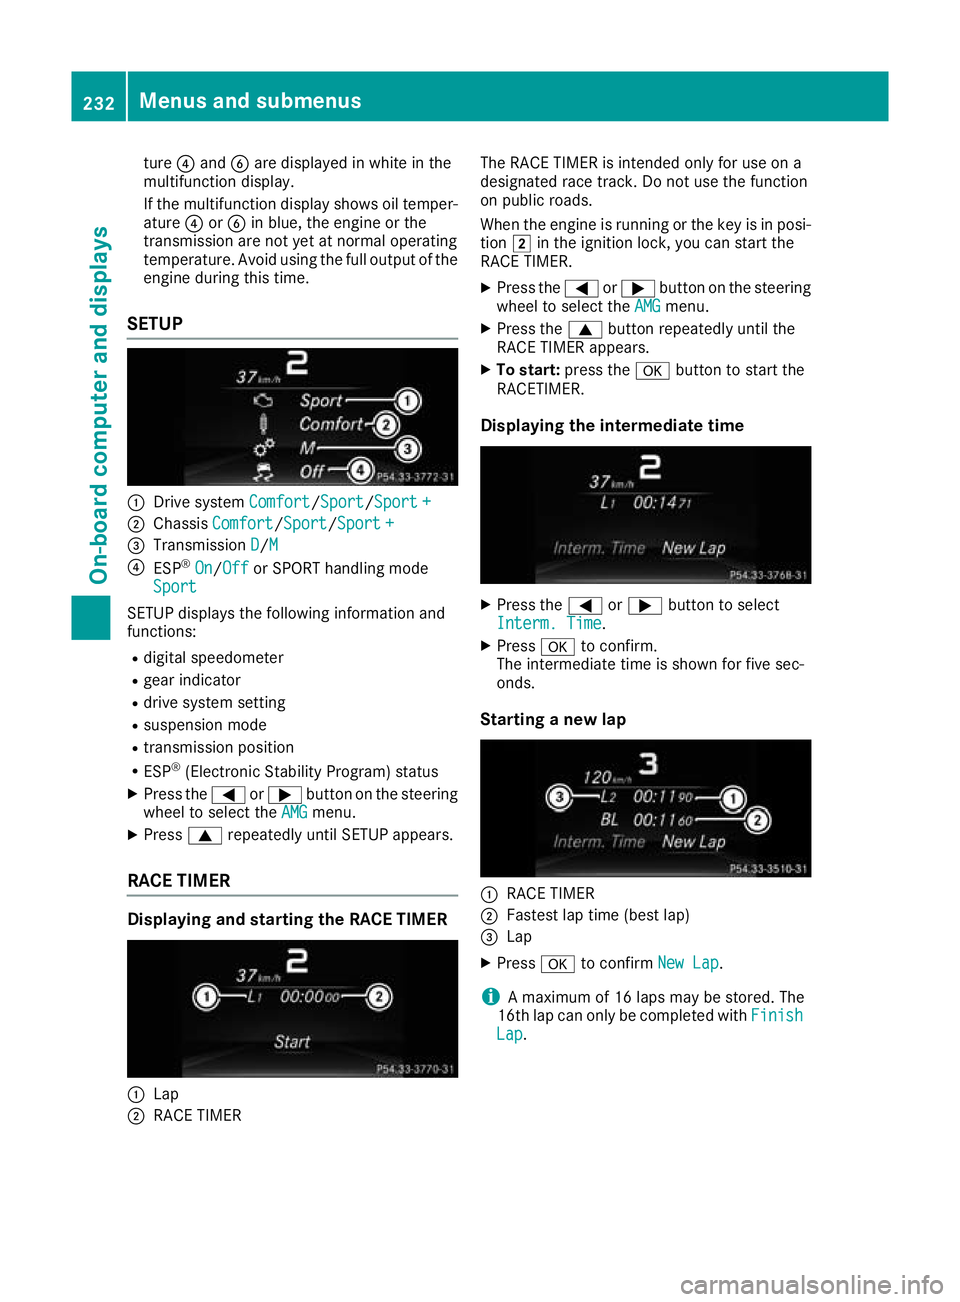
SETUP :
Drive system Comfort Comfort/Sport
Sport/Sport +
Sport +
; Chassis Comfort
Comfort/Sport Sport/Sport +
Sport +
= Transmission D
D/MM
? ESP ®
On
On/ Off
Off or SPORT handling mode
Sport
Sport
SETUP displays the following information and
functions:
R digital speedometer
R gear indicator
R drive system setting
R suspension mode
R transmission position
R ESP ®
(Electronic Stability Program) status
X Press the =or; button on the steering
wheel to select the AMG
AMG menu.
X Press 9repeatedly until SETUP appears.
RACE TIMER Displaying and starting the RACE TIMER
:
Lap
; RACE TIMER The RACE TIMER is intended only for use on a
designated race track. Do not use the function
on public roads.
When the engine is running or the key is in posi- tion 2in the ignition lock, you can start the
RACE TIMER.
X Press the =or; button on the steering
wheel to select the AMG AMGmenu.
X Press the 9button repeatedly until the
RACE TIMER appears.
X To start: press the abutton to start the
RACETIMER.
Displaying the intermediate time X
Press the =or; button to select
Interm. Time Interm. Time.
X Press ato confirm.
The intermediate time is shown for five sec-
onds.
Starting a new lap :
RACE TIMER
; Fastest lap time (best lap)
= Lap
X Press ato confirm New Lap
New Lap.
i A maximum of 16 laps may be stored. The
16th lap can only be completed with Finish
Finish
Lap
Lap . 232
Menus and submenusOn-board computer and displays
Page 264 of 369
Display messages
Possible causes/consequences and
M
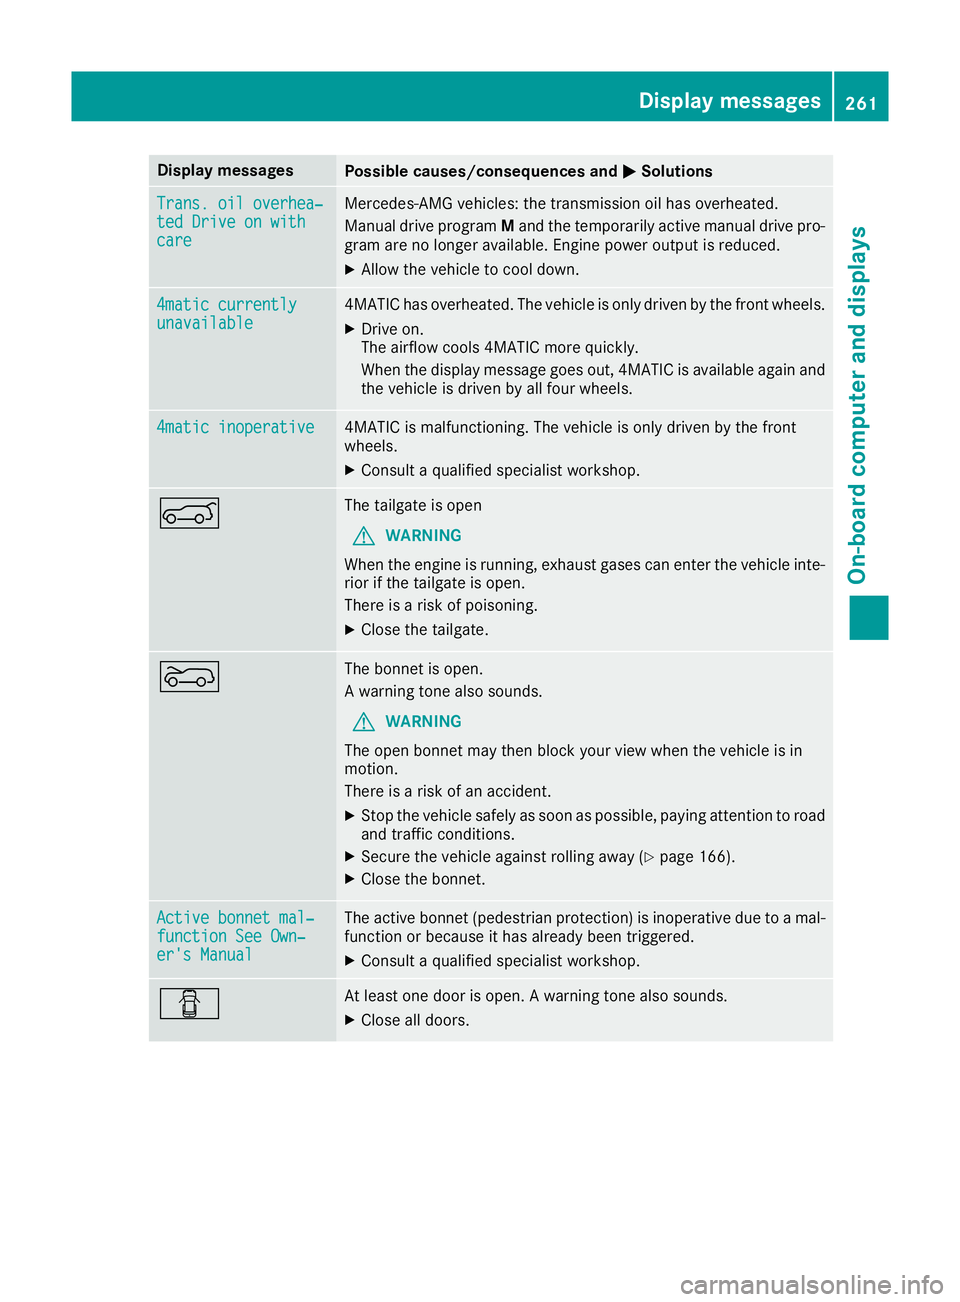
MSolutions Trans. oil overhea‐
Trans. oil overhea‐
ted Drive on with ted Drive on with
care care Mercedes-AMG vehicles: the transmission oil has overheated.
Manual drive program Mand the temporarily active manual drive pro-
gram are no longer available. Engine power output is reduced.
X Allow the vehicle to cool down. 4matic currently
4matic currently
unavailable unavailable 4MATIC has overheated. The vehicle is only driven by the front wheels.
X Drive on.
The airflow cools 4MATIC more quickly.
When the display message goes out, 4MATIC is available again and
the vehicle is driven by all four wheels. 4matic inoperative 4matic inoperative 4MATIC is malfunctioning. The vehicle is only driven by the front
wheels.
X Consult a qualified specialist workshop. A The tailgate is open
G WARNING
When the engine is running, exhaust gases can enter the vehicle inte- rior if the tailgate is open.
There is a risk of poisoning.
X Close the tailgate. ? The bonnet is open.
A warning tone also sounds.
G WARNING
The open bonnet may then block your view when the vehicle is in
motion.
There is a risk of an accident.
X Stop the vehicle safely as soon as possible, paying attention to road
and traffic conditions.
X Secure the vehicle against rolling away (Y page 166).
X Close the bonnet. Active bonnet mal‐ Active bonnet mal‐
function See Own‐ function See Own‐
er's Manual er's Manual The active bonnet (pedestrian protection) is inoperative due to a mal-
function or because it has already been triggered.
X Consult a qualified specialist workshop. C At least one door is open. A warning tone also sounds.
X Close all doors. Display
messages
261On-board computer and displays Z
Page 346 of 369
the wheels or tyres have different dimensions.
The wheel brakes or suspension components may also be damaged. There is a risk of acci-
dent.
Interchange front and rear wheels only if the
wheels and tyres are of the same dimensions.
! On vehicles fitted with a tyre pressure mon-
itor, electronic components are located in the wheel.
Tyre-fitting tools should not be applied in thearea of the valve, as this could damage the
electronic components.
Only have tyres changed at a qualified spe-
cialist workshop.
Interchanging the front and rear wheels of dif-
fering dimensions can render the general oper-
ating permit invalid.
Observe the instructions and safety notes in the "Changing a wheel" section (Y page 342).
The wear patterns on the front and rear tyres
differ depending on the operating conditions.
Interchange the wheels before a clear wear pat-
tern has formed on the tyres. Front tyres typi-
cally wear more on the shoulders, while rear
tyres wear more in the centre.
On vehicles that have front and rear wheels of
the same size, you can interchange the wheels
every 5,000 to 10,000 km depending on the
degree of tyre wear. Ensure the direction of
rotation is maintained.
Clean the contact surfaces of the wheel and the
brake disc thoroughly every time a wheel is
interchanged. Check the tyre pressure and, if
necessary, restart the tyre pressure loss warn-
ing system or the tyre pressure monitor. Direction of rotation
Tyres with a specified direction of rotation have additional benefits, e.g. if there is a risk of aqua-
planing. These advantages can only be gained if the tyres are fitted corresponding to the direc-
tion of rotation.
An arrow on the sidewall of the tyre indicates its correct direction of rotation. Storing wheels
Store wheels in a cool, dry and preferably dark
place if they are not being used. Protect the
tyres against oil, grease, petrol and diesel. Fitting a wheel
Preparing the vehicle X
Stop the vehicle on solid, non-slippery and
level ground.
X Apply the electric parking brake manually.
X Move the front wheels to the straight-ahead
position.
X Vehicles with manual transmission: fully
depress the clutch pedal and engage first or
reverse gear.
X Vehicles with automatic transmission:
shift the transmission to position
j.
X Switch off the engine.
X Vehicles without KEYLESS-GO: remove the
key from the ignition lock.
X Vehicles with KEYLESS-GO start-function
or KEYLESS-GO: open the driver's door.
The vehicle electronics are now in position
u. This is the same as “key removed”.
X Vehicles with KEYLESS-GO start function
or KEYLESS-GO: remove the Start/Stop but-
ton from the ignition lock (Y page 144).
X If included in the vehicle equipment, remove
the tyre-change tool kit from the vehicle.
X Additionally secure the vehicle against rolling
away (Y page 166).
i Apart from some country-specific variants,
vehicles are not equipped with a tyre-change
tool kit. Some tools for changing a wheel are
specific to the vehicle. For more information
on which tools are required to perform a
wheel change on your vehicle, consult a quali-
fied specialist workshop.
Necessary tyre-changing tools may include,
for example:
R Jack
R Wheel chock
R Wheel wrench Changing a
wheel
343Wheels an d tyres Z
Page 355 of 369
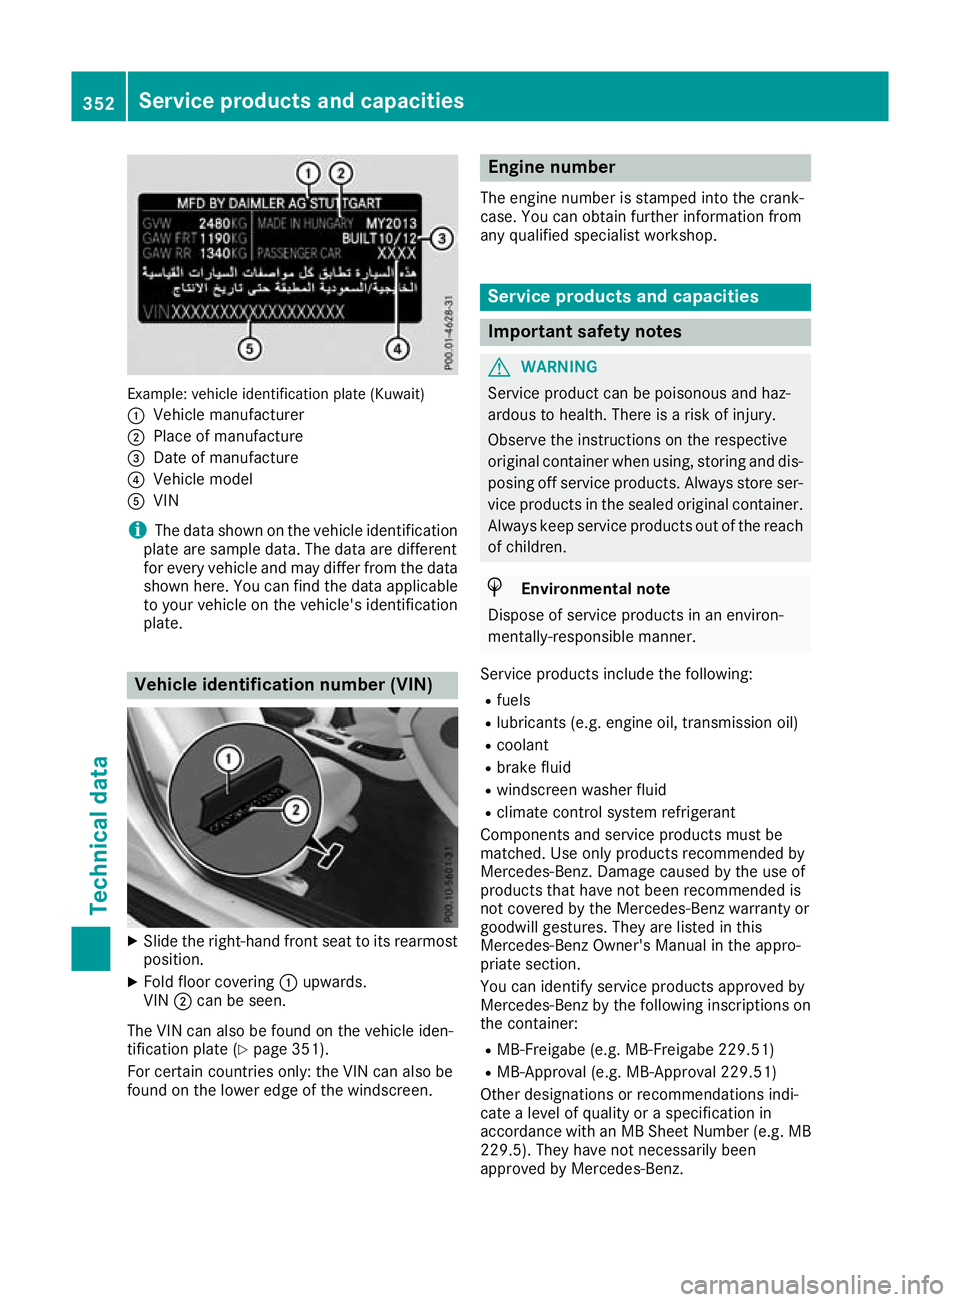
Example: vehicle identification plate (Kuwait)
: Vehicle manufacturer
; Place of manufacture
= Date of manufacture
? Vehicle model
A VIN
i The data shown on the vehicle identification
plate are sample data. The data are different
for every vehicle and may differ from the data shown here. You can find the data applicable
to your vehicle on the vehicle's identification
plate. Vehicle identification number (VIN)
X
Slide the right-hand front seat to its rearmost
position.
X Fold floor covering :upwards.
VIN ;can be seen.
The VIN can also be found on the vehicle iden-
tification plate (Y page 351).
For certain countries only: the VIN can also be
found on the lower edge of the windscreen. Engine number
The engine number is stamped into the crank-
case. You can obtain further information from
any qualified specialist workshop. Service products and capacities
Important safety notes
G
WARNING
Service product can be poisonous and haz-
ardous to health. There is a risk of injury.
Observe the instructions on the respective
original container when using, storing and dis- posing off service products. Always store ser-
vice products in the sealed original container. Always keep service products out of the reach
of children. H
Environmental note
Dispose of service products in an environ-
mentally-responsible manner.
Service products include the following:
R fuels
R lubricants (e.g. engine oil, transmission oil)
R coolant
R brake fluid
R windscreen washer fluid
R climate control system refrigerant
Components and service products must be
matched. Use only products recommended by
Mercedes-Benz. Damage caused by the use of
products that have not been recommended is
not covered by the Mercedes-Benz warranty or
goodwill gestures. They are listed in this
Mercedes-Benz Owner's Manual in the appro-
priate section.
You can identify service products approved by
Mercedes-Benz by the following inscriptions on the container:
R MB-Freigabe (e.g. MB-Freigabe 229.51)
R MB-Approval (e.g. MB-Approval 229.51)
Other designations or recommendations indi-
cate a level of quality or a specification in
accordance with an MB Sheet Number (e.g. MB 229.5). They have not necessarily been
approved by Mercedes-Benz. 352
Service products and capacitiesTechnical data