2017 MERCEDES-BENZ GLA SUV towing
[x] Cancel search: towingPage 25 of 369
Traction system
see ETS/4ETS (Electronic Trac-
tion System)
Traffic Sign Assist
Activating ....................................... 208
Activating/deactivating the warn-ing function .................................... 226
Display message ............................ 254
Function/note s............................. 207
Important safety notes .................. 208
Instrument cluster display ............. 208
Trailer
Folding the ball coupling in/out ..... 214
Trailer coupling
see Towing a trailer
Trailer towing
7-pin connecto r............................. 216
Blind Spot Assist ............................ 210
Cleaning the trailer tow hitch ......... 312
Coupling up a traile r...................... 215
Decoupling a traile r....................... 215
Driving tips .................................... 213
Folding in the ball coupling ............ 215
Folding out the ball coupling .......... 214
Important safety notes .................. 212
Lights display message .................. 246
Power supply ................................. 215
Trailer load s................................... 359
Transmission
see Automatic transmission
see Manual transmission
Transmission position display
(DIRECT SELECT lever) ...................... 155
Transporting the vehicle .................. 330
Travelling uphill
Brow of hill ..................................... 175
Driving downhill ............................. 176
Maximum gradient-climbing capa-
bility ............................................... 175
Trim pieces (cleaning instruc-
tions) .................................................. 313
Trip computer (on-board com-
puter) .................................................. 221
Trip meter
Calling up ....................................... 221
Resetting (on-board computer) ...... 222
Turn signal lamp
Replacing bulbs (rear) .................... 123 Turn signals
Replacing bulbs (front) ................... 122
Switching on/of f........................... 118
TV
Operating (on-board computer) ..... 224
see Separate operating instructions
Two-way radio
Frequencies ................................... 350
Installation ..................................... 350
Transmission output (maximum) .... 350
Type identification plate
see Vehicle identification plate
Tyre inflation compressor
see TIREFIT kit
Tyre pressure
Calling up (on-board computer) ..... 340
Display message ............................ 256
Not reached (TIREFIT) .................... 321
Reached (TIREFIT) .......................... 321
Recommended ............................... 337
Tyre pressure loss warning
General notes ................................ 339
Important safety notes .................. 339
Restarting ...................................... 339
Tyre pressure monitor
Checking the tyre pressure elec-
tronically ........................................ 340
Function/note s............................. 340
General notes ................................ 340
Important safety notes .................. 340
Radio type approval for the tyre
pressure monitor ........................... 342
Restarting ...................................... 341
Warning lamp ................................. 276
Warning message .......................... 341
Tyres
Changing a whee l.......................... 342
Checking ........................................ 334
Direction of rotation ...................... 343
Display message ............................ 256
General notes ................................ 347
Important safety notes .................. 334
Information on driving .................... 334
M+S tyres ...................................... 336
MOExtended tyre s......................... 336
Replacing ....................................... 342
Service life ..................................... 335
Storing ........................................... 343 22
Index
Page 60 of 369
Child restraint system
If you fit a rearward-facing child restraint system
to the centre rear seat, the rear armrest must be folded back as far as possible.
Observe the instructions for correct use of the
child restraint system (Y page 61).
For safety reasons, Mercedes-Benz recom-
mends that you use only a child restraint system recommended by Mercedes-Benz
(Y page 65). G
WARNING
If the child restraint system is incorrectly fit-
ted on the seat position suitable for this pur-
pose, it cannot perform its intended protec-
tive function. In the event of an accident,
sharp braking or a sudden change in direction, the child may not be held securely. There is an
increased risk of serious or even fatal injuries.
Observe the manufacturer's installation
instructions and the correct use for the child
restraint system. Make sure that the entire
surface of the child restraint system is resting
on the seat surface. Never place objects
under or behind the child restraint system,
e.g. cushions. Only use child restraint sys-
tems with the original cover designed for
them. Only replace damaged covers with gen- uine covers. G
WARNING
If the child restraint system is fitted incor-
rectly or is not secured, it can come loose in
the event of an accident, heavy braking or a
sudden change in direction. The child
restraint system could be thrown about, strik- ing vehicle occupants. There is an increased
risk of injury, possibly even fatal.
Always fit child restraint systems properly,
even if they are not being used. Make sure
that you observe the child restraint system
manufacturer's installation instructions.
You will find further information on stowing
objects, luggage and loads securely under
"Loading guidelines" (Y page 288). G
WARNING
Child restraint systems or their securing sys-
tems that have been damaged or subjected to a load in an accident cannot perform their
intended protective function. In the event of
an accident, sharp braking or a sudden
change in direction, the child may not be held securely. There is an increased risk of serious
or even fatal injuries.
Immediately replace child restraint systems
that have been damaged or subjected to a
load in an accident. Have the child restraint
securing systems checked in a qualified spe-
cialist workshop before fitting a child restraint
system again.
The securing systems of child restraint systems
are:
R the seat belt system
R the ISOFIX or i-Size securing rings
R the Top Tether anchorages
If circumstances require you to fit a child
restraint system to the front-passenger seat, be
sure to observe the information on "Child
restraint systems on the front-passenger seat"
(Y page 60).
Observe the warning labels in the vehicle inte-
rior and on the child restraint system.
i It is advisable to use Mercedes-Benz care
products to clean child restraint systems rec- ommended by Mercedes-Benz. Information
can be obtained at a qualified specialist work-
shop. ISOFIX and i-Size child seat securing
systems G
WARNING
ISOFIX child restraint systems or i-Size child
restraint systems do not offer sufficient pro-
tection for children whose weight is greater
than 22 kg, who are secured using the safety belt integrated in the child restraint system.
The child could, for example, not be restrained
correctly in the event of an accident. This
poses an increased risk of injury or even fatal
injury. Children in the vehicle
57Safety
Z
Page 75 of 369
brakes are applied again, the brake lamps light
up continuously. The hazard warning lamps
switch off automatically if you travel faster than
10 km/ h.You can also switch off the hazard
warning lamps using the hazard warning button (Y page 118). ESP
®
(Electronic Stability Program)
General notes i
Observe the "Important safety notes" sec-
tion (Y page 68).
ESP ®
monitors driving stability and traction, i.e.
power transmission between the tyres and the
road surface.
If ESP ®
detects that the vehicle is deviating from
the direction desired by the driver, one or more
wheels are braked to stabilise the vehicle. The
engine output is also modified to keep the vehi- cle on the desired course within physical limits.
ESP ®
assists the driver when pulling away on
wet or slippery roads. ESP ®
can also stabilise
the vehicle during braking.
ETS/4ETS (Electronic Traction System) i
Observe the "Important safety notes" sec-
tion (Y page 68).
ETS traction control is part of ESP ®
. On vehicles
with 4MATIC, 4ETS is part of ESP ®
.
Traction control brakes the drive wheels indi-
vidually if they spin. This enables you to pull
away and accelerate on slippery surfaces, e.g. if the road surface is slippery on one side. In addi-
tion, more drive torque is transferred to the
wheel or wheels with traction.
Traction control remains active if you deactivate
ESP ®
.
Off-road 4ETS (Electronic Traction Sys-
tem) A 4ETS system specifically suited to off-road
terrain is activated automatically once the off-
road program is activated (Y page 192).
Important safety notes i
Observe the "Important safety notes" sec-
tion (Y page 68). G
WARNING
If ESP ®
is malfunctioning, ESP ®
is unable to
stabilise the vehicle. In addition, other driving
safety systems are switched off. This increa-
ses the risk of skidding and an accident.
Drive on carefully. Have ESP ®
checked at a
qualified specialist workshop.
Vehicles without 4MATIC: when towing your
vehicle with the front axle raised, it is important
that you observe the notes on ESP ®
(Y page 329).
If the å ESP®
OFF warning lamp lights up
continuously, ESP ®
is deactivated.
If the ÷ ESP®
warning lamp and the å
warning lamp are lit continuously, ESP ®
is not
available due to a malfunction.
Read the information on warning lamps
(Y page 269) and display messages that may be
shown in the instrument cluster (Y page 235).
Use only wheels with the recommended tyre
sizes. Only then will ESP ®
function properly.
Characteristics of ESP ® General information
If the ÷ ESP warning lamp goes out before
you begin the journey, ESP ®
is automatically
active.
If ESP ®
intervenes, the ÷ESP®
warning lamp
flashes on the instrument cluster.
If ESP ®
intervenes:
X Do not deactivate ESP ®
under any circum-
stances.
X When pulling away, depress the accelerator
pedal only as far as is necessary.
X Adapt your driving style to suit the prevailing
road and weather conditions.
ECO start/stop function
The ECO start/stop function switches the
engine off automatically if the vehicle stops
moving. When pulling away again, the engine
starts automatically. ESP ®
remains in its previ-
ously selected status. Example:if ESP®
was
deactivated before the engine was switched off,
ESP ®
remains deactivated when the engine is
switched on again. 72
Driving safety systemsSafety
Page 121 of 369
2
Driver's seat, front-passenger seat and rear
seats occupied, luggage compartment
laden
3 Driver's and front-passenger seat occupied
and maximum permissible rear axle load uti- lised, e.g. when towing a trailer
The headlamp range control allows you to adjust
the cone of light from the headlamps to suit the
vehicle load.
X Start the engine.
X Turn the headlamp range controller to the
position that corresponds to the load in your
vehicle. Combination switch
X
To indicate briefly: press the combination
switch briefly to the pressure point in the
direction of arrow ;or?.
The corresponding turn signal flashes three
times.
X To indicate: press the combination switch
beyond the pressure point in the direction of
arrow ;or?.
X To switch on the main-beam headlamps:
turn the light switch to LorÃ.
X Press the combination switch beyond the
pressure point in the direction of arrow :.
The main-beam headlamps only switch on in
the à position if the dipped-beam head-
lamps are on.
The blue Kindicator lamp in the instru-
ment cluster lights up when the main-beam
headlamps are switched on.
X To switch off the main-beam headlamps:
move the combination switch back to its nor-
mal position.
The blue Kindicator lamp in the instru-
ment cluster goes out. Vehicles with Adaptive Highbeam Assist:
when Adaptive Highbeam Assist is active, it
controls activation and deactivation of the
main-beam headlamps (Y page 118).
X To switch on the headlamp flasher: pull the
combination switch in the direction of
arrow =. Hazard warning lamps
X
To switch on the hazard warning lamps:
press button :.
All turn signals flash. If you now switch on a
turn signal using the combination switch, only the turn signal lamp on the corresponding
side of the vehicle will flash.
X To switch off the hazard warning lamps:
press button
:.
The hazard warning lamps switch on automati-
cally if:
R an airbag is deployed or
R the vehicle decelerates rapidly from a speed
of above 70 km/h and comes to a standstill
The hazard warning lamps switch off automati-
cally if the vehicle reaches a speed of above
10 km/h again after a full brake application.
The hazard warning lamps continue to operate
even if the ignition is switched off. Adaptive Highbeam Assist
General notes You can use this function to set the headlamps
to switch automatically between dipped beam
and main beam. The system detects vehicles
with their lights on, either approaching from the
opposite direction or travelling in front of your
vehicle, and consequently switches the head- 118
Exterior lightingLights and
windscreen wipers
Page 156 of 369
S+
Sport Plus Particularly sporty trans-
mission settings
RACE
Maximum sportiness and
engine and transmission
settings suitable for the
racetrack Additional information on drive programs
(Y
page 159).
You can also change gear yourself using the
steering wheel gearshift paddles. Further infor-
mation on manual gearshifting (Y page 161).Manual transmission
Gear lever
! Only engage gear when the clutch pedal is
depressed.
! When shifting to
5thand 6thgear, you must
press the shift lever to the right. Otherwise,
you could shift unintentionally into 3rdor4th
gear and damage the engine or transmission.
If you shift down at too high a speed (trans-
mission braking), this can cause the engine to
overrev, leading to engine damage.
Do not use the clutch bite point to keep the
vehicle stationary on uphill gradients. There is otherwise a risk of damaging the clutch.
! On long and steep downhill gradients, espe-
cially if the vehicle is laden or towing a trailer,
you must select gear 1,2or3 in good
time. By doing so, you will make use of the
braking effect of the engine. This relieves the
load on the brake system and prevents the
brakes from overheating and wearing too
quickly. k
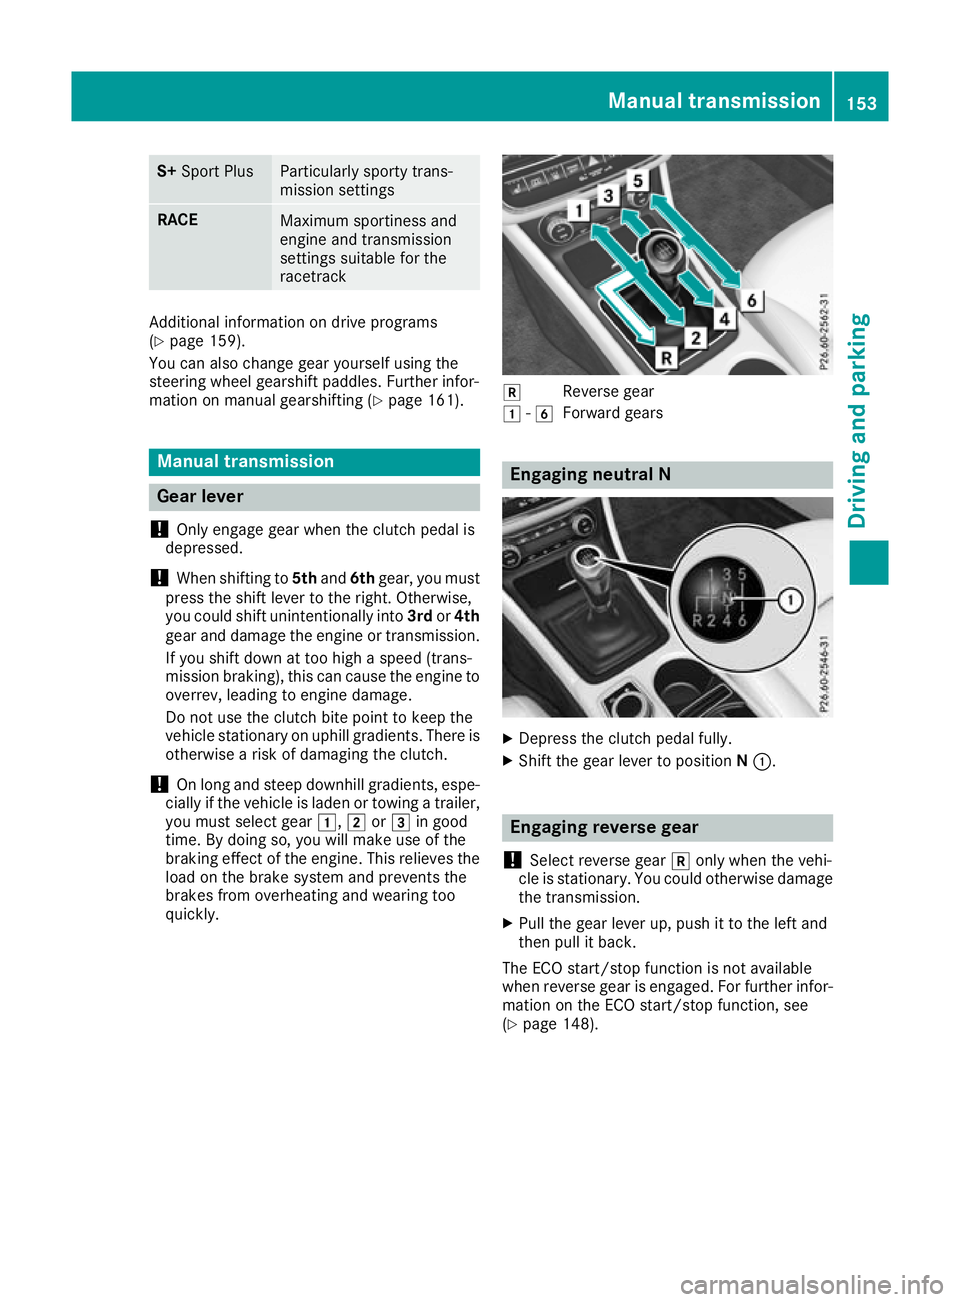
Reverse gear
1 -6
Forward gears Engaging neutral N
X
Depress the clutch pedal fully.
X Shift the gear lever to position N:. Engaging reverse gear
! Select reverse gear
konly when the vehi-
cle is stationary. You could otherwise damage the transmission.
X Pull the gear lever up, push it to the left and
then pull it back.
The ECO start/stop function is not available
when reverse gear is engaged. For further infor-
mation on the ECO start/stop function, see
(Y page 148). Manual transmission
153Driving and parking Z
Page 159 of 369
Engaging reverse gear R
!
Only move the automatic transmission to
k when the vehicle is stationary.
X Depress the brake pedal and keep it
depressed.
X Push the DIRECT SELECT lever up past the
first point of resistance.
The ECO start/stop function is not available
when reverse gear is engaged. For further infor- mation on the ECO start/stop function, see
(Y page 148).
Engaging neutral N G
WARNING
If children are left unsupervised in the vehicle, they can:
R open doors and endanger other persons or
road users
R climb out and be injured by the traffic
R operate vehicle equipment and, for exam-
ple, trap themselves.
Children could also set the vehicle in motion, for example by:
R releasing the parking brake
R shifting the automatic transmission out of
park position P
R starting the engine.
There is a risk of an accident and injury.
When leaving the vehicle, always take the key
with you and lock the vehicle. Never leave
children unattended in the vehicle. Always
keep the key out of reach of children.
X If the transmission is in position hork:
push the DIRECT SELECT lever up or down to the first point of resistance.
X If the transmission is in position j: depress
the brake pedal and push the DIRECT SELECT
lever up or down to the first point of resist-
ance.
If you switch the engine off with the transmis-
sion in position korh, the automatic trans-
mission shifts to iautomatically.
With the key: if you then open the driver's door
or the front-passenger door or remove the key from the ignition, the automatic transmission
shifts to jautomatically.
With the Start/Stop button: if you then open
the driver's door or the front-passenger door,
the automatic transmission shifts to jauto-
matically.
If you want the automatic transmission to
remain in neutral i, e.g. when having the vehi-
cle cleaned in an automatic car wash with a
towing system:
X Vehicles with the Start-Stop button:
remove the Start-Stop button from the igni-
tion lock.
X Insert the key into the ignition lock.
X All vehicles: switch the ignition on.
X Depress the brake pedal and keep it
depressed.
X Engage neutral i.
X Release the brake pedal.
X Release the electric parking brake.
X Switch off the ignition and leave the key in the
ignition lock.
Engaging drive position D X
If the transmission is in position kori:
push the DIRECT SELECT lever down past the first point of resistance.
X If the transmission is in position j: depress
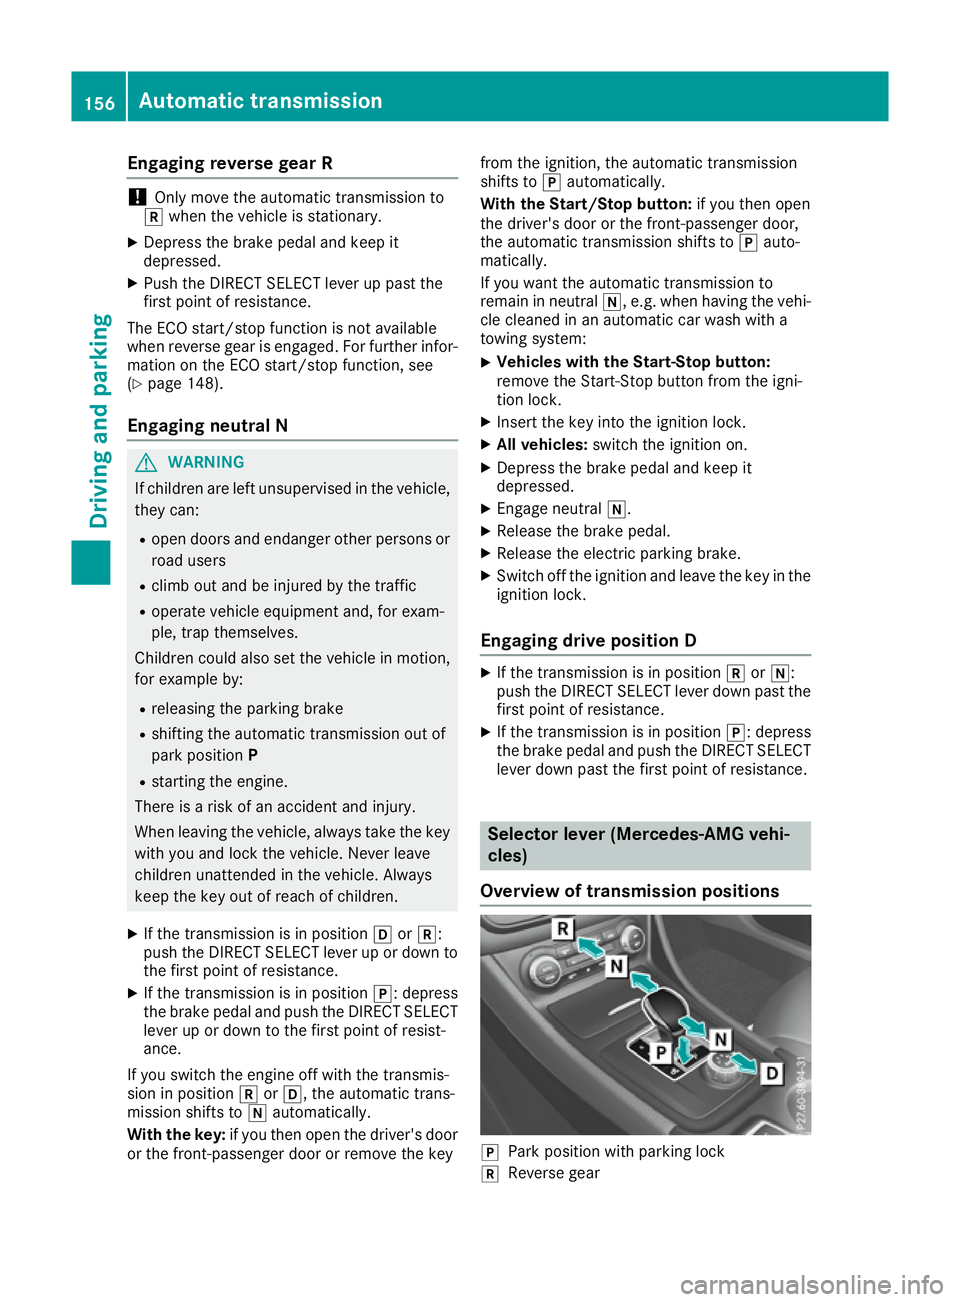
the brake pedal and push the DIRECT SELECT lever down past the first point of resistance. Selector lever (Mercedes-AMG vehi-
cles)
Overview of transmission positions j
Park position with parking lock
k Reverse gear 156
Automatic transmissionDriving and parking
Page 162 of 369
For further information on kickdown in manual
drive program M(Y page 163).
Gliding mode (diesel engines only) Gliding mode is characterised by the following:
R the combustion engine is disconnected from
the drive train
R the engine is running at idling speed
R the gear indicated after the transmission
position hdisappears in the multifunction
display (Y page 157)
Gliding mode can be activated and transmission
position hshown in green under the following
conditions:
R you select the "ECO" setting for the drive sys-
tem within the Individualdrive program. You
can find information about this in the Digital
Owner's Manual
R the speed is within a suitable range
R the type of road is suitable, e.g. no steep uphill
or downhill gradients
R the distance to the vehicle in front is sufficient
R you are no longer depressing the accelerator
pedal
Gliding mode is deactivated under the following
conditions:
R you depress the accelerator pedal
R you depress the brake pedal
R you use the DIRECT SELECT lever to switch
the transmission position (Y page 155)
R you use the DYNAMIC SELECT controller to
change the drive program (Y page 152)
R you activate manual gearshifting
(Y page 161)
R the distance to the vehicle in front is too short
R you leave the suitable speed range
Towing a trailer Not all models can tow a trailer. For further
information, see (Y page 213).
X Drive in the middle of the engine speed range
on uphill gradients.
X Depending on the uphill or downhill gradient,
select a lower gear (Y page 171), even if
cruise control, Distance Pilot DISTRONIC or
the speed limiter are activated. Drive programs
All vehicles (except Mercedes-AMG
vehicles) Drive program C (Comfort)
Drive program Cis characterised by the follow-
ing:
R the vehicle exhibits comfortable, economical
driving characteristics.
R the vehicle pulls away more gently in forward
and reverse gears unless the accelerator
pedal is depressed fully.
R the vehicle has improved driving stability, e.g.
on slippery road surfaces.
R optimal fuel consumption resulting from the
automatic transmission shifting up sooner.
The vehicle is driven in the low engine speed
range and the wheels are less likely to spin.
Drive program S (Sport) Drive program Sis characterised by the follow-
ing:
R sporty engine settings.
R the automatic transmission shifts up later.
Fuel consumption may be higher as a result of
the later automatic transmission shift points.
Drive program I (Individual)
In drive program I, the following properties of
the drive program can be selected:
R the drive (engine and transmission manage-
ment)
R the suspension (vehicles with adjustable
damping)
R the steering
R the availability of the ECO start/stop function
R the climate control
Information on configuring drive program Iwith
the multimedia system can be found in the Dig-
ital Owner's Manual.
i To permanently shift the gears manually in
drive program Iusing the steering wheel gear-
shift paddles, select the M(Manual) setting
for the drive. Automatic transmission
159Driving and parking Z
Page 170 of 369
Automatic transmission
X
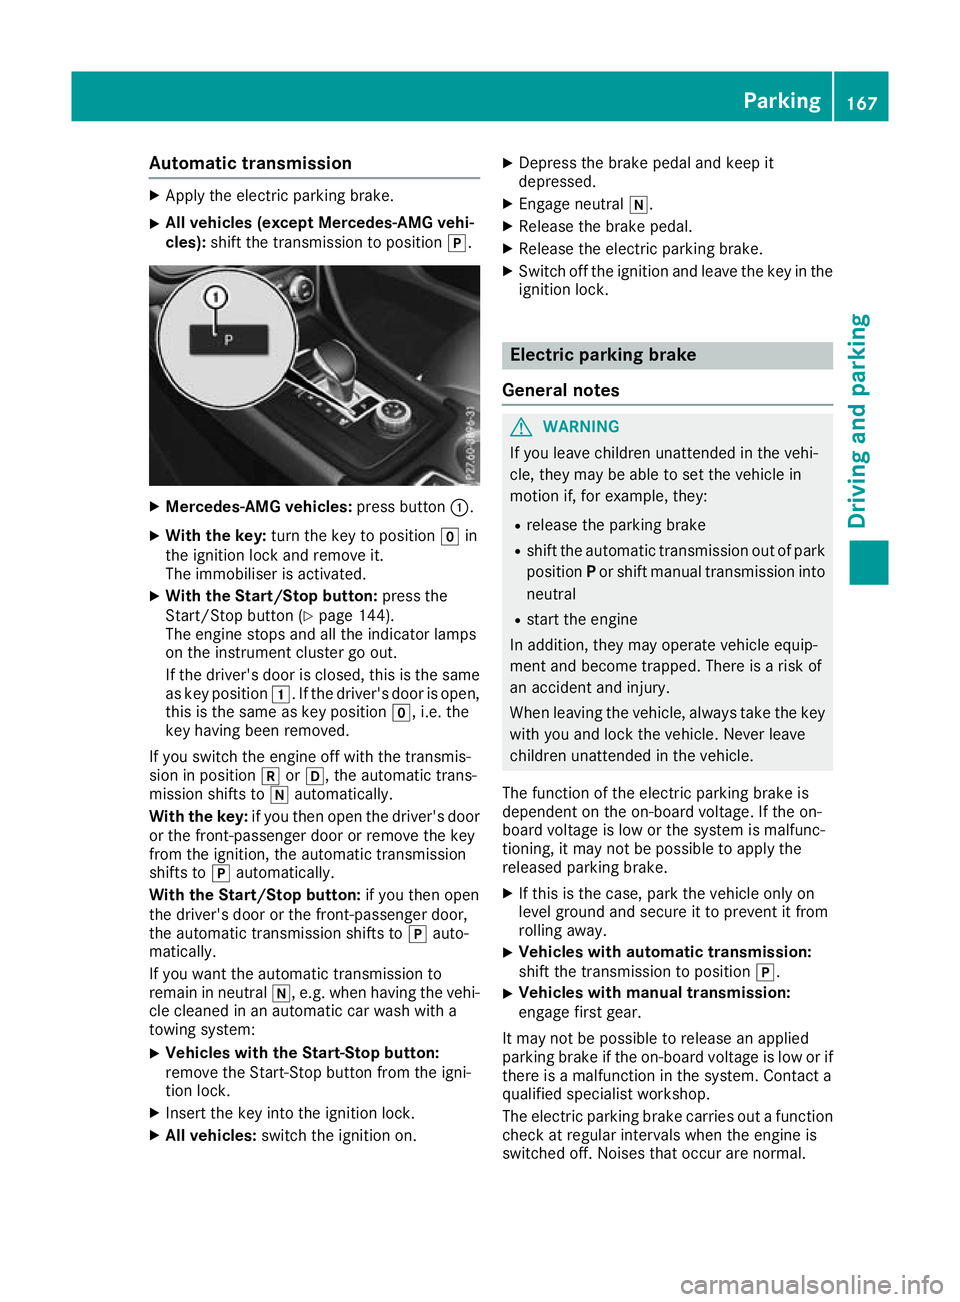
Apply the electric parking brake.
X All vehicles (except Mercedes-AMG vehi-
cles): shift the transmission to position j.X
Mercedes-AMG vehicles: press button:.
X With the key: turn the key to position gin
the ignition lock and remove it.
The immobiliser is activated.
X With the Start/Stop button: press the
Start/Stop button (Y page 144).
The engine stops and all the indicator lamps
on the instrument cluster go out.
If the driver's door is closed, this is the same
as key position 1. If the driver's door is open,
this is the same as key position g, i.e. the
key having been removed.
If you switch the engine off with the transmis-
sion in position korh, the automatic trans-
mission shifts to iautomatically.
With the key: if you then open the driver's door
or the front-passenger door or remove the key
from the ignition, the automatic transmission
shifts to jautomatically.
With the Start/Stop button: if you then open
the driver's door or the front-passenger door,
the automatic transmission shifts to jauto-
matically.
If you want the automatic transmission to
remain in neutral i, e.g. when having the vehi-
cle cleaned in an automatic car wash with a
towing system:
X Vehicles with the Start-Stop button:
remove the Start-Stop button from the igni-
tion lock.
X Insert the key into the ignition lock.
X All vehicles: switch the ignition on. X
Depress the brake pedal and keep it
depressed.
X Engage neutral i.
X Release the brake pedal.
X Release the electric parking brake.
X Switch off the ignition and leave the key in the
ignition lock. Electric parking brake
General notes G
WARNING
If you leave children unattended in the vehi-
cle, they may be able to set the vehicle in
motion if, for example, they:
R release the parking brake
R shift the automatic transmission out of park
position Por shift manual transmission into
neutral
R start the engine
In addition, they may operate vehicle equip-
ment and become trapped. There is a risk of
an accident and injury.
When leaving the vehicle, always take the key with you and lock the vehicle. Never leave
children unattended in the vehicle.
The function of the electric parking brake is
dependent on the on-board voltage. If the on-
board voltage is low or the system is malfunc-
tioning, it may not be possible to apply the
released parking brake. X If this is the case, park the vehicle only on
level ground and secure it to prevent it from
rolling away.
X Vehicles with automatic transmission:
shift the transmission to position
j.
X Vehicles with manual transmission:
engage first gear.
It may not be possible to release an applied
parking brake if the on-board voltage is low or if
there is a malfunction in the system. Contact a
qualified specialist workshop.
The electric parking brake carries out a function check at regular intervals when the engine is
switched off. Noises that occur are normal. Parking
167Driving and pa rking Z