2017 MERCEDES-BENZ G-Class window
[x] Cancel search: windowPage 71 of 286
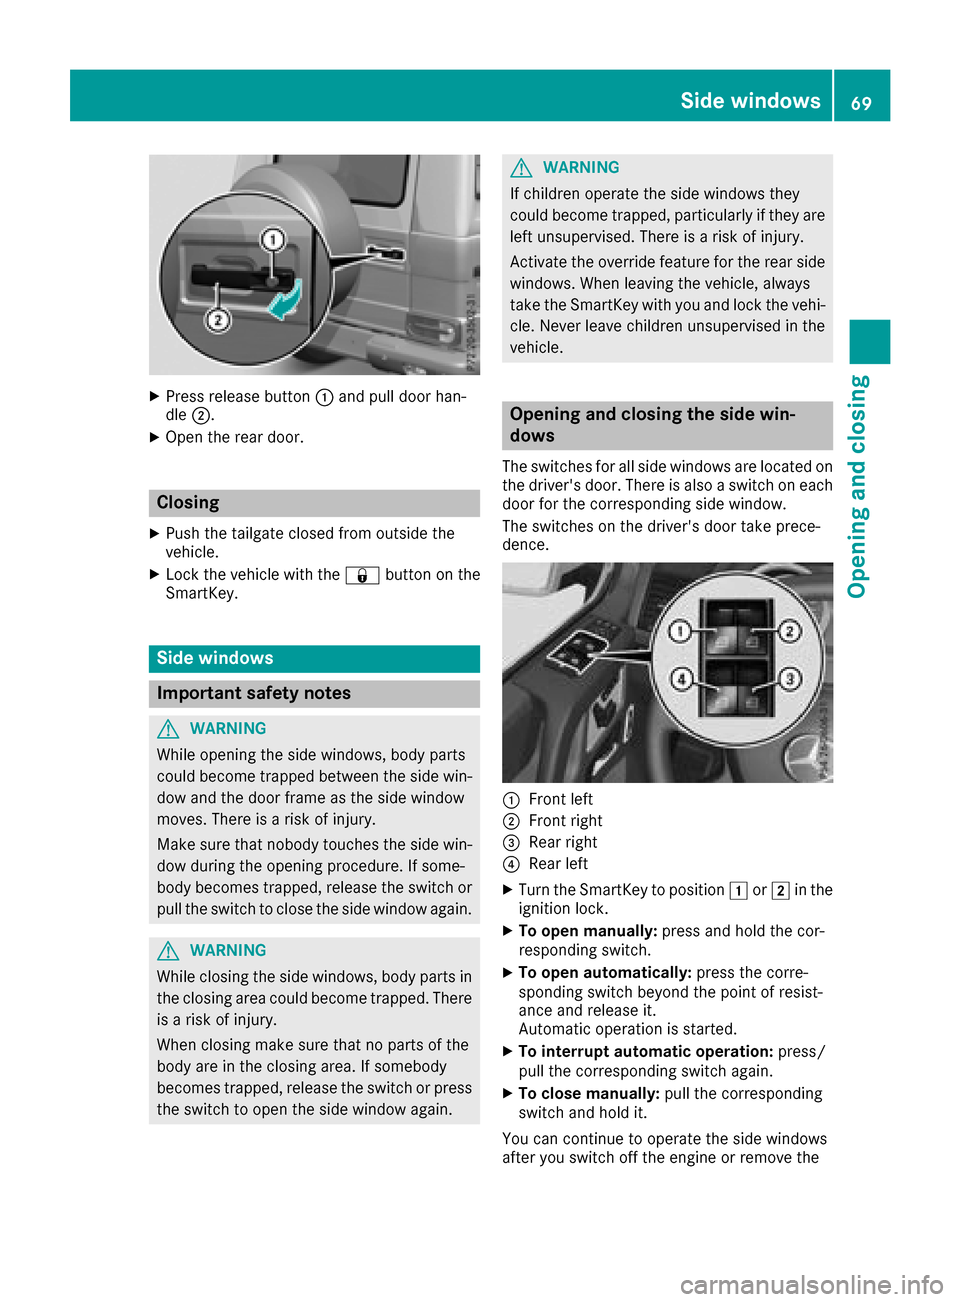
XPress release button:and pull door han-
dle ;.
XOpen the rear door.
Closing
XPush the tailgate closed from outside the
vehicle.
XLock the vehicle with the &button on the
SmartKey.
Side windows
Important safety notes
GWARNING
While opening the side windows, body parts
could become trapped between the side win-
dow and the door frame as the side window
moves. There is arisk of injury.
Make sure that nobody touches the side win-
dow during the opening procedure. If some-
body becomes trapped, release the switch or
pull the switch to close the side window again.
GWARNING
While closing the side windows, body parts in
the closing area could become trapped. There is ar isk of injury.
When closing make sure that no parts of the
body are in the closing area. If somebody
becomes trapped, release the switch or press
the switch to open the side window again.
GWARNING
If children operate the side windows they
could become trapped, particularly if they are left unsupervised. There is arisk of injury.
Activate the override feature for the rear side
windows. When leaving the vehicle, always
take the SmartKey with you and lock the vehi-
cle. Never leave children unsupervised in the
vehicle.
Opening and closing the side win-
dows
The switches for all side windows are located on
the driver's door. There is also aswitch on each
door for the corresponding side window.
The switches on the driver's door take prece-
dence.
:Frontl eft
;Frontr ight
=Rear right
?Rear left
XTurn the SmartKey to position 1or2 in the
ignition lock.
XTo open manually: press and hold the cor-
respondings witch.
XTo open automatically: press the corre-
sponding switch beyond the point of resist-
ance and release it.
Automatic operation is started.
XTo interrupt automatic operation: press/
pull the corresponding switch again.
XTo close manually: pull the corresponding
switch and hold it.
You can continue to operate the side windows
after you switch off the engine or remove the
Side windows69
Opening and closing
Z
Page 72 of 286
SmartKey.Thisf unction remains active for five
minutes or unti lyou ope naf ront door.
The sid ewindow scanno tbeo perate dfrom the
rearw hent he overrid efeature for the sid ewin-
dow sisa ctivate d(
Ypage 56).
Convenience opening
i
The convenience opening feature can only
be operate dusing the SmartKey .The Smart-
Key mus tbec lose to the driver'sd oorh andle.
You can ventilate the vehicl ebefore yo ustart
driving .Todot his,the SmartKey is used to carry
outt he following functions simultaneously:
Runlock the vehicle
Ropenthe sid ewindows
Rope nthe sliding sunroof
Rswitch on the seatv entilation for the driver's
and front-passenger seat
XPoint the tip of the SmartKey at the driver's
doo rhandle.
XPress and holdt he% button on the Smart-
Key unti lthe sid ewindow sand the sliding
sunroof are in the desire dposition.
XTo interrupt convenience opening: release
the % button.
Convenience closin gfeature
Important safety notes
GWARNING
Whent he convenience closing feature is oper-
ating, parts of the bod ycould become trapped
in the closing are aofthe sid ewindow and the
sliding sunroof.T here isariskofi njury.
Observe the complete closing procedure
when the convenience closing feature is oper-
ating. Make sure that no bod yparts are in
close proximity during the closing procedure.
Operation
iThe "convenience closing feature "can only
be operate dusing the SmartKey .The Smart-
Key mus tbec lose to the driver'sd oorh andle.
Wheny oulock the vehicle, yo ucan simultane-
ously:
Rclose the sid ewindows
Rclose the sliding sunroof
XPoint the tip of the SmartKey at the driver's
doo rhandle.
XPress and holdt he& button on the Smart-
Key unti lthe sid ewindow sand the sliding
sunroof are fully closed.
XMake sure that al lthe sid ewindow sand the
sliding sunroof are closed.
XTo interrupt convenience closing: release
the & button.
Problems with the side windows
GWARNING
Closing the sid ewindow swithi ncreased force or withoutt he anti-entrapment feature could lead
to serious or evenf atalinjury. Make sure that nobody can become trapped when closing the side
windows.
70Side windows
Opening and closing
Page 73 of 286
ProblemPossible causes/consequences andMSolutions
Aside window cannot be
closed because it is
blocked by objects, e.g.
leaves in the window
guide.XRemove the objects.
XClose the side window.
As ide window cannot be
closed and you cannot
see the cause.If as ide window is obstructed during closing and reopens again
slightly:
XImmediately after the window blocks, pull the correspondings witch
again until the side window has closed.
If as ide window is obstructed again during closing and reopens again
slightly:
XImmediately after the window blocks, pull the correspondings witch
again until the side window has closed.
If as ide window will still not open or close due to amalfunction, consult aqualified specialist
workshop.
Sliding sunroof
Important safety notes
GWARNING
While opening and closing the sliding sunroof, body parts in close proximity could become
trapped. There is arisk of injury.
Make sure that no body parts are in close
proximity during the opening and closing pro-
cedures.
If somebody becomes trapped:
Rrelease the switch immediately, or
Rduring automatic operation, push the
switch briefly in any direction
The opening or closing procedure will be stop- ped.
GWARNING
If children operate the sliding sunroof they
could become trapped, particularly if they are left unsupervised. There is arisk of injury.
When leaving the vehicle, always take the
SmartKey with you and lock the vehicle. Never
leave children unsupervised in the vehicle.
!Only open the sliding sunroof if it is free of
snow and ice. Otherwise, malfunctions may
occur.
Do not allow anything to protrude from the
sliding sunroof. Otherwise, the seals could be
damaged.
!The weather can change abruptly. It could
start to rain or snow. Make sure that the slid- ing sunroof is closed when you leave the vehi-
cle. The vehicle electronics can be damaged if
water enters the vehicle interior.
Resonance noises can occur in addition to the
usual airflow noises when the sliding sunroof is
open. They are caused by minor pressure fluc-
tuations in the vehicle interior. Change the posi-
tion of the sliding sunroof or open aside window
slightly to reduce or eliminate these noises.
Sliding sunroof71
Opening and closing
Z
Page 81 of 286
The system automatically switches off
approximately 35 minutes after it is set to
level1.
Switching the seat ventilation on/off
Switching on/off
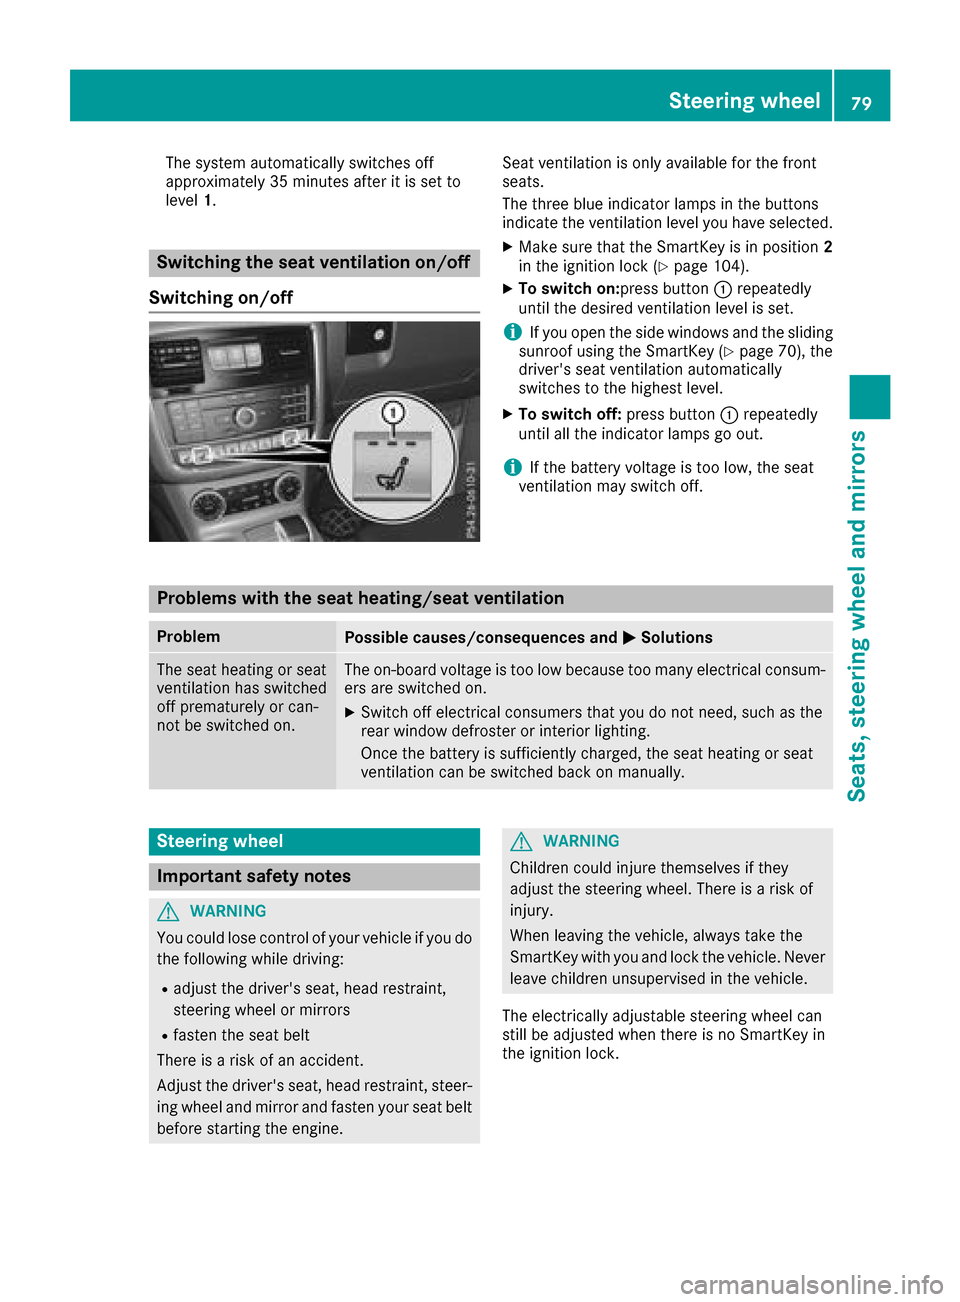
Seat ventilation is only availablef or the front
seats.
The three blue indicator lamps in the buttons
indicate the ventilation level you have selected.
XMake sure that the SmartKey is in position 2
in the ignition lock (Ypage 104).
XTo switch on:press button :repeatedly
until the desired ventilation level is set.
iIf you open the side windows and the sliding
sunroof using the SmartKey (Ypage 70), the
driver's seat ventilation automatically
switches to the highest level.
XTo switch off: press button:repeatedly
until all the indicator lamps go out.
iIf the battery voltage is too low, the seat
ventilation may switch off.
Problems with the seat heating/seat ventilation
ProblemPossible causes/consequences and MSolutions
The seat heating or seat
ventilation has switched
off prematurely or can-
not be switched on.The on-board voltage is too low because too many electrical consum-
ers are switched on.
XSwitch off electrical consumersthat you do not need, such as the
rear window defroster or interior lighting.
Once the battery is sufficiently charged, the seat heating or seat
ventilation can be switched back on manually.
Steering wheel
Important safety notes
GWARNING
You could lose control of your vehicle if you do the following while driving:
Radjust the driver's seat, head restraint,
steerin gwheel or mirrors
Rfasten the seat belt
There is arisk of an accident.
Adjust the driver's seat, head restraint, steer-
ing wheel and mirror and fasten your seat belt before starting the engine.
GWARNING
Children could injure themselves if they
adjust the steerin gwheel. There is arisk of
injury.
When leaving the vehicle, alwayst ake the
SmartKey with you and lock the vehicle. Never
leave children unsupervised in the vehicle.
The electrically adjustable steerin gwheel can
still be adjusted when there is no SmartKey in
the ignition lock.
Steering wheel79
Seats, steering wheel and mirrors
Z
Page 82 of 286
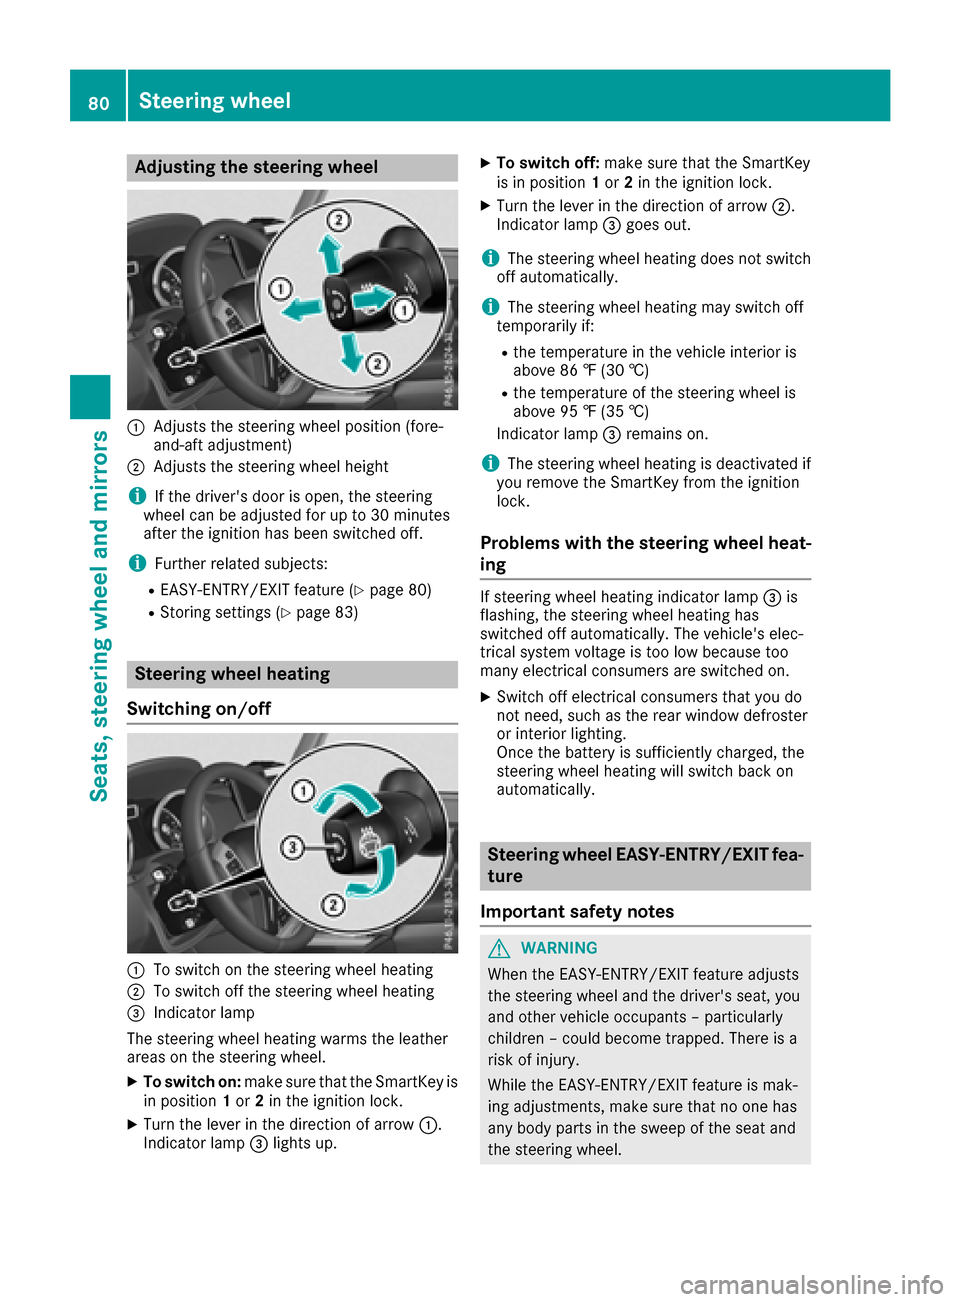
Adjusting thesteering wheel
:Adjusts th esteering whee lposition (fore-
and-af tadjustment)
;Adjusts th esteering whee lheight
iIf th edriver's door is open ,the steering
whee lcan be adjusted for up to 30 minute s
after th eignition has been switched off .
iFurther relatedsubjects :
REASY-ENTRY/EXIT feature (Ypage 80)
RStoring settings(Ypage 83)
Steering wheel heating
Switchin gon/off
:To switch on th esteering whee lheating
;To switch off th esteering whee lheating
=Indicato rlamp
The steering whee lheating warm sthe leather
areas on th esteering wheel.
XTo switch on: makesuret ha tthe SmartKey is
in position 1or 2in th eignition lock.
XTurn th elever in th edirection of arrow :.
Indicato rlamp =lights up.
XTo switch off :mak esuret hatthe SmartKey
is in position 1or 2in th eignition lock.
XTurn th elever in th edirection of arrow ;.
Indicato rlamp =goes out .
iThe steering whee lheating does no tswitch
off automatically.
iThe steering whee lheating may switch off
temporarily if:
Rth et em perature in th evehicl einterior is
abov e86‡ (30 †)
Rthet em perature of th esteering whee lis
abov e95‡ (35 †)
Indicato rlamp =remain son.
iThe steering whee lheating is deactivated if
you remove th eSmartKey from th eignition
lock.
Problemsw ith thesteering wheel heat-
ing
If steering whee lheating indicator lamp =is
flashing, th esteering whee lheating has
switched off automatically. The vehicle's elec -
trical system voltag eistoolow because to o
man yelectrical consumer sare switched on .
XSwitchoff electrical consumer sthaty ou do
no tn eed, suc hastherear window defroste r
or interior lighting .
Once th ebattery is sufficientl ycharged, th e
steering whee lheating will switch bac kon
automatically.
Steering wheel EASY-ENTRY/EX ITfea-
tu re
Import ant safety notes
GWARNIN G
When th eEASY-ENTRY/EXIT feature adjust s
th es teering whee land th edriver's seat ,you
and other vehicl eoccupant s–particularly
children –could become trapped .There is a
ris kofi njury.
Whil ethe EASY-ENTRY/EXIT feature is mak -
ing adjustments ,makes uret hatnoo nehas
any body part sintheswee poft heseat and
th es teering wheel.
80Steering wheel
Seats ,steering wheel and mirrors
Page 84 of 286
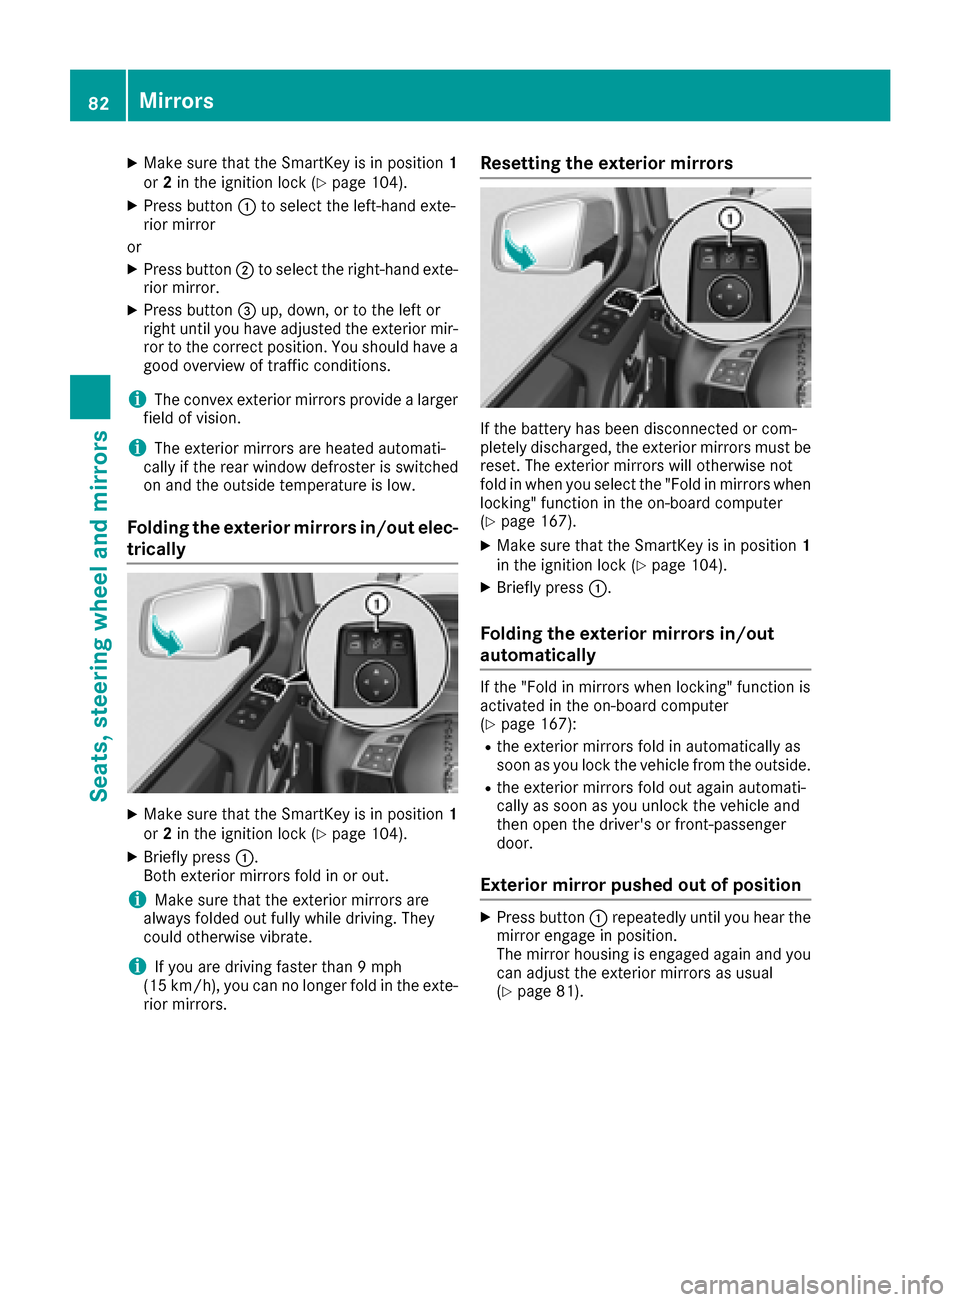
XMake sure that the SmartKey is in position1
or 2in the ignition lock (Ypage 104).
XPress button :to select the left-hand exte-
rior mirror
or
XPress button ;to select the right-hand exte-
rior mirror.
XPress button =up, down, or to the left or
right until you have adjusted the exterior mir- ror to the correct position. You should have a
good overview of traffic conditions.
iThe convex exterior mirrors provide alarger
field of vision.
iThe exterior mirrors are heated automati-
cally if the rear window defroster is switched
on and the outside temperature is low.
Folding the exterior mirrors in/out elec-
trically
XMake sure that the SmartKey is in position 1
or 2in the ignition lock (Ypage 104).
XBriefly press :.
Both exterior mirrors fold in or out.
iMake sure that the exterior mirrors are
always folded out fully while driving. They
could otherwise vibrate.
iIf you are driving faster than 9mph
(15 km/h), you can no longer fold in the exte-
rior mirrors.
Resetting the exterior mirrors
If the battery has been disconnected or com-
pletely discharged, the exterior mirrors must be
reset. The exterior mirrors will otherwise not
fold in when you select the "Fold in mirrors when
locking" function in the on-board computer
(
Ypage 167).
XMake sure that the SmartKey is in position 1
in the ignition lock (Ypage 104).
XBriefly press :.
Folding the exterior mirrors in/out
automatically
If the "Fold in mirrors when locking" function is
activated in the on-board computer
(
Ypage 167):
Rthe exterior mirrors fold in automatically as
soon as you lock the vehicle from the outside.
Rthe exterior mirrors fold out again automati-
cally as soon as you unlock the vehicle and
then open the driver's or front-passenger
door.
Exterior mirror pushed out of position
XPress button :repeatedly until you hear the
mirror engage in position.
The mirror housing is engaged again and you
can adjust the exterior mirrors as usual
(
Ypage 81).
82Mirrors
Seats, steering wheela nd mirrors
Page 94 of 286

XTurn bulb=counter-clockwise, applying
slight pressure, and pull it out of the bulb
holder.
XInsert the new bulb into the bulb holder and,
applying slight pressure, turn it clockwise
until it engages.
XInstall lens ;.
XTighten screws :.
Windshield wipers
Switching the windshield wipers
on/off
!
Do not operate the windshield wipers when
the windshield is dry, as this could damage
the wiper blades. Moreover, dust that has col-
lected on the windshield/rear window can
scratc hthe glass if wiping takes place when
the windshield/rear window is dry.
If it is necessary to switch on the windshield
wipers in dry weather conditions, alwaysu se
washer fluid when operating the windshield
wipers.
!If the windshield wipers leave smears on the
windshield/rear window after the vehicle has
been washed in an automatic car wash, this
may be due to wax or other residue. Clean the
windshield/rear window with washer fluid
after an automatic car wash.
!Intermittent wiping with rain sensor: due to
optical influences and the windshield becom-
ing dirty in dry weather conditions, the wind-
shield wipers may be activated inadvertently.
This could then damage the windshield wiper
blades or scratc hthe windshield.
For this reason, you should alwayss witch off
the windshield wipers in dry weather.
1$ Windshield wipers off
2ÄIntermittent wipe, normal
3ÅIntermittent wipe, frequent
4°Continuous wipe, slow
5¯Continuous wipe, fast
BíSingle wipe
î Wipes with washer fluid
XSwitch on the ignition.
XTurn the combination switch to the corre-
sponding position.
In the ÄorÅ position, the appropriate
wiping frequency is set automatically according
to the intensity of the rain. In the Åposition,
the rain sensor is more sensitiv ethan in the
Ä position, causing the windshield wiper to
wipe more frequently.
Intermittent wiping is interrupted if you stop the vehicle and open afront door. This protects
people getting into and out of the vehicle from
being sprayed with water.
Intermittent wiping continues when all doors are
closed and:
Ryou shift the automatic transmission to drive
position Dor reverse gear R
or
Ryou change the wiper setting on the combi-
nation switch
92Windshield wipers
Lights and windshield wipers
Page 95 of 286
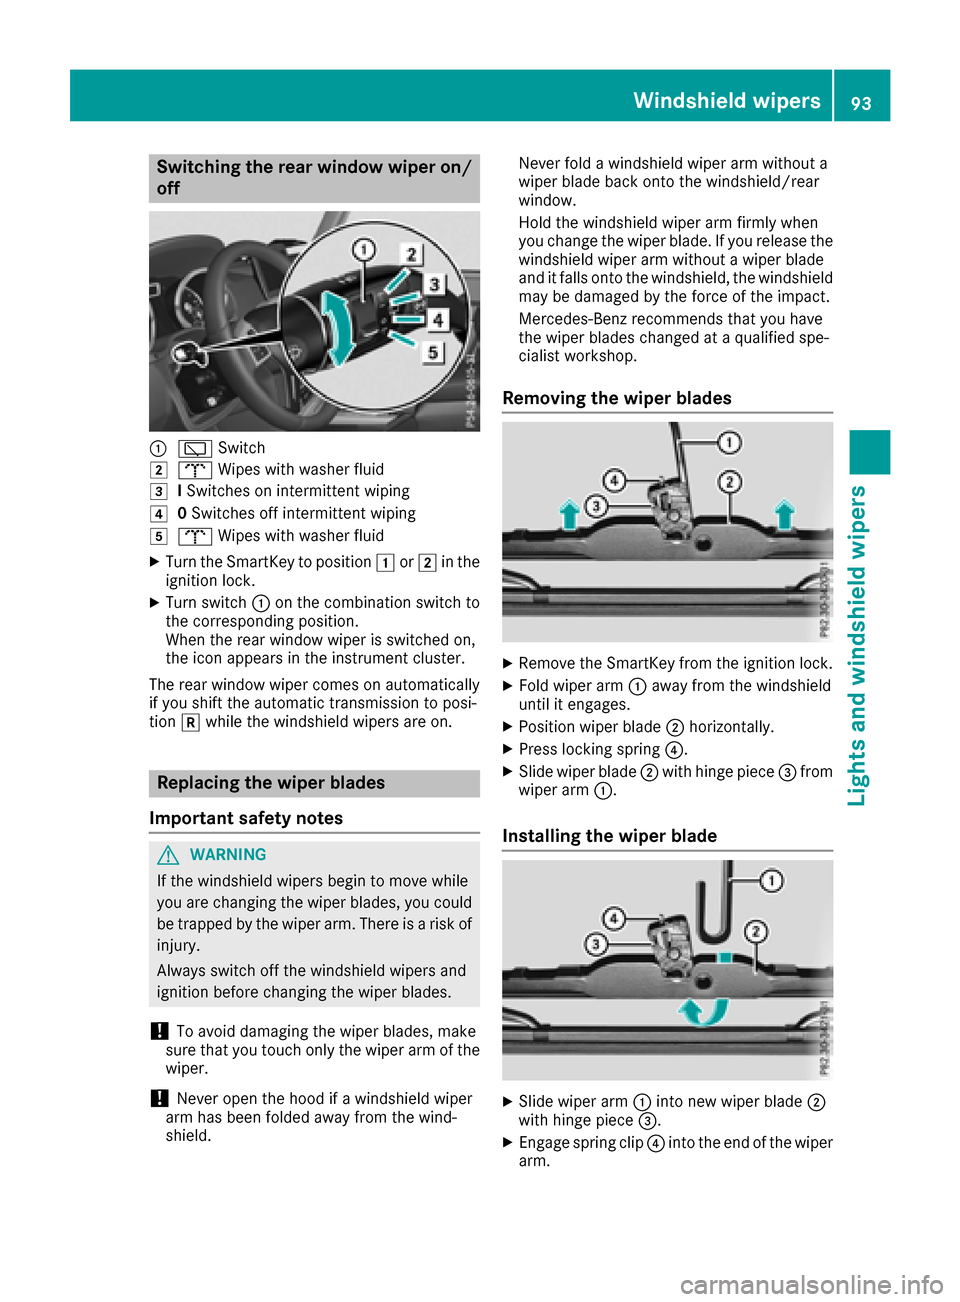
Switching the rear window wiper on/
off
:èSwitch
2bWipes with washer fluid
3ISwitches on intermittent wiping
40 Switches off intermittent wiping
5b Wipes with washer fluid
XTurn the SmartKey to position 1or2 in the
ignition lock.
XTurn switch :on the combination switch to
the correspondingp osition.
When the rear window wiper is switched on,
the icon appears in the instrumentc luster.
The rear window wiper comes on automatically
if you shift the automatic transmission to posi-
tion kwhile the windshield wipers are on.
Replacing the wiper blades
Important safety notes
GWARNING
If the windshield wipers begin to move while
you are changing the wiper blades, you could be trapped by the wiper arm. There is arisk of
injury.
Always switch off the windshield wipers and
ignition before changing the wiper blades.
!To avoid damaging the wiper blades, make
sure that you touch only the wiper arm of the
wiper.
!Never open the hood if awindshield wiper
arm has been folded away from the wind-
shield. Never fold
awindshield wiper arm without a
wiper blade back onto the windshield/rear
window.
Hold the windshield wiper arm firmly when
you change the wiper blade. If you release the
windshield wiper arm without awiper blade
and it falls onto the windshield, the windshield
may be damaged by the force of the impact.
Mercedes-Benz recommends that you have
the wiper blades changed at aqualified spe-
cialist workshop.
Removing the wiper blades
XRemove the SmartKey from the ignition lock.
XFold wiper arm :away from the windshield
until it engages.
XPosition wiper blade ;horizontally.
XPress locking spring ?.
XSlide wiper blade;with hinge piece =from
wiper arm :.
Installing the wiper blade
XSlide wiper arm :into new wiper blade ;
with hinge piece =.
XEngage spring clip ?into the end of the wiper
arm.
Windshield wipers93
Lights and windshieldw ipers
Z