2017 MERCEDES-BENZ G-Class window
[x] Cancel search: windowPage 211 of 286

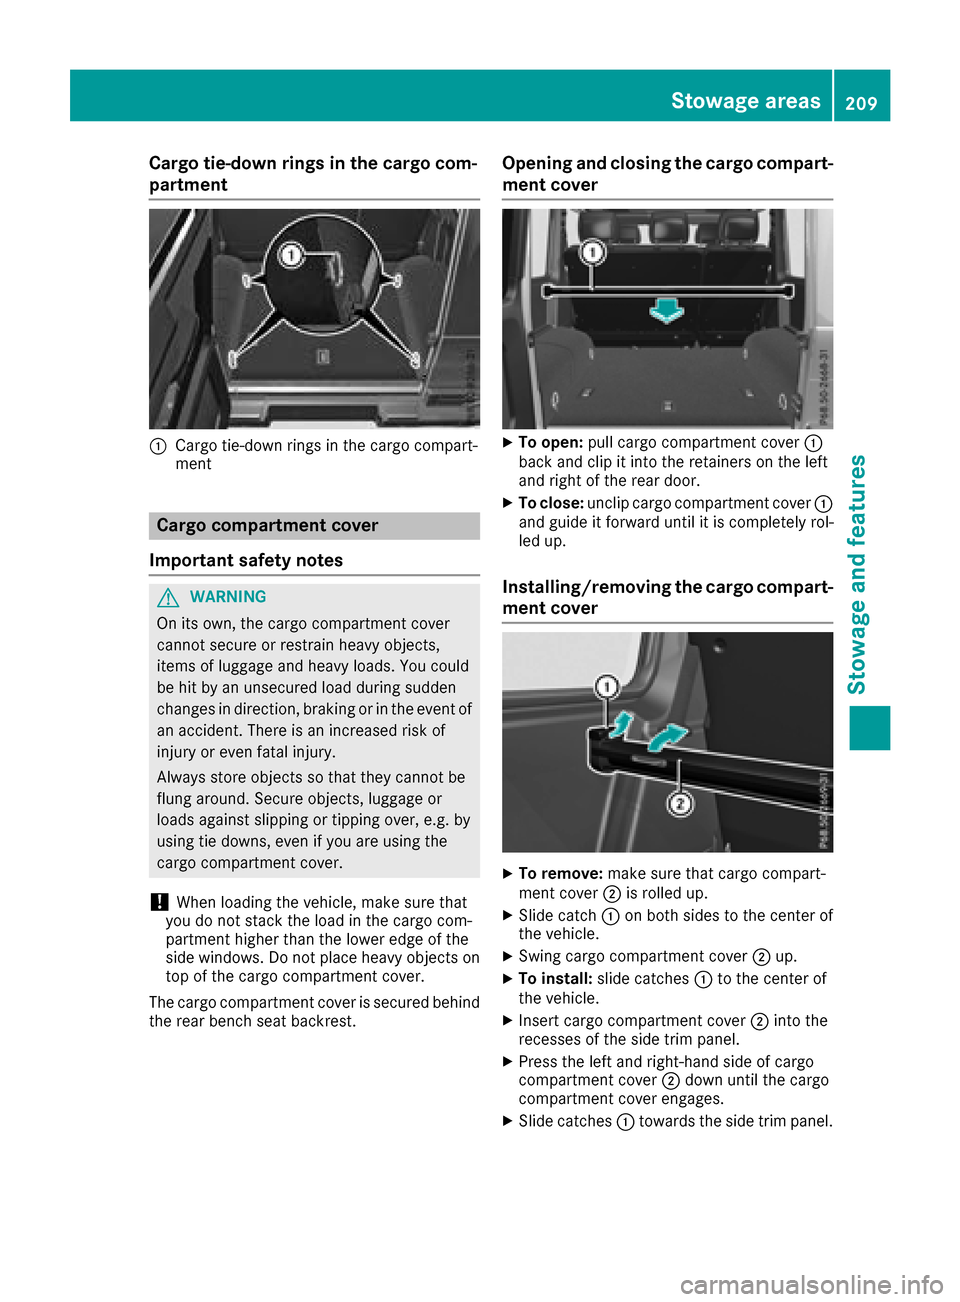
Cargo tie-down rings in thecargo com-
partment
:Cargo tie-down rings in th ecargo compart-
ment
Cargo compartment cover
Important safety notes
GWARNING
On its own,t hecargo compartmen tcover
canno tsecure or restrain heavyo bjects,
items of luggagea nd heavyloads.You could
be hit by an unsecured load durin gsudden
changes in direction,b raking or in theevent of
an accident. Thereisani ncreased riskof
injury or eve nfatal injury.
Always store object ssothatthe yc anno tbe
flun garound. Secure objects, luggageo r
loads against slipping or tippingo ver, e.g.by
usingt ie downs, evenify ou are usingthe
cargo compartmen tcover.
!When loadingt hevehicle ,makes ure that
you do no tstack th eload in th ecargo com-
partmen thigher than th elower edge of the
side windows. Do no tplaceh eavyo bjectson
to poft hecargo compartmen tcover.
The cargo compartmen tcover is secured behind
th er ear bench seat backrest.
Opening and closing th ecargo compart-
men tcover
XTo open: pull cargo compartmen tcover :
back and clip it int othe retainers on th eleft
and righ toftherear door.
XTo close: unclip cargo compartmen tcover :
and guide it forward until it is completely rol-
led up.
Installing/removing th ecargo compart-
men tcover
XTo remove: makesure that cargo compart-
men tcover ;is rolled up.
XSlid ecatch :on boths ides to th ecente rof
th ev ehicle.
XSwin gcargo compartmen tcover ;up.
XTo install: slide catches :to th ecente rof
th ev ehicle.
XInsertc argo compartmen tcover ;intot he
recesses of th eside trim panel.
XPress th eleft and right-hands ide of cargo
compartmen tcover ;down until th ecargo
compartmen tcover engages.
XSlid ecatches :towards th eside trim panel.
Stowage areas209
Stowage and features
Z
Page 221 of 286

Specifying and sending the destination
address
XGo to the website http://maps.google.com
and enteradestination address into the entry
field.
XTo send the destination address to the e-
mail address of your mbrace account:
click on the correspondingb utton on the web-
site.
Example:
If you select 'Send to vehicle' and then
'Mercedes-Benz', the destination address will
be sent to your vehicle.
XWhen the "Send" dialog window appears:
Enter the e-mail address you specified when
settingupy our mbrace account into the cor-
responding field.
XClick "Send".
Information on specific commands such as
"Address entry" or "Send" can be found on the
website.
Calling up atransmitted destination
address
XTurn the SmartKey to position 2in the ignition
lock (Ypage 104).
The transmitted destination address is loaded
into the vehicle's navigation system.
Ad isplay message appears, asking whether
navigation should be started.
XSelectYesby turning 3or sliding 1
the controller and confirm with 7.
The system calculates the route and subse-
quently starts the route guidance with the
address entered.
If you select No
the address can be stored in
the address book.
If you have sent more than one destination
address, each individual destination must be
confirmed separately.
Destination addresses are loaded in the same
order as the order in which they were sent.
If you own multiple Mercedes-Benzv ehicles with
mbrace and activated mbrace accounts:
If multiple vehicles are registered under the
same e-mail address, the destination will be
sent to all the vehicles.
Vehicle remote opening
You can use the vehicle remote opening if you
have unintentionally locked your vehicle and a
replacement SmartKey is not available.
The vehicle can be opened by the Mercedes-
Benz Customer AssistanceC enter.
The vehicle can be immediately opened
remotely within four days of the ignition being
turned off. After this time, the remote unlocking
may be delayed by 15 to 60 minutes. After
30 days, the vehicle can no longer be opened
remotely.
The vehicle remote unlocking feature is availa-
ble if the relevant mobile phone network is avail-
able and adata connection is possible.
XContact the following service hotlines:
Mercedes-BenzC ustomer AssistanceC enter
at 1-800-FOR-MERCedes (1-800-367-6372)
or 1-866-990-9007
You will be asked for your password.
XReturn to your vehicle at the time agreed upon
with the Mercedes-BenzC ustomer Assis-
tance Center.
Alternatively, the vehicle can be opened via:
Rthe Internet, under the "Owners Online" sec-
tion
Rtelephone applications (e.g. for iPhone®,
Android™)
To do this, you will need your identification num-
ber and password.
Vehicle remote closing
The vehicle remote-closing feature can be used
when you have forgotten to lock the vehicle and
you are no longer nearby.
The vehicle can then be locked by the Mercedes-
Benz Customer AssistanceC enter.
The vehicle can be immediately remotely locked
within four days of the ignition being turned off.
After this time, remote closing may be delayed
by 15 to 60 minutes. After 30 days the vehicle
can no longer be valet locked remotely.
The vehicle remote closing feature is available if
the relevant mobile phone network is available
and adata connection is possible.
XContact the following service hotlines:
Features219
Stowage and features
Z
Page 234 of 286

cleaning agents. These cleaning agents can
damagethe paintwork or plasti cparts.
!Make sure that the automatic car wash is
suitablef or the size of the vehicle .Fold in the
exterior mirrors before the vehicle is washed.
The exterior mirrors could otherwise be dam-
aged.
!Make sure that the automatic transmission
is in position Nwhe nwashing your vehicle in
at ow-through car wash. The vehicle could be
damaged if the transmission is in another
position.
!Make sure that:
Rthe sid ewindow sand the sliding sunroof
are fully closed.
Rthe blower is switched off.
Rthe windshield wiper switch is at position 0.
The vehicle may otherwise be damaged.
You can wash the vehicle in an automatic car
wash from the very start.
If the vehicle is very dirty, pre-wash it before
cleaning it in an automatic car wash.
After using an automatic car wash, wipe off wax
from the windshield and the wiper blades. This
will prevent smears and reduce wiping noises
caused by residueont he windshield.
Washing by hand
In some countries,washing by hand is only
allowed at speciall yequipped washing bays.
Observe the legalr equirements in each country.
Whenu sing the vehicle in winter, remove all
trace sofroads altd eposits carefully and as
soona spossible.
Whenw ashing the underside of the vehicle ,also
clean the insides of the wheels.
XDo not us ehot water and do not wash the
vehicle in direct sunlight.
XUse asoft sponge to clean.
XUse amildc leaning agent, such as acar
shampooa pproved by Mercedes-Benz.
XThoroughlyh osedownthe vehicle with agen-
tle jet of water.
XDo not point the water jet directlyt owards the
ai ri nlet.
XUse plenty of water and rinse outt he sponge
frequently.
XRinse the vehicle with clean water and dry
thoroughly with achamois.
XDo not le tthe cleaning agent dry on the paint-
work.
Powe rwashers
GWARNING
The water jet from acircula rjet nozzle (dirt
blasters) can cause invisible exterior damage
to the tire sorchassisc omponents. Compo-
nents damaged in this wa ymay fai lunexpect-
edly. There is ariskofana ccident.
Do not us epower washers with circula rjet
nozzle stoclean the vehicle .Have damaged
tire sorc hassisc omponents replaced imme-
diately.
!Alway smaintainad istance of at least
11.8 in (30 cm )between the vehicle and the
power washern ozzle.Information aboutt he
correct distance is available from the equip-
ment manufacturer.
Move the power washern ozzle around when
cleaning your vehicle.
Do not ai mdirectlyata ny of the following:
RTires
RDoor gaps, roof gaps, joints, etc.
RElectrical components
RBattery
RConnectors
RLamps
RSeals
RTrim
RVentilation slots
Damaged seals or electrical components can
lead to leaks or failures.
!Vehicles with decorative film: parts of your
vehicle are covered with adecorative film.
Maintain adistance of at least 27.5 in (70 cm)
between the parts of the vehicle covered with
the fil mand the nozzle of the hig hpressure
cleaner.
Information aboutt he correct distance is
available from the equipment manufacturer.
Move the power washern ozzle around when
cleaning your vehicle.
232Care
Maintenancea nd care
Page 236 of 286

!Do not park your vehicle foralong period of
time directly after cleaning, particularlya fter
cleaning the wheel rim with wheel cleaner.
Wheel cleaner can lead to the increased cor-
rosion of the brake discs and pads. Therefore,
drive for afew minutes after cleaning. By
heating up the brakes, the brake discs and
pads dry. The vehicle can then be parked for a
long period of time.
Cleaning the windows
GWARNING
You could become trapped by the windshield wipers if they start moving while cleaning the
windshieldorw iper blades. There is arisk of
injury.
Alwayss witch off the windshieldw ipers and
the ignition before cleaning the windshieldo r
wiper blades.
!Do not use dry cloths, abrasive products,
solvents or cleaning agents containing sol-
vents to clean the inside of the windows. Do
not touch the insides of the windows with
hard objects, e.g. an ice scraper or ring. There
is otherwise arisk of damaging the windows.
!Cleant he water drainage channels of the
windshielda nd the rear window at regular
intervals. Deposits such as leaves, petals and pollen may under certain circumstances pre-
vent water from draining away. This can lead
to corrosion damage and damage to elec-
tronic components.
XCleant he inside and outside of the windows
with adamp cloth and acleaning product that
is recommended and approved by Mercedes-
Benz.
Cleaning wiper blades
GWARNING
You could become trapped by the windshield wipers if they start moving while cleaning the
windshieldorw iper blades. There is arisk of
injury.
Alwayss witch off the windshieldw ipers and
the ignition before cleaning the windshieldo r
wiper blades.
!Do not pull the wiper blade.O therwise, the
wiper blade could be damaged.
!Do not clean wiper bladest oo often and do
not rub them too hard. Otherwise, the graph-
ite coating could be damaged. This could
cause wiper noise.
!Hold the wiper arm securely when folding
back. The windshieldc ould be damagedifthe
wiper arm smacks against it suddenly.
XFold the windshieldw iper arms awayfrom the
windshield.
XCarefully clean the wiper bladesw ithadamp
cloth.
XFold the windshieldw iper arms back again
before switching on the ignition.
Cleaning the exterior lighting
!Only use cleaning agents or cleaning cloths
which are suitablef or plastic light lenses.
Unsuitable cleaning agents or cleaning cloths
could scratch or damage the plastic light len- ses.
XCleant he plastic lenses of the exterior light-
ing using awet sponge and amild cleaning
agent, e.g. Mercedes-Benz car shampoo or
cleaning cloths.
Cleaning the mirror turns ignals
!Only use cleaning agents or cleaning cloths
that are suitablef or plastic lenses. Unsuitable
cleaning agents or cleaning cloths could
scratch or damage the plastic lenses of the
mirror turn signals.
XCleant he plastic lenses of the mirror turn sig-
nals in the exterior mirror housing using awet
sponge and mild cleaning agent, e.g.
Mercedes-Benz car shampoo or cleaning
cloths.
Cleaning the sensors
!If you clean the sensors with apower
washer, make sure that you keep adistance
of at least 11.8 in (30 cm) between the vehicle
and the power washer nozzle. Information
aboutt he correct distance is available from
the equipment manufacturer.
234Care
Maintenance and care