2017 MERCEDES-BENZ G-Class steering
[x] Cancel search: steeringPage 80 of 286
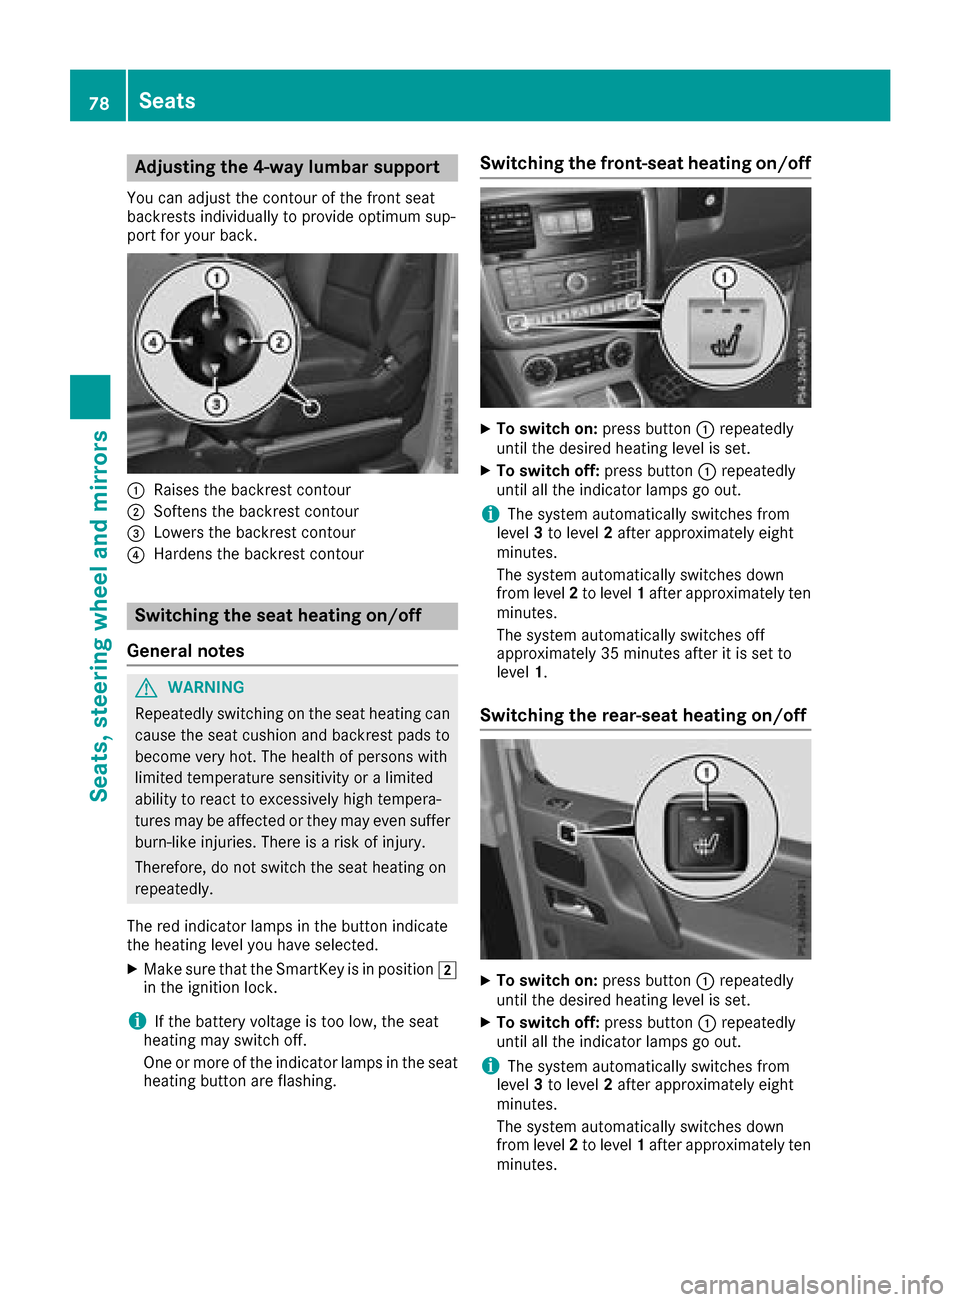
Adjusting the4-wa ylumbar support
You can adjust th econtou rofthefron tseat
backrest sindividually to provid eoptimum sup-
por tfor your back.
:Raises th ebackrest contour
;Soften sthe backrest contour
=Lowers th ebackrest contour
?Harden sthe backrest contour
Switchin gthe seath eating on/off
Gene raln otes
GWARNIN G
Repeatedly switching on th eseat heating can
caus ethe seat cushion and backrest pads to
become ver yhot.T he healt hofpersonswith
limite dtem perature sensitivit yoralimited
abilit ytor eac ttoe xcessivelyhigh tempera-
tures may be affecte dortheym ay eve nsuffer
burn-like injuries. There is ariskofi njury.
Therefore ,donotswitch th eseat heating on
repeatedly.
The red indicator lamp sinthebutto nindicat e
th eh eating level you hav eselected.
XMak esuret ha tthe SmartKey is in position 2
in th eignition lock.
iIf th ebattery voltag eistoolow, th eseat
heating may switch off .
On eorm oreoft heindicator lamp sintheseat
heating butto nare flashing.
Switchin gthe front-seat heating on/off
XTo switch on: press button: repeatedly
until th edesired heating level is set .
XTo switch off:press butto n: repeatedly
until all th eindicator lamp sgoout.
iThe system automatically switches from
level 3to level 2after approximately eigh t
minutes.
The system automatically switches down
from level 2to level 1after approximately te n
minutes.
The system automatically switches off
approximately 35 minute safter it is set to
level 1.
Switchin gthe rea r-seath eating on/off
XTo switch on: press button: repeatedly
until th edesired heating level is set .
XTo switch off:press butto n: repeatedly
until all th eindicator lamp sgoout.
iThe system automatically switches from
level 3to level 2after approximately eigh t
minutes.
The system automatically switches down
from level 2to level 1after approximately te n
minutes.
78Seats
Seats ,steering wheel and mirrors
Page 81 of 286
The system automatically switches off
approximately 35 minutes after it is set to
level1.
Switching the seat ventilation on/off
Switching on/off
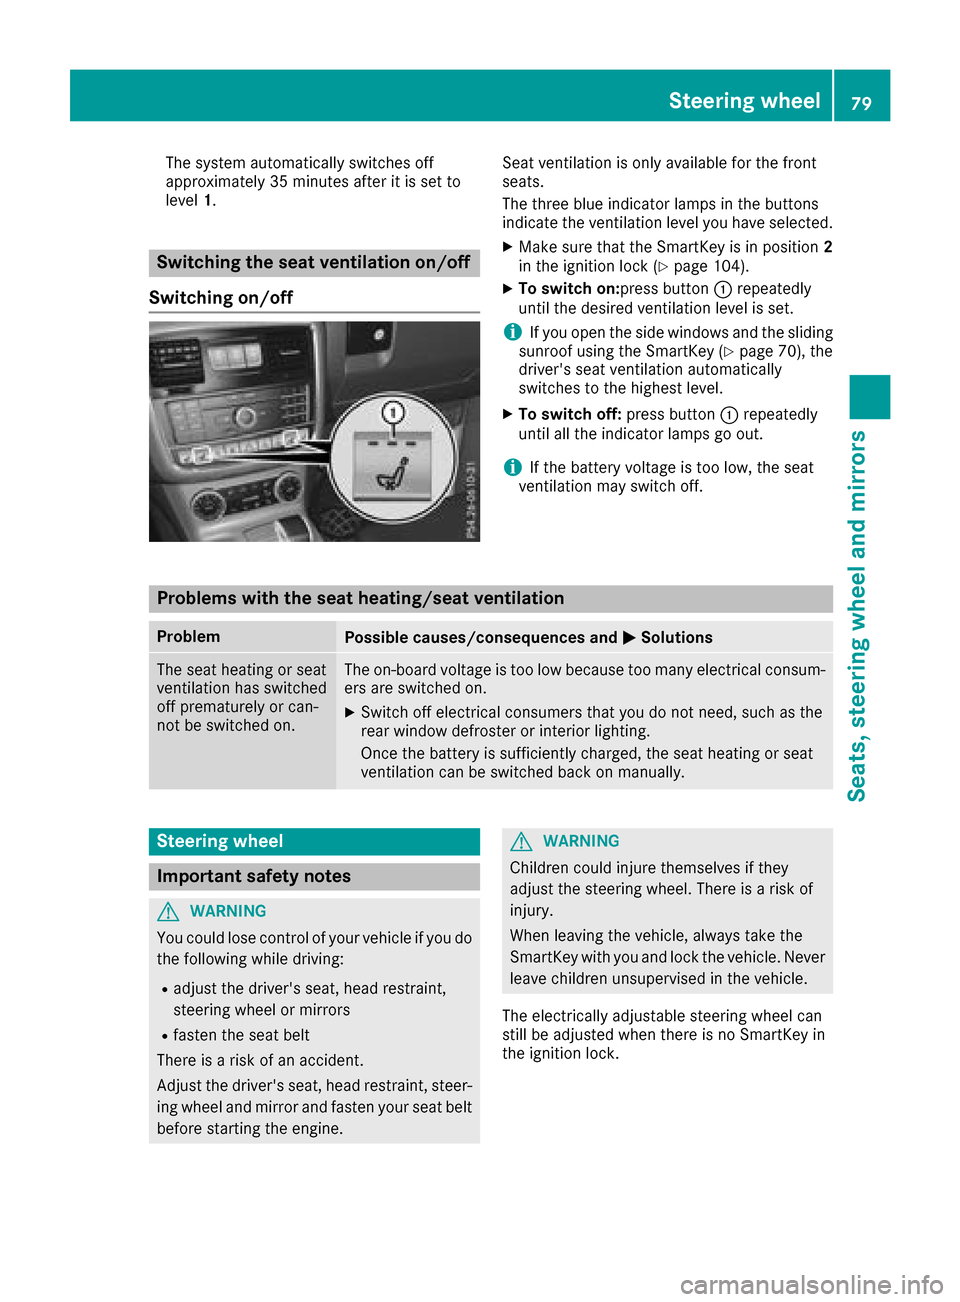
Seat ventilation is only availablef or the front
seats.
The three blue indicator lamps in the buttons
indicate the ventilation level you have selected.
XMake sure that the SmartKey is in position 2
in the ignition lock (Ypage 104).
XTo switch on:press button :repeatedly
until the desired ventilation level is set.
iIf you open the side windows and the sliding
sunroof using the SmartKey (Ypage 70), the
driver's seat ventilation automatically
switches to the highest level.
XTo switch off: press button:repeatedly
until all the indicator lamps go out.
iIf the battery voltage is too low, the seat
ventilation may switch off.
Problems with the seat heating/seat ventilation
ProblemPossible causes/consequences and MSolutions
The seat heating or seat
ventilation has switched
off prematurely or can-
not be switched on.The on-board voltage is too low because too many electrical consum-
ers are switched on.
XSwitch off electrical consumersthat you do not need, such as the
rear window defroster or interior lighting.
Once the battery is sufficiently charged, the seat heating or seat
ventilation can be switched back on manually.
Steering wheel
Important safety notes
GWARNING
You could lose control of your vehicle if you do the following while driving:
Radjust the driver's seat, head restraint,
steerin gwheel or mirrors
Rfasten the seat belt
There is arisk of an accident.
Adjust the driver's seat, head restraint, steer-
ing wheel and mirror and fasten your seat belt before starting the engine.
GWARNING
Children could injure themselves if they
adjust the steerin gwheel. There is arisk of
injury.
When leaving the vehicle, alwayst ake the
SmartKey with you and lock the vehicle. Never
leave children unsupervised in the vehicle.
The electrically adjustable steerin gwheel can
still be adjusted when there is no SmartKey in
the ignition lock.
Steering wheel79
Seats, steering wheel and mirrors
Z
Page 82 of 286
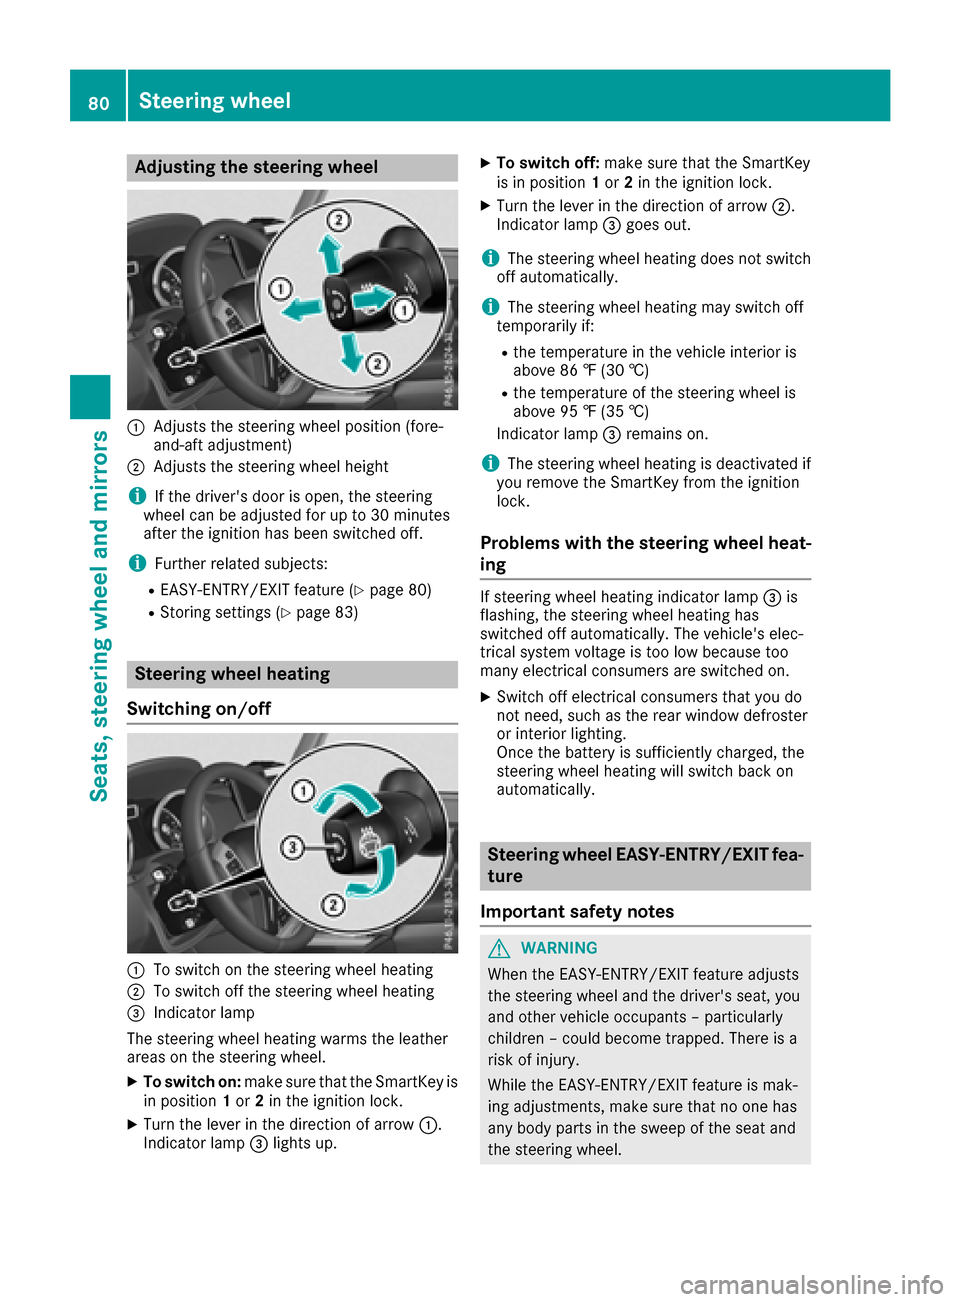
Adjusting thesteering wheel
:Adjusts th esteering whee lposition (fore-
and-af tadjustment)
;Adjusts th esteering whee lheight
iIf th edriver's door is open ,the steering
whee lcan be adjusted for up to 30 minute s
after th eignition has been switched off .
iFurther relatedsubjects :
REASY-ENTRY/EXIT feature (Ypage 80)
RStoring settings(Ypage 83)
Steering wheel heating
Switchin gon/off
:To switch on th esteering whee lheating
;To switch off th esteering whee lheating
=Indicato rlamp
The steering whee lheating warm sthe leather
areas on th esteering wheel.
XTo switch on: makesuret ha tthe SmartKey is
in position 1or 2in th eignition lock.
XTurn th elever in th edirection of arrow :.
Indicato rlamp =lights up.
XTo switch off :mak esuret hatthe SmartKey
is in position 1or 2in th eignition lock.
XTurn th elever in th edirection of arrow ;.
Indicato rlamp =goes out .
iThe steering whee lheating does no tswitch
off automatically.
iThe steering whee lheating may switch off
temporarily if:
Rth et em perature in th evehicl einterior is
abov e86‡ (30 †)
Rthet em perature of th esteering whee lis
abov e95‡ (35 †)
Indicato rlamp =remain son.
iThe steering whee lheating is deactivated if
you remove th eSmartKey from th eignition
lock.
Problemsw ith thesteering wheel heat-
ing
If steering whee lheating indicator lamp =is
flashing, th esteering whee lheating has
switched off automatically. The vehicle's elec -
trical system voltag eistoolow because to o
man yelectrical consumer sare switched on .
XSwitchoff electrical consumer sthaty ou do
no tn eed, suc hastherear window defroste r
or interior lighting .
Once th ebattery is sufficientl ycharged, th e
steering whee lheating will switch bac kon
automatically.
Steering wheel EASY-ENTRY/EX ITfea-
tu re
Import ant safety notes
GWARNIN G
When th eEASY-ENTRY/EXIT feature adjust s
th es teering whee land th edriver's seat ,you
and other vehicl eoccupant s–particularly
children –could become trapped .There is a
ris kofi njury.
Whil ethe EASY-ENTRY/EXIT feature is mak -
ing adjustments ,makes uret hatnoo nehas
any body part sintheswee poft heseat and
th es teering wheel.
80Steering wheel
Seats ,steering wheel and mirrors
Page 83 of 286
If somebodybecomes trapped:
Rpress one of the memory function position
buttons, or
Rpress one of the memory function memory
buttons, or
Rmove the switch for steering wheel adjust-
ment in the opposite direction to that in
which the steering wheel is moving
The adjustment process is stopped.
GWARNING
If you drive off whilet he EASY-ENTRY/EXIT
feature is making adjustments, you could lose
control of the vehicle.T here isarisk of an
accident.
Alway swaitu ntil the adjustment process is
complete before driving off.
!Do not activate the EASY-ENTRY/EXIT fea-
ture, if the seat backrest is reclined too far
backwards. This can damage the front or rear
seats. You must first move the backrest to a
vertical position.
The EASY-ENTRY/EXIT feature makes getting in
and out of you rvehicle easier.
You can activate and deactivate the EASY-
ENTRY/EXIT feature in the on-board computer
(
Ypage 166).
Position of the steering whee lwhen the
EASY-ENTRY/EXIT feature is active
The steering wheel moves upwards and towards
the dashboard if:
Ryou remove the SmartKey from the ignition
lock or
Ryou open the driver's door and the SmartKey
is in position 0or 1in the ignition lock
iThe steering wheel only moves upwards and
towards the dashboard if it has not already
reached the uppers teering limiter.
Position of the steering whee lfor driv-
ing
The steering wheel is moved to the last selected positionw hen:
Rthe driver's door is closed
Ryou insert the SmartKey into the ignition lock
The last positionoft he steering column is stored
when you switch off the ignition or when you
store the setting with the memory function
(
Ypage 83).
Mirrors
Rear-view mirror
XAdjust the rear-view mirror in such away that
you have agood view of road and traffic con-
ditions behind you.
Exteriorm irrors
Adjusting the exterio rmirrors
GWARNING
The exterior mirror on the front-passenger
side reduces the size of the image.V isible
objects are actually closer than they appear.
This means that you could misjudge the dis-
tance from road users traveling behind, e.g.
when changing lane. There is arisk of an acci-
dent.
For this reason, always make sure of the
actual distance from the road users traveling
behind by glancing over you rshoulder.
Mirrors81
Seats, steeringw heel and mirrors
Z
Page 84 of 286
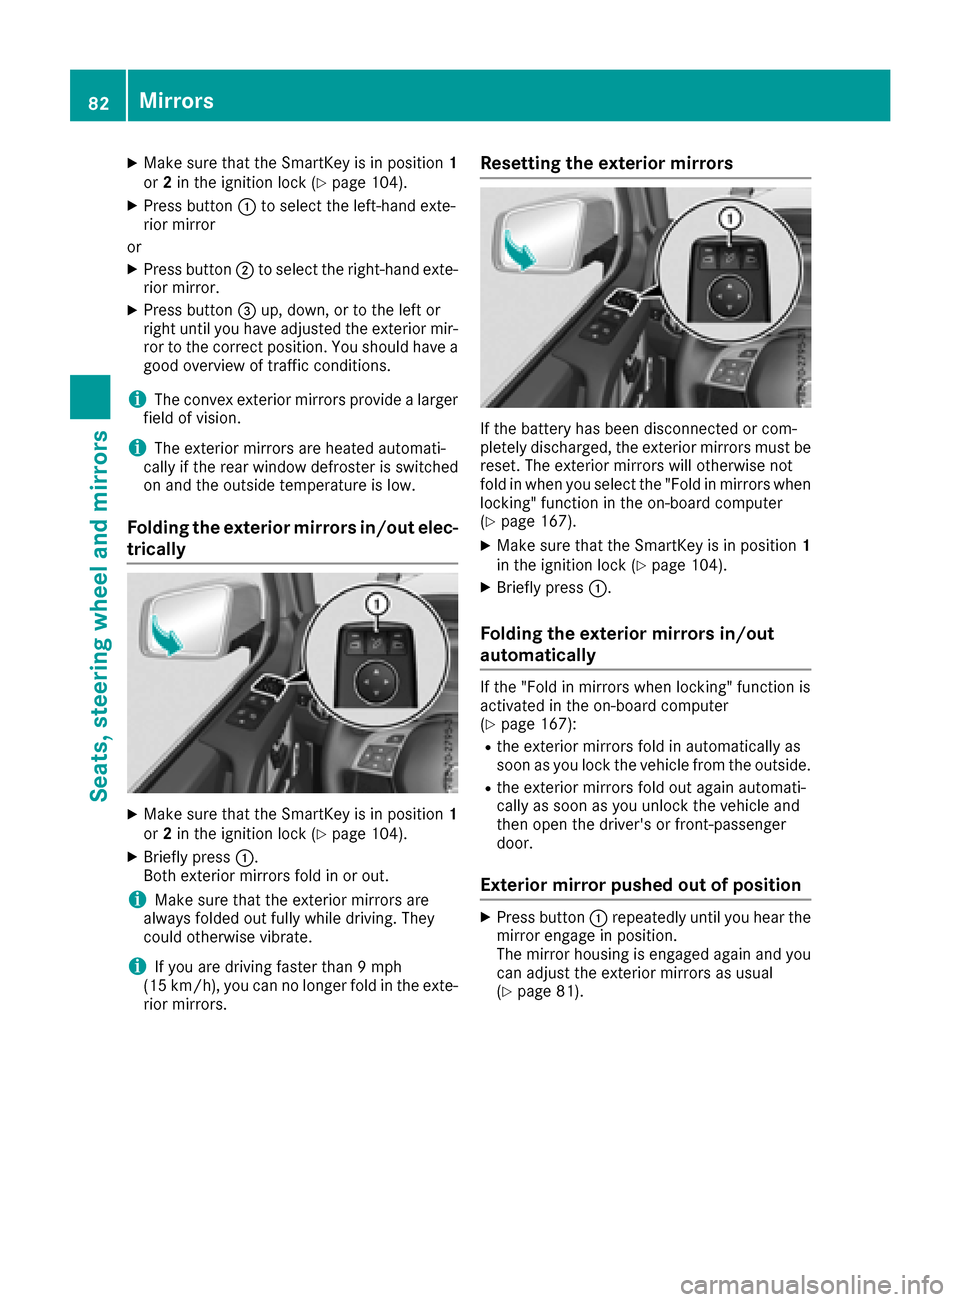
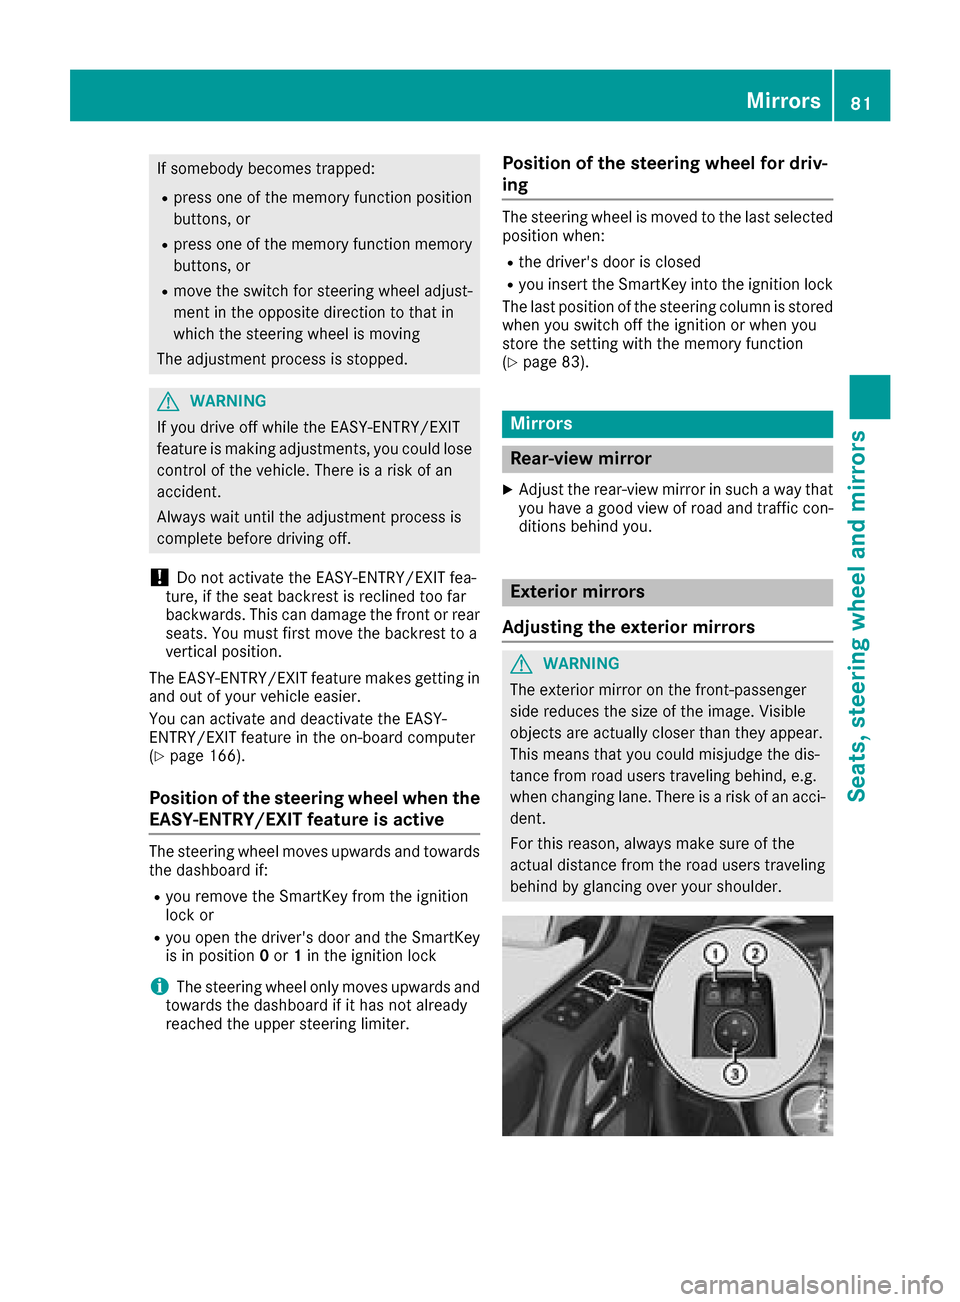
XMake sure that the SmartKey is in position1
or 2in the ignition lock (Ypage 104).
XPress button :to select the left-hand exte-
rior mirror
or
XPress button ;to select the right-hand exte-
rior mirror.
XPress button =up, down, or to the left or
right until you have adjusted the exterior mir- ror to the correct position. You should have a
good overview of traffic conditions.
iThe convex exterior mirrors provide alarger
field of vision.
iThe exterior mirrors are heated automati-
cally if the rear window defroster is switched
on and the outside temperature is low.
Folding the exterior mirrors in/out elec-
trically
XMake sure that the SmartKey is in position 1
or 2in the ignition lock (Ypage 104).
XBriefly press :.
Both exterior mirrors fold in or out.
iMake sure that the exterior mirrors are
always folded out fully while driving. They
could otherwise vibrate.
iIf you are driving faster than 9mph
(15 km/h), you can no longer fold in the exte-
rior mirrors.
Resetting the exterior mirrors
If the battery has been disconnected or com-
pletely discharged, the exterior mirrors must be
reset. The exterior mirrors will otherwise not
fold in when you select the "Fold in mirrors when
locking" function in the on-board computer
(
Ypage 167).
XMake sure that the SmartKey is in position 1
in the ignition lock (Ypage 104).
XBriefly press :.
Folding the exterior mirrors in/out
automatically
If the "Fold in mirrors when locking" function is
activated in the on-board computer
(
Ypage 167):
Rthe exterior mirrors fold in automatically as
soon as you lock the vehicle from the outside.
Rthe exterior mirrors fold out again automati-
cally as soon as you unlock the vehicle and
then open the driver's or front-passenger
door.
Exterior mirror pushed out of position
XPress button :repeatedly until you hear the
mirror engage in position.
The mirror housing is engaged again and you
can adjust the exterior mirrors as usual
(
Ypage 81).
82Mirrors
Seats, steering wheela nd mirrors
Page 85 of 286
Automa tica nti-glar emirror s
The rear-view mirror and th eexter iorm irror on
th ed river's side automatically go int oanti-glare
mod eif:
Rthei gnition is switched on and
Rinciden tligh tfro mh eadlamp sstrikes th esen-
sor in th erear-view mirror
iThe mirror sdonotgo int oanti-glare mod eif
revers egear is engage doriftheinterior light-
ing is switched on .
Parking position for th eexteri or mir-
ror on thef ront-passenger side
Setting/stori ng theparki ng position
Usin grevers egear
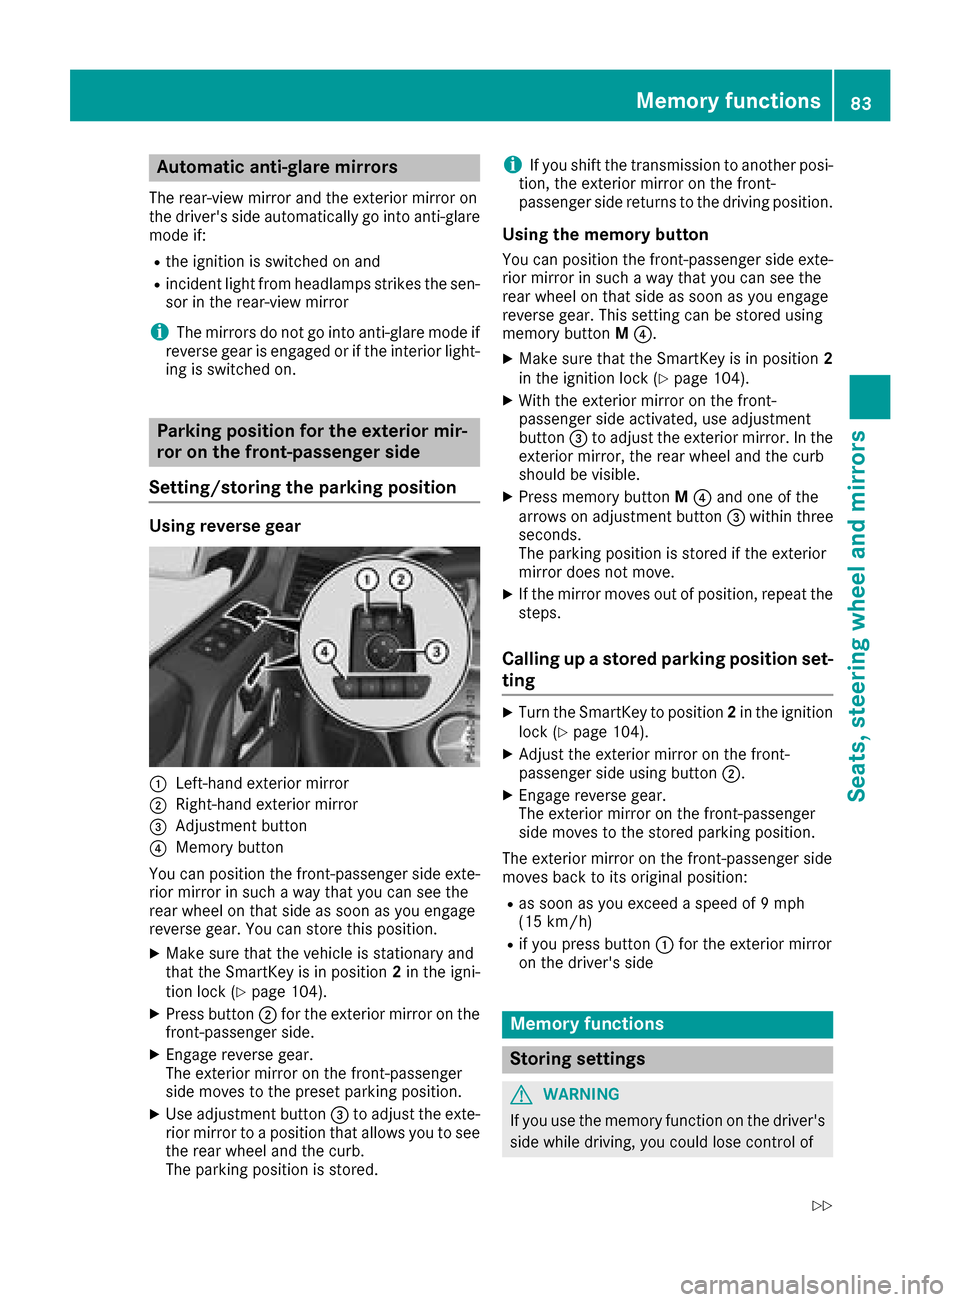
:Left-han dexter iorm irror
;Right-hand exterio rmirror
=Adjustmen tbutto n
?Memory butto n
You can position th efront-pa ssenger side exte -
rio rm irror in suc haway that you can see th e
rear whee lonthats ide as soo nasyou engage
revers egear .You can store this position .
XMakesuret hatthe vehicl eisstationary and
that th eSmartKey is in position 2in th eigni-
tion loc k(
Ypage 104).
XPress butto n; for th eexter iorm irror on th e
front-passenger side .
XEngage reversegear .
The exterio rmirror on th efront-pa ssenger
side moves to th epreset parking position .
XUse adjustmentbutto n= to adjust th eexte-
rio rm irror to aposition that allows you to see
th er ear whee land th ecurb.
The parking position is stored.
iIf you shif tthe transmission to another posi-
tion ,the exterio rmirror on th efront -
passenger side return stothedrivin gposition .
Usingthe memory button
You can position th efront-pa ssenger side exte -
rio rm irror in suc haway that you can see th e
rear whee lonthats ide as soo nasyou engage
revers egear .This setting can be store dusing
memory butto nM ?.
XMak esuret hatthe SmartKey is in position 2
in thei gnition loc k(Ypage 104).
XWiththe exterio rmirror on th efront -
passenger side activated, use adjustmen t
butto n= to adjust th eexter iorm irror .Int he
exterio rmirror ,the rear whee land th ecurb
should be visible.
XPress memory butto nM ? and on eofthe
arrows on adjustmen tbutto n= within three
seconds.
The parking position is store diftheexterio r
mirror does no tmove.
XIf th emirror moves out of position ,repeat th e
steps.
Calling up astoredp arki ng position set-
ting
XTurn th eSma rtKey to position 2in th eignition
loc k(Ypage 104).
XAdjus tthe exterio rmirror on th efront -
passenger side usin gbutto n;.
XEngage revers egear .
The exterio rmirror on th efront-pa ssenger
side moves to th estoredp arking position .
The exterio rmirror on th efront-pa ssenger side
moves bac ktoitsoriginal position :
Ras soonasyou exceed aspee dof9 mph
(15 km/h)
Rif you press butto n: for th eexter iorm irror
on th edriver's side
Mem oryfunctions
Stori ng settings
GWARNIN G
If you use th ememory function on th edriver's
side while driving, you could lose control of
Memoryf unctions83
Seats ,steering wheel and mirrors
Z
Page 86 of 286
the vehicleasaresultoft he adjustments
being made .There is ariskofana ccident.
Onlyu sethe memory functio nonthe driver's
side when the vehicl eisstationary.
GWARNING
When the memory functio nadjusts the seat or
steering wheel, yo uand othe rvehicl eoccu-
pants –particularly children –could become
trapped .There is ariskofi njury.
Whil ethe memory functio nism aking adjust-
ments ,makes uret hatnoo ne hasa ny body
parts in the swee pofthe seat or steering
wheel. If somebod ybecome strapped ,imm e-
diately release the memory functio nposit ion
button. The adjustment proces sisstopped.
GWARNING
Childre ncould become trapped if theya cti-
vate the memory function, particularly when
unattended .There is ariskofi njury.
When leaving the vehicle, always take the
SmartKeyw ithy ou and lock the vehicle. Never
leav echildren unsupervised in the vehicle.
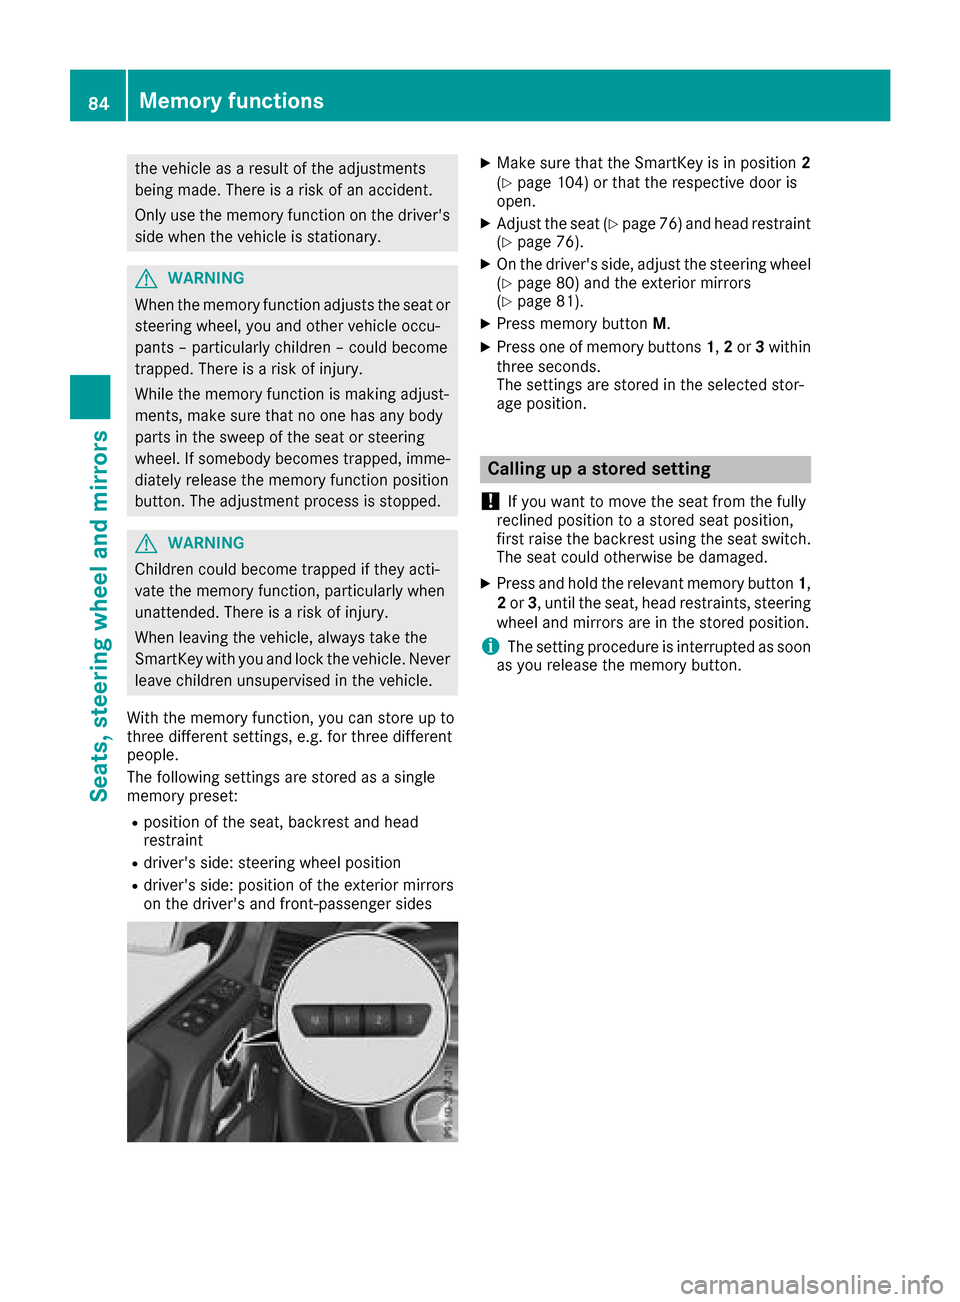
With the memory function, yo ucan stor eupto
threed ifferent settings, e.g .for threed ifferent
people.
The following setting sarestored as asingle
memory preset:
Rpositio nofthe seat, backrest and head
restraint
Rdriver's side :steering whee lposit ion
Rdriver's side :posit ionoft he exterio rmirrors
on the driver's and front-passenge rsides
XMake sure thatt he SmartKeyisinp osition 2
(Ypage 104 )orthatthe respectiv edooris
open.
XAdjust the seat (Ypage 76 )and hea drestraint
(Ypage 76).
XOn the driver'ss ide,adjus tthe steering wheel
(Ypage 80 )and the exterio rmirrors
(Ypage 81).
XPress memory button M.
XPress one of memory buttons 1,2 or 3within
threes econds.
The settings are stored in the selecte dstor-
ag ep osition.
Calling up astored setting
!
If yo uwanttom ove the sea tfrom the fully
recline dposition toas tored sea tposition,
first raise the backres tusing the sea tswitch.
The sea tcould otherwise be damaged.
XPress and hol dthe relevant memory button 1,
2 or 3,u nti lthe seat, hea drestraints, steering
whee land mirrors are in the stored position.
iThe setting procedur eisinterruptedass oon
as yo urelease the memory button.
84Memory functions
Seats, steering wheel andmirrors
Page 105 of 286
Notesonb reaking-in anew vehicle
Important safety notes
Thes ensors ystemofs omedriving and driving
safety systems adjusts automaticall ywhile a
certai ndistance is being driven after the vehicle
ha sb eend elivere dorafter repairs. Full system
effectiveness is not reachedu ntilthe end of this
teach-inp rocedure.
New and replaced brake pads and discs only
reach their optimum braking effect after several hundred kilometers of driving. Compensate for
thi sb yapplyin ggreate rforce to the brake pedal.
The first 1000 miles (150 0km)
Them orey ou look after the engine when it is
new ,the mor esatisfied yo uwillbew ithi ts per-
formance in the future.
RYo us houl dtherefore drive at varying vehicle
and engine speeds for the first 1,000 miles
(1,500 km).
RAvoi dheavy loads, e.g .driving at full throttle,
during thi speriod.
RWhen shifting gear smanually, shift up in good
time, befor ethe tachomete rneedl ereaches
Ô of the wa ytothe red area of the tachom-
ete rdisplay .
RDo not manuall yshift to alower gear to brake
the vehicle.
RTry to avoi ddepressing the accelerator pedal
beyond the pressure point (kickdown).
Additiona lbreaking-i nnote sfor Mercedes-AMG
vehicles:
RDo not drive fastert han85m ph (140km/h)
for the first 1,000 mile s(1,50 0km).
ROnlyb rieflyallow the engine to reach amax-
imum engine spee dof4,500 rpm.
RAvoiddriving off-roa dbefor et he first differ-
ential oi lchange at 2,000 mile s(3,000 km).
RIdeally ,for the first 1,000 mile s(1,50 0km),
drive in program C.
After 1,000 mile s(1,500 km), you can increase
the engine speedg radually and bring the vehicle
to ful lspeed.
You should also observe these notes on break-
i
ng in if the engine or parts of the drive train on
you rvehicle have beenr eplaced.
Always observe the maximu mpermissible
speed.
Axl edifferential transmission
(Mercedes-AMG vehicles)
Change the oil after abreaking-in period of
2,000 miles( 3,000 km) to improve protectiono f
the axle differential transmission.
This oil change prolongs the service life of the
axle differential transmission. Have the oil
change carrie dout at aqualified specialist work-
shop.
Driving
Important safety notes
GWARNING
Objects in the driver's footwell may restrict
the clearance around the pedal sorblock a
depressedp edal.This jeopardizes the oper-
ating and road safety of the vehicle. There is a risk of an accident.
Stow al lobjects securely in the vehicle so that
they do not get into the driver's footwell.
When using floormats or carpets, make sure
that they are properly secured so that they do not sliporo bstruct the pedals. Do not place
severalf loormats or carpets on top of one
another.
GWARNING
Unsuitabl efootwear can hinde rcorrect usage
of the pedals, e.g.:
Rshoesw ith thick soles
Rshoeswith high heels
Rslippers
There is arisk of an accident.
Wears uitablefootwear to ensure correct
usage of the pedals.
GWARNING
If you switch off the ignition while driving,
safety-relevant functions are only available
with limitations, or not at all. This coul daffect,
for example, the power steering and the brake
boosting effect. You wil lrequire considerably
more effort to steer and brake .There is arisk
of an accident.
Driving103
Driving and parking
Z