2017 MERCEDES-BENZ E-CLASS SALOON wheel
[x] Cancel search: wheelPage 108 of 497

Switching
thest eering wheel heater on/off Re
quirements:
R The po wer supply or the ignition is switched
on. #
Toswitch on/off: turnthe le ver in the direc‐
tion of ar row1or2.
If indicator lamp 3lights up, thesteering
wheel heater is switched on. Easy entry and
exitfeature Fu
nction of the easy entry and exitfeature &
WARNING Risk of accident when pulling
aw ay during the adjustment process of
th e easy exitfeature
‑ If you pull away while the easy entry and
ex itfeature is making adjustments, you could
lose cont rol of theve hicle. #
Alw ayswa it until the adjustment proc‐
ess is comple tebefore pulling away. &
WARNING Risk of becoming trapped
while adjusting the easy entry andexit
fe ature
When the easy entry andexitfeature adjusts
th esteering wheel, you and other vehicle
occupants – particularly children – could
become trapped. #
During the adjustment process of the
easy entry andexitfeature, make sure th
at no one has any body parts in the
sweep of thesteering wheel. #
Movethe adjustment le ver of thesteer‐
ing wheel if there is a risk of becoming
trapped bythesteering wheel.
The adjustment process is stopped. #
Never lea vechildren unat tended in the
ve hicle. #
When leaving theve hicle, alw aysta ke
th eke y with you and lock theve hicle.
This also applies tomobile phones if the
"Digital Car Key in the smartphone"
function is activated via the Mercedes
connect me web App. Ve
hicles with memory function: you can stop
th e adjustment process bypressing one of the
memory position buttons of the memory func‐
tion.
If th e easy entry andexitfeature is active, the
st eering wheel will mo veupwards in thefo llow‐
ing situations:
R you swit chthe ignition off Seats and
stowing 105
Page 109 of 497

R
you open the driver's door when the ignition
is switched on
The steering wheel mo ves back tothe last drive
position in thefo llowing cases:
R you swit chthe ignition on when the driver's
door is closed
R you close the driver's door when the ignition
is switched on
The last drive position of thesteering wheel is
st ored in thefo llowing situations:
R you swit ch the ignition off
R Vehicles with memory function: save the
seat settings via the memory function.
Ve hicles with memory function: press one of
th e memory function sa ved position buttons to
st op the adjustment process.
Setting the easy entry and exitfeature
Multimedia sy stem:
, Vehicle .
Vehicle settings .
Easy
Entry/Exit #
Activate Oor deacti vate ª the function. Using
the memory function &
WARNING Risk of an accident if memo ry
function is used while driving
If yo u use the memory function on the driv‐
er's side while driving, you could lose cont rol
of theve hicle as a result of the adjustments
being made. #
Only use the memory function on the
driver's side when theve hicle is station‐
ar y. &
WARNING Risk of entrapment when set‐
ting the seat with the memory function
If yo u use the memory function toset the
seat or thesteering wheel, you and other
ve hicle occupants, especially children, could
be ent rapped. #
During the setting procedure of the
memory function, ensure that no body
parts are in the sweep of the seat or
th esteering wheel. #
If somebody becomes trapped, immedi‐
ately release the memory function posi‐
tion button.
The adjustment process is stopped. &
WARNING Risk of entrapment if the
memory function is activated bychildren
Children could become trapped if they acti‐
va te the memory function, particularly when
unattended. #
Never lea vechildren unat tended in the
ve hicle. #
When leaving theve hicle, alw aysta ke
th eke y with you and lock theve hicle.
This also applies tomobile phones if the
"Digital Car Key in the smartphone"
function is activated via the Mercedes
connect me web app. The memory function can be used when
the igni‐
tion is switched off. 106
Seats and stowing
Page 110 of 497

St
oring
Seat adjustments for up tothre e people can be
st ored and called up using the memory function.
The following sy stems can be selected:
R Seat, backrest and head restra int
R Steering wheel
R Outside mir rors
R Head-up display #
Set the seat, thesteering wheel, the head-up
display and the outside mir rorto the desired
position. #
Press memory button M toge ther with one of
th estorage position buttons 1,2 or 3.
An acou stic signal sounds. The settings are
st ored. #
Tocall up: press and hold there leva nt pre‐
set position button 1,2 or 3 until the front
seat, thesteering wheel, head-up display and
outside mir ror is in thestored position. St
ow age areas Note
s on loading theve hicle &
WARNING Risk ofexhaust gas poisoning
Combustion engines emit poisonous exhaust
ga ses such as carbon monoxide. Exhaust
ga ses can enter theve hicle interior if the
boot lid is open when the engine is running,
especially if theve hicle is in motion. #
Alw ays switch off the engine before
opening the boot lid. #
Never drive with the boot lid open. &
WARNING Risk of inju ryfrom unsecu red
items in theve hicle
If objects, luggage or loads are not secured
or not secured suf ficientl y,they could slip,
tip ove r or be throw n around and thereby hit
ve hicle occupants.
There is a risk of injur y,particularly in the
ev ent of sudden braking or a sudden change
in direction. #
Alw aysstow objects in such a wayth at
th ey cannot be thro wn around. #
Before the journe y,secure objects, lug‐
ga ge or loads against slipping or tipping
ove r. &
WARNING Risk of inju ryfrom incor rectly
stowe d objects
If objects in the passenger compartment are
stowe d incor rectl y,they can slide or be
th ro wn around and hit vehicle occupants. In Seats and
stowing 107
Page 134 of 497

Ac
tive headlamps function R
The headlamps follow thesteering mo ve‐
ments.
R Releva nt areas are better illumina ted while
driving.
The functions are active when the dipped beam
is switched on.
Depending on theve hicle's equipment, the
cou rse of the lane you are driving in is also eval‐
uated and the active headlamps function adjusts
th e light in advance. Cornering light function
The cornering light impr
ovesth e illumination of
th e car riag ewa yove r a wide angle in the turning
direction, enabling better visibility on tight
bends, forex ample. It can be activated on ly
when the dipped beam is switched on.
The function is active:
R Atspeeds below 40 km/h when the turn sig‐
nal light is switched on or thesteering wheel
is turned.
R Atspeeds between 40 km/h and 70 km/h
when thesteering wheel is turned. Ro
undabout and intersection function: the
cornering light is acti vated on bo thsides thro ugh
an evaluation of the cur rent GPS position of the
ve hicle. It remains active until af terth eve hicle
has left thero undabout or the intersection.
Mo torw ay mode function
Mo torw ay mode increases thera nge and bright‐
ness of the cone of light, enabling better visibil‐
ity. The function is active if a mo
torw ay jou rney is
de tected by:
R The vehicle's speed.
R The multifunction camera. Light and sight
131
Page 141 of 497

Changing
the front bulbs (vehicles with halo‐
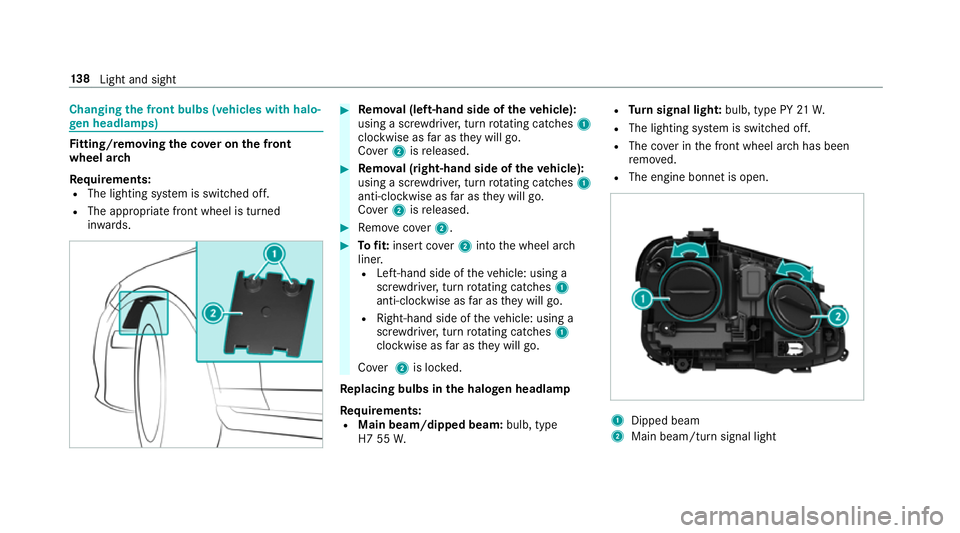
ge n headla mps) Fi
tting/ removing the co ver on the front
wheel ar ch
Re quirements:
R The lighting sy stem is switched off.
R The appropriate front wheel is turned
in wa rds. #
Remo val (left-hand side of theve hicle):
using a scr ewdriver, turn rotating catches 1
clo ckwise as far as they will go.
Co ver2 isreleased. #
Remo val (right-hand side of theve hicle):
using a scr ewdriver, turn rotating catches 1
anti-clo ckwise as far as they will go.
Co ver2 isreleased. #
Remo vecover2. #
Tofit: inse rtco ver2 into the wheel ar ch
liner.
R Left-hand side of theve hicle: using a
scr ewdriver, turn rotating catches 1
anti-clo ckwise as far as they will go.
R Right-hand side of theve hicle: using a
scr ewdriver, turn rotating catches 1
clo ckwise as far as they will go.
Co ver2 is loc ked.
Re placing bulbs in the halo gen headla mp
Requ irements:
R Main beam/dipped beam: bulb, type
H7 55 W. R
Turn signal light: bulb, type PY 21W.
R The lighting sy stem is switched off.
R The co ver in the front wheel ar chhas been
re mo ved.
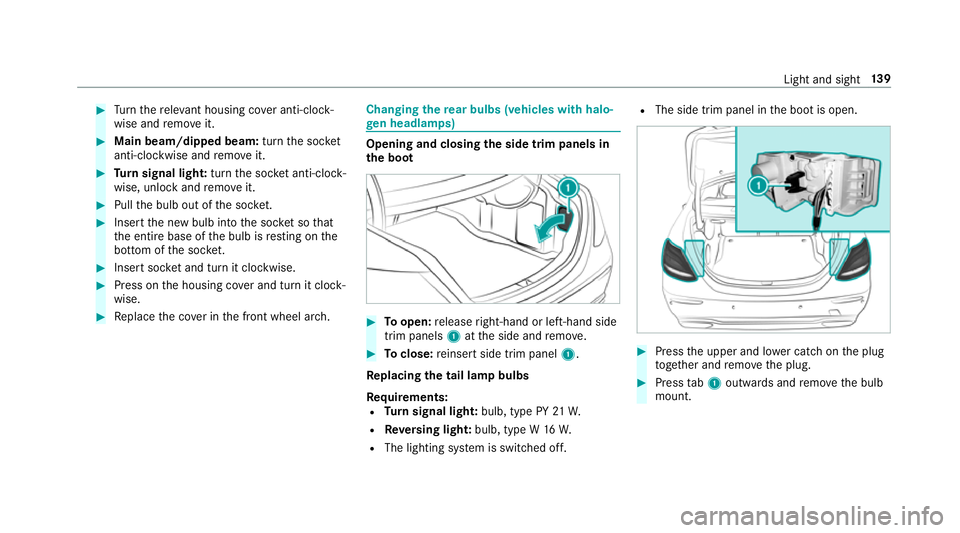
R The engine bonn etis open. 1
Dipped beam
2 Main beam/turn signal light 13 8
Light and sight
Page 142 of 497

#
Turn there leva nt housing co ver anti-clock‐
wise and remo veit. #
Main beam/dipped beam: turnthe soc ket
anti-clockwise and remo veit. #
Turn signal light: turnthe soc ket anti-clo ck‐
wise, unlock and remo veit. #
Pull the bulb out of the soc ket. #
Inse rtthe new bulb into the soc ket so that
th e entire base of the bulb is resting on the
bottom of the soc ket. #
Inse rtsoc ket and turn it clo ckwise. #
Press on the housing co ver and turn it clock‐
wise. #
Replace the co ver in the front wheel ar ch. Changing
there ar bulbs (vehicles with halo‐
ge n headla mps) Opening and closing
the side trim panels in
th e boot #
Toopen: release right-hand or left-hand side
trim panels 1atthe side and remo ve. #
Toclose: reinse rtside trim panel 1.
Re placing the tail lamp bulbs
Re quirements:
R Turn signal light: bulb, type PY 21W.
R Reversing light: bulb, type W 16W.
R The lighting sy stem is switched off. R
The side trim panel in the boot is open. #
Press the upper and lo wer catch on the plug
to ge ther and remo vethe plug. #
Press tab1 outwards and remo vethe bulb
mount. Light and sight
13 9
Page 145 of 497

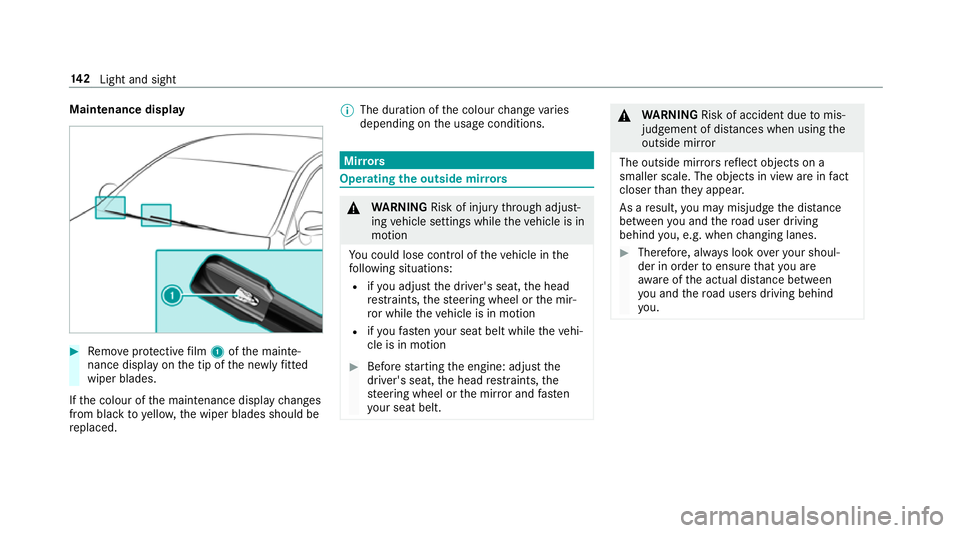
Maintenance display
#
Remo veprotective film 1 ofthe mainte‐
nance display on the tip of the newly fitted
wiper blades.
If th e colour of the maintenance display changes
from black to yellow, the wiper blades should be
re placed. %
The duration of the colour change varies
depending on the usage conditions. Mir
rors Operating
the outside mir rors &
WARNING Risk of inju rythro ugh adjust‐
ing vehicle settings while theve hicle is in
motion
Yo u could lose cont rol of theve hicle in the
fo llowing situations:
R ifyo u adjust the driver's seat, the head
re stra ints, thesteering wheel or the mir‐
ro r while theve hicle is in motion
R ifyo ufast enyour seat belt while theve hi‐
cle is in motion #
Before starting the engine: adjust the
driver's seat, the head restra ints, the
st eering wheel or the mir ror and fasten
yo ur seat belt. &
WARNING Risk of accident due tomis‐
judgement of dis tances when using the
outside mir ror
The outside mir rors reflect objects on a
smaller scale. The objects in view are in fact
closer than they appear.
As a result, you may misjud gethe dis tance
between you and thero ad user driving
behind you, e.g. when changing lanes. #
Therefore, alw ays look over your shoul‐
der in order toensure that you are
aw are of the actual dis tance between
yo u and thero ad users driving behind
yo u. 14 2
Light and sight
Page 147 of 497

The inside
rear-view mir ror and the outside mir‐
ro r on the driver's side automatically go into
anti-dazzle mode if light from a headlamp hits
th e inside rear-view mir ror.
Sy stem limitations
The sy stem does not go into anti-dazzle mode in
th efo llowing situations:
R the engine is switched off.
R reve rsege ar is engaged
R the interior lighting is switched on Fu
nction of the passenger outside mir ror
parking position %
The pa rking position is available on ly invehi‐
cles with a memory function.
The parking position makes parking easier.
The passenger outside mir ror tilts down wards
and sho ws there ar wheel on the front passenger
side in thefo llowing situations:
R the parking position is stored (→ page144)
R the passenger mir ror is selected
R reve rsege ar is engaged The passenger outside mir
ror mo ves back toits
original position in thefo llowing situations:
R ifyo u shift the transmission toano ther trans‐
mission position
R at speeds greater than 15 km/h
R ifyo u press the button forth e outside mir ror
on the driver's side St
oring the pa rking position of the
pa ssenger outside mir ror using reve rsege ar St
oring #
Select the passenger outside mir ror using
button 2. #
Engage reve rsege ar. #
Movethe passenger outside mir ror into the
desired parking position using button 1.14 4
Light and sight