2017 MERCEDES-BENZ E-CLASS SALOON engine
[x] Cancel search: enginePage 97 of 497

Note
s onthe cor rect driver's seat position &
WARNING Risk of inju rythro ugh adjust‐
ing vehicle settings while theve hicle is in
motion
Yo u could lose cont rol of theve hicle in the
fo llowing situations:
R ifyo u adjust the driver's seat, the head
re stra ints, thesteering wheel or the mir‐
ro r while theve hicle is in motion
R ifyo ufast enyour seat belt while theve hi‐
cle is in motion #
Before starting the engine: adjust the
driver's seat, the head restra ints, the
st eering wheel or the mir ror and fasten
yo ur seat belt. Ensure
thefo llowing when adjusting thesteering
wheel 1, seat belt 2and driver's seat 3:
R you are as faraw ay from the driver's airbag
as possible
R you are sitting in a no rmal upright position
R your thighs are slight lysuppor tedby the seat
cushion R
your legs are not entirely stre tched and you
can dep ress the pedals properly
R the back of your head is suppo rted at eye
le ve lby the cent reofthe head restra int
R you can hold thesteering wheel with your
arms slightly bent
R you can mo veyour legs freely
R you can see all the displa yson the instru‐
ment clus ter clea rly
R you ha vea good overview of the traf fic con‐
ditions
R the seat belt is pulled snug lyagainst the
body and is routed across the cent reofyour
shoulder and across your hips in the pelvic
area 94
Seats and stowing
Page 98 of 497

Seats
Ad
justing the front seat mechanically and
electrically (without Seat Comfort Package) &
WARNING Risk of becoming trapped if
th e seats are adjus tedby children
Children could become trapped if they adjust
th e seats, particularly when unattended. #
When leaving theve hicle, alw aysta ke
th eke y with you and lock theve hicle.
This also applies tomobile phones if the
"Digital Car Key in the smartphone"
function is activated via the Mercedes
connect me web App. #
Never lea vechildren unat tended in the
ve hicle. The seats can be adjus
ted when the ignition is
switched off. &
WARNING Risk of becoming trapped
when adjusting the seats
When you adjust a seat, you or other vehicle
occupants could become trapped, e.g. on the
seat guide rail. #
Make sure when adjusting a seat that
no one has any body parts in the sweep
of the seat. Obser
vethe saf ety no tes on "Airbags" and "Chil‐
dren in theve hicle". &
WARNING Risk of accident due tothe
driver's seat not being engaged
If th e driver's seat is not engaged, it could
mo veunexpectedly while theve hicle is in
motion.
This could cause youto lose control of the
ve hicle. #
Alw ays make sure that the driver's seat
is engaged before starting theve hicle. &
WARNING Risk of inju rythro ugh adjust‐
ing vehicle settings while theve hicle is in
motion
Yo u could lose cont rol of theve hicle in the
fo llowing situations:
R ifyo u adjust the driver's seat, the head
re stra ints, thesteering wheel or the mir‐
ro r while theve hicle is in motion
R ifyo ufast enyour seat belt while theve hi‐
cle is in motion #
Before starting the engine: adjust the
driver's seat, the head restra ints, the
st eering wheel or the mir ror and fasten
yo ur seat belt. &
WARNING Risk of becoming trapped if
th e seat height is adjus ted carelessly
If yo u adjust the seat height carelessly, you
or other vehicle occupants could be trapped
and thereby injured. Seats and
stowing 95
Page 102 of 497

#
Toselect the front passenger seat: press
button 1.
When the indicator lamp lights up, the front
passenger seat is selected. #
Adjust the front passenger seat using the
buttons in the door control panel on the driv‐
er's side. Ad
justing the 4-w aylumbar support 1
Toraise
2 Tosof ten
3 Tolower
4 Toharden #
Using buttons 1to4 , adjust the conto ur
of the backrest individually tosuit your bac k. Head
restra ints Ad
justing the front seat head restra ints man‐
ually &
WARNING Risk of inju rythro ugh adjust‐
ing vehicle settings while theve hicle is in
motion
Yo u could lose cont rol of theve hicle in the
fo llowing situations:
R ifyo u adjust the driver's seat, the head
re stra ints, thesteering wheel or the mir‐
ro r while theve hicle is in motion
R ifyo ufast enyour seat belt while theve hi‐
cle is in motion #
Before starting the engine: adjust the
driver's seat, the head restra ints, the
st eering wheel or the mir ror and fasten
yo ur seat belt. Seats and
stowing 99
Page 106 of 497

#
Toswitch off/reduce the le vel:press but‐
to n1 repeatedly until the desired heating
le ve l is set.
If all indicator lamps are off, the seat heater
is switched off.
% The seat heater automatically switches down
from theth re e heating le vels af ter 8, 10and
20 minutes until the seat heater is switched
off. Switching
the seat ventilation on/off Re
quirements:
R The po wer supply is switched on. #
Toswitch on/increase the le vel:press but‐
to n1 repeatedly until the desired ventila‐
tion le vel is set.
Depending on theve ntilation le vel, up to
th re e indicator lamps light up. #
Toswitch off/reduce the le vel:press but‐
to n1 repeatedly until the desired ventila‐
tion le vel is set.
If all indicator lamps are off, the seat ventila‐
tion is switched off. Ste
ering wheel Ad
justing the steering wheel manually &
WARNING Risk of inju rythro ugh adjust‐
ing vehicle settings while theve hicle is in
motion
Yo u could lose cont rol of theve hicle in the
fo llowing situations:
R ifyo u adjust the driver's seat, the head
re stra ints, thesteering wheel or the mir‐
ro r while theve hicle is in motion
R ifyo ufast enyour seat belt while theve hi‐
cle is in motion #
Before starting the engine: adjust the
driver's seat, the head restra ints, the Seats and
stowing 103
Page 110 of 497

St
oring
Seat adjustments for up tothre e people can be
st ored and called up using the memory function.
The following sy stems can be selected:
R Seat, backrest and head restra int
R Steering wheel
R Outside mir rors
R Head-up display #
Set the seat, thesteering wheel, the head-up
display and the outside mir rorto the desired
position. #
Press memory button M toge ther with one of
th estorage position buttons 1,2 or 3.
An acou stic signal sounds. The settings are
st ored. #
Tocall up: press and hold there leva nt pre‐
set position button 1,2 or 3 until the front
seat, thesteering wheel, head-up display and
outside mir ror is in thestored position. St
ow age areas Note
s on loading theve hicle &
WARNING Risk ofexhaust gas poisoning
Combustion engines emit poisonous exhaust
ga ses such as carbon monoxide. Exhaust
ga ses can enter theve hicle interior if the
boot lid is open when the engine is running,
especially if theve hicle is in motion. #
Alw ays switch off the engine before
opening the boot lid. #
Never drive with the boot lid open. &
WARNING Risk of inju ryfrom unsecu red
items in theve hicle
If objects, luggage or loads are not secured
or not secured suf ficientl y,they could slip,
tip ove r or be throw n around and thereby hit
ve hicle occupants.
There is a risk of injur y,particularly in the
ev ent of sudden braking or a sudden change
in direction. #
Alw aysstow objects in such a wayth at
th ey cannot be thro wn around. #
Before the journe y,secure objects, lug‐
ga ge or loads against slipping or tipping
ove r. &
WARNING Risk of inju ryfrom incor rectly
stowe d objects
If objects in the passenger compartment are
stowe d incor rectl y,they can slide or be
th ro wn around and hit vehicle occupants. In Seats and
stowing 107
Page 131 of 497

5
L Dipped beam/main beam
6 R Switches there ar fog light on or off
When dipped beam is activated, the indicator
lamp forth est anding lights Tis deactivated
and replaced bythe dipped beam indicator lamp
L. #
Alw ays park your vehicle safely and in a well-
lit area, in accordance with there leva nt le gal
st ipulations.
* NO
TEBattery discharging byoperating
th est anding lights Operating
thest anding lights over a period of
hours puts a stra in on the batter y. #
Where possible, switch on the
ri ght X or left Wparking light. In
the case of se vere battery discharging, the
st anding lights or parking lights are automati‐
cally swit ched off tofacilitate the next engine
st art. The
exterior lighting (e xcept standing and park‐
ing lights) swit ches off automatically when the
driver's door is opened.
R Obser vethe no tes on sur round lighting .
Au tomatic driving lights function
The standing lights, dipped beam and daytime
ru nning lights are switched on au tomatical ly
depending on the ignition status, whe ther the
engine is running and the light conditions. &
WARNING Risk of accident when the
dipped beam is switched off in poor visi‐
bility
When the light switch is set toà ,the
dipped beam may not be switched on auto‐
matically if there is fog, snow or other causes
of poor visibility such as spr ay. #
In such cases, turn the light switch to
L . The automatic driving lights are only an aid.
Yo u
are responsible forve hicle lighting. Ac
tivating/deactivating the rear fog light
Re quirements:
R The light switch is in the L orà posi‐
tion. #
Press the R button.
Please obser vethe count ry-specific la wsonthe
use of rear fog lamps.
Ad justing the headlamp range (halogen
headla mps without active suspension)
The headlamp range adjus ter allows youto
adjust the cone of light from the headlamps in
re lation totheve hicle's load condition. 12 8
Light and sight
Page 141 of 497

Changing
the front bulbs (vehicles with halo‐
ge n headla mps) Fi
tting/ removing the co ver on the front
wheel ar ch
Re quirements:
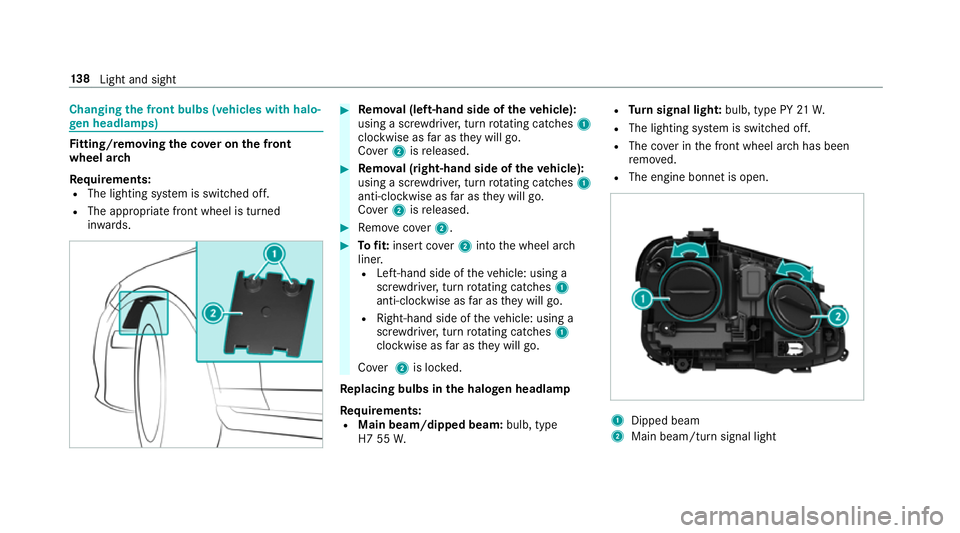
R The lighting sy stem is switched off.
R The appropriate front wheel is turned
in wa rds. #
Remo val (left-hand side of theve hicle):
using a scr ewdriver, turn rotating catches 1
clo ckwise as far as they will go.
Co ver2 isreleased. #
Remo val (right-hand side of theve hicle):
using a scr ewdriver, turn rotating catches 1
anti-clo ckwise as far as they will go.
Co ver2 isreleased. #
Remo vecover2. #
Tofit: inse rtco ver2 into the wheel ar ch
liner.
R Left-hand side of theve hicle: using a
scr ewdriver, turn rotating catches 1
anti-clo ckwise as far as they will go.
R Right-hand side of theve hicle: using a
scr ewdriver, turn rotating catches 1
clo ckwise as far as they will go.
Co ver2 is loc ked.
Re placing bulbs in the halo gen headla mp
Requ irements:
R Main beam/dipped beam: bulb, type
H7 55 W. R
Turn signal light: bulb, type PY 21W.
R The lighting sy stem is switched off.
R The co ver in the front wheel ar chhas been
re mo ved.
R The engine bonn etis open. 1
Dipped beam
2 Main beam/turn signal light 13 8
Light and sight
Page 144 of 497

Moving
the wiper arms toave rtical position #
Set the windscreen wipers tothe° slow
continuous wiping position on the combina‐
tion switch. #
As soon as the wiper arms are vertical rela‐
tive tothe engine bonn et, switch off the igni‐
tion.
Re moving the wiper blades #
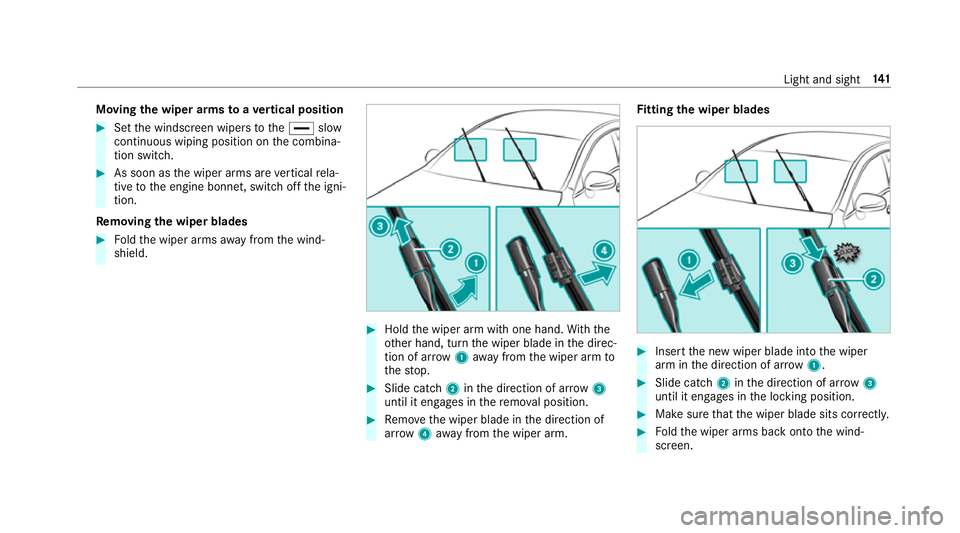
Foldthe wiper arms away from the wind‐
shield. #
Hold the wiper arm with one hand. With the
ot her hand, turn the wiper blade in the direc‐
tion of ar row1away from the wiper arm to
th estop. #
Slide catch 2inthe direction of ar row 3
until it engages in there mo val position. #
Remo vethe wiper blade in the direction of
ar row 4away from the wiper arm. Fi
tting the wiper blades #
Inse rtthe new wiper blade into the wiper
arm in the direction of ar row1. #
Slide catch 2inthe direction of ar row 3
until it engages in the locking position. #
Make sure that the wiper blade sits cor rectly. #
Foldthe wiper arms back onto the wind‐
screen. Light and sight
141