2017 MERCEDES-BENZ CLS-Class phone
[x] Cancel search: phonePage 164 of 206
Option 2:
XTo selectOptions: slide6and press the
controller.
XTo select BluetoothAudioDevices: press
the controller.
XTo select a Bluetooth®audio device: turn and
press the controller.
If the Bluetooth
®audio device has been
authorized, playback starts.
Bluetooth®audio device and simulta-
neous search for mobile phones
i
When searching for a mobile phone or a new
Bluetooth®audio device, the connection to an
already activated Bluetooth®audio device is
separated (Ypage 95).
In the Bluetooth
®audio basic display, you will
see the No Bluetooth Audio Device Con‐
nectedmessage, and the Connect Devicemenu item cannot be selected.
Displaying details
XTo select a Bluetooth®audio device from the
Bluetooth®device list: turn the controller.
XTo select the symbol to the right of the Blue-
tooth®audio device: slide 9the controller.
XTo select Details: turn and press the con-
troller.
The following information concerning the
selected mobile phone is shown:
RBluetooth®name
RBluetooth®address
RAvailability status (shown after an update)
RAuthorization status
XTo close the detailed display: press the
% button.
De-authorizing (deregistering) a Blue-
tooth®audio device
XTo select a Bluetooth®audio device from the
Bluetooth®device list: turn the controller.
XTo select the symbol to the right of the Blue-
tooth®audio device: slide 9and press the
controller.
XTo select Deauthorize: press the controller.
A prompt appears asking whether you really
wish to deauthorize this device.
XTo select YesorNo: turn and press the con-
troller.
If you select Yes
, the device will be deleted
from the Bluetooth®device list.
If you select No
the process is canceled.
iBefore re-authorizing the Bluetooth®audio
device, you should also delete the device
name MB Bluetooth
from your Bluetooth®
audio device's Bluetooth®list (see the Blue-
tooth®audio device's operating instructions).
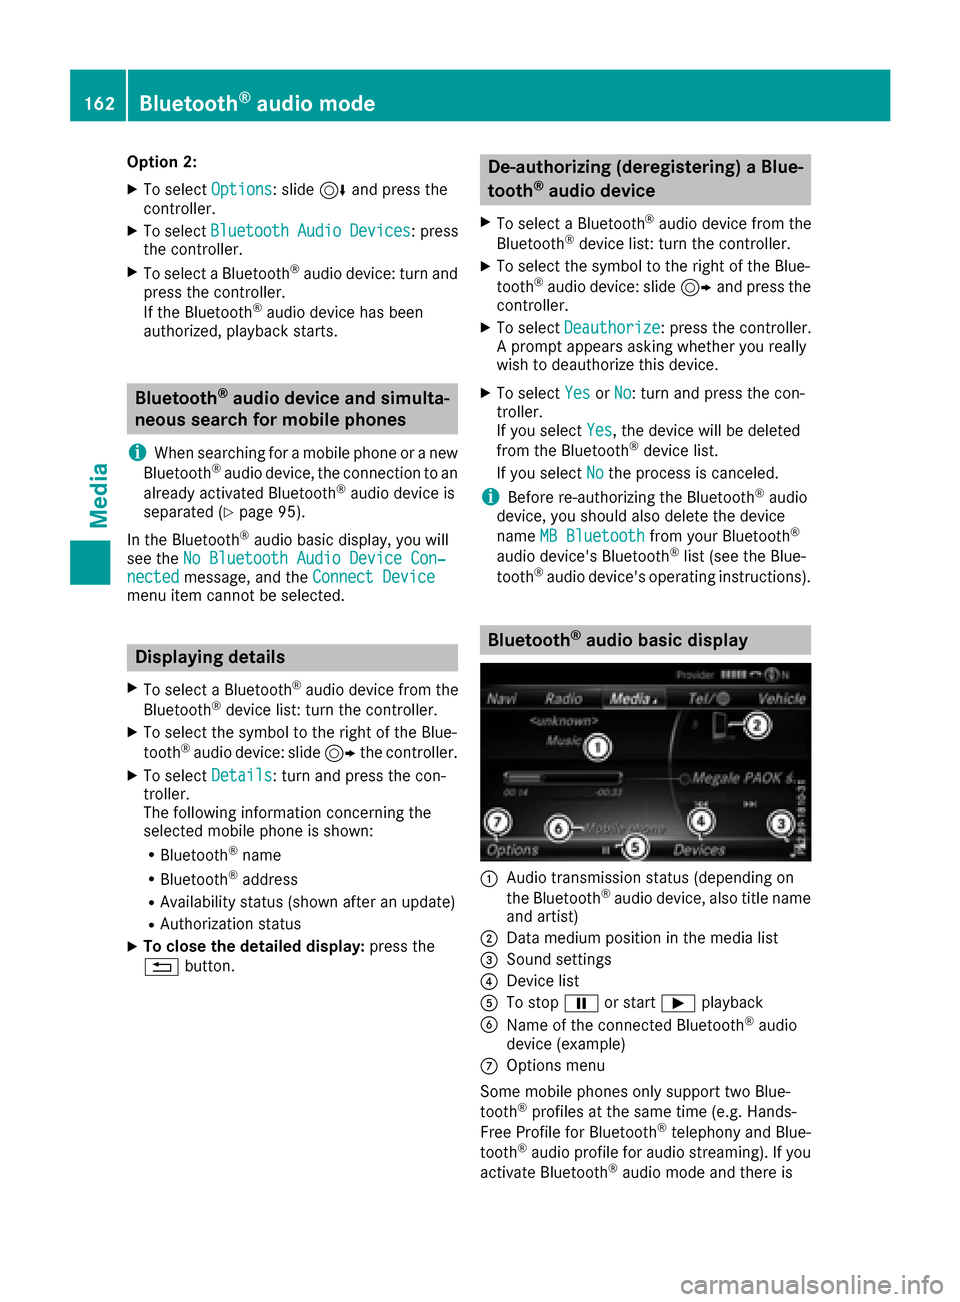
Bluetooth®audio basic display
:Audio transmission status (depending on
the Bluetooth®audio device, also title name
and artist)
;Data medium position in the media list
=Sound settings
?Device list
ATo stop Ëor start Ìplayback
BName of the connected Bluetooth®audio
device (example)
COptions menu
Some mobile phones only support two Blue-
tooth
®profiles at the same time (e.g. Hands-
Free Profile for Bluetooth®telephony and Blue-
tooth®audio profile for audio streaming). If you
activate Bluetooth®audio mode and there is
162Bluetooth®audio mode
Media
Page 165 of 206
already an active Internet connection, this can
cause the connection to be terminated.
Switching to Bluetooth®audio
XPress theÕbutton.
XTo select BluetoothAudioin the menu: turn
and press the controller.
The multimedia system activates the Blue-
tooth
®audio device. The basic display then
appears. Playback starts.
iIf the Bluetooth®audio device connected
supports metadata and corresponding data is
available, then the artist, track and album
name can be displayed.
Starting/stopping playback
XTo select Start playback Ì: turn and
press the controller.
Playback starts. Ëis selected.
XTo stop playback: select Ë.
A message appears. Ìis selected.
XTo continue playback: select Ì.
A message appears. Ëis selected.
Starting playback if the Bluetooth®
audio device has been stopped
During the search for mobile phones, the con-
nection with the Bluetooth®audio device is ter-
minated (
Ypage 95). In the Bluetooth®audio
basic display (Ypage 163) you will see the NoBluetooth Audio Device Connectedmes-
sage and the Connect Last Used Player
menu item cannot be selected.
When the search is finished, the Bluetooth®
audio device can be reconnected.
XTo select Start playback Ì: slide6
and press the controller.
Playback resumes from the beginning.
XTo select Connect Last Used Player:
press the controller.
Depending on the Bluetooth
®audio device
used, playback starts immediately or you
must start playback manually. In this case, you will see the
Bluetooth
Audio Device Pausedmessage.
iIf there is an Internet connection and the
mobile phone that is connected only supports
two Bluetooth
®profiles at the same time, the
Internet connection is interrupted.
Selecting a track
The function is not supported by all Bluetooth®
audio devices.
Some mobile phones impair function with
regard to the following criteria:
Rthe number of tracks that can be selected
Rthe time period until the next or previous track
is played
XUse the multifunction steering wheel to
switch to the media menu in the on-board
computer (see the vehicle Operator's Man-
ual).
XTo skip forwards or backwards to a track:
press the 9or: button on the multi-
function steering wheel.
XRapid scroll: press and hold the 9
or : button on the multifunction steering
wheel until the desired track is reached.
If you press and hold the 9or: but-
tons, the rapid scrolling speed increases after a short time.
Further ways to select tracks (
Ypage 155).
iIn rapid scroll, track names are not shown,
but instead only Track 1, Track 2 etc. The
playback times for the tracks played are not
displayed. This is available as an optional
function starting with AVRCP Version 1.3.
There is also no music search option available
with Bluetooth
®Audio.
Selecting playback options
If the Bluetooth®audio device supports the cor-
responding function, the following options are
available:
RNormal Track Sequence: the tracks are
played in the normal order (e.g. track 1, 2, 3
etc.).
Audio data playback is determined by the
order in which the tracks are written to the
data medium. Alphabetical order is the most
Bluetooth®audio mode163
Media
Z
Page 166 of 206
common. Once all the tracks in a folder have
been played, the tracks in the next folder are
played.
RRandomTrackList: the current track list is
played in random order (e.g. 3, 8, 5 etc.).
RRandom Medium: all tracks on the data
medium are played in random order (e.g.
track 3, 8, 5 etc.).
Playback options are optional functions and
are not, or only partially, supported by Blue-
tooth
®audio devices.
Selecting playback options
XTo select Options: turn and press the con-
troller.
XSelect Playback Mode.
A # dot indicates the current setting.
XSelect the desired option.
If you select Random Track List, you will
see a corresponding message in the display or
selection window.
Increasing the volume in the multime-
dia system
XTo select Options: slide6and press the
controller.
XTo select Volume: turn and press the control-
ler.
A menu appears. The #dot indicates the cur-
rent setting.
XSelect StandardorBoost.
Information on sound settings (
Ypage 172).
Operation with the Media Interface
General notes
Media Interface is a universal interface for the
connection of mobile audio and video devices.
Media Interface in the multimedia system has
two USB connections.
The USB connection sockets are located in the
stowage compartment under the armrest.
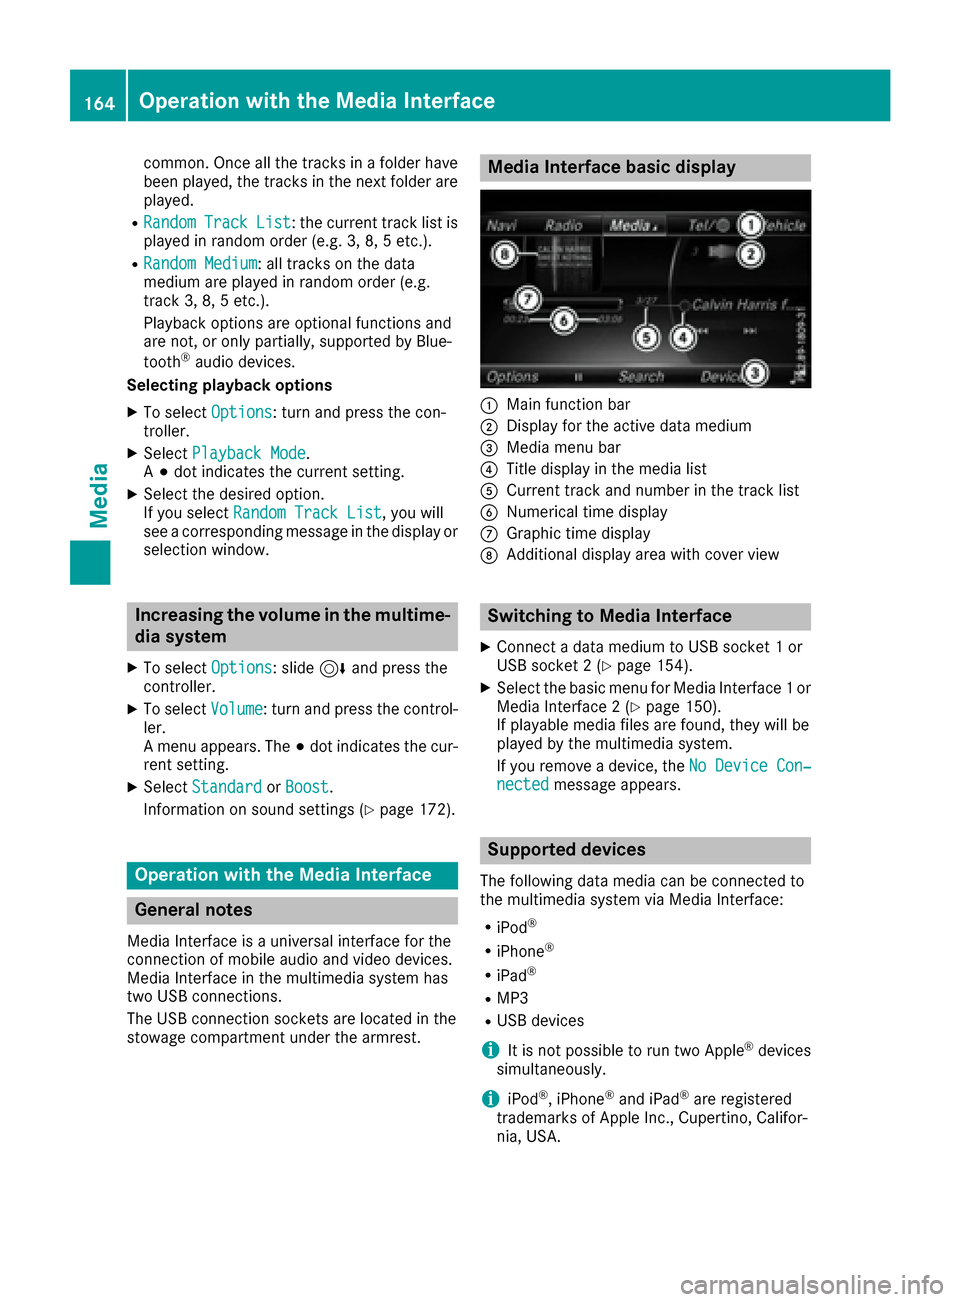
Media Interface basic display
:Main function bar
;Display for the active data medium
=Media menu bar
?Title display in the media list
ACurrent track and number in the track list
BNumerical time display
CGraphic time display
DAdditional display area with cover view
Switching to Media Interface
XConnect a data medium to USB socket 1 or
USB socket 2 (Ypage 154).
XSelect the basic menu for Media Interface 1 or
Media Interface 2 (Ypage 150).
If playable media files are found, they will be
played by the multimedia system.
If you remove a device, the No Device Con‐
nectedmessage appears.
Supported devices
The following data media can be connected to
the multimedia system via Media Interface:
RiPod®
RiPhone®
RiPad®
RMP3
RUSB devices
iIt is not possible to run two Apple®devices
simultaneously.
iiPod®, iPhone®and iPad®are registered
trademarks of Apple Inc., Cupertino, Califor-
nia, USA.
164Operation with the Media Interface
Media
Page 180 of 206

Your multimediasyste mequipment
These operatin ginstruction sdescribe all th e
standar dan doptional equipment of your multi-
media system, as available at th etime of going
to press. Country-specifi cdifference sare pos -
sible. Bear in min dthat your vehicle may no t
feature all function sdescribed here. Thi salso
applies to safety-relevan tsystems an dfunc-
tions.
Read th einformation on qualifie dspecialis t
workshop sin th evehicle Operator's Manual.
Weather forecasts
Introduction
Thi sfunction is currentl yno tavailable fo rCan -
ada.
Fo rth ereception of weather forecast svia sat -
ellite radio, you will need aSIRIU SXM Satellite
Weather subscription .
If th emessage: Pleasecall SIRIUS to
activate the system at :888-539-7474ESN :SIRIUS IDappears alon gwit hth eID
number of th eSIRIU Sdevice, you will need to
hav eth eweather servic eactivated first .
XTo selectCal lorCancel:turn an dpress th e
controller .
If amobile phone is connecte dto th emulti-
media syste m (
Ypage 94), when you selec t
Cal l, acal lis placed to amember of th eSIR-
IU Sservic estaff .The ID number of th eSIRIU S
devic ewill be transferred to th etelephon e
display.
XThi swill be followed by instruction sfrom th e
servic eemployee.
The multimedia syste mcan receiv eweather
forecast sfo rth eUS A(includin gAlask aan d
Hawaii) via satellite radio.
The received weather dat acan be displaye das
an information chart (dail yforecast ,five-day
forecast ,detailed information )or on th e
weather map .
The weather dat areceived from th eweather
station is stored in th emultimedia syste mfor
on ehour .It can therefore be displaye dagain
immediately after restartin gth eengin e(fo r
example after refueling). Dependin
gon whic hscale has bee nselected,
th eweather map can display th efollowin g
weather dat awit hsymbols :
Rprecipitation radar
The precipitation radar canno tbe displaye d
fo rAlaska, Hawaii an dPuerto Rico.
Rstor mcharacteristics
Rhig han dlow-pressure areas, weather fronts
Rcours eof tropical cyclones (hurricanes,
typhoons )
Rstormwarnings
Rwin ddirection an dspeeds
iHurricane: term used to describe th etropi-
cal cyclones that primarily develo pin th e
Atlantic, North Pacifi can dSout hPacifi c
oceans. The win dspeeds are abov e74 mph
(11 8km/ h). Five categories are used to clas-
sify the strength of a hurricane.
Typhoon: term used to describe a tropical
cyclone that develops in the northwestern
Pacific. The wind speeds are in the category of
a hurricane.
Switching the SIRIUS Weather display
on/off
Switching on
XPress the %button.
XTo select Tel/®in the main function bar:
slide 5, turn and press the controller.
A menu appears.
XTo select SIRIUS Weather: turn and press
the controller.
The information chart shows the daily fore-
cast at the current vehicle position.
178Weather forecasts
SIRIUS Weather
Page 188 of 206
Your multimediasyste mequipment
These operatin ginstruction sdescribe all th e
standar dan doptional equipment of your multi-
media system, as available at th etime of going
to press. Country-specifi cdifference sare pos -
sible. Bear in min dthat your vehicle may no t
feature all function sdescribed here. Thi salso
applies to safety-relevan tsystems an dfunc-
tions.
Read th einformation on qualifie dspecialis t
workshop sin th evehicle Operator's Manual.
Overview
Important safet ynotes
GWARNING
The CD/DVD drive is aclass 1lase rproduct.
If you ope nth ehousin gof th eCD/DVD drive,
there is aris kof exposure to invisible lase r
radiation .Thi slase rradiation could damage
your retina. There is aris kof injury.
Never ope nth ehousing. Always hav emain -
tenanc ean drepair wor kcarrie dout at aquali -
fie dspecialis tworkshop .
GWARNING
If objects suc has headphones/headset sor
external audio/video sources are no tsecure d
in th epassenger compartment, they can be
flun garound an dhit vehicle occupants .There
is aris kof injury, fo rexample in th eevent of
sudden braking or asudden change in direc -
tion .
Always stow these items or similar objects
carefully so that they canno tbe flun garound ,
fo rexample in alockable vehicle stowag e
compartment.
Equipment
Observ ethat arange of Rear Seat Entertain -
men tSystems are available fo rMercedes-Ben z
vehicles .In this Operator's Manual, th eRear
Seat Entertainmen tSyste mCode 86 4is used
fo rillustration purposes. If you hav e adifferen t
Rear Seat Entertainmen tSyste min your vehicle, please refer to th
emanufacturer's operatin g
instructions.
Component s
The Rear Seat Entertainmen tSyste mincludes :
Rtwoscreens fo rth erea rbehin dth efront-seat
head restraints
Rtw oremot econtrols
Rasingle drive (rear-compartmen tdrive)
RAU Xjack son bot hrea rscreens (AUX display)
an don th erear-compartmen tdrive (AUX
drive)
Rheadphone sfo reac hrea rscree n
Rtwoset sof cordless headphone s
186Overview
Rear Seat Entertainment System
Page 191 of 206
Cordless headphones
Overview
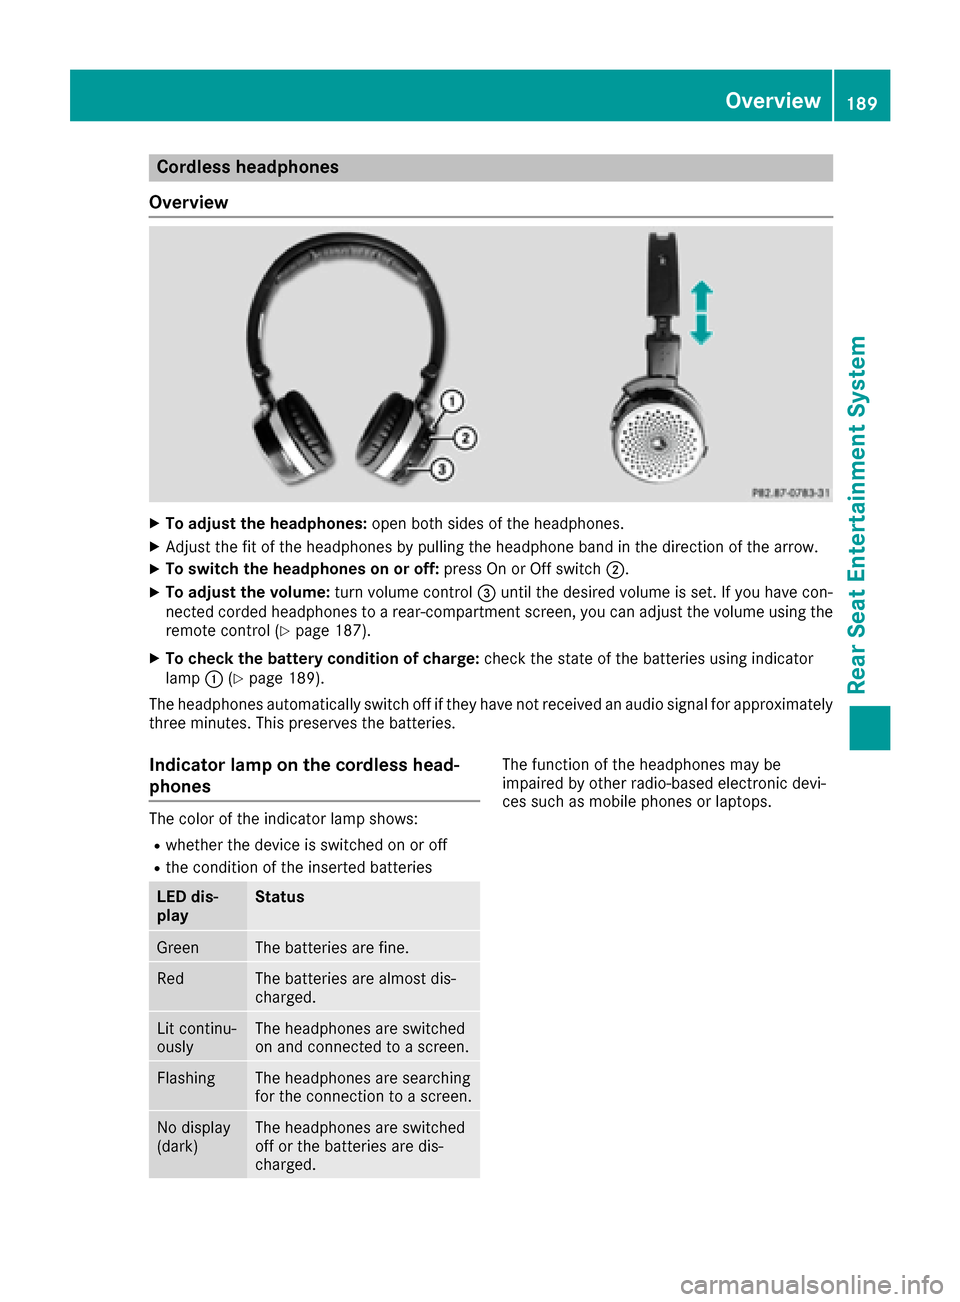
XTo adjust the headphones: open both sides of the headphones.
XAdjust the fit of the headphones by pulling the headphone band in the direction of the arrow.
XTo switch the headphones on or off: press On or Off switch;.
XTo adjust the volume: turn volume control=until the desired volume is set. If you have con-
nected corded headphones to a rear-compartment screen, you can adjust the volume using the
remote control (
Ypage 187).
XTo check the battery condition of charge: check the state of the batteries using indicator
lamp :(Ypage 189).
The headphones automatically switch off if they have not received an audio signal for approximately
three minutes. This preserves the batteries.
Indicator lamp on the cordless head-
phones
The color of the indicator lamp shows:
Rwhether the device is switched on or off
Rthe condition of the inserted batteries
LED dis-
playStatus
GreenThe batteries are fine.
RedThe batteries are almost dis-
charged.
Lit continu-
ouslyThe headphones are switched
on and connected to a screen.
FlashingThe headphones are searching
for the connection to a screen.
No display
(dark)The headphones are switched
off or the batteries are dis-
charged.
The function of the headphones may be
impaired by other radio-based electronic devi-
ces such as mobile phones or laptops.
Overview189
Rear Seat Entertainment System
Z
Page 192 of 206
Selecting the screen for the cordless
headphones
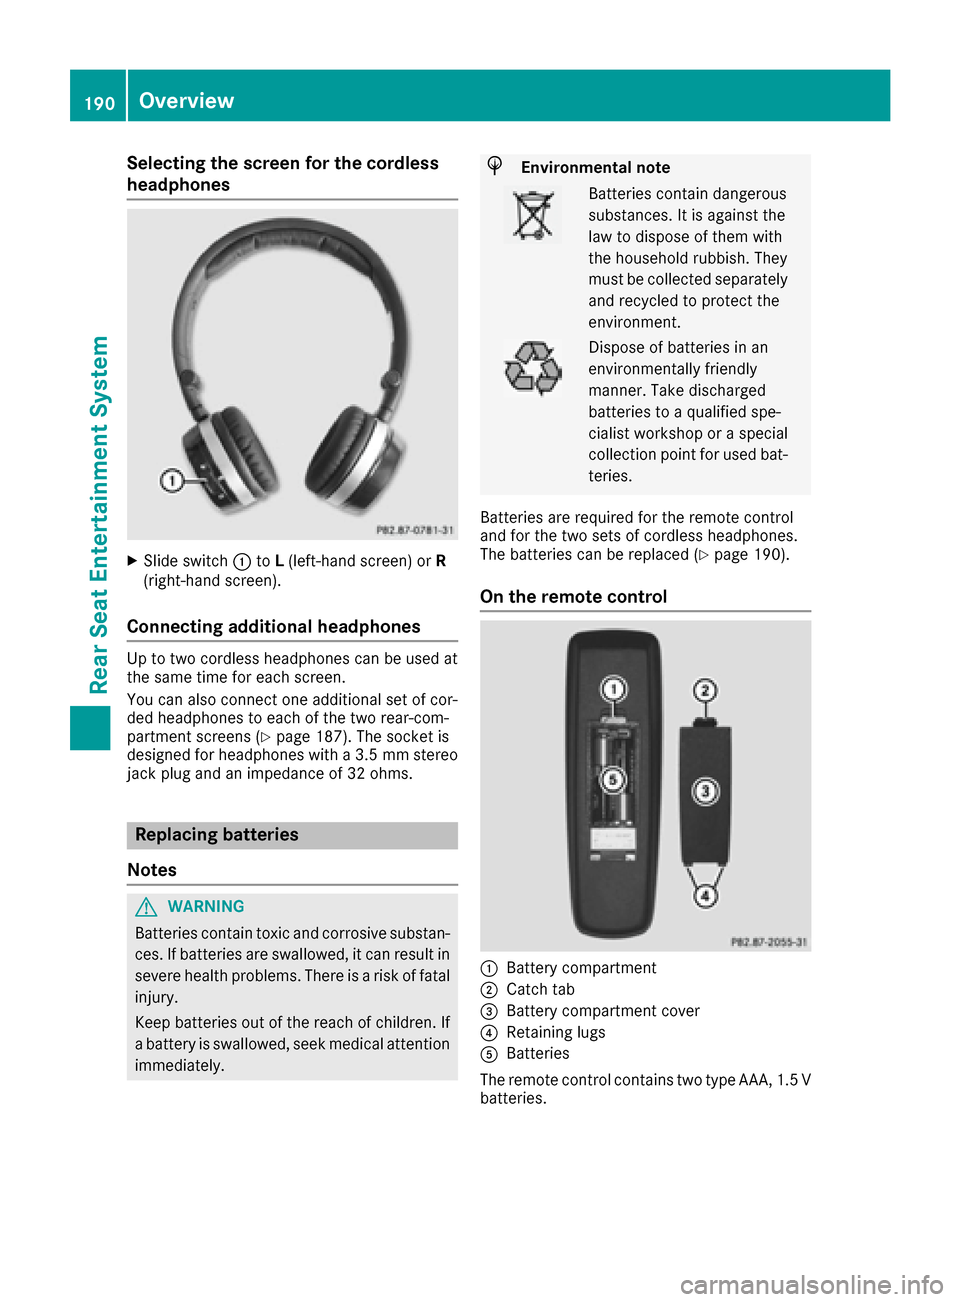
XSlide switch:toL(left-hand screen) or R
(right-hand screen).
Connecting additional headphones
Up to two cordless headphones can be used at
the same time for each screen.
You can also connect one additional set of cor-
ded headphones to each of the two rear-com-
partment screens (
Ypage 187). The socket is
designed for headphones with a 3.5 mm stereo
jack plug and an impedance of 32 ohms.
Replacing batteries
Notes
GWARNING
Batteries contain toxic and corrosive substan- ces. If batteries are swallowed, it can result in
severe health problems. There is a risk of fatalinjury.
Keep batteries out of the reach of children. If
a battery is swallowed, seek medical attention immediately.
HEnvironmental note
Batteries contain dangerous
substances. It is against the
law to dispose of them with
the household rubbish. They
must be collected separatelyand recycled to protect the
environment.
Dispose of batteries in an
environmentally friendly
manner. Take discharged
batteries to a qualified spe-
cialist workshop or a special
collection point for used bat-
teries.
Batteries are required for the remote control
and for the two sets of cordless headphones.
The batteries can be replaced (
Ypage 190).
On the remote control
:Battery compartment
;Catch tab
=Battery compartment cover
?Retaining lugs
ABatteries
The remote control contains two type AAA, 1.5 V
batteries.
190Overview
Rear Seat Entertainment System
Page 193 of 206

XTo open the battery compartment:remove
battery compartment cover =on the back of
the remote control.
XTo do so, press down retaining lug ;and
take off battery compartment cover =.
XRemove discharged batteriesAfrom the
tray.
XInsert the new batteries. Observe the polarity
markings on the batteries and battery com-
partment when doing so.
Left-hand battery: the positive pole (+) must
face upwards.
Right-hand battery: the positive pole (+) must
face downwards.
XTo close the battery compartment: insert
battery compartment cover =starting with
retaining lugs ?into the battery compart-
ment and allow catch tab ;to engage in
place.
On the cordless headphones
The battery compartment is located on the left
headphone. The cordless headphones require
two type AAA, 1.5 V batteries.
XTo open the battery compartment: turn
battery compartment cover :counter-
clockwise and remove.
XRemove the discharged batteries from the
tray.
XInsert the new batteries. Observe the polarity markings on the batteries and battery tray
when doing so.
XTo close the battery compartment: replace
battery housing cover :and turn it clock-
wise until it engages.
If the batteries have been inserted correctly,
the indicator lamp will light up green when the
headphones are switched on.
iThe operating duration of the headphones
with a set of batteries is up to 40 hours.
Basic functions
Using headphones
You can use the cordless headphones supplied
and/or up to two sets of corded headphones
connected to the corresponding jack of the rear-
compartment screens (
Ypage 187).
Information on the cordless headphones
(
Ypage 189).
Using the main loudspeakers
This function is available in conjunction with
COMAND.
You can use the vehicle loudspeakers to listen to
a disc inserted in the rear-compartment drive.
To do so, disc mode (audio CD/audio DVD/
MP3) must be activated on at least one rear
screen.
The headphones' volume setting does not affect
the main loudspeakers.
XTo set on COMAND: press the$button,
for example, to switch on an audio mode.
XTo select Info6slide and press the con-
troller.
A menu appears.
XTurn the controller until Rear Seat Enter‐tainment System: Audiois brought to the
front.
XPress the controller.
Basic functions191
Rear Seat Entertainment System
Z