2017 Hyundai Ioniq Electric tire pressure
[x] Cancel search: tire pressurePage 499 of 582
7-33
7
Maintenance
Check tire inflation pressure
Check your tires, including the spare
tire, once a month or more.
How to check
Use a good quality tire pressure
gauge to check tire pressure. You
can not tell if your tires are properly
inflated simply by looking at them.
Radial tires may look properly inflat-
ed when they are under-inflated.
Remove the valve cap from the tire
valve stem. Press the tire gauge firm-
ly onto the valve to get a pressure
measurement. If the cold tire inflationpressure matches the recommendedpressure on the tire and loading
information label, no further adjust-
ment is necessary. If the pressure is
low, add air until you reach the rec-
ommended pressure. Make sure to
put the valve caps back on the valve
stems. Without the valve cap, dirt or
moisture could get into the valve
core and cause air leakage. If a valve
cap is missing, install a new one as
soon as possible.If you overfill the tire, release air bypushing on the metal stem in the
center of the tire valve. Recheck the
tire pressure with the tire gauge. Be
sure to put the valve caps back on
the valve stems. Without the valve
cap, dirt or moisture could get into
the valve core and cause air leakage.
If a valve cap is missing, install a new
one as soon as possible.
Under-inflation results in
excessive wear, poor handling
and reduced fuel economy.
Wheel deformation is also
possible. Keep your tire pres-
sures at the proper levels. If a
tire frequently needs refilling,
we recommend it be checked
by an authorized HYUNDAI
dealer.
Over-inflation produces a
harsh ride, excessive wear atthe center of the tire tread,and a greater possibility of
damage from road hazards.
CAUTION
Page 500 of 582
7-34
Maintenance
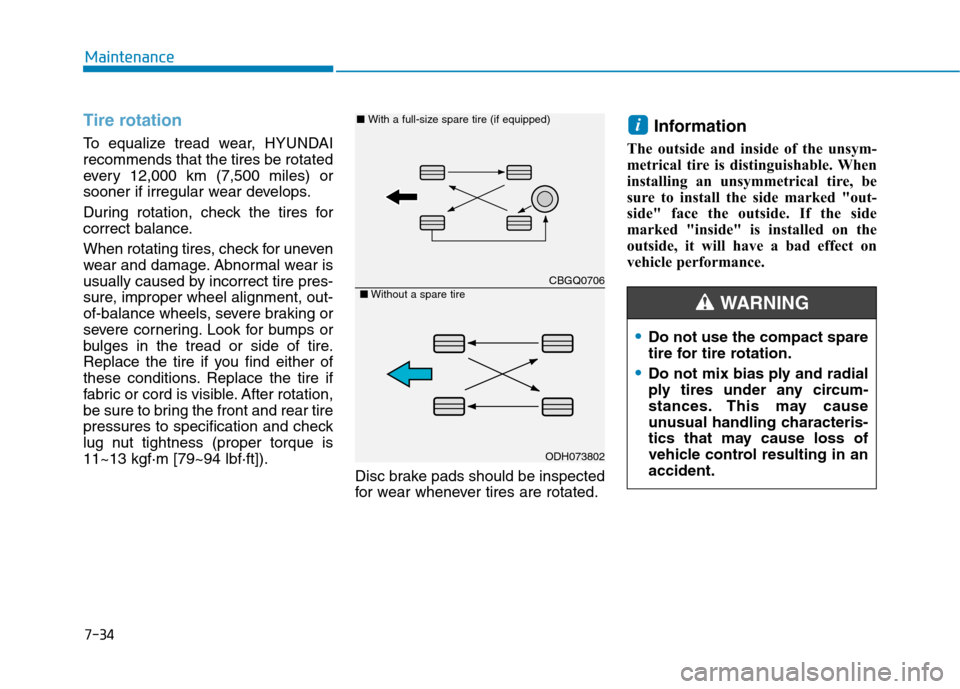
Tire rotation
To equalize tread wear, HYUNDAI recommends that the tires be rotated
every 12,000 km (7,500 miles) or
sooner if irregular wear develops.
During rotation, check the tires for
correct balance.
When rotating tires, check for uneven
wear and damage. Abnormal wear is
usually caused by incorrect tire pres-
sure, improper wheel alignment, out-
of-balance wheels, severe braking or
severe cornering. Look for bumps or
bulges in the tread or side of tire.
Replace the tire if you find either of
these conditions. Replace the tire if
fabric or cord is visible. After rotation,
be sure to bring the front and rear tire
pressures to specification and check
lug nut tightness (proper torque is 11~13 kgf·m [79~94 lbf·ft]).Disc brake pads should be inspected
for wear whenever tires are rotated. Information
The outside and inside of the unsym-
metrical tire is distinguishable. When
installing an unsymmetrical tire, be
sure to install the side marked "out-
side" face the outside. If the side
marked "inside" is installed on the
outside, it will have a bad effect on
vehicle performance.
i
CBGQ0706
ODH073802
■ With a full-size spare tire (if equipped)
■Without a spare tire
Do not use the compact spare
tire for tire rotation.
Do not mix bias ply and radial
ply tires under any circum-
stances. This may cause
unusual handling characteris-
tics that may cause loss of
vehicle control resulting in anaccident.
WARNING
Page 504 of 582
7-38
Maintenance
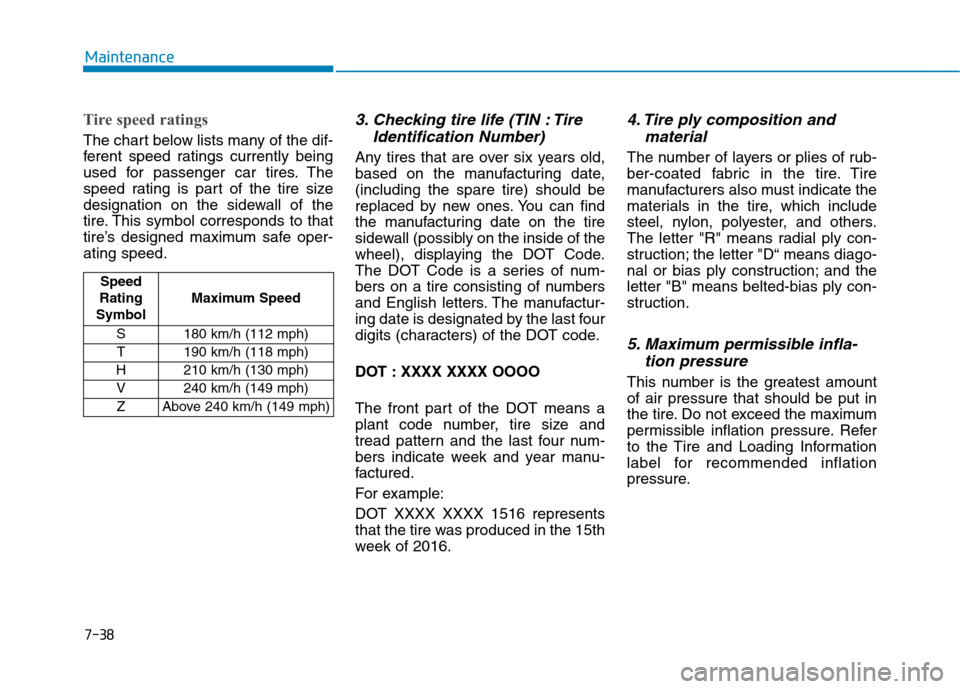
Tire speed ratings
The chart below lists many of the dif-
ferent speed ratings currently being
used for passenger car tires. The
speed rating is part of the tire size
designation on the sidewall of the
tire. This symbol corresponds to that
tire’s designed maximum safe oper-ating speed.
3. Checking tire life (TIN : TireIdentification Number)
Any tires that are over six years old,
based on the manufacturing date,(including the spare tire) should be
replaced by new ones. You can find
the manufacturing date on the tire
sidewall (possibly on the inside of the
wheel), displaying the DOT Code.
The DOT Code is a series of num-
bers on a tire consisting of numbers
and English letters. The manufactur-
ing date is designated by the last four
digits (characters) of the DOT code.
DOT : XXXX XXXX OOOO
The front part of the DOT means a
plant code number, tire size and
tread pattern and the last four num-
bers indicate week and year manu-
factured.
For example:
DOT XXXX XXXX 1516 represents
that the tire was produced in the 15th
week of 2016.
4. Tire ply composition andmaterial
The number of layers or plies of rub-
ber-coated fabric in the tire. Tire
manufacturers also must indicate the
materials in the tire, which include
steel, nylon, polyester, and others.
The letter "R" means radial ply con-
struction; the letter "D“ means diago-
nal or bias ply construction; and theletter "B" means belted-bias ply con-
struction.
5. Maximum permissible infla-tion pressure
This number is the greatest amountof air pressure that should be put in
the tire. Do not exceed the maximum
permissible inflation pressure. Refer
to the Tire and Loading Information
label for recommended inflation
pressure.
Speed
Rating
Symbol Maximum Speed
S 180 km/h (112 mph) T 190 km/h (118 mph)
H 210 km/h (130 mph) V 240 km/h (149 mph) Z Above 240 km/h (149 mph)
Page 507 of 582
7-41
Maintenance
The side wall of a low aspect
ratio tire is shorter than the nor-
mal one. Thus, the low-aspect
wheel and tire are easily dam-
aged. Follow the below instruc-tions.
When driving on a rough road
or driving off a road, be care-
ful not to damage the tires
and wheels. After driving,inspect the tires and wheels.
When passing over a pothole,
speed bump, manhole, or
curb stone, slowly drive the
vehicle not to damage thetires and wheels.
When there is an impact on a
tire, inspect the tire condition.
Or, contact an authorized
HYUNDAI dealer.(Continued)
CAUTION(Continued)
Inspect the tire condition and
pressure every 3,000 km
(1,800 miles) to prevent a tire
damage.
It is difficult to recognize a tire
damage only with your eyes.When there is a slight hint of a
tire damage, check and replace
the tire to prevent the damage
caused by air leakage.
When a tire is damaged while
driving on a rough road, off a
road, or over obstacles, such
as a pothole, manhole, or curb
stone, your warranty does not
cover the damage.
The tire information is speci- fied on the tire side wall.
7
Page 528 of 582
7-62
Maintenance
Headlamp aiming (For Europe)
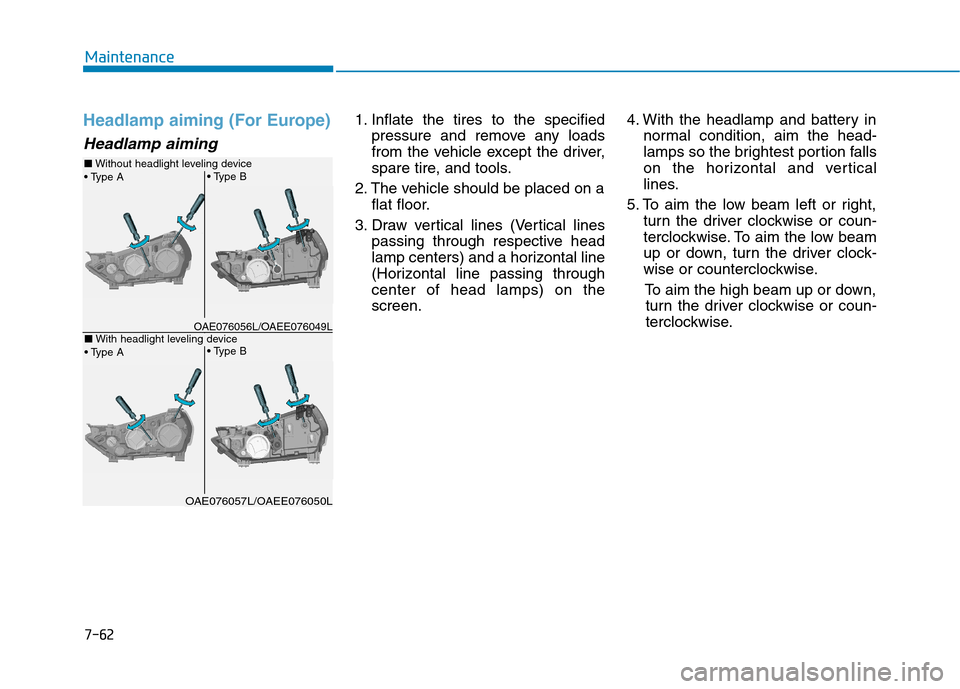
Headlamp aiming
1. Inflate the tires to the specifiedpressure and remove any loads
from the vehicle except the driver,
spare tire, and tools.
2. The vehicle should be placed on a flat floor.
3. Draw vertical lines (Vertical lines passing through respective head
lamp centers) and a horizontal line
(Horizontal line passing throughcenter of head lamps) on thescreen. 4. With the headlamp and battery in
normal condition, aim the head-
lamps so the brightest portion falls
on the horizontal and vertical
lines.
5. To aim the low beam left or right, turn the driver clockwise or coun-
terclockwise. To aim the low beam
up or down, turn the driver clock-
wise or counterclockwise.
To aim the high beam up or down,turn the driver clockwise or coun-
terclockwise.
A B
B
A
OAE076056L/OAEE076049L
■ Without headlight leveling device
OAE076057L/OAEE076050L
■With headlight leveling device
Page 544 of 582
8
Specifications & Consumer information
8
Specifications & Consumer information
8
Dimensions ..............................................................8-2
Electric vehicle specifications..............................8-2
Bulb wattage ...........................................................8-3
Tires and wheels ....................................................8-4
Tire load and speed capacity ...............................8-5
Air conditioning system ........................................8-5
Volume and weight ................................................8-5
Recommended lubricants and capacities ...........8-6
Vehicle identification number (VIN) ....................8-7
Vehicle certification label .....................................8-7
Tire specification and pressure label .................8-8
Motor number.........................................................8-8
Air conditioner compressor label ........................8-8
Declaration of conformity ....................................8-9
Page 547 of 582
8-4
Specifications & Consumer informationT
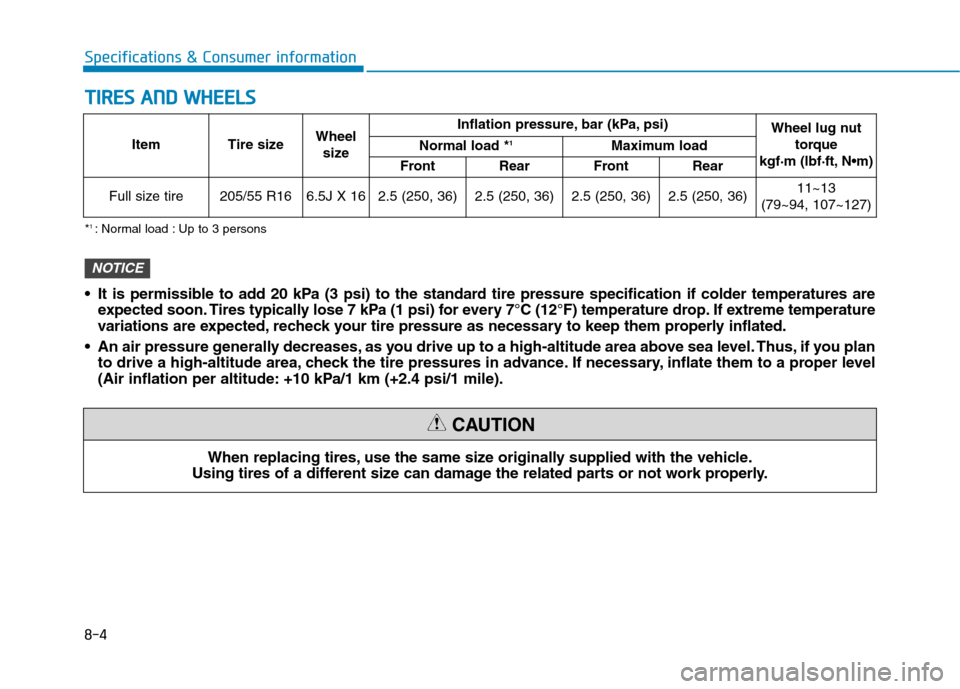
T IIRR EESS AA NN DD WW HHEEEELLSS
Item Tire size Wheel
size Inflation pressure, bar (kPa, psi)
Wheel lug nut
torque
kgf·m (lbf·ft, N
Normal load *
1
Maximum load
Front Rear Front Rear
Full size tire 205/55 R16 6.5J X 16 2.5 (250, 36) 2.5 (250, 36) 2.5 (250, 36) 2.5 (250, 36) 11~13
(79~94, 107~127)
When replacing tires, use the same size originally supplied with the vehicle.
Using tires of a different size can damage the related parts or not work properly.
CAUTION
* 1
: Normal load : Up to 3 persons
It is permissible to add 20 kPa (3 psi) to the standard tire pressure specification if colder temperatures are expected soon. Tires typically lose 7 kPa (1 psi) for every 7°C (12°F) temperature drop. If extreme temperature
variations are expected, recheck your tire pressure as necessary to keep them properly inflated.
An air pressure generally decreases, as you drive up to a high-altitude area above sea level. Thus, if you plan to drive a high-altitude area, check the tire pressures in advance. If necessary, inflate them to a proper level
(Air inflation per altitude: +10 kPa/1 km (+2.4 psi/1 mile).
NOTICE
Page 572 of 582
I-3
Battery (12 volt) ...........................................................7-27
Battery recharging......................................................7-29
Battery cooling duct .....................................................2-24
Battery saver function...................................................3-81
Before driving .................................................................5-3
Blind spot detection (BSD) system ..............................5-40
Bluetooth ®
Wireless Technology hands-free..................4-4
Bottle holder ...............................................................3-119
Brake fluid ....................................................................7-21
Brake system.................................................................5-19
Anti-lock brake system (ABS) ..................................5-29
Auto hold ...................................................................5-25
Disc brakes wear indicator ........................................5-20
Electronic parking brake (EPB).................................5-20
Electronic stability control (ESC) .............................5-31
Good braking practices ..............................................5-37
Hill-start assist control (HAC)...................................5-36
Power brakes..............................................................5-19
Vehicle stability management (VSM) .......................5-35
Bulb replacement ..........................................................7-57
Daytime running lamp ...............................................7-66
Front position lamp....................................................7-58
Front turn signal lamp ...............................................7-58
Headlamp ...................................................................7-58
Headlamp aiming .......................................................7-62
High mounted stop lamp ...........................................7-69 Interior light bulb .......................................................7-69
License plate light bulb .............................................7-69
Rear combination light bulb ......................................7-66
Rear fog lamp ............................................................7-69
Side repeater lamp ....................................................7-66
Bulb wattage ...................................................................8-3
Camera (Rear view)......................................................3-90
Capacities (Lubricants) ...................................................3-6
Care Exterior care...............................................................7-71
Interior care................................................................7-76
Tire care .....................................................................7-31
Cargo security screen .................................................3-126
Cellular phone holder .................................................3-122
Center console storage ................................................3-116
Central door lock switch...............................................3-10
Certification label ...........................................................8-7
Chains Tire chains..................................................................5-97
Checking tire inflation pressure ...................................7-33
Child restraint system (CRS)........................................2-37 Booster seats ..............................................................2-39
Forward-facing child restraint system .......................2-39
Installing a child restraint system (CRS)...................2-40
ISOFIX anchorage and top-tether anchorage for children....................................................................2-41
I
Index
B
C