2017 Hyundai Ioniq Electric tire pressure
[x] Cancel search: tire pressurePage 461 of 582
6-20
What to do in an emergency
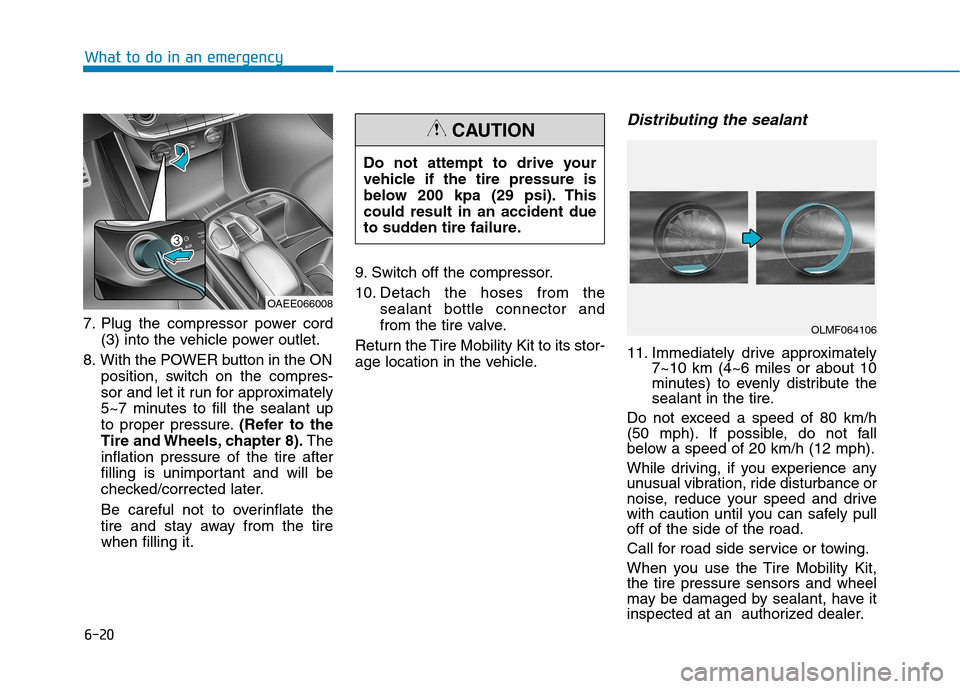
7. Plug the compressor power cord(3) into the vehicle power outlet.
8. With the POWER button in the ON position, switch on the compres-
sor and let it run for approximately
5~7 minutes to fill the sealant up
to proper pressure. (Refer to the
Tire and Wheels, chapter 8). The
inflation pressure of the tire after
filling is unimportant and will be
checked/corrected later.
Be careful not to overinflate the
tire and stay away from the tirewhen filling it. 9. Switch off the compressor.
10. Detach the hoses from the
sealant bottle connector and
from the tire valve.
Return the Tire Mobility Kit to its stor-
age location in the vehicle.
Distributing the sealant
11. Immediately drive approximately 7~10 km (4~6 miles or about 10
minutes) to evenly distribute the
sealant in the tire.
Do not exceed a speed of 80 km/h
(50 mph). If possible, do not fall
below a speed of 20 km/h (12 mph).
While driving, if you experience any
unusual vibration, ride disturbance or
noise, reduce your speed and drive
with caution until you can safely pulloff of the side of the road.
Call for road side service or towing.
When you use the Tire Mobility Kit, the tire pressure sensors and wheel
may be damaged by sealant, have it
inspected at an authorized dealer.
Do not attempt to drive your
vehicle if the tire pressure is
below 200 kpa (29 psi). Thiscould result in an accident due
to sudden tire failure.
CAUTION
OAEE066008
OLMF064106
Page 462 of 582
6-21
What to do in an emergency
6
Checking the tire inflation pressure
1. After driving approximately 7~10 km(4~6 miles or about 10 minutes),
stop at a safe location.
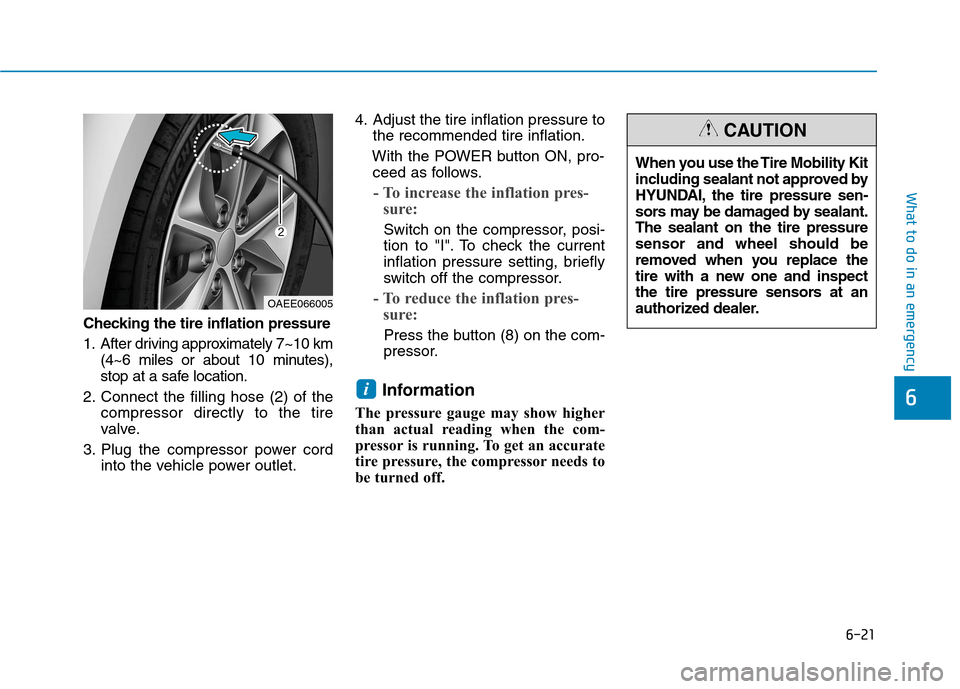
2. Connect the filling hose (2) of the compressor directly to the tire
valve.
3. Plug the compressor power cord into the vehicle power outlet. 4. Adjust the tire inflation pressure to
the recommended tire inflation.
With the POWER button ON, pro- ceed as follows.
- To increase the inflation pres- sure:
Switch on the compressor, posi-
tion to "I". To check the current
inflation pressure setting, briefly
switch off the compressor.
- To reduce the inflation pres- sure:
Press the button (8) on the com-
pressor.
Information
The pressure gauge may show higher
than actual reading when the com-
pressor is running. To get an accurate
tire pressure, the compressor needs to
be turned off.
i
OAEE066005 When you use the Tire Mobility Kit
including sealant not approved by
HYUNDAI, the tire pressure sen-
sors may be damaged by sealant.The sealant on the tire pressuresensor and wheel should be
removed when you replace the
tire with a new one and inspect
the tire pressure sensors at an
authorized dealer.
CAUTION
Page 467 of 582
7
Maintenance
7
Maintenance
Motor compartment...............................................7-3
Maintenance services ...........................................7-4Owner's responsibility ......................................................7-4
Owner maintenance precautions ..................................7-4
Owner maintenance ...............................................7-5 Owner maintenance schedule ........................................7-5
Scheduled maintenance services.........................7-7 Normal maintenance schedule - For Europe.............7-8
Maintenance under severe usage conditions -
For Europe ........................................................................7-10 Normal maintenance schedule - Except Europe ....7-12
Maintenance under severe usage conditions -
Except Europe..................................................................7-14
Explanation of scheduled maintenance items .7-16 Coolant...................................................................7-17 Checking the coolant level ...........................................7-17 Changing coolant.............................................................7-20
Brake fluid ............................................................7-21 Checking the brake fluid level .....................................7-21
Washer fluid .........................................................7-22 Checking the washer fluid level ..................................7-22
Climate control air filter .....................................7-23 Filter inspection ...............................................................7-23 Wiper blades .........................................................7-25
Blade inspection ..............................................................7-25
Blade replacement ..........................................................7-25
Battery (12 Volt) ..................................................7-27 For best battery service................................................7-28
Battery capacity label ....................................................7-28
Battery recharging .........................................................7-29
Reset features .................................................................7-30
Tires and wheels ..................................................7-31 Tire care ............................................................................7-31
Recommended cold tire inflation pressures.............7-32
Check tire inflation pressure........................................7-33
Tire rotation .....................................................................7-34
Wheel alignment and tire balance ..............................7-35
Tire replacement ............................................................7-35
Wheel replacement .........................................................7-36
Tire traction ....................................................................7-36
Tire maintenance ............................................................7-36
Tire sidewall labeling ......................................................7-36
Low aspect ratio tires ....................................................7-40
Fuses ......................................................................7-42 Instrument panel fuse replacement ...........................7-43
Motor compartment panel fuse replacement ..........7-44
Fuse/relay panel description .......................................7-45
7
Page 472 of 582
7-6
Maintenance
While operating your vehicle:
Check for vibrations in the steeringwheel. Notice if there is any
increased steering effort or loose-
ness in the steering wheel, or
change in its straight-ahead posi-tion.
Notice if your vehicle constantly turns slightly or “pulls” to one side
when traveling on smooth, levelroad.
When stopping, listen and check for unusual sounds, pulling to one
side, increased brake pedal travel
or “hard-to-push” brake pedal.
If any slipping or changes in the operation of your reduction gear
occurs, check the reduction gear
fluid level.
Check the reduction gear P (Park) function.
Check the parking brake.
Check for fluid leaks under your vehicle (water dripping from the air
conditioning system during or after
use is normal).
At least monthly:
Check coolant level in the coolantreservoir.
Check the operation of all exterior lights, including the stoplights, turn
signals and hazard warning flashers.
Check the inflation pressures of all tires including the spare for tires
that are worn, show uneven wear,or are damaged.
Check for loose wheel lug nuts.
At least twice a year: (i.e., every Spring and Fall)
Check radiator, heater and air condi- tioning hoses for leaks or damage.
Check windshield washer spray and wiper operation. Clean wiper
blades with clean cloth dampened
with washer fluid.
Check headlamp alignment.
Check muffler, exhaust pipes, shields and clamps.
Check the seat belts for wear and function.
At least once a year:
Clean body and door drain holes.
Lubricate door hinges and hoodhinges.
Lubricate door and hood locks and latches.
Lubricate door rubber weather strips.
Check the air conditioning system.
Inspect and lubricate reduction gear linkage and controls.
Clean the battery and terminals.
Check the brake fluid level.
Page 475 of 582
7-9
7
Maintenance
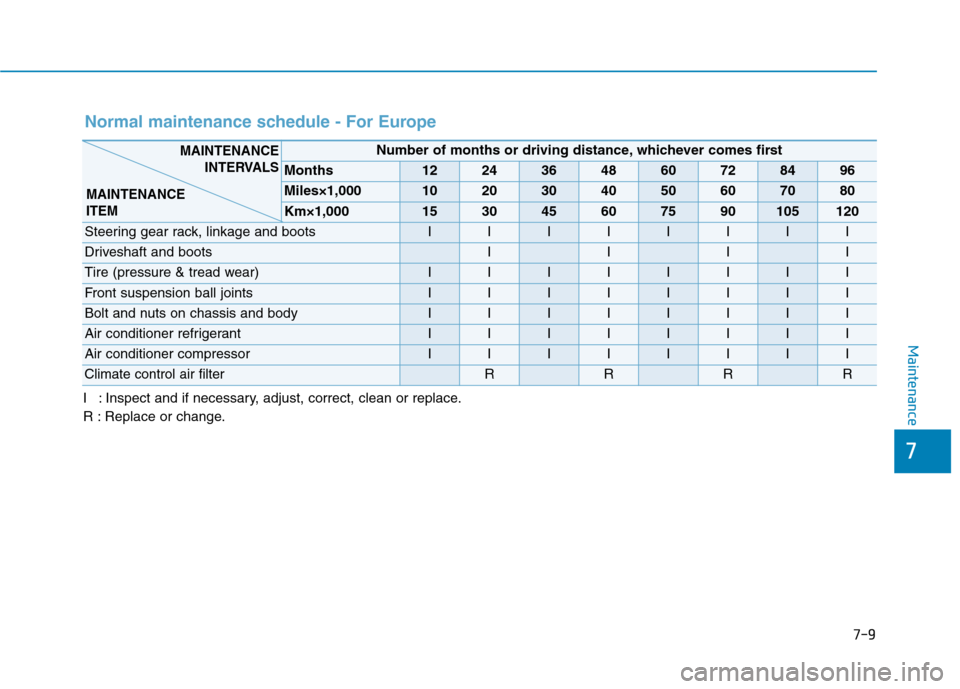
Normal maintenance schedule - For Europe
I : Inspect and if necessary, adjust, correct, clean or replace.
R : Replace or change.
Number of months or driving distance, whichever comes first
Months1224364860728496
Miles×1,0001020304050607080
Km×1,000153045607590105120
Steering gear rack, linkage and bootsIIIIIIII
Driveshaft and bootsIIII
Tire (pressure & tread wear) IIIIIIII
Front suspension ball jointsIIIIIIII
Bolt and nuts on chassis and bodyIIIIIIII
Air conditioner refrigerant IIIIIIII
Air conditioner compressorIIIIIIII
Climate control air filterRRRR
MAINTENANCEINTERVALS
MAINTENANCE ITEM
Page 479 of 582
7-13
7
Maintenance
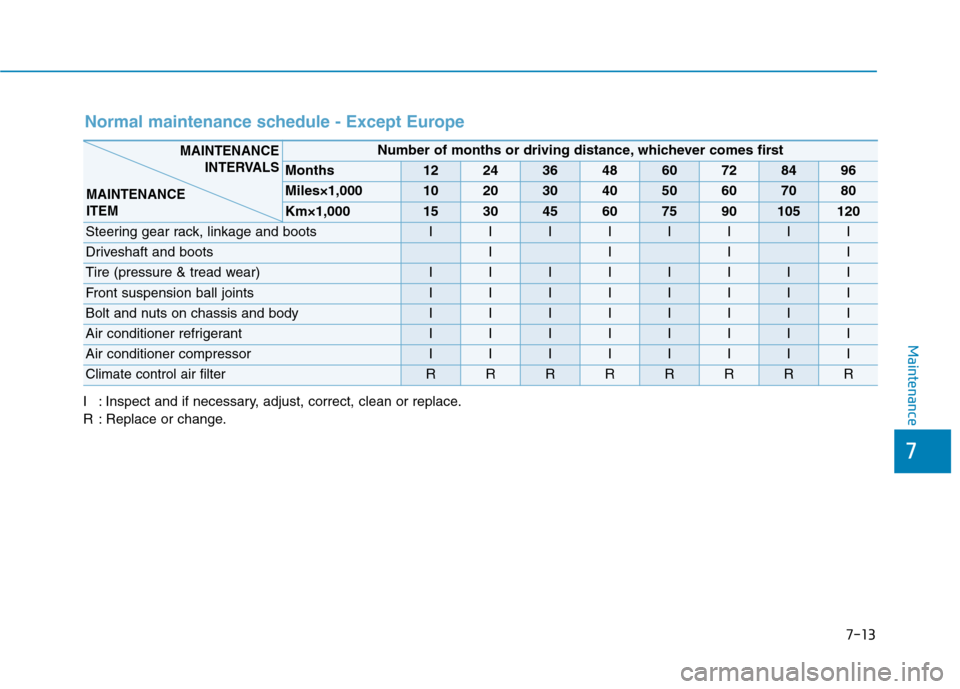
Normal maintenance schedule - Except Europe
Number of months or driving distance, whichever comes first
Months1224364860728496
Miles×1,0001020304050607080
Km×1,000153045607590105120
Steering gear rack, linkage and bootsIIIIIIII
Driveshaft and bootsIIII
Tire (pressure & tread wear) IIIIIIII
Front suspension ball jointsIIIIIIII
Bolt and nuts on chassis and bodyIIIIIIII
Air conditioner refrigerant IIIIIIII
Air conditioner compressorIIIIIIII
Climate control air filterRRRRRRRR
MAINTENANCEINTERVALS
MAINTENANCE ITEM
I : Inspect and if necessary, adjust, correct, clean or replace.
R : Replace or change.
Page 497 of 582
7-31
7
Maintenance
TTIIRR EESS AA NN DD WW HHEEEELLSS
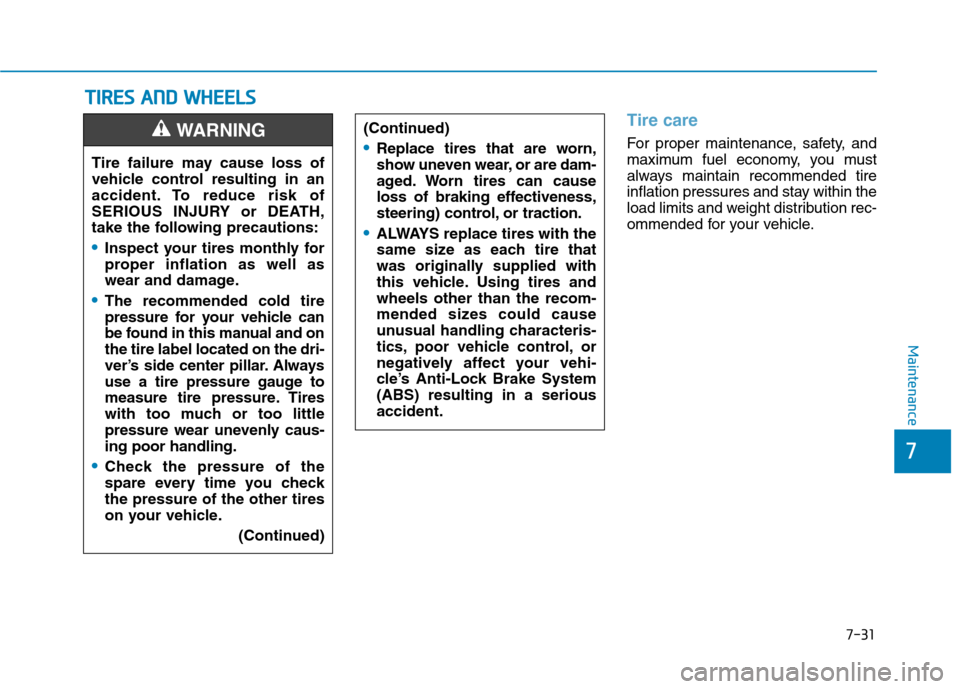
Tire care
For proper maintenance, safety, and
maximum fuel economy, you must
always maintain recommended tire
inflation pressures and stay within the
load limits and weight distribution rec-
ommended for your vehicle.
(Continued)Replace tires that are worn,
show uneven wear, or are dam-
aged. Worn tires can cause
loss of braking effectiveness,
steering) control, or traction.
ALWAYS replace tires with the
same size as each tire that
was originally supplied with
this vehicle. Using tires andwheels other than the recom-
mended sizes could cause
unusual handling characteris-
tics, poor vehicle control, or
negatively affect your vehi-
cle’s Anti-Lock Brake System(ABS) resulting in a seriousaccident.
Tire failure may cause loss of
vehicle control resulting in an
accident. To reduce risk of
SERIOUS INJURY or DEATH,
take the following precautions:
Inspect your tires monthly for
proper inflation as well as
wear and damage.
The recommended cold tire
pressure for your vehicle can
be found in this manual and onthe tire label located on the dri-
ver’s side center pillar. Always
use a tire pressure gauge to
measure tire pressure. Tires
with too much or too little
pressure wear unevenly caus-ing poor handling.
Check the pressure of the
spare every time you checkthe pressure of the other tires
on your vehicle.
(Continued)
WARNING
Page 498 of 582
7-32
Maintenance
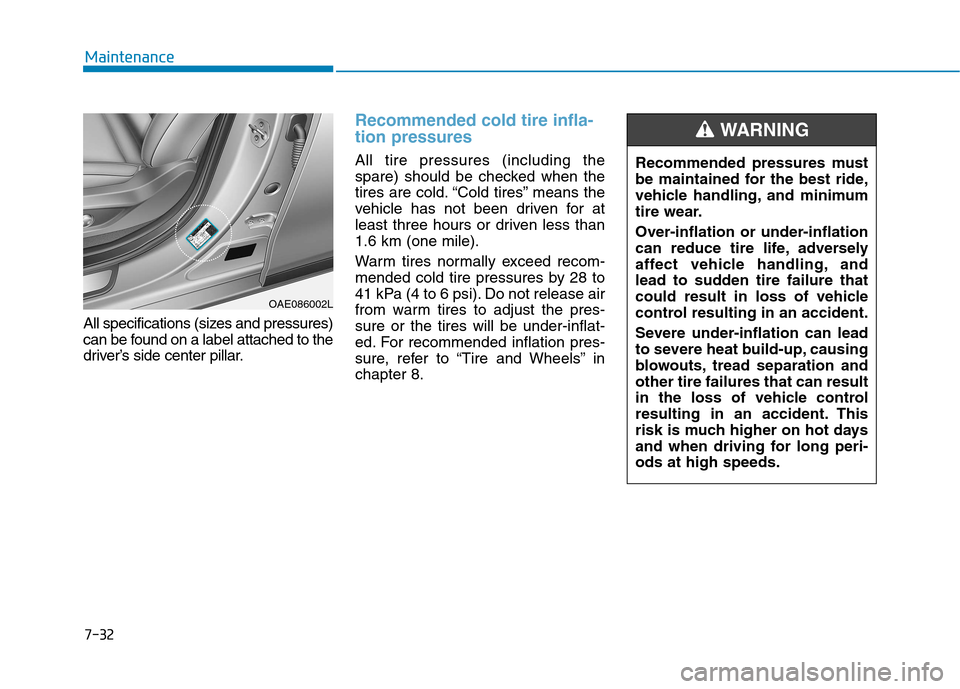
All specifications (sizes and pressures)
can be found on a label attached to the
driver’s side center pillar.
Recommended cold tire infla- tion pressures
All tire pressures (including the
spare) should be checked when the
tires are cold. “Cold tires” means the
vehicle has not been driven for at
least three hours or driven less than1.6 km (one mile).
Warm tires normally exceed recom-
mended cold tire pressures by 28 to
41 kPa (4 to 6 psi). Do not release air
from warm tires to adjust the pres-sure or the tires will be under-inflat-
ed. For recommended inflation pres-
sure, refer to “Tire and Wheels” inchapter 8.Recommended pressures must
be maintained for the best ride,
vehicle handling, and minimum
tire wear.
Over-inflation or under-inflation
can reduce tire life, adversely
affect vehicle handling, and
lead to sudden tire failure that
could result in loss of vehicle
control resulting in an accident.
Severe under-inflation can lead
to severe heat build-up, causing
blowouts, tread separation andother tire failures that can result
in the loss of vehicle control
resulting in an accident. This
risk is much higher on hot days
and when driving for long peri-ods at high speeds.
WARNING
OAE086002L