2017 FORD SUPER DUTY ECO mode
[x] Cancel search: ECO modePage 150 of 636
AUTO: Press to switch on automatic operation. Adjust to select the desired
temperature. Fan speed, air distribution, air conditioning operation, and outside
or recirculated air are automatically adjusted to heat or cool the vehicle to
maintain the desired temperature. You can also switch off dual zone mode by
pressing and holding for more than two seconds.
A
MAX Defrost:
Press to switch on defrost. Outside air flows through the
windshield vents, air conditioning automatically turns on, and fan automatically
adjusts to the highest speed. You can also use this setting to defrost and clear
the windshield of a thin covering of ice. The heated rear window also
automatically turns on when you select maximum defrost.
B
Note:
To prevent window fogging, you cannot select recirculated air when
maximum defrost is on.
Power:
Press to switch the system on and off. When the system is off, it
prevents outside air from entering the vehicle.
C
Air distribution control:
Press to switch airflow from the windshield,
instrument panel, or footwell vents on or off. You can distribute air through any
combination of these vents.
D
Recirculated air:
Press to switch between outside air and recirculated air. The
air currently in the passenger compartment recirculates. This can reduce the
time needed to cool the interior and reduce unwanted odors from entering your
vehicle.
E
Note:
Recirculated air may also turn on and off automatically in instrument
panel or instrument panel and floor airflow modes during hot weather to improve
cooling efficiency.
MAX A/C:
Press for maximum cooling. Recirculated air flows through the
instrument panel vents, air conditioning automatically turns on, and the fan
automatically adjusts to the highest speed.
F
DUAL:
Press to switch separate passenger side temperature control off and
on. When dual zone is off, passenger temperature settings remain the same as
the driver settings.
G
Passenger temperature control:
Adjust the temperature setting on the
passenger side.
H
A/C:
Press to switch the air conditioning on or off. Air conditioning cools your
vehicle using outside air. To improve the time to reach a comfortable
temperature in hot weather, drive with the windows open until you feel cold air
through the air vents.
I
Note: In certain conditions (for example, maximum defrost), the air conditioning
may continue to operate even though the air conditioning is switched off.
Heated seats:
Press to switch the heated seats on and off. See Heated Seats
(page 160).
J
147
Super Duty (TFE) Canada/United States of America, enUSA, First Printing Climate Control
Page 159 of 636
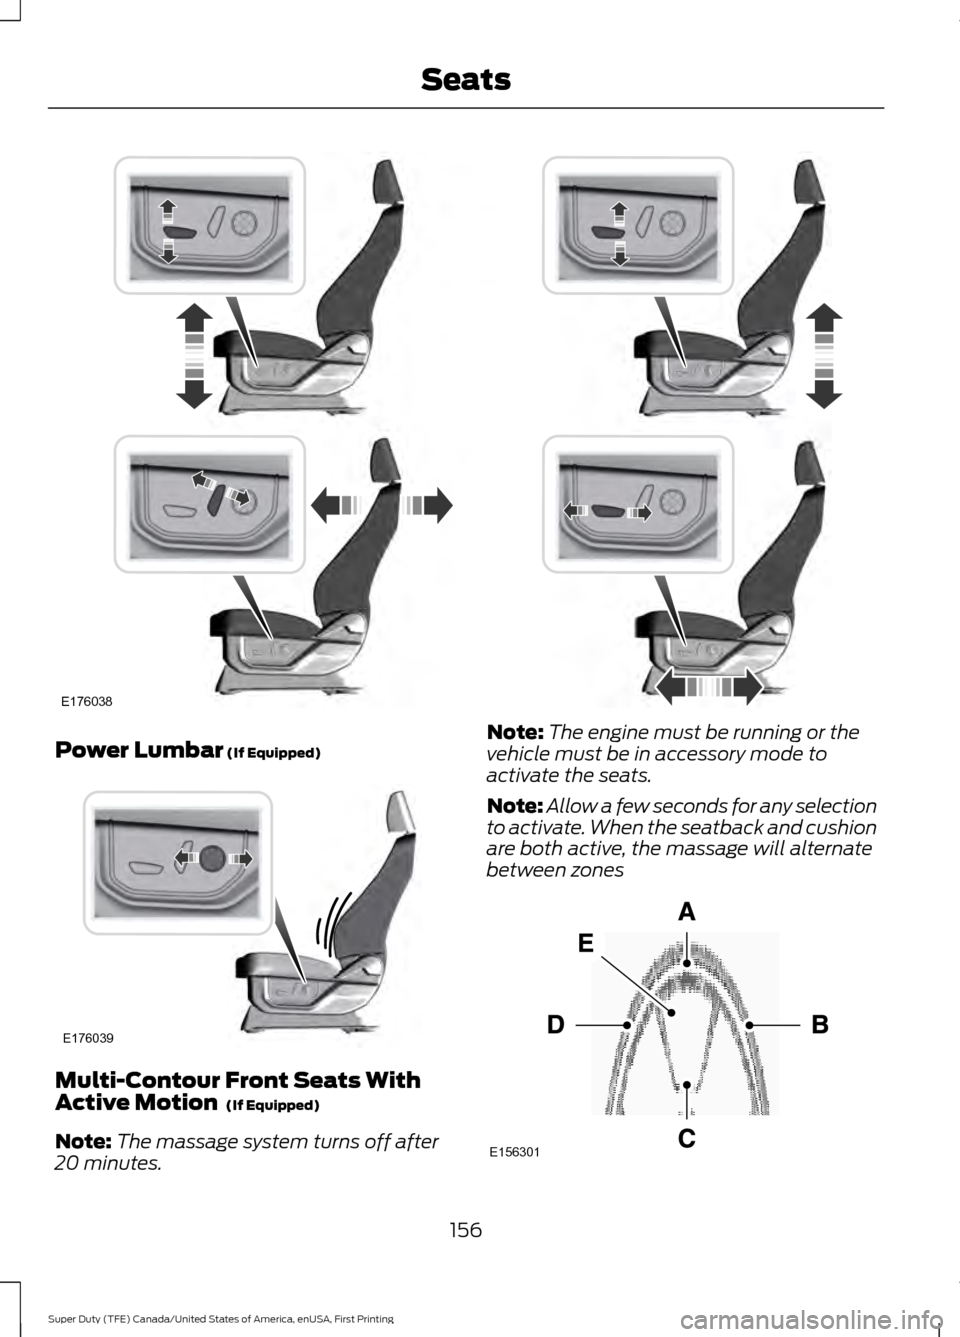
Power Lumbar (If Equipped)
Multi-Contour Front Seats With
Active Motion
(If Equipped)
Note: The massage system turns off after
20 minutes. Note:
The engine must be running or the
vehicle must be in accessory mode to
activate the seats.
Note: Allow a few seconds for any selection
to activate. When the seatback and cushion
are both active, the massage will alternate
between zones 156
Super Duty (TFE) Canada/United States of America, enUSA, First Printing SeatsE176038 E176039 E156301
Page 160 of 636
Lumbar and bolster mode
Massage mode
Upper lumbar
Back massage intensity
adjustment
A
Lumbar decrease
Massage intensity decrease
and off*
B
Lower lumbar**
Cushion massage intensity
adjustment
C
Lumbar increase
Massage intensity increase
D
-
On and off
E
* The massage feature defaults to an
alternating massage mode with back
massage intensity adjustment. The lumbar
and bolster feature defaults to the middle
lumbar mode.
** Press C a second time to adjust the back
bolster. Press C a third time to adjust the
cushion bolster.
You can also adjust this feature through
the touchscreen. When switched on, the
system displays directions for you to adjust
the lumbar settings in your seat or to set
the massage function. To access and make
adjustments to the lumbar setting:
1. Press the Menu Settings icon > Vehicle
> Multi-contour Seat.
2. Choose the desired seat to adjust.
3. Press the + or - to adjust the lumbar intensity.
To access and make adjustments to the
massage setting:
1. Press the Menu Settings icon > Vehicle
>Multi-contour Seat.
2. Choose the desired seat to adjust.
3. Press Off, Low or High. MEMORY FUNCTION (If Equipped) WARNINGS
Before activating the seat memory,
make sure that the area immediately
surrounding the seat is clear of
obstructions and that all occupants are
clear of moving parts. Do not use the memory function
when your vehicle is moving.
This feature automatically recalls the
position of the following:
•
Driver seat.
• Power mirrors.
• Optional adjustable pedals.
The memory control is located on the
driver door.
157
Super Duty (TFE) Canada/United States of America, enUSA, First Printing Seats
Page 182 of 636
We recommend the following cold
weather idling guidelines:
•
You can use Motorcraft® cetane
improvers or non-alcohol-based
cetane improvers from a reputable
manufacturer as needed.
• Maintain the engine cooling system
properly.
• Avoid shutting the engine down after
an extensive idling period. Drive your
vehicle for several miles with the
engine at normal operating
temperatures under a moderate load.
• Consider using an engine block heater.
• For extended idle times use an
approved idle speed increase device.
Winter Operating Tips for Arctic
Operation -20°F (-29°C) and Below
The following information is a guideline
only and is not to be the only source of
possible solutions in resolving extreme
cold temperature issues.
Starting Aids WARNING
Do not use starting fluid, for example
ether, in the air intake system. Such
fluid could cause immediate
explosive damage to the engine and
possible personal injury. The use of the factory engine block heater
assists in engine starting in extreme cold
ambient temperatures See Engine Block
Heater (page 181). Idle Control
Your vehicle may have a factory option for
a stationary elevated idle control through
the upfitter switches in the overhead
console. This allows the operator to
elevate the idle RPM for extended idle
periods, as well as aftermarket equipment
such as PTO operation. You must configure
this feature even if ordered from the
factory. See your authorized dealer for
required upfitting.
Operation in Snow and Rain
Vehicle operation in heavy snowfall or
extreme rain conditions may feed
excessive amounts of snow or water into
the air intake system. This could plug the
air filter with snow and may cause the
engine to lose power and possibly shut
down.
We recommend the following actions after
operating your vehicle up to
200 mi
(320 km) in snowfall or extreme rain:
• Snow: At the earliest opportunity, open
the hood and clear all the snow and ice
from the air filter housing inlet (do not
remove the foam filter) and reset the
air filter restriction gauge.
Note: Removal of the foam filter degrades
your vehicle performance during snow and
hot weather conditions.
• Extreme rain: The air filter dries after
about 15– 30 minutes at highway
speeds. At the earliest opportunity,
open the hood and reset the air filter
restriction gauge.
Refer to Air filter and restriction gauge in
the Maintenance chapter for more
information. See
Changing the Engine
Air Filter (page 354).
179
Super Duty (TFE) Canada/United States of America, enUSA, First Printing Starting and Stopping the Engine
Page 184 of 636
To help prolong engine life, we
recommended you allow the engine to idle
for three to five minutes, especially after
any of the following:
•
Continuous engine speed.
• High ambient temperature.
• High GVW or GCW operation, for
example heavy loads or trailers.
This allows the turbo charged engine to
cool down.
ENGINE IDLE SHUTDOWN (If
Equipped)
Your vehicle may be equipped with an
engine idle shutdown system. This system
automatically shuts down your engine
when it has been idling in
P (Park) or N
(Neutral) for five minutes (parking brake
set) or 15 minutes (parking brake not set).
When the engine idle shutdown process
has started:
• A chime sounds and the information
display will show ENGINE TURNS OFF
IN 30 (seconds) and start counting
down
• You can restart the five or 15-minute
timer by changing the position of the
accelerator pedal, brake pedal or the
park brake within the final 30 seconds
• When the timer reaches zero, the
engine shuts down and this message
will appear in your information display
ENGINE TURNED OFF
• One minute after the engine has shut
down, the electrical system simulates
key off, even though the ignition is still
in the on position, initiating normal
accessory delay period
• You must move the ignition to the off
position to reset the system before
restarting your vehicle. The engine idle shutdown idle timer does
not start if:
•
The engine is operating in power
take-off mode.
• The engine coolant temperature is
below 60°F (16°C).
• The exhaust emission control device is
regenerating.
ENGINE BLOCK HEATER
(If
Equipped) WARNINGS
Failure to follow engine block heater
instructions could result in property
damage or serious personal injury.
Do not use your heater with
ungrounded electrical systems or
two-pronged adapters. There is a risk
of electrical shock. Note:
The heater is most effective when
outdoor temperatures are below 0°F
(-18°C).
The heater acts as a starting aid by
warming the engine coolant. This allows
the climate control system to respond
quickly. The equipment includes a heater
element (installed in the engine block) and
a wire harness. You can connect the
system to a grounded 120-volt AC
electrical source.
181
Super Duty (TFE) Canada/United States of America, enUSA, First Printing Starting and Stopping the Engine
Page 210 of 636
In order to prevent the engine from running
at too low an RPM, which may cause it to
stall, SelectShift will still automatically
make some downshifts if it has determined
that you have not downshifted in time.
Although SelectShift will make some
downshifts for you, it will still allow you to
downshift at any time as long as the
SelectShift determines that damage will
not be caused to the engine from
over-revving.
SelectShift will not automatically upshift,
even if the engine is approaching the RPM
limit. It must be shifted manually by
pressing the + button.
Note:
Engine damage may occur if you
maintain excessive engine revving without
shifting.
The SelectShift Automatic transmission
feature has two modes: PRS and M mode.
PRS (Progressive Range Selection)
Progressive Range Selection gives you the
ability to lockout gears from the automatic
shifting range. This may provide you with
an improved driving experience (for
example, in slippery conditions or when
experiencing a steep grade). With the gearshift lever in drive (D), press
the – button to active PRS. The available
and selected gears are indicated on the
instrument cluster.
All available gears will display with the
current gear indicated. Press the – button
again to lock out gears beginning with the
highest gear. Example: press the – button
twice to lock out 6th and 5th gears. Only
the available gears will display and the
transmission will automatically shift
between the available gears. Press the +
button to unlock gears to allow the
transmission to shift to higher gears. The
transmission will shift automatically within
the gear range you select.
Manual (M)
Moving the gearshift lever to the manual
(M) position will allow you to manually
select the gear you desire. Only the current
gear will display. Use the buttons on the
gearshift lever to manually select gears.
Press the + button to upshift or the –
button to downshift. Return the
transmission to a different gearshift
position to deactivate manual control.
Recommended shift speeds
Upshift according to the following chart:
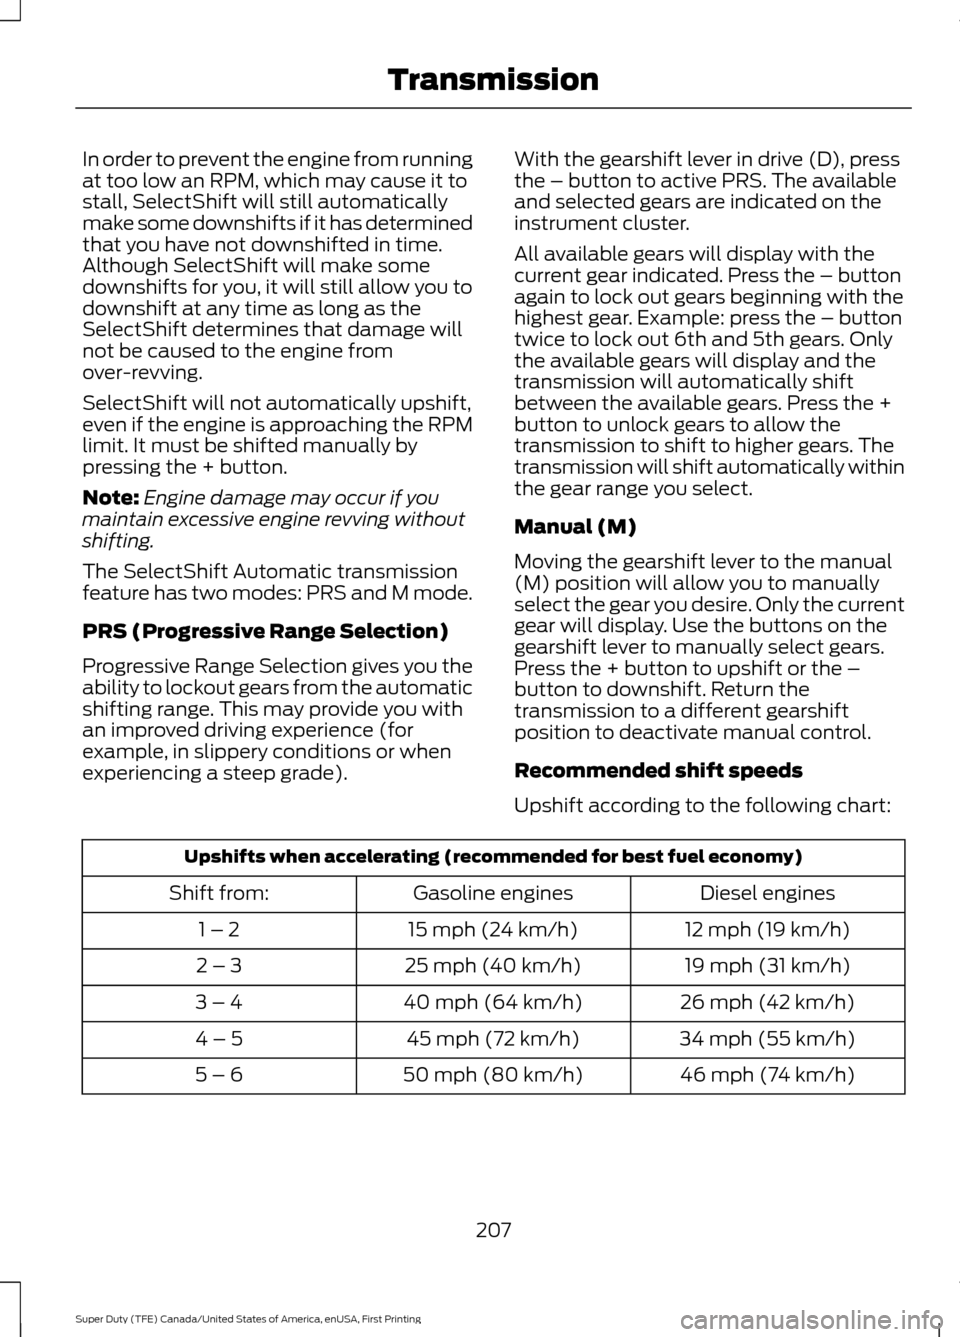
Upshifts when accelerating (recommended for best fuel economy)
Diesel engines
Gasoline engines
Shift from:
12 mph (19 km/h)
15 mph (24 km/h)
1 – 2
19 mph (31 km/h)
25 mph (40 km/h)
2 – 3
26 mph (42 km/h)
40 mph (64 km/h)
3 – 4
34 mph (55 km/h)
45 mph (72 km/h)
4 – 5
46 mph (74 km/h)
50 mph (80 km/h)
5 – 6
207
Super Duty (TFE) Canada/United States of America, enUSA, First Printing Transmission
Page 213 of 636
USING FOUR-WHEEL DRIVE
Note:
For important information regarding
the safe operation of this type of vehicle,
see General Information in the Wheels and
Tires chapter.
Note: Do not use 4H or 4L mode on dry,
hard surfaced roads. Doing so can produce
excessive noise, increase tire wear and may
damage drive components. 4X4 mode is
only intended for consistently slippery or
loose surfaces. Use of 4L mode on these
surfaces may produce some noise (such as
occasional clunks), but will not damage
drive components.
Note: If 4X4 low is selected while the
vehicle is moving above 3 mph (5 km/h),
the 4WD system will not perform a shift.
This is normal and should be no reason for
concern. Refer to Shifting to or from 4L (4X4
Low) for proper operation.
Note: You can switch on and switch off the
electronic locking differential by pulling the
4WD control (4WD vehicles) or turning the
electronic locking differential control (2WD
vehicles). See
Electronic Locking
Differential (page 219).
Manual Shift On Stop (MSOS)
4WD system
(If Equipped)
Note: The vehicle should not be driven in
4X4 High or 4X4 Low modes with the hub
locks set to FREE as this condition may
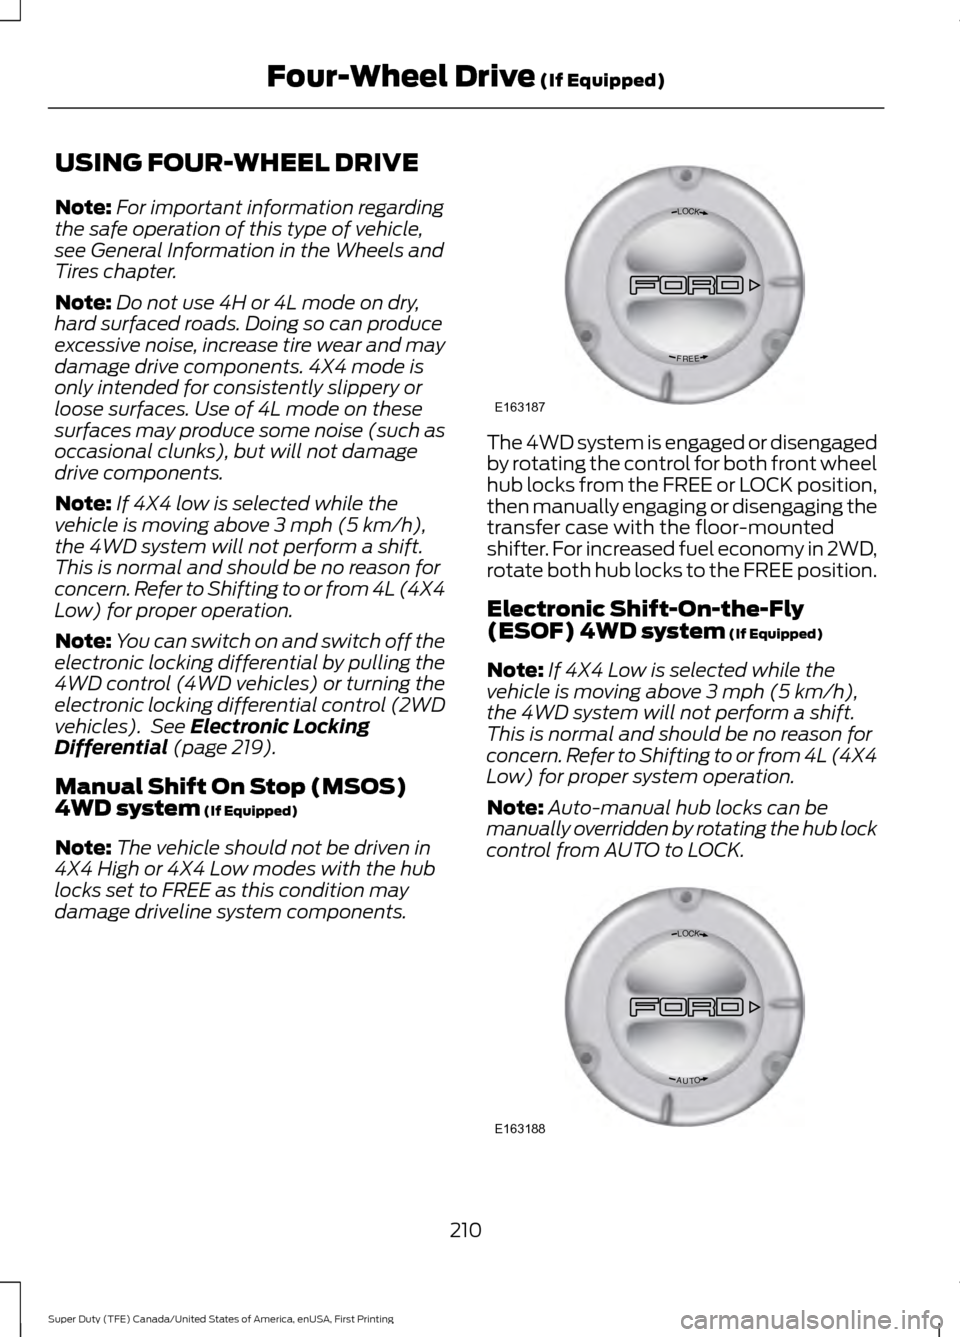
damage driveline system components. The 4WD system is engaged or disengaged
by rotating the control for both front wheel
hub locks from the FREE or LOCK position,
then manually engaging or disengaging the
transfer case with the floor-mounted
shifter. For increased fuel economy in 2WD,
rotate both hub locks to the FREE position.
Electronic Shift-On-the-Fly
(ESOF) 4WD system
(If Equipped)
Note: If 4X4 Low is selected while the
vehicle is moving above
3 mph (5 km/h),
the 4WD system will not perform a shift.
This is normal and should be no reason for
concern. Refer to Shifting to or from 4L (4X4
Low) for proper system operation.
Note: Auto-manual hub locks can be
manually overridden by rotating the hub lock
control from AUTO to LOCK. 210
Super Duty (TFE) Canada/United States of America, enUSA, First Printing Four-Wheel Drive
(If Equipped)LOC K
EERF
E163187 LOC K
OTUA
E163188
Page 214 of 636
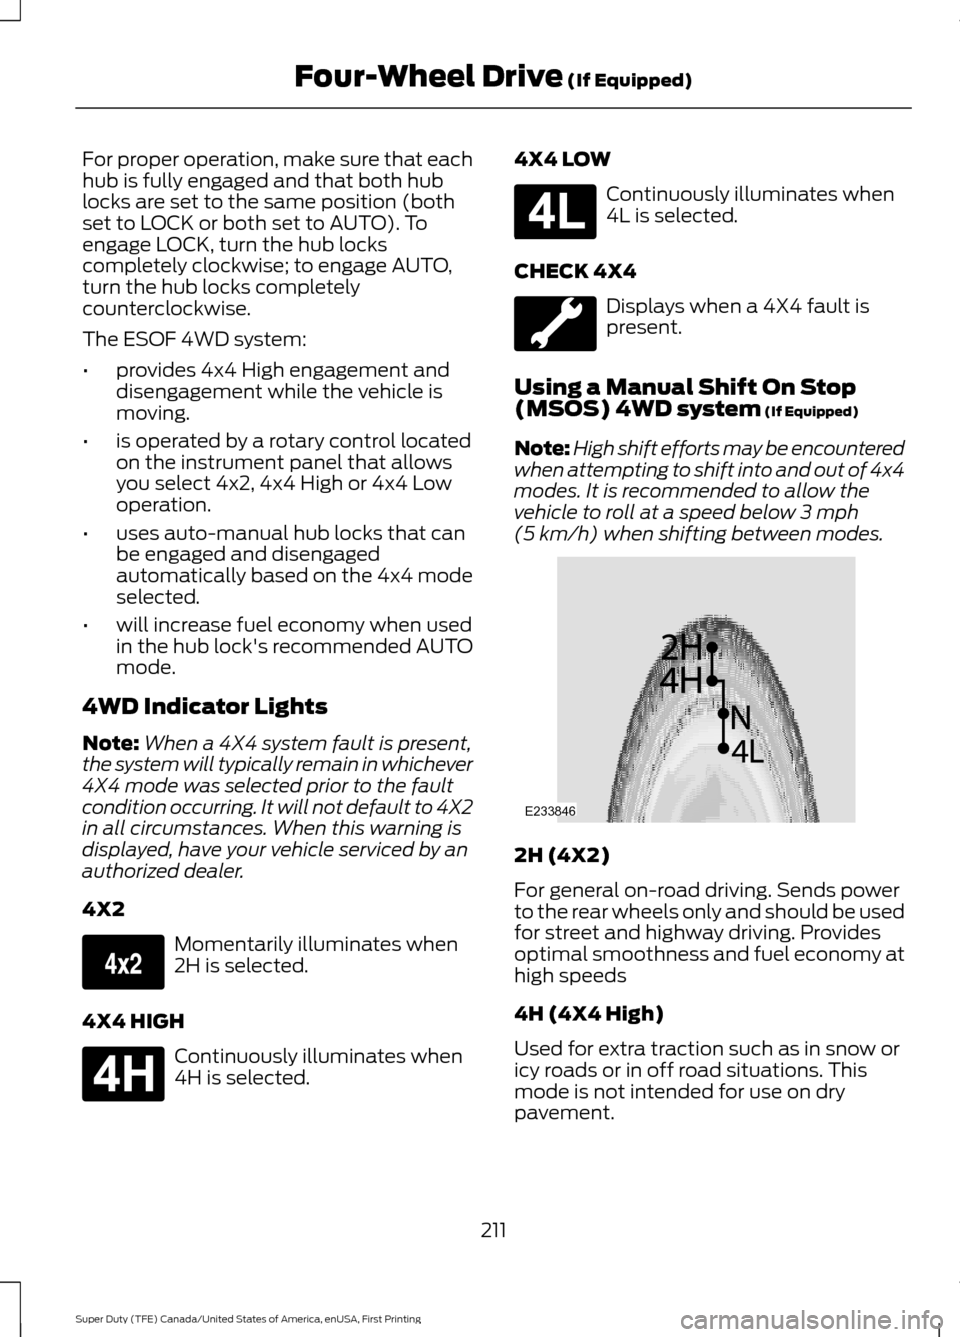
For proper operation, make sure that each
hub is fully engaged and that both hub
locks are set to the same position (both
set to LOCK or both set to AUTO). To
engage LOCK, turn the hub locks
completely clockwise; to engage AUTO,
turn the hub locks completely
counterclockwise.
The ESOF 4WD system:
•
provides 4x4 High engagement and
disengagement while the vehicle is
moving.
• is operated by a rotary control located
on the instrument panel that allows
you select 4x2, 4x4 High or 4x4 Low
operation.
• uses auto-manual hub locks that can
be engaged and disengaged
automatically based on the 4x4 mode
selected.
• will increase fuel economy when used
in the hub lock's recommended AUTO
mode.
4WD Indicator Lights
Note: When a 4X4 system fault is present,
the system will typically remain in whichever
4X4 mode was selected prior to the fault
condition occurring. It will not default to 4X2
in all circumstances. When this warning is
displayed, have your vehicle serviced by an
authorized dealer.
4X2 Momentarily illuminates when
2H is selected.
4X4 HIGH Continuously illuminates when
4H is selected. 4X4 LOW Continuously illuminates when
4L is selected.
CHECK 4X4 Displays when a 4X4 fault is
present.
Using a Manual Shift On Stop
(MSOS) 4WD system (If Equipped)
Note: High shift efforts may be encountered
when attempting to shift into and out of 4x4
modes. It is recommended to allow the
vehicle to roll at a speed below
3 mph
(5 km/h) when shifting between modes. 2H (4X2)
For general on-road driving. Sends power
to the rear wheels only and should be used
for street and highway driving. Provides
optimal smoothness and fuel economy at
high speeds
4H (4X4 High)
Used for extra traction such as in snow or
icy roads or in off road situations. This
mode is not intended for use on dry
pavement.
211
Super Duty (TFE) Canada/United States of America, enUSA, First Printing Four-Wheel Drive
(If Equipped)E163173 E181779 E181780 E233846