2017 FORD SUPER DUTY manual transmission
[x] Cancel search: manual transmissionPage 10 of 636
ABOUT THIS MANUAL
Thank you for choosing Ford. We
recommend that you take some time to
get to know your vehicle by reading this
manual. The more that you know about
your vehicle, the greater the safety and
pleasure you will get from driving it.
WARNING
Driving while distracted can result in
loss of vehicle control, crash and
injury. We strongly recommend that
you use extreme caution when using any
device that may take your focus off the
road. Your primary responsibility is the safe
operation of your vehicle. We recommend
against the use of any hand-held device
while driving and encourage the use of
voice-operated systems when possible.
Make sure you are aware of all applicable
local laws that may affect the use of
electronic devices while driving. Note:
This manual describes product
features and options available throughout
the range of available models, sometimes
even before they are generally available. It
may describe options that are not on your
vehicle. It is possible that either Ford Motor
Company or an authorized Ford dealer may
have originally sold an incomplete vehicle
to a vehicle modifier who upfitted it. As a
result, some of the options and features on
this vehicle may differ from what we
describe in this manual.
Note: Some of the illustrations in this
manual may show features as used in
different models, so they may appear
differently to you on your vehicle.
Note: Always use and operate your vehicle
in line with all applicable laws and
regulations.
Note: Pass on this manual when selling
your vehicle. It is an integral part of the
vehicle. Note:
Your vehicle ’s powertrain control
systems can detect and store information
about vehicle modifications that increase
horsepower and torque output such as
whether or not performance-enhancing
powertrain components commonly referred
to as performance chips have been used.
This information will stay in the system ’s
memory and cannot be erased even if the
modification is removed. Ford Motor
Company, Ford of Canada, Ford of Mexico
and service or repair facilities can retrieve
this information when servicing your vehicle.
Ford Motor Company may use this
information to determine if your warranty
covers any needed repairs.
Note: Some aftermarket products may
cause severe engine, transmission and
exhaust system damage. See your warranty
information for more details.
Your new diesel engine may feel, drive and
function somewhat differently than a
gasoline engine. Therefore, it is very
important that you read and thoroughly
familiarize yourself and others operating
the vehicle with this guide. There is a
special procedure for turning off the diesel
engine. See Starting a Diesel Engine
(page 176). It is important to read and
understand this material in order to
maintain the best service life for your
engine.
Ford may discontinue models or change
specifications without any notice and
without incurring obligations.
This manual may qualify the location of a
component as left-hand side or right-hand
side. The side is determined when facing
forward in the seat.
7
Super Duty (TFE) Canada/United States of America, enUSA, First Printing Introduction
Page 16 of 636
vehicle development we validate that
these parts deliver the intended level of
protection as a whole system. A great way
to know for sure you are getting this level
of protection is to use genuine Ford
replacement collision parts.
Warranty on Replacement Parts
Genuine Ford and Motorcraft replacement
parts are the only replacement parts that
benefit from a Ford Warranty. The Ford
Warranty may not cover damage caused
to your vehicle as a result of failed
non-Ford parts. For additional information,
refer to the terms and conditions of the
Ford Warranty.
SPECIAL NOTICES
New Vehicle Limited Warranty
For a detailed description of what is
covered and what is not covered by your
vehicle
’s New Vehicle Limited Warranty,
see the Warranty Guide that is provided to
you along with your Owner ’s Manual.
Special Instructions
For your added safety, your vehicle has
sophisticated electronic controls. WARNINGS
You risk death or serious injury to
yourself and others if you do not
follow the instruction highlighted by
the warning symbol. Failure to follow the
specific warnings and instructions could
result in personal injury. Never place front seat mounted
rear-facing child or infant seats in
front of an active passenger airbag. On Board Diagnostics Data Link
Connector
WARNING
Do not connect wireless plug-in
devices to the data link connector.
Unauthorized third parties could gain
access to vehicle data and impair the
performance of safety related systems.
Only allow repair facilities that follow our
service and repair instructions to connect
their equipment to the data link connector. Your vehicle has an OBD Data Link
Connector (DLC) that is used in
conjunction with a diagnostic scan tool for
vehicle diagnostics, repairs and
reprogramming services. Installing an
aftermarket device that uses the DLC
during normal driving for purposes such as
remote insurance company monitoring,
transmission of vehicle data to other
devices or entities, or altering the
performance of the vehicle, may cause
interference with or even damage to
vehicle systems. We do not recommend
or endorse the use of aftermarket plug-in
devices unless approved by Ford. The
vehicle Warranty will not cover damage
caused by an aftermarket plug-in device.
Using your Vehicle With a
Snowplow
More information and guidelines for using
your vehicle with a snowplow are in this
Owner's Manual. See Snowplowing (page
292
).
Using your Vehicle as an
Ambulance
If your light truck has the Ford Ambulance
Preparation Package, it may be utilized as
an ambulance. We urge ambulance
manufacturers to follow the
recommendations of the Ford Incomplete
Vehicle Manual, Ford Truck Body Builder ’s
13
Super Duty (TFE) Canada/United States of America, enUSA, First Printing Introduction
Page 62 of 636

Car Finder
Press the button twice within
three seconds. A tone sounds
and the direction indicators will
flash. We recommend you use this method
to locate your vehicle, rather than using
the panic alarm.
Sounding the Panic Alarm Press the button to sound the
panic alarm. Press the button
again or switch the ignition on to
turn it off.
Note: The panic alarm only operates when
the ignition is off.
Remote Start (If Equipped) WARNING
To avoid exhaust fumes, do not use
remote start if your vehicle is parked
indoors or in areas that are not well
ventilated. Note:
Do not use remote start if your fuel
level is low. The remote start button is on the
transmitter.
This feature allows you to start your
vehicle from the outside. The transmitter
has an extended operating range.
You can configure vehicles with automatic
climate control to turn on the automatic
climate control when you remote start your
vehicle. See Automatic Climate Control
(page
146). A manual climate control
system runs at the setting you set it to
when you switched your vehicle off.
Many states and provinces restrict the use
of remote start. Check your local and state
or provincial laws for specific requirements
regarding remote start systems. The remote start system does not work if
any of the following occur:
•
The ignition is on.
• The anti-theft alarm triggers.
• You switch off the feature.
• The hood is open.
• The transmission is not in park (P).
• The battery voltage is below the
minimum operating voltage.
• The service engine soon light is on.
Remote Control Feedback
An LED on the remote control provides
status feedback of remote start or stop
commands. Status
LED
Remote start orextension
successful
Solid green
Remote stop
successful; vehicle off
Solid red
Remote start orstop failed
Blinking red
Waiting for statusupdate
Blinking green
Remote Starting Your Vehicle
Note: You must press each button within
three seconds of each other. 59
Super Duty (TFE) Canada/United States of America, enUSA, First Printing Keys and Remote ControlsE138623 E138624 E138625 E138626
Page 91 of 636
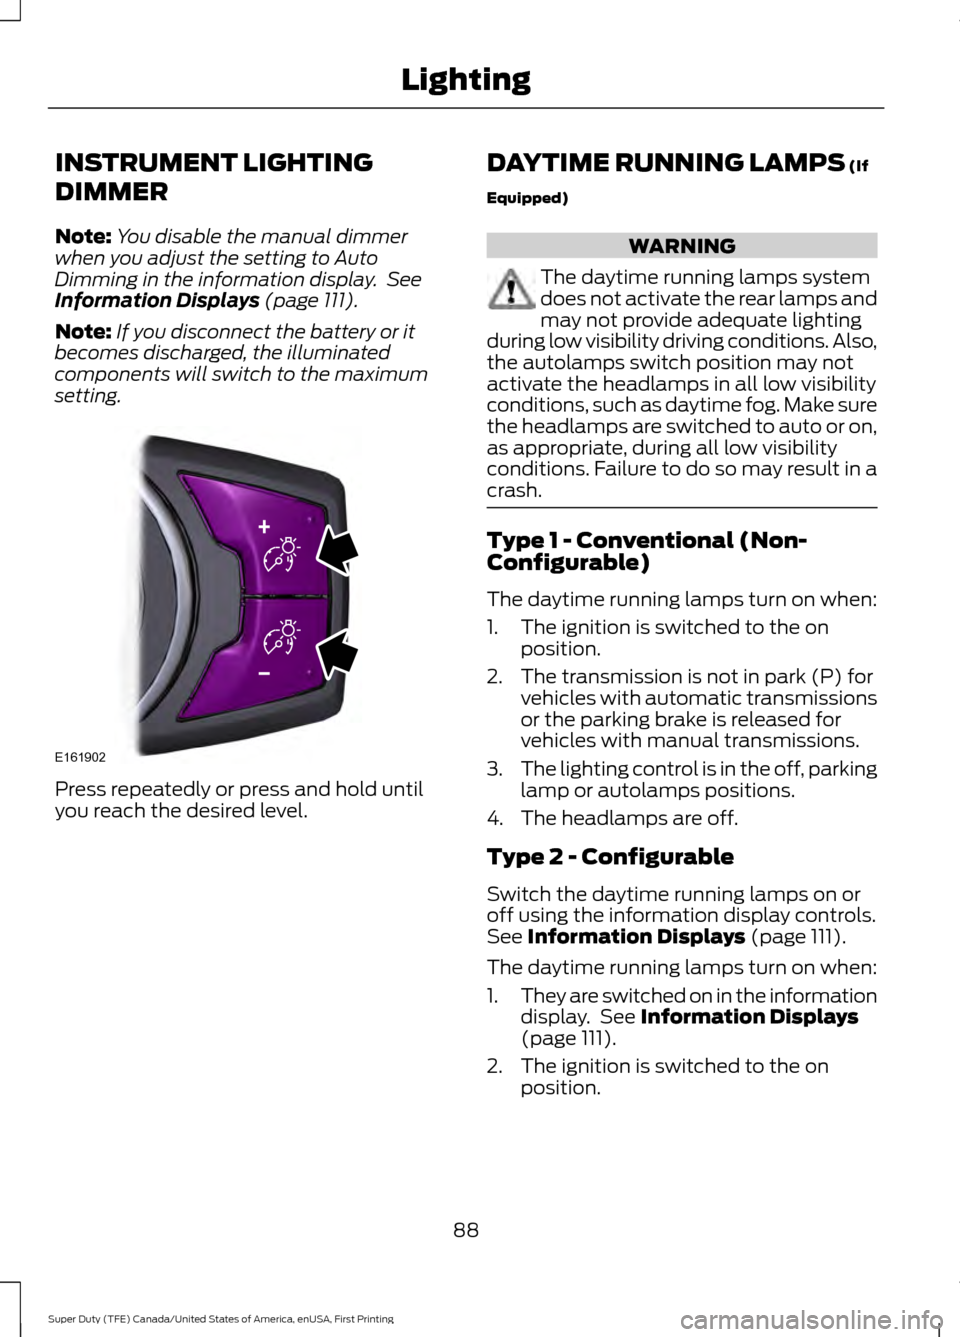
INSTRUMENT LIGHTING
DIMMER
Note:
You disable the manual dimmer
when you adjust the setting to Auto
Dimming in the information display. See
Information Displays (page 111).
Note: If you disconnect the battery or it
becomes discharged, the illuminated
components will switch to the maximum
setting. Press repeatedly or press and hold until
you reach the desired level. DAYTIME RUNNING LAMPS
(If
Equipped) WARNING
The daytime running lamps system
does not activate the rear lamps and
may not provide adequate lighting
during low visibility driving conditions. Also,
the autolamps switch position may not
activate the headlamps in all low visibility
conditions, such as daytime fog. Make sure
the headlamps are switched to auto or on,
as appropriate, during all low visibility
conditions. Failure to do so may result in a
crash. Type 1 - Conventional (Non-
Configurable)
The daytime running lamps turn on when:
1. The ignition is switched to the on
position.
2. The transmission is not in park (P) for vehicles with automatic transmissions
or the parking brake is released for
vehicles with manual transmissions.
3. The lighting control is in the off, parking
lamp or autolamps positions.
4. The headlamps are off.
Type 2 - Configurable
Switch the daytime running lamps on or
off using the information display controls.
See
Information Displays (page 111).
The daytime running lamps turn on when:
1. They are switched on in the information
display. See
Information Displays
(page 111).
2. The ignition is switched to the on position.
88
Super Duty (TFE) Canada/United States of America, enUSA, First Printing LightingE161902
Page 92 of 636
3. The transmission is not in park (P) for
vehicles with automatic transmissions
or the parking brake is released for
vehicles with manual transmissions.
4. The lighting control is in the autolamps
position.
5. The headlamps are off.
The other lighting control switch positions
do not activate the daytime running lamps,
and you can use them to temporarily
override autolamp control.
When switched off in the information
display, the daytime running lamps are off
in all lighting control switch positions.
AUTOMATIC HIGH BEAM
CONTROL (If Equipped)
The system automatically turns on the high
beams if it is dark enough and no other
traffic is present. When it detects the
headlights of an approaching vehicle, the
tail lamps of the preceding vehicle or street
lighting, the system turns off the high
beams before they distract other drivers.
The low beams remain on.
Note: If it appears that automatic high
beam is not functioning properly, check the
windshield in front of the camera for a
blockage. A clear view of the road is required
for proper system operation. Make sure that
authorized personnel repair any windshield
damage in the area of the camera's field of
view.
Note: If the system detects a blockage such
as bird droppings, bug splatter, snow or ice,
and you do not observe changes, the system
may go into low beam mode until you clear
the blockage. A message may also appear
in the information display noting the front
camera is blocked. Note:
Typical road dust, dirt and water
spots do not affect the performance of the
automatic high beam control. However, in
cold or inclement weather conditions, you
may notice a decrease in the availability of
the automatic high beam control, especially
at start up. If you want to change the beam
state independently of the system, you may
switch the high beams on or off using the
high beam lever. Automatic high beam
control resumes when conditions are
correct.
Note: Using much larger tires or equipping
vehicle accessories such as snowplows can
modify your vehicle's ride height and
degrade automatic high beam control
performance.
A camera sensor, centrally mounted
behind the windshield of your vehicle,
continuously monitors conditions to decide
when to switch the high beams off and on.
Once the system is active, the high beams
switch on if:
• The outside light level is low enough.
• There is no traffic in front of your
vehicle.
• The vehicle speed is greater than
32 mph (52 km/h)
.
The high beams switch off if:
• The system detects the headlamps of
an approaching vehicle or the rear
lamps of a vehicle in front of you.
• Vehicle speed falls below
16 mph
(26 km/h).
• The outside light level is high enough
that high beams are not required.
• The system detects severe rain, snow
or fog.
• The camera is blocked.
89
Super Duty (TFE) Canada/United States of America, enUSA, First Printing Lighting
Page 132 of 636
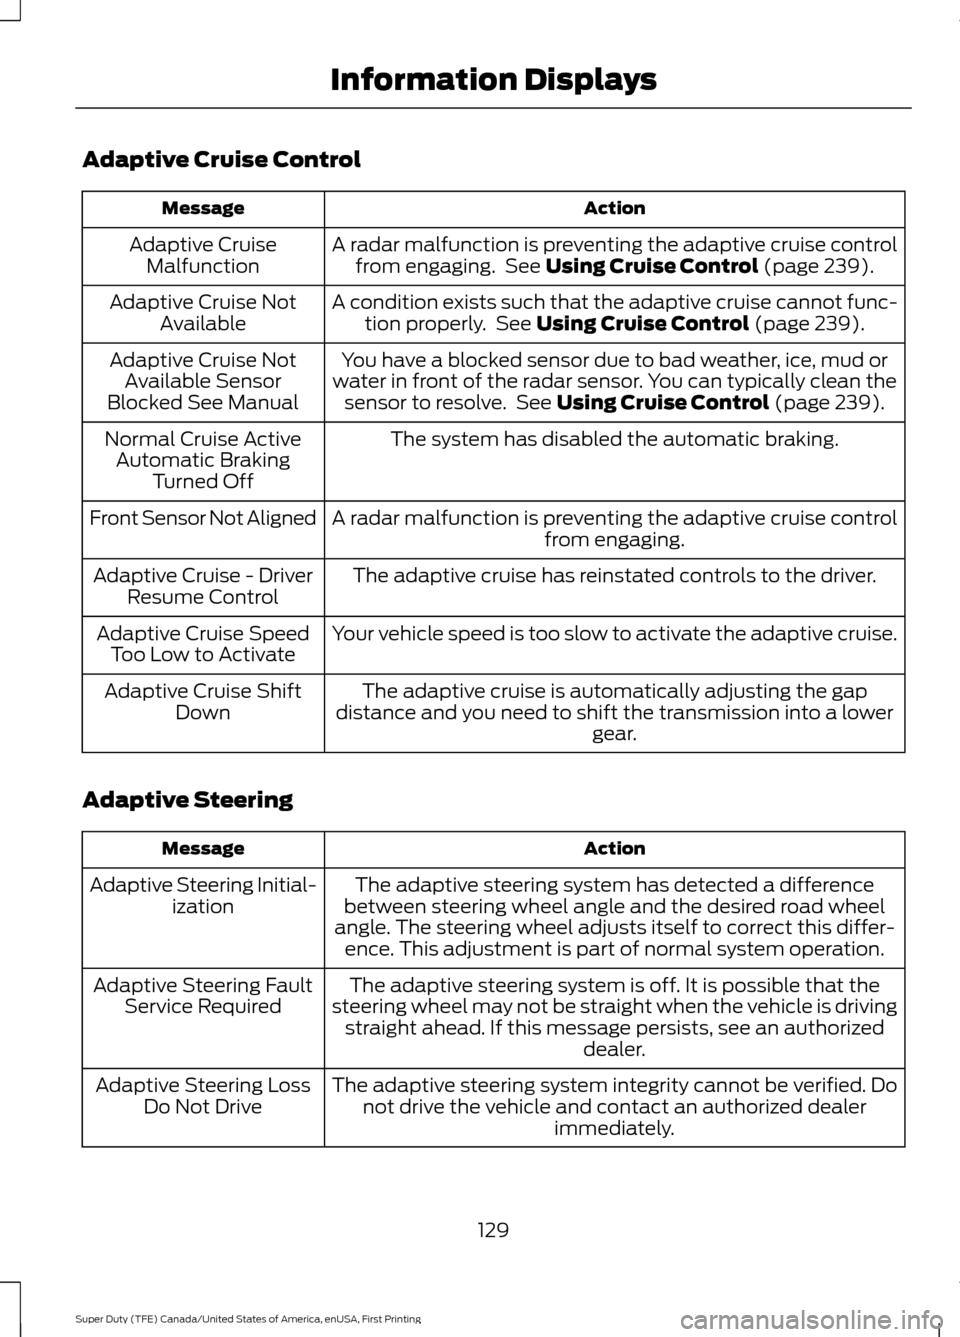
Adaptive Cruise Control
Action
Message
A radar malfunction is preventing the adaptive cruise controlfrom engaging. See Using Cruise Control (page 239).
Adaptive Cruise
Malfunction
A condition exists such that the adaptive cruise cannot func-tion properly. See
Using Cruise Control (page 239).
Adaptive Cruise Not
Available
You have a blocked sensor due to bad weather, ice, mud or
water in front of the radar sensor. You can typically clean the sensor to resolve. See
Using Cruise Control (page 239).
Adaptive Cruise Not
Available Sensor
Blocked See Manual
The system has disabled the automatic braking.
Normal Cruise Active
Automatic Braking Turned Off
A radar malfunction is preventing the adaptive cruise control from engaging.
Front Sensor Not Aligned
The adaptive cruise has reinstated controls to the driver.
Adaptive Cruise - Driver
Resume Control
Your vehicle speed is too slow to activate the adaptive cruise.
Adaptive Cruise Speed
Too Low to Activate
The adaptive cruise is automatically adjusting the gap
distance and you need to shift the transmission into a lower gear.
Adaptive Cruise Shift
Down
Adaptive Steering Action
Message
The adaptive steering system has detected a difference
between steering wheel angle and the desired road wheel
angle. The steering wheel adjusts itself to correct this differ- ence. This adjustment is part of normal system operation.
Adaptive Steering Initial-
ization
The adaptive steering system is off. It is possible that the
steering wheel may not be straight when the vehicle is driving straight ahead. If this message persists, see an authorized dealer.
Adaptive Steering Fault
Service Required
The adaptive steering system integrity cannot be verified. Donot drive the vehicle and contact an authorized dealer immediately.
Adaptive Steering Loss
Do Not Drive
129
Super Duty (TFE) Canada/United States of America, enUSA, First Printing Information Displays
Page 208 of 636
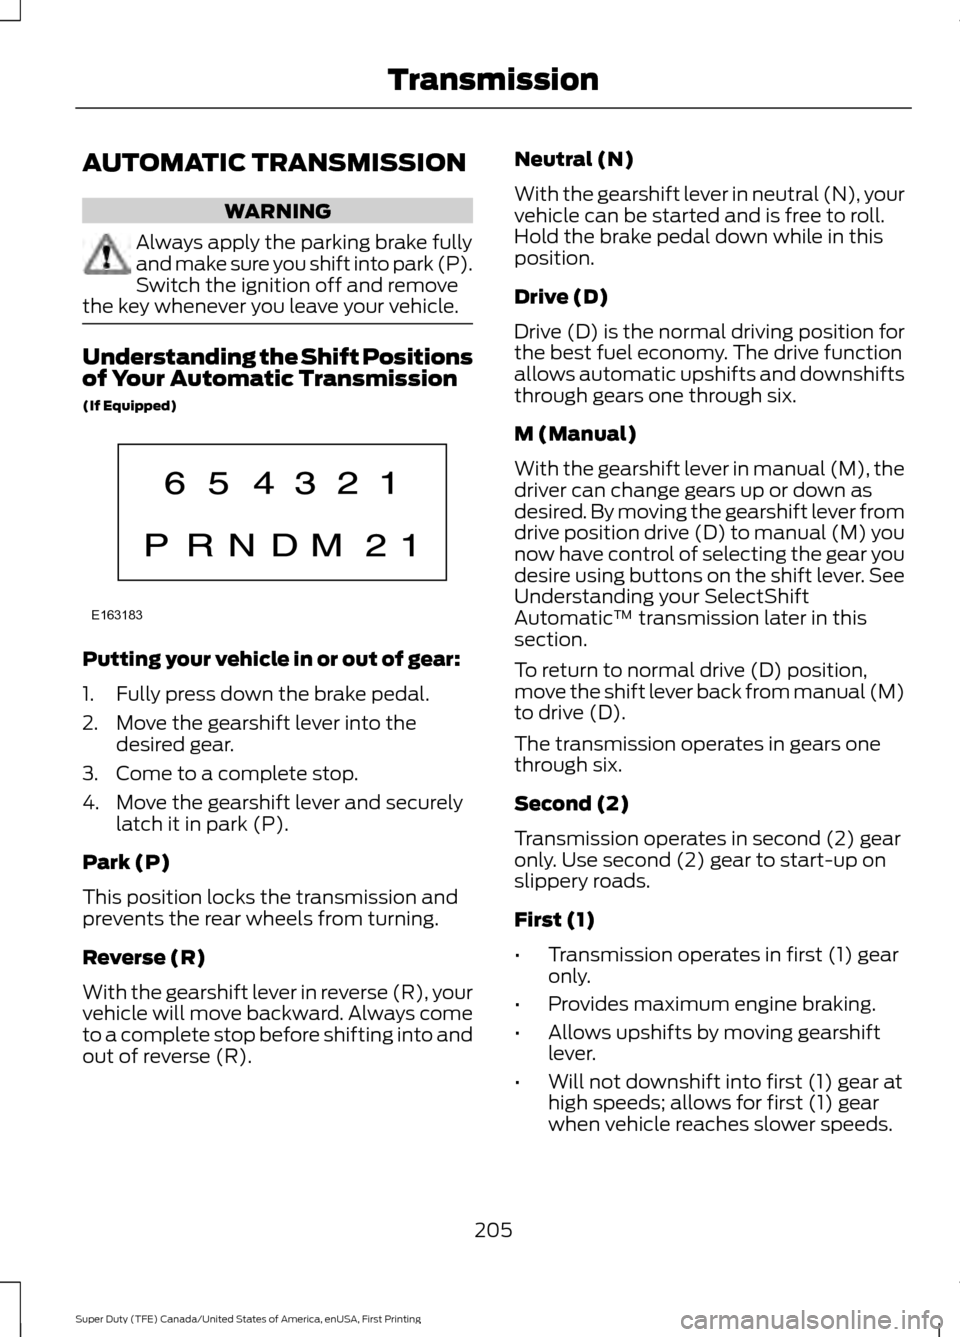
AUTOMATIC TRANSMISSION
WARNING
Always apply the parking brake fully
and make sure you shift into park (P).
Switch the ignition off and remove
the key whenever you leave your vehicle. Understanding the Shift Positions
of Your Automatic Transmission
(If Equipped)
Putting your vehicle in or out of gear:
1. Fully press down the brake pedal.
2. Move the gearshift lever into the
desired gear.
3. Come to a complete stop.
4. Move the gearshift lever and securely latch it in park (P).
Park (P)
This position locks the transmission and
prevents the rear wheels from turning.
Reverse (R)
With the gearshift lever in reverse (R), your
vehicle will move backward. Always come
to a complete stop before shifting into and
out of reverse (R). Neutral (N)
With the gearshift lever in neutral (N), your
vehicle can be started and is free to roll.
Hold the brake pedal down while in this
position.
Drive (D)
Drive (D) is the normal driving position for
the best fuel economy. The drive function
allows automatic upshifts and downshifts
through gears one through six.
M (Manual)
With the gearshift lever in manual (M), the
driver can change gears up or down as
desired. By moving the gearshift lever from
drive position drive (D) to manual (M) you
now have control of selecting the gear you
desire using buttons on the shift lever. See
Understanding your SelectShift
Automatic
™ transmission later in this
section.
To return to normal drive (D) position,
move the shift lever back from manual (M)
to drive (D).
The transmission operates in gears one
through six.
Second (2)
Transmission operates in second (2) gear
only. Use second (2) gear to start-up on
slippery roads.
First (1)
• Transmission operates in first (1) gear
only.
• Provides maximum engine braking.
• Allows upshifts by moving gearshift
lever.
• Will not downshift into first (1) gear at
high speeds; allows for first (1) gear
when vehicle reaches slower speeds.
205
Super Duty (TFE) Canada/United States of America, enUSA, First Printing TransmissionE163183
Page 210 of 636
In order to prevent the engine from running
at too low an RPM, which may cause it to
stall, SelectShift will still automatically
make some downshifts if it has determined
that you have not downshifted in time.
Although SelectShift will make some
downshifts for you, it will still allow you to
downshift at any time as long as the
SelectShift determines that damage will
not be caused to the engine from
over-revving.
SelectShift will not automatically upshift,
even if the engine is approaching the RPM
limit. It must be shifted manually by
pressing the + button.
Note:
Engine damage may occur if you
maintain excessive engine revving without
shifting.
The SelectShift Automatic transmission
feature has two modes: PRS and M mode.
PRS (Progressive Range Selection)
Progressive Range Selection gives you the
ability to lockout gears from the automatic
shifting range. This may provide you with
an improved driving experience (for
example, in slippery conditions or when
experiencing a steep grade). With the gearshift lever in drive (D), press
the – button to active PRS. The available
and selected gears are indicated on the
instrument cluster.
All available gears will display with the
current gear indicated. Press the – button
again to lock out gears beginning with the
highest gear. Example: press the – button
twice to lock out 6th and 5th gears. Only
the available gears will display and the
transmission will automatically shift
between the available gears. Press the +
button to unlock gears to allow the
transmission to shift to higher gears. The
transmission will shift automatically within
the gear range you select.
Manual (M)
Moving the gearshift lever to the manual
(M) position will allow you to manually
select the gear you desire. Only the current
gear will display. Use the buttons on the
gearshift lever to manually select gears.
Press the + button to upshift or the –
button to downshift. Return the
transmission to a different gearshift
position to deactivate manual control.
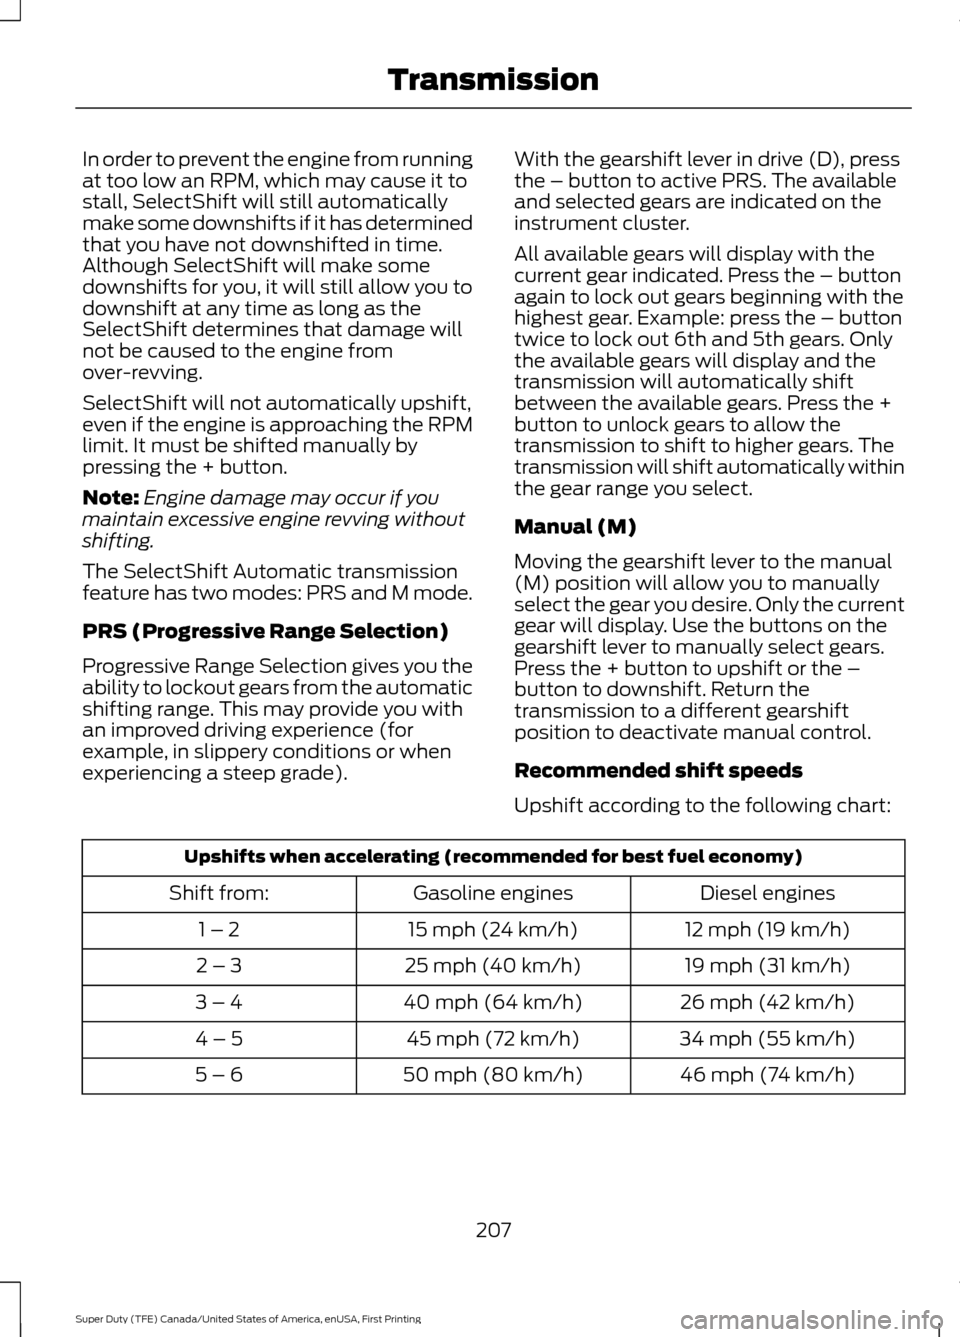
Recommended shift speeds
Upshift according to the following chart:
Upshifts when accelerating (recommended for best fuel economy)
Diesel engines
Gasoline engines
Shift from:
12 mph (19 km/h)
15 mph (24 km/h)
1 – 2
19 mph (31 km/h)
25 mph (40 km/h)
2 – 3
26 mph (42 km/h)
40 mph (64 km/h)
3 – 4
34 mph (55 km/h)
45 mph (72 km/h)
4 – 5
46 mph (74 km/h)
50 mph (80 km/h)
5 – 6
207
Super Duty (TFE) Canada/United States of America, enUSA, First Printing Transmission