2017 FORD SUPER DUTY cooling
[x] Cancel search: coolingPage 143 of 636
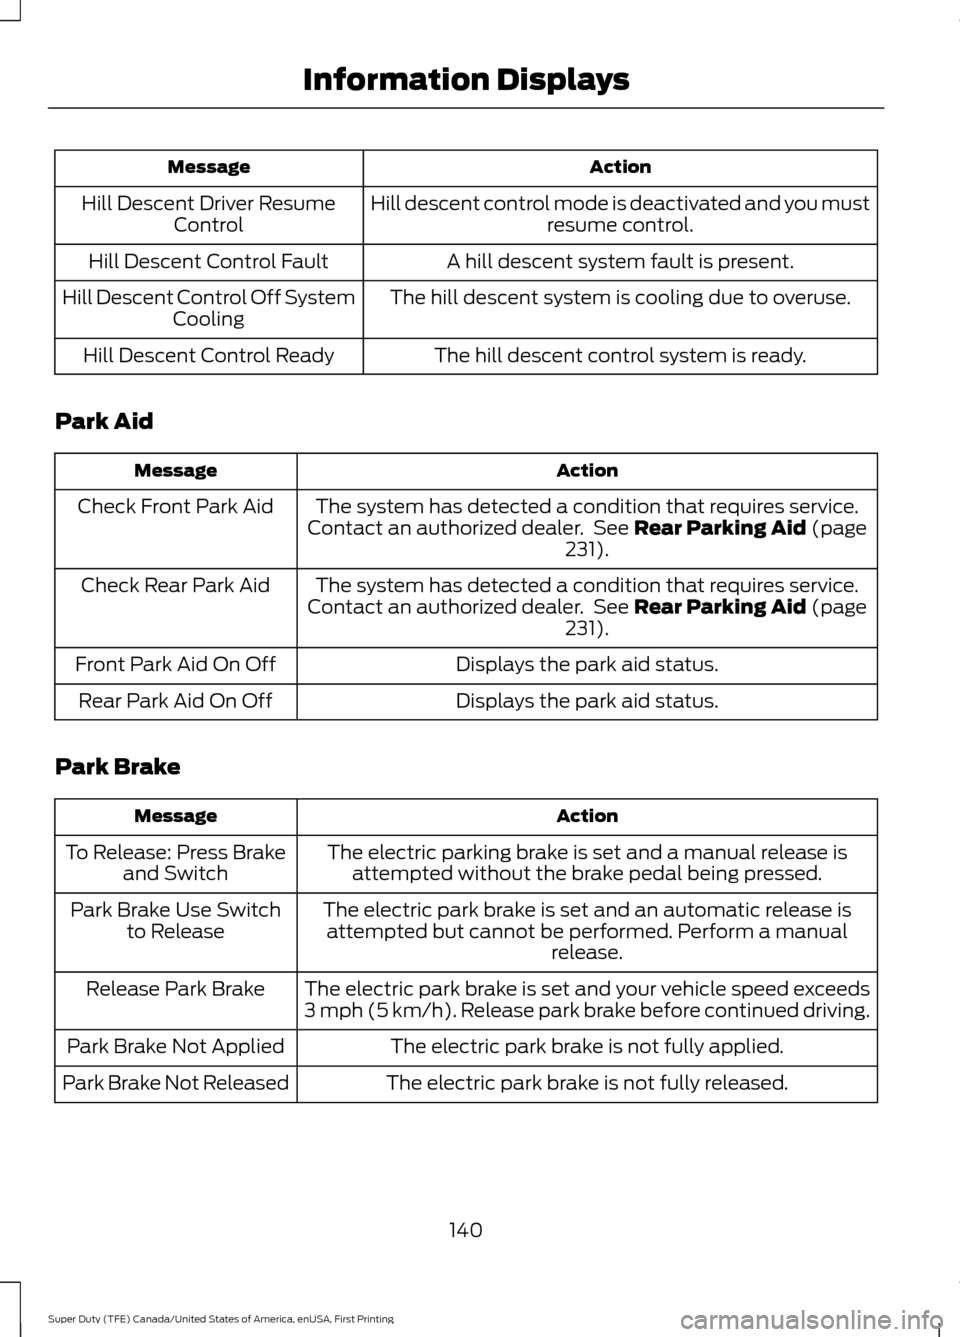
Action
Message
Hill descent control mode is deactivated and you mustresume control.
Hill Descent Driver Resume
Control
A hill descent system fault is present.
Hill Descent Control Fault
The hill descent system is cooling due to overuse.
Hill Descent Control Off System
Cooling
The hill descent control system is ready.
Hill Descent Control Ready
Park Aid Action
Message
The system has detected a condition that requires service.
Contact an authorized dealer. See Rear Parking Aid (page
231).
Check Front Park Aid
The system has detected a condition that requires service.
Contact an authorized dealer. See
Rear Parking Aid (page
231).
Check Rear Park Aid
Displays the park aid status.
Front Park Aid On Off
Displays the park aid status.
Rear Park Aid On Off
Park Brake Action
Message
The electric parking brake is set and a manual release isattempted without the brake pedal being pressed.
To Release: Press Brake
and Switch
The electric park brake is set and an automatic release isattempted but cannot be performed. Perform a manual release.
Park Brake Use Switch
to Release
The electric park brake is set and your vehicle speed exceeds
3 mph (5 km/h). Release park brake before continued driving.
Release Park Brake
The electric park brake is not fully applied.
Park Brake Not Applied
The electric park brake is not fully released.
Park Brake Not Released
140
Super Duty (TFE) Canada/United States of America, enUSA, First Printing Information Displays
Page 149 of 636
Note: To prevent window fogging, you cannot select recirculated air when
maximum defrost is on.
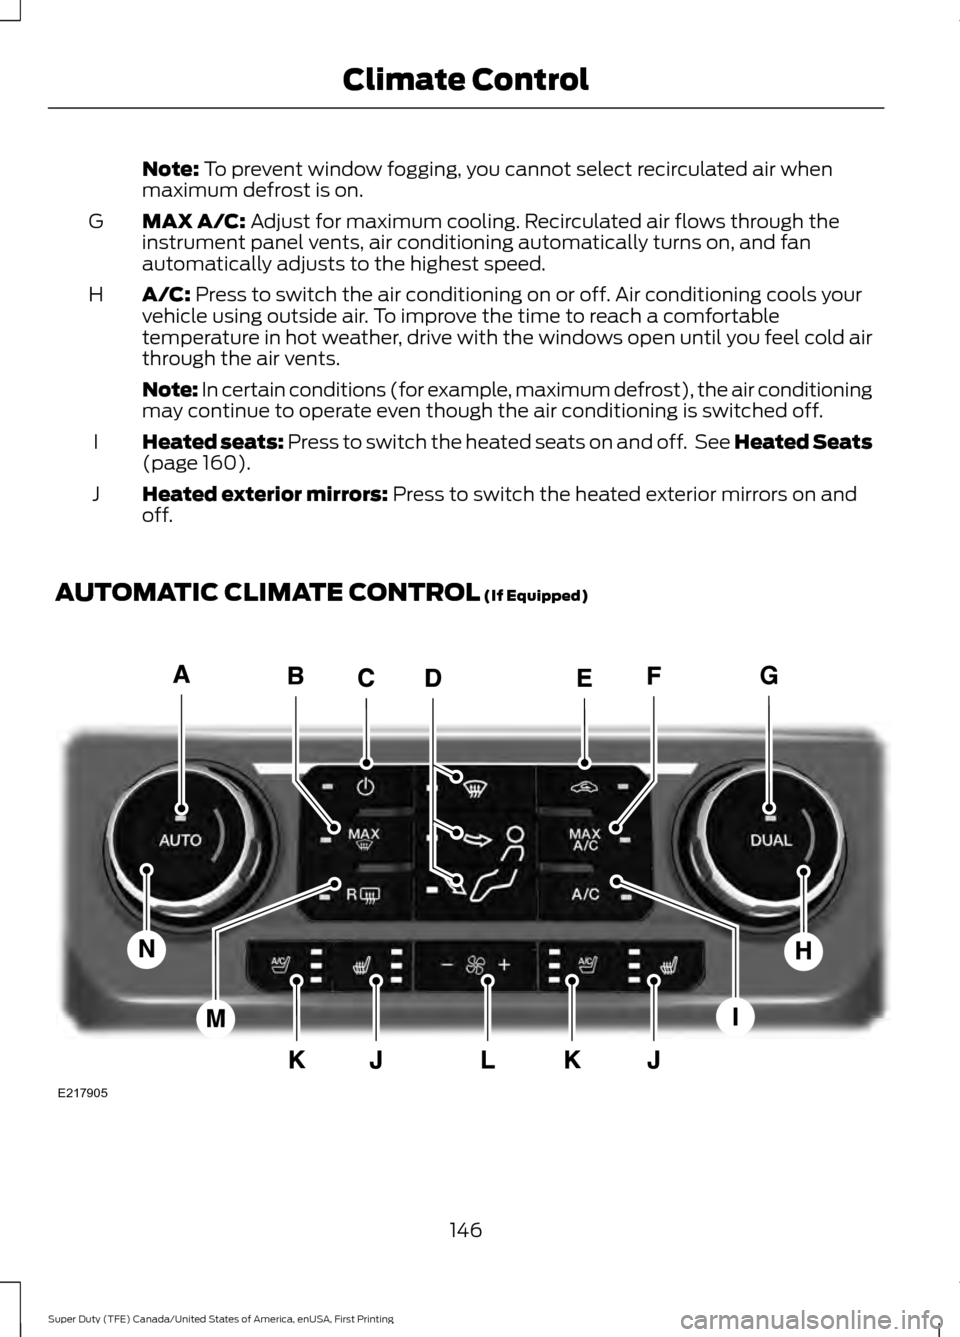
MAX A/C:
Adjust for maximum cooling. Recirculated air flows through the
instrument panel vents, air conditioning automatically turns on, and fan
automatically adjusts to the highest speed.
G
A/C:
Press to switch the air conditioning on or off. Air conditioning cools your
vehicle using outside air. To improve the time to reach a comfortable
temperature in hot weather, drive with the windows open until you feel cold air
through the air vents.
H
Note: In certain conditions (for example, maximum defrost), the air conditioning
may continue to operate even though the air conditioning is switched off.
Heated seats:
Press to switch the heated seats on and off. See Heated Seats
(page 160).
I
Heated exterior mirrors:
Press to switch the heated exterior mirrors on and
off.
J
AUTOMATIC CLIMATE CONTROL
(If Equipped) 146
Super Duty (TFE) Canada/United States of America, enUSA, First Printing Climate ControlE217905
Page 150 of 636
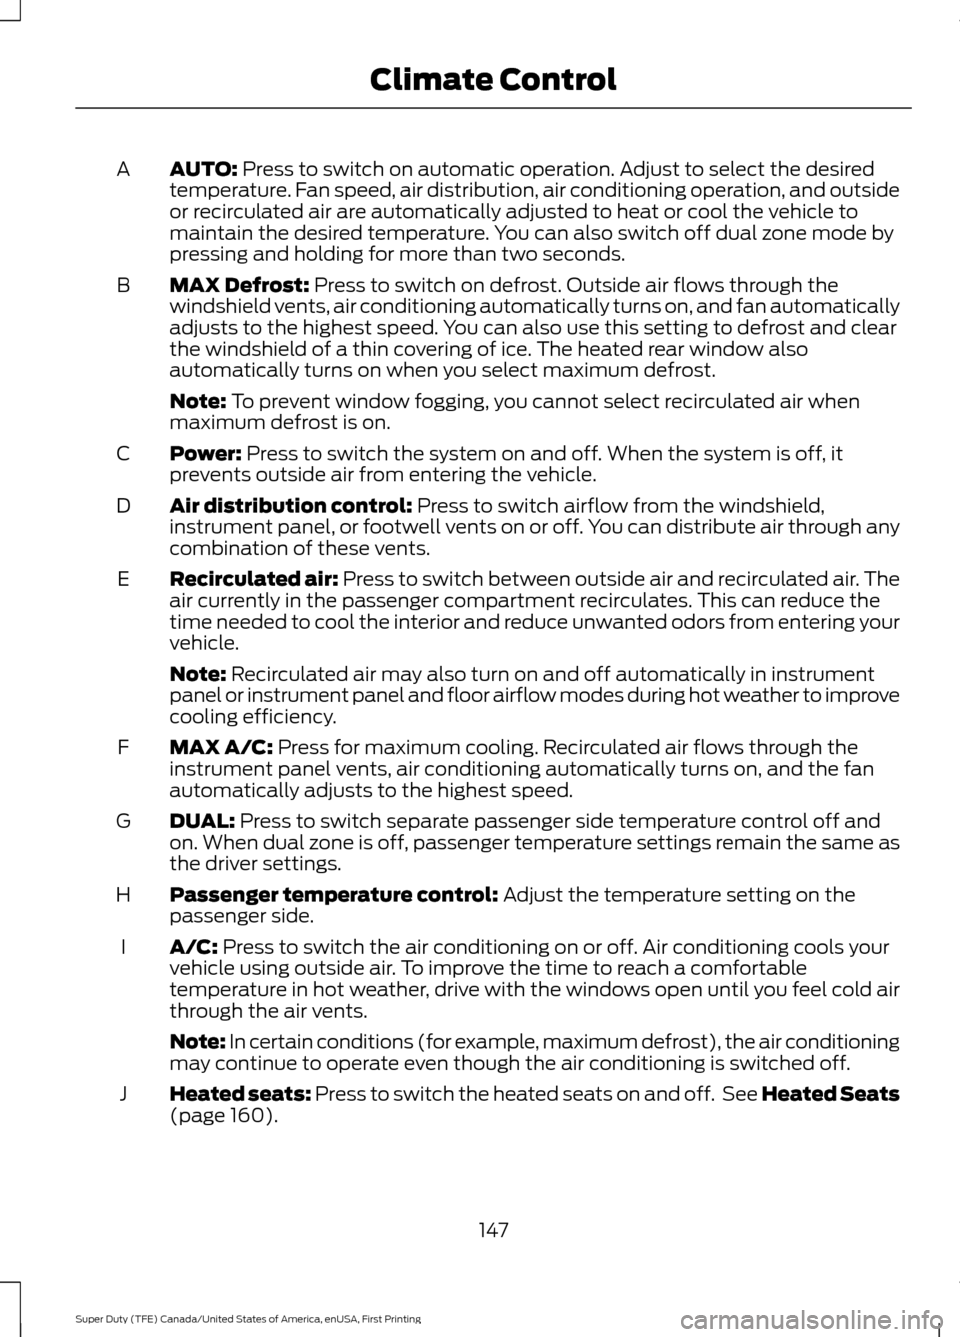
AUTO: Press to switch on automatic operation. Adjust to select the desired
temperature. Fan speed, air distribution, air conditioning operation, and outside
or recirculated air are automatically adjusted to heat or cool the vehicle to
maintain the desired temperature. You can also switch off dual zone mode by
pressing and holding for more than two seconds.
A
MAX Defrost:
Press to switch on defrost. Outside air flows through the
windshield vents, air conditioning automatically turns on, and fan automatically
adjusts to the highest speed. You can also use this setting to defrost and clear
the windshield of a thin covering of ice. The heated rear window also
automatically turns on when you select maximum defrost.
B
Note:
To prevent window fogging, you cannot select recirculated air when
maximum defrost is on.
Power:
Press to switch the system on and off. When the system is off, it
prevents outside air from entering the vehicle.
C
Air distribution control:
Press to switch airflow from the windshield,
instrument panel, or footwell vents on or off. You can distribute air through any
combination of these vents.
D
Recirculated air:
Press to switch between outside air and recirculated air. The
air currently in the passenger compartment recirculates. This can reduce the
time needed to cool the interior and reduce unwanted odors from entering your
vehicle.
E
Note:
Recirculated air may also turn on and off automatically in instrument
panel or instrument panel and floor airflow modes during hot weather to improve
cooling efficiency.
MAX A/C:
Press for maximum cooling. Recirculated air flows through the
instrument panel vents, air conditioning automatically turns on, and the fan
automatically adjusts to the highest speed.
F
DUAL:
Press to switch separate passenger side temperature control off and
on. When dual zone is off, passenger temperature settings remain the same as
the driver settings.
G
Passenger temperature control:
Adjust the temperature setting on the
passenger side.
H
A/C:
Press to switch the air conditioning on or off. Air conditioning cools your
vehicle using outside air. To improve the time to reach a comfortable
temperature in hot weather, drive with the windows open until you feel cold air
through the air vents.
I
Note: In certain conditions (for example, maximum defrost), the air conditioning
may continue to operate even though the air conditioning is switched off.
Heated seats:
Press to switch the heated seats on and off. See Heated Seats
(page 160).
J
147
Super Duty (TFE) Canada/United States of America, enUSA, First Printing Climate Control
Page 151 of 636
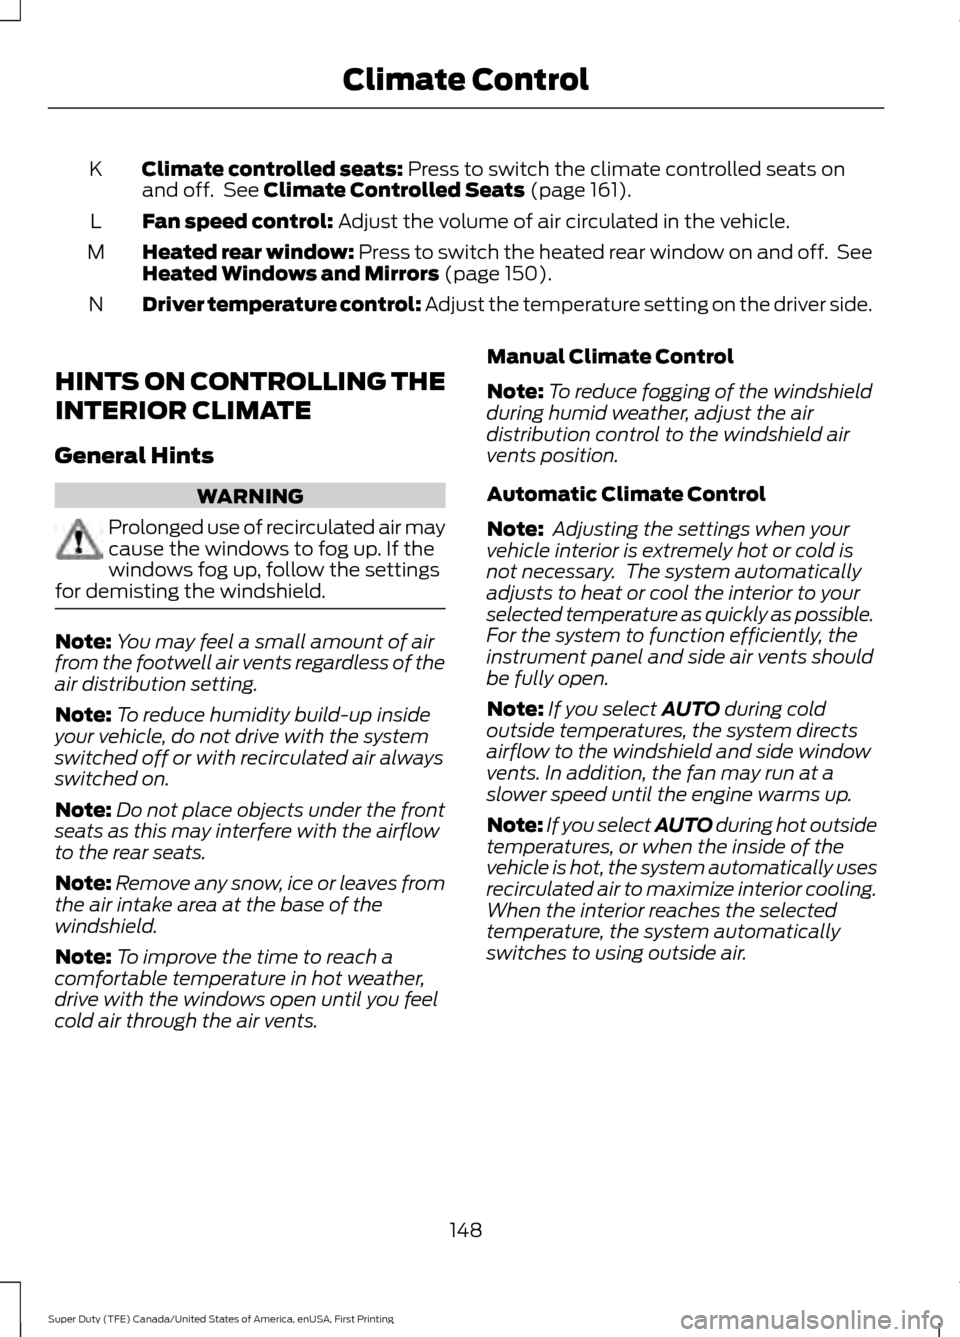
Climate controlled seats: Press to switch the climate controlled seats on
and off. See Climate Controlled Seats (page 161).
K
Fan speed control:
Adjust the volume of air circulated in the vehicle.
L
Heated rear window: Press to switch the heated rear window on and off. See
Heated Windows and Mirrors
(page 150).
M
Driver temperature control: Adjust the temperature setting on the driver side.
N
HINTS ON CONTROLLING THE
INTERIOR CLIMATE
General Hints WARNING
Prolonged use of recirculated air may
cause the windows to fog up. If the
windows fog up, follow the settings
for demisting the windshield. Note:
You may feel a small amount of air
from the footwell air vents regardless of the
air distribution setting.
Note: To reduce humidity build-up inside
your vehicle, do not drive with the system
switched off or with recirculated air always
switched on.
Note: Do not place objects under the front
seats as this may interfere with the airflow
to the rear seats.
Note: Remove any snow, ice or leaves from
the air intake area at the base of the
windshield.
Note: To improve the time to reach a
comfortable temperature in hot weather,
drive with the windows open until you feel
cold air through the air vents. Manual Climate Control
Note:
To reduce fogging of the windshield
during humid weather, adjust the air
distribution control to the windshield air
vents position.
Automatic Climate Control
Note: Adjusting the settings when your
vehicle interior is extremely hot or cold is
not necessary. The system automatically
adjusts to heat or cool the interior to your
selected temperature as quickly as possible.
For the system to function efficiently, the
instrument panel and side air vents should
be fully open.
Note: If you select
AUTO during cold
outside temperatures, the system directs
airflow to the windshield and side window
vents. In addition, the fan may run at a
slower speed until the engine warms up.
Note: If you select AUTO during hot outside
temperatures, or when the inside of the
vehicle is hot, the system automatically uses
recirculated air to maximize interior cooling.
When the interior reaches the selected
temperature, the system automatically
switches to using outside air.
148
Super Duty (TFE) Canada/United States of America, enUSA, First Printing Climate Control
Page 152 of 636
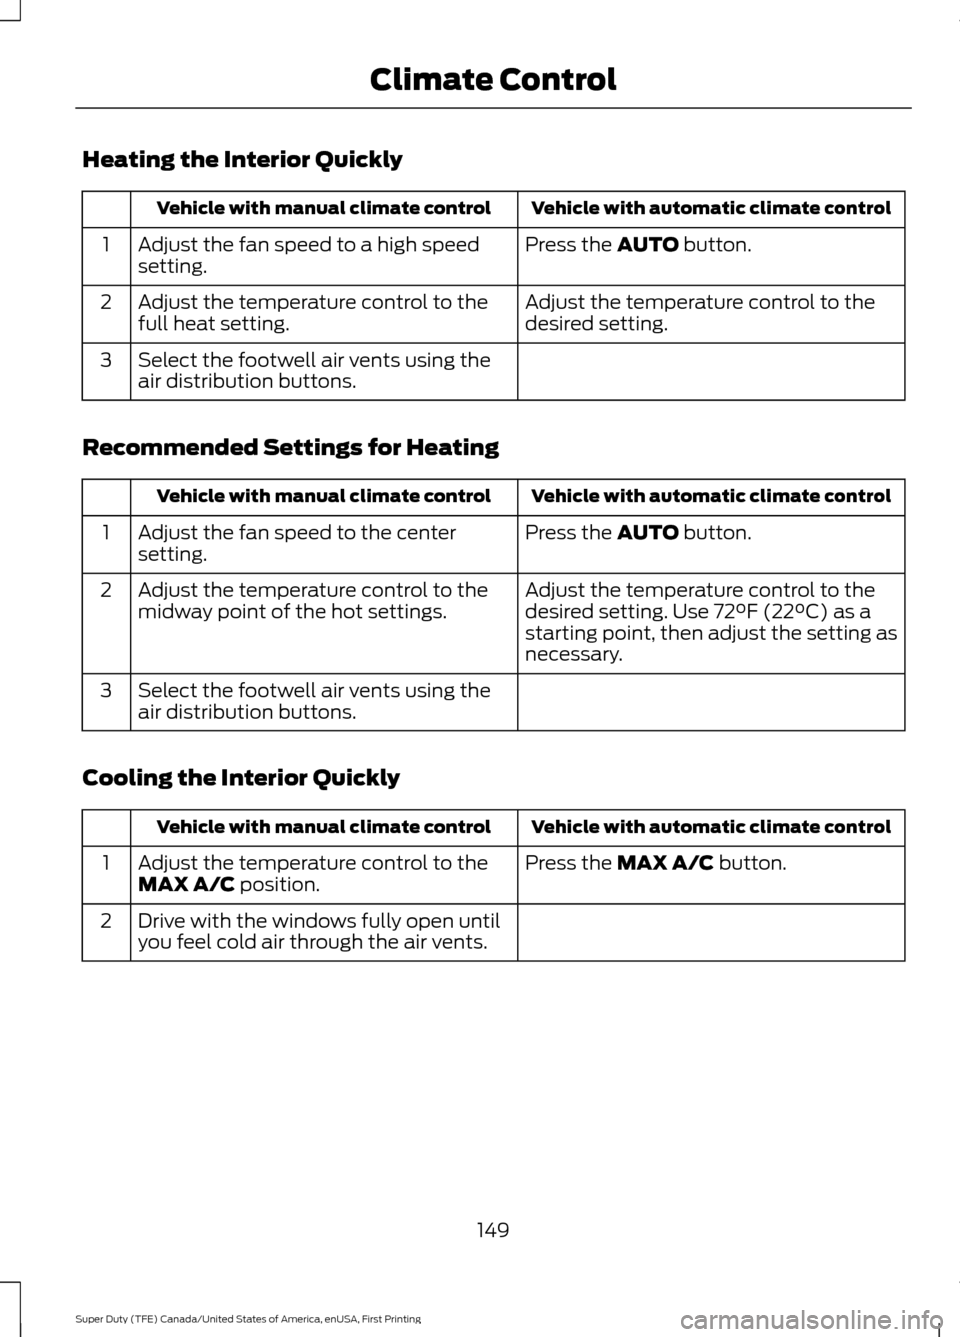
Heating the Interior Quickly
Vehicle with automatic climate control
Vehicle with manual climate control
Press the AUTO button.
Adjust the fan speed to a high speed
setting.
1
Adjust the temperature control to the
desired setting.
Adjust the temperature control to the
full heat setting.
2
Select the footwell air vents using the
air distribution buttons.
3
Recommended Settings for Heating Vehicle with automatic climate control
Vehicle with manual climate control
Press the
AUTO button.
Adjust the fan speed to the center
setting.
1
Adjust the temperature control to the
desired setting. Use
72°F (22°C) as a
starting point, then adjust the setting as
necessary.
Adjust the temperature control to the
midway point of the hot settings.
2
Select the footwell air vents using the
air distribution buttons.
3
Cooling the Interior Quickly Vehicle with automatic climate control
Vehicle with manual climate control
Press the
MAX A/C button.
Adjust the temperature control to the
MAX A/C position.
1
Drive with the windows fully open until
you feel cold air through the air vents.
2
149
Super Duty (TFE) Canada/United States of America, enUSA, First Printing Climate Control
Page 153 of 636
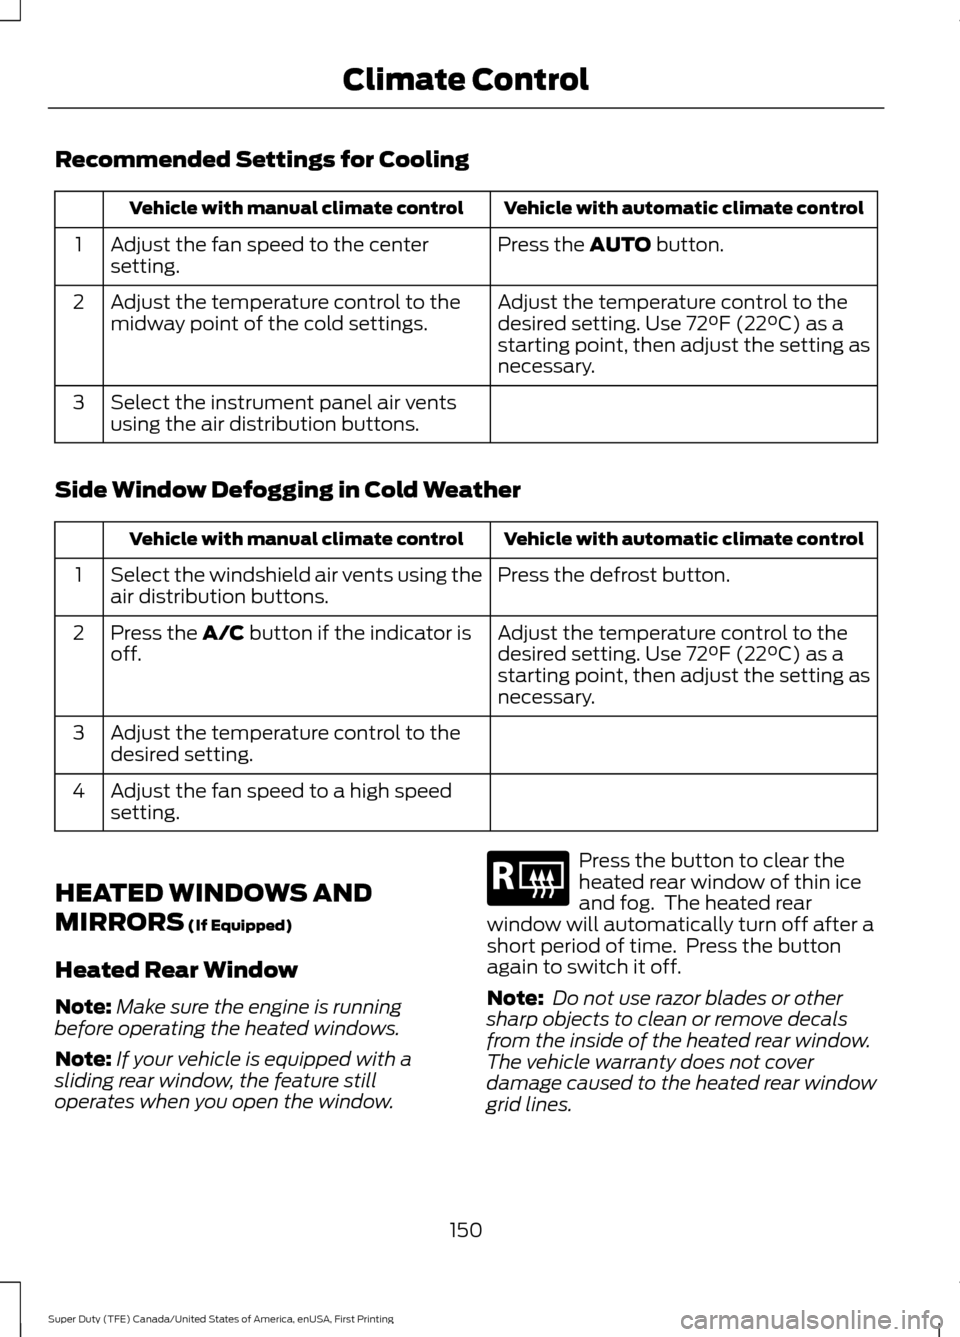
Recommended Settings for Cooling
Vehicle with automatic climate control
Vehicle with manual climate control
Press the AUTO button.
Adjust the fan speed to the center
setting.
1
Adjust the temperature control to the
desired setting. Use
72°F (22°C) as a
starting point, then adjust the setting as
necessary.
Adjust the temperature control to the
midway point of the cold settings.
2
Select the instrument panel air vents
using the air distribution buttons.
3
Side Window Defogging in Cold Weather Vehicle with automatic climate control
Vehicle with manual climate control
Press the defrost button.
Select the windshield air vents using the
air distribution buttons.
1
Adjust the temperature control to the
desired setting. Use
72°F (22°C) as a
starting point, then adjust the setting as
necessary.
Press the A/C button if the indicator is
off.
2
Adjust the temperature control to the
desired setting.
3
Adjust the fan speed to a high speed
setting.
4
HEATED WINDOWS AND
MIRRORS
(If Equipped)
Heated Rear Window
Note: Make sure the engine is running
before operating the heated windows.
Note: If your vehicle is equipped with a
sliding rear window, the feature still
operates when you open the window. Press the button to clear the
heated rear window of thin ice
and fog. The heated rear
window will automatically turn off after a
short period of time. Press the button
again to switch it off.
Note: Do not use razor blades or other
sharp objects to clean or remove decals
from the inside of the heated rear window.
The vehicle warranty does not cover
damage caused to the heated rear window
grid lines.
150
Super Duty (TFE) Canada/United States of America, enUSA, First Printing Climate ControlE184884
Page 182 of 636
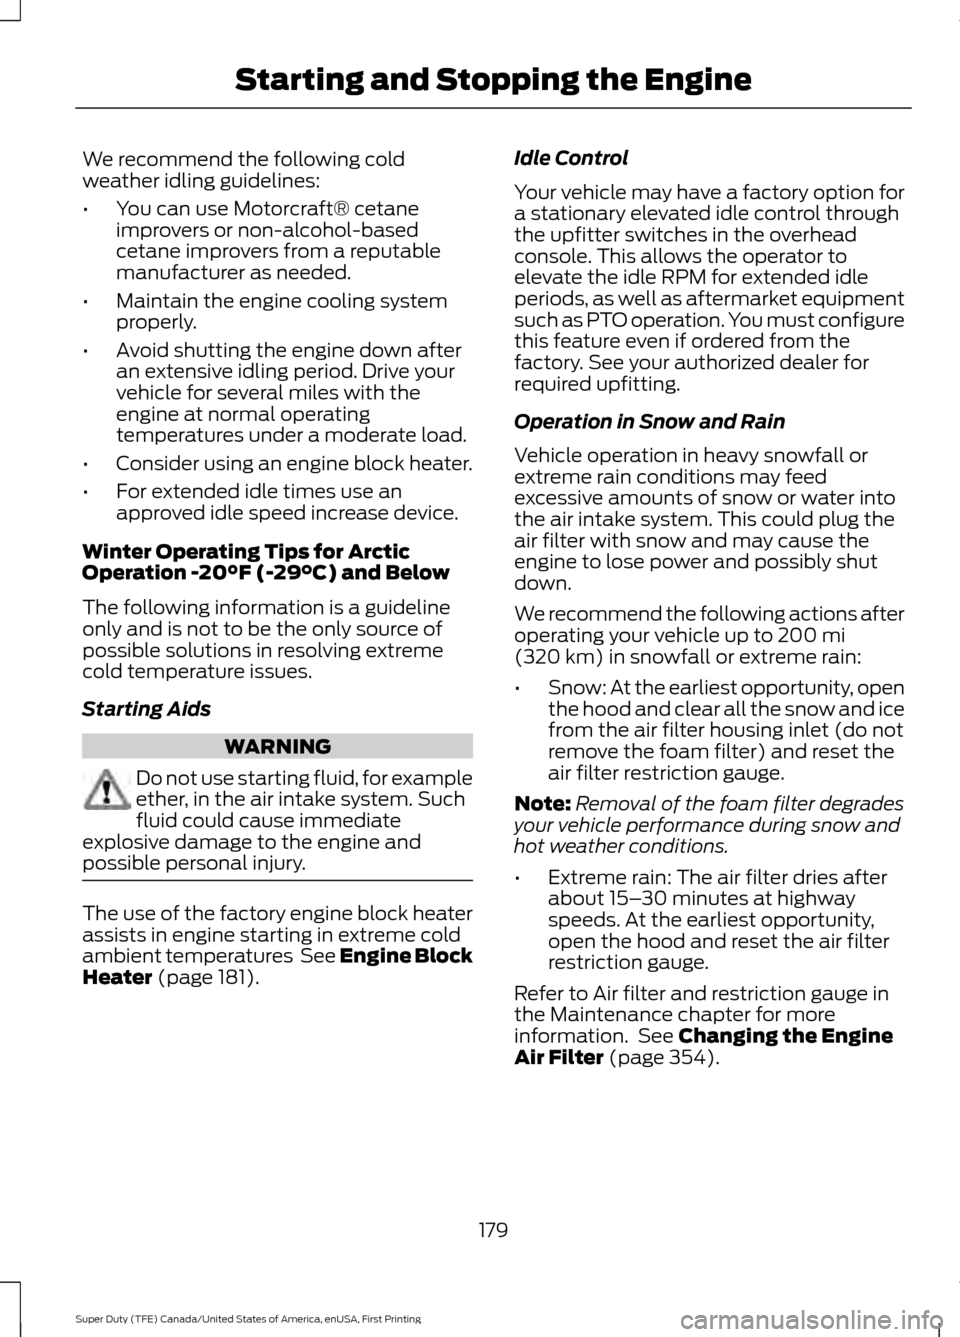
We recommend the following cold
weather idling guidelines:
•
You can use Motorcraft® cetane
improvers or non-alcohol-based
cetane improvers from a reputable
manufacturer as needed.
• Maintain the engine cooling system
properly.
• Avoid shutting the engine down after
an extensive idling period. Drive your
vehicle for several miles with the
engine at normal operating
temperatures under a moderate load.
• Consider using an engine block heater.
• For extended idle times use an
approved idle speed increase device.
Winter Operating Tips for Arctic
Operation -20°F (-29°C) and Below
The following information is a guideline
only and is not to be the only source of
possible solutions in resolving extreme
cold temperature issues.
Starting Aids WARNING
Do not use starting fluid, for example
ether, in the air intake system. Such
fluid could cause immediate
explosive damage to the engine and
possible personal injury. The use of the factory engine block heater
assists in engine starting in extreme cold
ambient temperatures See Engine Block
Heater (page 181). Idle Control
Your vehicle may have a factory option for
a stationary elevated idle control through
the upfitter switches in the overhead
console. This allows the operator to
elevate the idle RPM for extended idle
periods, as well as aftermarket equipment
such as PTO operation. You must configure
this feature even if ordered from the
factory. See your authorized dealer for
required upfitting.
Operation in Snow and Rain
Vehicle operation in heavy snowfall or
extreme rain conditions may feed
excessive amounts of snow or water into
the air intake system. This could plug the
air filter with snow and may cause the
engine to lose power and possibly shut
down.
We recommend the following actions after
operating your vehicle up to
200 mi
(320 km) in snowfall or extreme rain:
• Snow: At the earliest opportunity, open
the hood and clear all the snow and ice
from the air filter housing inlet (do not
remove the foam filter) and reset the
air filter restriction gauge.
Note: Removal of the foam filter degrades
your vehicle performance during snow and
hot weather conditions.
• Extreme rain: The air filter dries after
about 15– 30 minutes at highway
speeds. At the earliest opportunity,
open the hood and reset the air filter
restriction gauge.
Refer to Air filter and restriction gauge in
the Maintenance chapter for more
information. See
Changing the Engine
Air Filter (page 354).
179
Super Duty (TFE) Canada/United States of America, enUSA, First Printing Starting and Stopping the Engine
Page 204 of 636
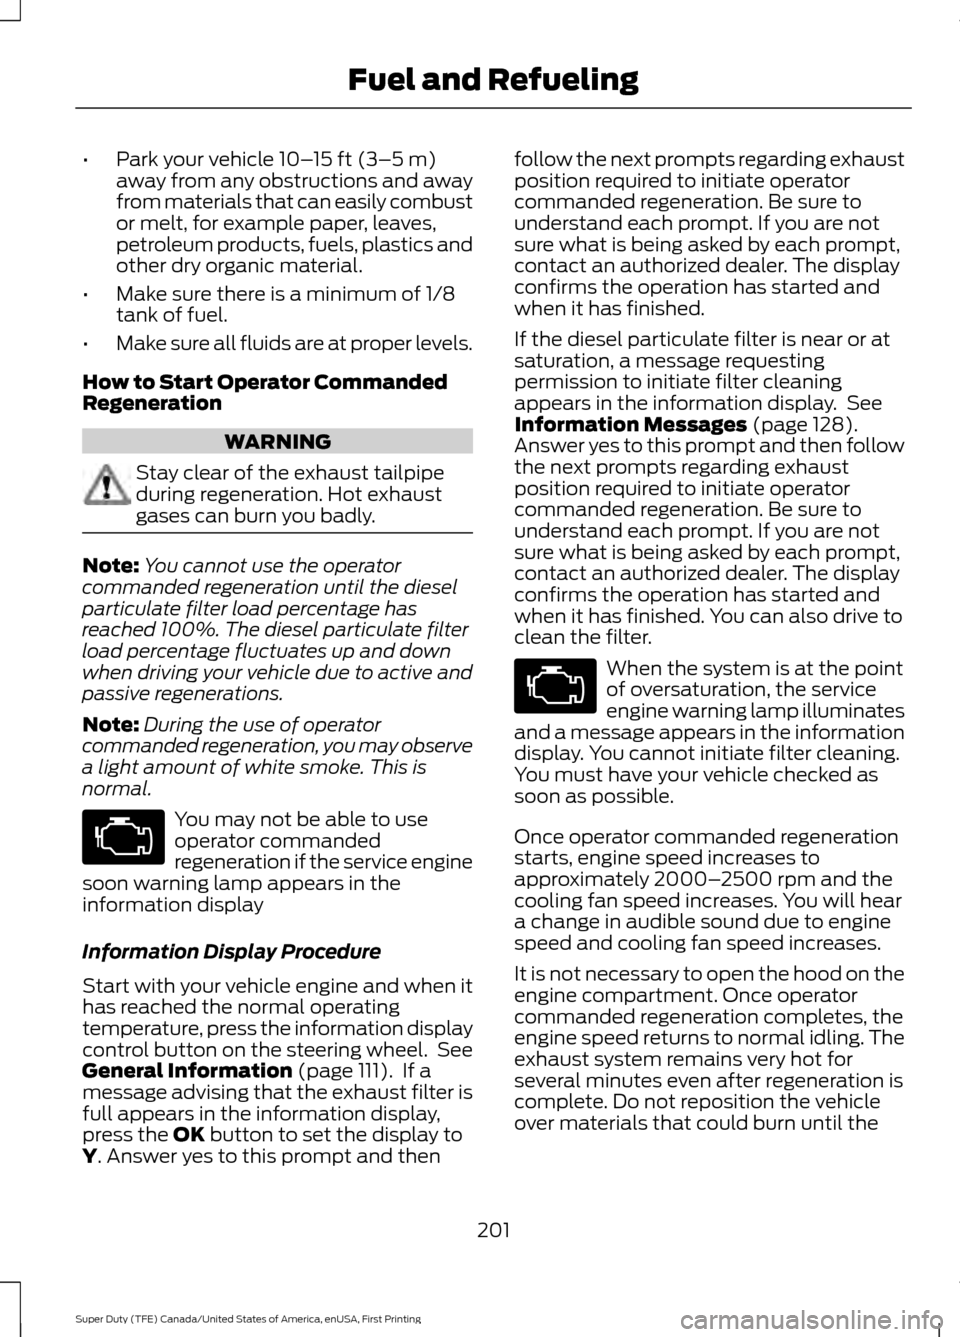
•
Park your vehicle 10– 15 ft (3–5 m)
away from any obstructions and away
from materials that can easily combust
or melt, for example paper, leaves,
petroleum products, fuels, plastics and
other dry organic material.
• Make sure there is a minimum of 1/8
tank of fuel.
• Make sure all fluids are at proper levels.
How to Start Operator Commanded
Regeneration WARNING
Stay clear of the exhaust tailpipe
during regeneration. Hot exhaust
gases can burn you badly.
Note:
You cannot use the operator
commanded regeneration until the diesel
particulate filter load percentage has
reached 100%. The diesel particulate filter
load percentage fluctuates up and down
when driving your vehicle due to active and
passive regenerations.
Note: During the use of operator
commanded regeneration, you may observe
a light amount of white smoke. This is
normal. You may not be able to use
operator commanded
regeneration if the service engine
soon warning lamp appears in the
information display
Information Display Procedure
Start with your vehicle engine and when it
has reached the normal operating
temperature, press the information display
control button on the steering wheel. See
General Information
(page 111). If a
message advising that the exhaust filter is
full appears in the information display,
press the
OK button to set the display to
Y. Answer yes to this prompt and then follow the next prompts regarding exhaust
position required to initiate operator
commanded regeneration. Be sure to
understand each prompt. If you are not
sure what is being asked by each prompt,
contact an authorized dealer. The display
confirms the operation has started and
when it has finished.
If the diesel particulate filter is near or at
saturation, a message requesting
permission to initiate filter cleaning
appears in the information display. See
Information Messages
(page 128).
Answer yes to this prompt and then follow
the next prompts regarding exhaust
position required to initiate operator
commanded regeneration. Be sure to
understand each prompt. If you are not
sure what is being asked by each prompt,
contact an authorized dealer. The display
confirms the operation has started and
when it has finished. You can also drive to
clean the filter. When the system is at the point
of oversaturation, the service
engine warning lamp illuminates
and a message appears in the information
display. You cannot initiate filter cleaning.
You must have your vehicle checked as
soon as possible.
Once operator commanded regeneration
starts, engine speed increases to
approximately 2000– 2500 rpm and the
cooling fan speed increases. You will hear
a change in audible sound due to engine
speed and cooling fan speed increases.
It is not necessary to open the hood on the
engine compartment. Once operator
commanded regeneration completes, the
engine speed returns to normal idling. The
exhaust system remains very hot for
several minutes even after regeneration is
complete. Do not reposition the vehicle
over materials that could burn until the
201
Super Duty (TFE) Canada/United States of America, enUSA, First Printing Fuel and Refueling