2017 FORD SUPER DUTY heating
[x] Cancel search: heatingPage 101 of 636
To adjust your mirrors, make sure you
switch your vehicle on (with the ignition in
accessory mode or the engine running) and
then press the adjustment control to
position the mirrors.
Note:
Moving the mirrors 10 or more times
within one minute, or repeated folding,
unfolding and telescoping of the mirrors
while holding the control down during full
travel, may disable the system to protect
the motors from overheating. Wait
approximately three minutes with the
vehicle running, and up to 10 minutes with
the vehicle off, for the system to reset and
for function to return to normal.
Loose Mirror
If your power-folding mirrors are manually
folded, they may not work properly even
after you re-position them. You need to
reset them if:
• The mirrors vibrate when you drive.
• The mirrors feel loose.
• The mirrors do not stay in the folded or
unfolded position.
• One of the mirrors is not in its normal
driving position.
To reset the power-fold feature, use the
power-folding mirror control to fold and
unfold the mirrors. You may hear a loud
noise as you reset the power-folding
mirrors. This sound is normal. Repeat this
process as needed each time the mirrors
are manually folded.
Heated Exterior Mirrors (If Equipped)
See Heated Windows and Mirrors (page
150
).
Memory Mirrors
(If Equipped)
You can save and recall the mirror
positions through the memory function.
See
Memory Function (page 157). Direction Indicator Mirrors (If Equipped)
While the vehicle is running, the
forward-facing portion of the appropriate
mirror housing blinks when you switch on
the direction indicator.
Puddle Lamps
(If Equipped)
The lamps on the bottom part of the mirror
housing light when you use your
transmitter to unlock the doors or when
you open a door.
Clearance Lamps
(If Equipped)
The lower, outer part of the mirror housings
light when you switch the headlamps or
parking lamps on.
Spot Lamps
(If Equipped)
The area lights are on the forward-facing
portion of the mirror housing. You can
switch them on and off by using the
controls located on the instrument panel.
See
Lighting (page 86).
Trailer Towing Camera System
(If
Equipped)
See
Rear View Camera (page 232).
Blind Spot Information System
(If
Equipped)
See
Blind Spot Information System
(page 249).
INTERIOR MIRROR WARNING
Do not adjust the mirror when your
vehicle is moving.
98
Super Duty (TFE) Canada/United States of America, enUSA, First Printing Windows and Mirrors
Page 152 of 636
Heating the Interior Quickly
Vehicle with automatic climate control
Vehicle with manual climate control
Press the AUTO button.
Adjust the fan speed to a high speed
setting.
1
Adjust the temperature control to the
desired setting.
Adjust the temperature control to the
full heat setting.
2
Select the footwell air vents using the
air distribution buttons.
3
Recommended Settings for Heating Vehicle with automatic climate control
Vehicle with manual climate control
Press the
AUTO button.
Adjust the fan speed to the center
setting.
1
Adjust the temperature control to the
desired setting. Use
72°F (22°C) as a
starting point, then adjust the setting as
necessary.
Adjust the temperature control to the
midway point of the hot settings.
2
Select the footwell air vents using the
air distribution buttons.
3
Cooling the Interior Quickly Vehicle with automatic climate control
Vehicle with manual climate control
Press the
MAX A/C button.
Adjust the temperature control to the
MAX A/C position.
1
Drive with the windows fully open until
you feel cold air through the air vents.
2
149
Super Duty (TFE) Canada/United States of America, enUSA, First Printing Climate Control
Page 163 of 636
HEATED SEATS (If Equipped)
WARNING
People who are unable to feel pain
to their skin because of advanced
age, chronic illness, diabetes, spinal
cord injury, medication, alcohol use,
exhaustion or other physical conditions,
must exercise care when using the heated
seat. The heated seat may cause burns
even at low temperatures, especially if
used for long periods of time. Do not place
anything on the seat that insulates against
heat, such as a blanket or cushion. This
may cause the heated seat to overheat.
Do not puncture the seat with pins, needles
or other pointed objects. This may damage
the heating element which may cause the
heated seat to overheat. An overheated
seat may cause serious personal injury. Do not do the following:
•
Place heavy objects on the seat.
• Operate the heated seat if water or any
other liquid spills on the seat. Allow the
seat to dry thoroughly.
Note: The engine must be running to use
this feature. Press the heated seat symbol to cycle
through the various heat settings and off.
More indicator lights indicate warmer
settings. Note:
The heated seats may remain on
after you remote start your vehicle, based
on your remote start settings. The heated
seats may also turn on when you start your
vehicle if they were on when you switched
your vehicle off.
Rear Heated Seats
(If Equipped) WARNING
People who are unable to feel pain
to their skin because of advanced
age, chronic illness, diabetes, spinal
cord injury, medication, alcohol use,
exhaustion or other physical conditions,
must exercise care when using the heated
seat. The heated seat may cause burns
even at low temperatures, especially if
used for long periods of time. Do not place
anything on the seat that insulates against
heat, such as a blanket or cushion. This
may cause the heated seat to overheat.
Do not puncture the seat with pins, needles
or other pointed objects. This may damage
the heating element which may cause the
heated seat to overheat. An overheated
seat may cause serious personal injury. Do not do the following:
•
Place heavy objects on the seat.
• Operate the heated seat if water or any
other liquid spills on the seat. Allow the
seat to dry thoroughly.
Note: The engine must be running to use
this feature.
The rear seat heat controls are on the rear
of the center console.
160
Super Duty (TFE) Canada/United States of America, enUSA, First Printing SeatsE146322
Page 164 of 636
Press the heated seat symbol to cycle
through the various heat settings and off.
More indicator lights indicate warmer
settings.
The heated seat module resets at every
ignition run cycle. While the ignition is in
the on position, press the heated seat
switch to enable heating mode. When
activated, they turn off automatically when
you switch off the engine.
CLIMATE CONTROLLED SEATS
(If Equipped)
Heated Seats
WARNING
People who are unable to feel pain
to their skin because of advanced
age, chronic illness, diabetes, spinal
cord injury, medication, alcohol use,
exhaustion or other physical conditions,
must exercise care when using the heated
seat. The heated seat may cause burns
even at low temperatures, especially if
used for long periods of time. Do not place
anything on the seat that insulates against
heat, such as a blanket or cushion. This
may cause the heated seat to overheat.
Do not puncture the seat with pins, needles
or other pointed objects. This may damage
the heating element which may cause the
heated seat to overheat. An overheated
seat may cause serious personal injury. Do not do the following:
•
Place heavy objects on the seat.
• Operate the heated seat if water or any
other liquid spills on the seat. Allow the
seat to dry thoroughly.
Note: The engine must be running to use
this feature. Press the heated seat symbol to cycle
through the various heat settings and off.
More indicator lights indicate warmer
settings.
Note:
The heated seats may remain on
after you remote start your vehicle, based
on your remote start settings. The heated
seats may also turn on when you start your
vehicle if they were on when you switched
your vehicle off.
Note: After 60 minutes of operation, the
heated seats switch off. Press the heated
seat symbol to switch the heated seats on.
Cooled Seats
Note: The engine must be running to use
this feature. 161
Super Duty (TFE) Canada/United States of America, enUSA, First Printing SeatsE146322 E146322 E146309
Page 169 of 636
3.
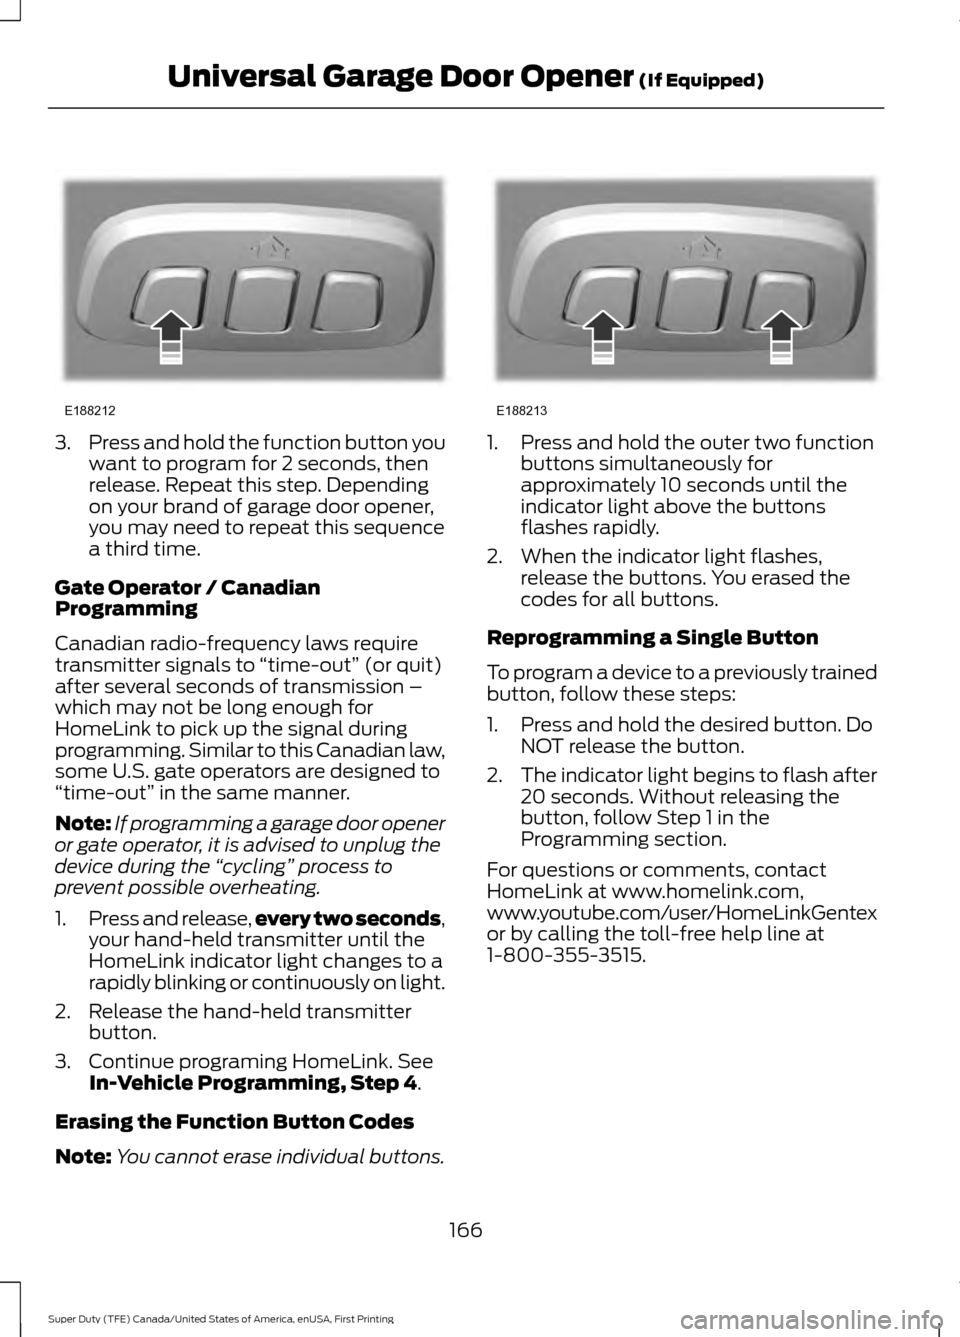
Press and hold the function button you
want to program for 2 seconds, then
release. Repeat this step. Depending
on your brand of garage door opener,
you may need to repeat this sequence
a third time.
Gate Operator / Canadian
Programming
Canadian radio-frequency laws require
transmitter signals to “time-out” (or quit)
after several seconds of transmission –
which may not be long enough for
HomeLink to pick up the signal during
programming. Similar to this Canadian law,
some U.S. gate operators are designed to
“time-out” in the same manner.
Note: If programming a garage door opener
or gate operator, it is advised to unplug the
device during the “cycling” process to
prevent possible overheating.
1. Press and release, every two seconds,
your hand-held transmitter until the
HomeLink indicator light changes to a
rapidly blinking or continuously on light.
2. Release the hand-held transmitter button.
3. Continue programing HomeLink. See In-Vehicle Programming, Step 4.
Erasing the Function Button Codes
Note: You cannot erase individual buttons. 1. Press and hold the outer two function
buttons simultaneously for
approximately 10 seconds until the
indicator light above the buttons
flashes rapidly.
2. When the indicator light flashes, release the buttons. You erased the
codes for all buttons.
Reprogramming a Single Button
To program a device to a previously trained
button, follow these steps:
1. Press and hold the desired button. Do NOT release the button.
2. The indicator light begins to flash after
20 seconds. Without releasing the
button, follow Step 1 in the
Programming section.
For questions or comments, contact
HomeLink at www.homelink.com,
www.youtube.com/user/HomeLinkGentex
or by calling the toll-free help line at
1-800-355-3515.
166
Super Duty (TFE) Canada/United States of America, enUSA, First Printing Universal Garage Door Opener
(If Equipped)E188212 E188213
Page 189 of 636
Note:
Do not blend used engine oil with
diesel fuel under any circumstances.
Blending used oil with the fuel will
significantly increase your vehicle ’s exhaust
emissions and reduce engine life due to
increased internal wear. Using low sulfur diesel fuel
(16-500 ppm) or high sulfur
diesel fuel (greater than 500
ppm) in your diesel engine will cause
certain emission components to
malfunction which may also cause the
service engine soon light to illuminate
indicating an emissions-related concern.
Diesel fuel is adjusted seasonally for cold
temperature. For best results at
temperatures below 19°F (-7°C), it is
recommended to use a diesel fuel which
has been seasonally adjusted for the
ambient conditions.
Fuel Requirements - Choosing The
Right Fuel: Vehicles Operated
Where Ultra Low Sulfur Diesel Fuel
Is Not Required
For the engine to operate reliably on
low-sulfur or high-sulfur diesel fuel, the
engine must be a factory built high-sulfur
engine (available as a dealer order option
for select markets) or an ultra low sulfur
diesel fuel configured engine that has been
retrofitted for high-sulfur diesel fuel using
Ford Motor Company dealer service parts.
Failure to use retrofit components other
than those available through your
authorized dealer will result in coolant
system damage, engine overheating,
selective catalyst reduction system or
diesel particulate filter damage and
possible base engine damage. Use only a diesel engine configured for use
with high sulfur diesel fuel in markets with
diesel fuel that has sulfur content greater
than 15 ppm. Using low sulfur diesel fuel
(16–500 ppm) or high sulfur diesel fuel
(greater than 500 ppm) in a diesel engine
designed to use only Ultra Low Sulfur
Diesel fuel may result in damage to engine
emission control devices and the
aftertreatment system, potentially
rendering the vehicle inoperable.
Vehicles with engines configured for use
with high sulfur diesel fuel are only
available for sale in countries where ultra
low sulfur diesel fuel is generally not
available or mandated by the government.
Vehicles originally sold in a ultra low sulfur
diesel fuel market that are subsequently
exported to non- ultra low sulfur diesel fuel
markets will need to be retrofitted (at the
customer
’s expense using Ford authorized
dealer service parts) in order to be reliably
operated on non- ultra low sulfur diesel
fuel.
Biodiesel WARNINGS
Do not use home heating oil,
agricultural fuel, raw fats and oils,
waste cooking greases, biodiesel
fuels greater than 20% or any diesel fuel
not intended for highway use. Damage to
the fuel injection system, engine and
exhaust catalyst can occur if an improper
fuel is used. Do not add gasoline, gasohol
or alcohol to diesel fuel. This practice
creates a serious fire hazard and engine
performance problems. Do not mix diesel fuel with gasoline,
gasohol or alcohol. This could cause
an explosion resulting in personal
injury.
186
Super Duty (TFE) Canada/United States of America, enUSA, First Printing Fuel and Refueling
Page 190 of 636
WARNINGS
Do not add gasoline, gasohol or
alcohol to diesel fuel. This practice
creates a serious fire hazard resulting
in personal injury and engine performance
problems. Do not use home heating oil or any
diesel fuel not intended for highway
use. Damage to the fuel injection
system, engine, exhaust catalyst and diesel
particulate filter can occur if an improper
fuel is used. Red dye is used to identify
fuels intended for agricultural and
non-highway use. You may operate your vehicle on diesel
fuels containing up to 20% biodiesel, also
known as B20.
Biodiesel fuel is a chemically converted
product from renewable fuel sources, such
as vegetable oils, animal fats and waste
cooking greases.
To help achieve acceptable engine
performance and durability when using
biodiesel in your vehicle:
•
Confirm the biodiesel content of the
fuel to be B20 (20% biodiesel) or less
• Only use biodiesel fuel of good quality
that complies with industry standards
• Follow the recommended service
maintenance intervals. See
Scheduled Maintenance (page 567).
• Do not store biodiesel fuel in the fuel
tank for more than 1 month
• Consider changing brands or reducing
biodiesel content if you have cold
temperature fuel gelling issues or a
frequent LOW FUEL PRESSURE
message appearing
• Do NOT use raw oils, fats or waste
cooking greases Use of biodiesel in concentrations greater
than 20% may cause damage to your
vehicle, including engine and/or exhaust
after-treatment hardware (exhaust
catalyst and particulate filter) failures.
Concentrations greater than 20% can also
cause fuel filter restrictions that may result
in a lack of power or damage to fuel
system components, including fuel pump
and fuel injector failures.
SAE 5W-40 or SAE 15W-40 oil is
recommended for fuels with greater than
5% biodiesel (B5). Refer to the Special
operating conditions section under the
Schedule Maintenance chapter for more
information about oil change intervals and
other maintenance when operating on
biodiesel.
Look for a label on the fuel pump to
confirm the amount of biodiesel contained
in a diesel fuel. Biodiesel content is often
indicated with the letter B followed by the
percent of biodiesel in the fuel. For
example, B20 indicates a fuel containing
20% biodiesel. Ask the service station
attendant to confirm the biodiesel content
of a diesel fuel if you do not see a label on
the fuel pump.
Biodiesel fuels degrade more easily than
diesel fuels not containing biodiesel and
should not be stored in the fuel tank for
more than 1 month. If you plan to park or
store your vehicle for more than 1 month,
then you should empty your vehicle fuel
tank of biodiesel fuel. You should fill the
tank with a pure petroleum-based diesel
fuel and run your vehicle for a minimum of
30 minutes.
Note:
Degraded or oxidized biodiesel can
damage fuel system seals and plastics and
corrode steel parts.
During cold weather, if you have problems
operating on biodiesel, you may need to
use a diesel fuel with lower biodiesel
content, try another brand, or discontinue
the use of biodiesel.
187
Super Duty (TFE) Canada/United States of America, enUSA, First Printing Fuel and Refueling
Page 193 of 636
2. Remove the diesel exhaust fluid tank
filler cap.
3. Insert the spout in to the filler neck until
the seal on the spout seats on to the
filler neck. Pour the fluid in to the tank.
When the tank is full the fluid will stop
flowing automatically.
4. Return the container to the vertical position slightly below the diesel
exhaust fluid filler neck. Allow any fluid
remaining in the spout to drain back in
to the container.
5. Remove the spout from the diesel exhaust fluid filler neck. Replace the
diesel exhaust fluid tank cap.
6. Remove the spout from the diesel exhaust fluid container and replace the
cap.
Note: If there is diesel exhaust fluid left in
the container retain it for later use. The
spout is re-useable. Wash the spout with
clean water prior to storage. Do not use the
diesel exhaust fluid spout with any other
fluid.
Filling the Diesel Exhaust Fluid Tank in
Cold Climates
Diesel exhaust fluid may freeze if the
ambient temperature is below 12°F (-11°C).
Your vehicle has a preheating system
which allows diesel exhaust fluid to
operate below 12°F (-11°C). If you do not
use your vehicle for an extended period
when the ambient temperature is below
12°F (-11°C)
, the fluid in the tank may
freeze. If the tank is overfilled and the fluid
freezes it may damage the tank. This is not
covered by the vehicle warranty. Diesel Exhaust Fluid Warning
Messages and Vehicle Operations WARNINGS
Diesel exhaust fluid must be refilled
when low or replaced when
contaminated or your vehicle speed
becomes limited to 50 mph (80 km/h). In
these conditions, drive with caution and
refill diesel exhaust fluid immediately. If
the diesel exhaust fluid becomes empty
or contaminated and fluid is not replaced,
your vehicle becomes limited to engine idle
only once stopped. In these conditions, be
cautious where you stop your vehicle
because you may not be able to drive long
distances or maintain highway speeds until
you refill or replace the diesel exhaust fluid. Tampering with or disabling selective
catalytic reduction system results in
severe vehicle performance
limitation including eventual speed limiting
to
5 mph (5 km/h). The information display shows a series of
messages about the amount of diesel
exhaust fluid available. A systems check
displays messages indicating the amount
of diesel exhaust fluid available or displays
a warning message indicating the
approximate distance remaining as the
fluid in the diesel exhaust fluid tank nears
empty. See
Information Messages
(page 128). As the diesel exhaust fluid level
nears empty, the warning
symbol displays and a series of
tones and messages starting at
500 mi
(800 km) remaining before diesel exhaust
fluid is depleted. The warning symbol and
messages continue until you refill the
diesel exhaust fluid tank.
190
Super Duty (TFE) Canada/United States of America, enUSA, First Printing Fuel and RefuelingE163176