2017 FORD EXPEDITION EL display
[x] Cancel search: displayPage 129 of 500
Note:Using a linked key fob to recall yourmemory position when the ignition is offmoves the seat and steering column to theEasy Entry position.
Note:Pressing any active memory featurecontrol - power seat, mirror (or steeringcolumn switch) (or any memory button)during a memory recall cancels theoperation.
Linking a PreSet Position to yourRemote Control or Intelligent AccessKey Fob
Your vehicle can save the preset memorypositions for up to two remote controls.
1.With the ignition on, move the memorypositions to the desired positions.
2. Press and hold the desired presetbutton for about five seconds. A tonesounds after about two seconds.Continue holding until you hear asecond tone.
3. Within three seconds, press the lockbutton on the remote control you arelinking.
To unlink a remote control, follow thesame procedure – except in step 3, pressthe unlock button on the remote control.
Note:If more than one linked remotecontrol or intelligent access key is in range,the memory function moves to the settingsof the first key to initiate a memory recall.
Easy Entry and Exit Feature (If
Equipped)
This feature adjusts the position of the seatand steering column to allow easier exitand entry to the vehicle.
The driver seat automatically moves 2inches (5 centimeters) rearward when thetransmission is in park (P) and you removethe key from the ignition or you switch theignition off.
The driver seat returns to the previousposition when you put the key in theignition or switch the ignition on.
You can enable or disable this feature inthe information display. See InformationDisplays (page 91).
REAR SEATS
Folding Down the Second Row40% Seat
WARNINGS
Use caution when folding theseatback to the flat back position asthe system will move forward whenyou lift the release handle.
Before returning the seatback to itsoriginal position, make sure thatcargo or any objects are not trappedbehind the seatback. After returning theseatback to its original position, pull on theseatback to make sure that it has fullylatched. An unlatched seat may becomedangerous in the event of a sudden stopor crash.
Make sure that the head restraint is in thedown position and no objects such asbooks, purses or briefcases are on the floorin front of the second row seats beforefolding them down.
Move the front passenger seat forward sothat the second row seat head restraintclears the front seat.
126
Expedition (TB7) Canada/United States of America, enUSA, Edition date: 03/2016, First Printing
Seats
Page 142 of 500
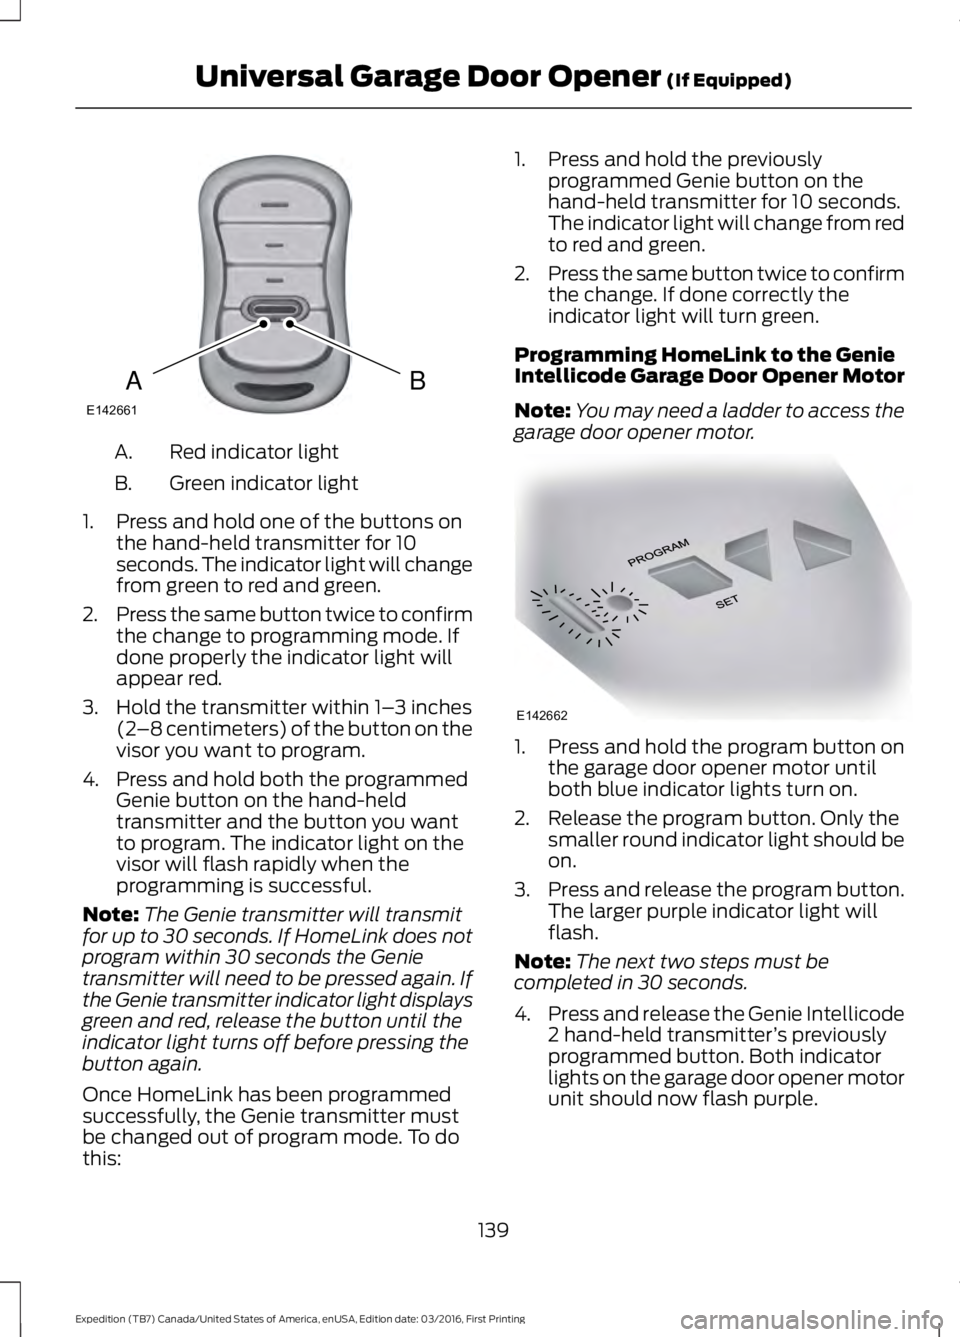
Red indicator lightA.
Green indicator lightB.
1. Press and hold one of the buttons onthe hand-held transmitter for 10seconds. The indicator light will changefrom green to red and green.
2.Press the same button twice to confirmthe change to programming mode. Ifdone properly the indicator light willappear red.
3. Hold the transmitter within 1–3 inches(2–8 centimeters) of the button on thevisor you want to program.
4. Press and hold both the programmedGenie button on the hand-heldtransmitter and the button you wantto program. The indicator light on thevisor will flash rapidly when theprogramming is successful.
Note:The Genie transmitter will transmitfor up to 30 seconds. If HomeLink does notprogram within 30 seconds the Genietransmitter will need to be pressed again. Ifthe Genie transmitter indicator light displaysgreen and red, release the button until theindicator light turns off before pressing thebutton again.
Once HomeLink has been programmedsuccessfully, the Genie transmitter mustbe changed out of program mode. To dothis:
1. Press and hold the previouslyprogrammed Genie button on thehand-held transmitter for 10 seconds.The indicator light will change from redto red and green.
2.Press the same button twice to confirmthe change. If done correctly theindicator light will turn green.
Programming HomeLink to the GenieIntellicode Garage Door Opener Motor
Note:You may need a ladder to access thegarage door opener motor.
1. Press and hold the program button onthe garage door opener motor untilboth blue indicator lights turn on.
2. Release the program button. Only thesmaller round indicator light should beon.
3.Press and release the program button.The larger purple indicator light willflash.
Note:The next two steps must becompleted in 30 seconds.
4.Press and release the Genie Intellicode2 hand-held transmitter’s previouslyprogrammed button. Both indicatorlights on the garage door opener motorunit should now flash purple.
139
Expedition (TB7) Canada/United States of America, enUSA, Edition date: 03/2016, First Printing
Universal Garage Door Opener (If Equipped)BAE142661 E142662
Page 150 of 500
Within 20 seconds of switching the engineoff, press the brake pedal and press thepush button ignition switch. After 20seconds, you can no longer start yourvehicle if it does not detect a valid passivekey.
Once your vehicle starts, it remains runninguntil you press the push button ignitionswitch, even if your vehicle does not detecta valid passive key. If you open and closea door while your vehicle is running, thesystem searches for a valid passive key.You cannot start your vehicle if the systemdoes not detect a valid passive key within20 seconds.
Failure to Start
If you cannot start the engine after threeattempts, wait 10 seconds and follow thisprocedure:
1. Fully press the brake pedal.
2. Shift into park (P).
3. Fully press the accelerator pedal andhold it there.
4. Start the engine.
Automatic Engine Shutdown
For vehicles with a keyless ignition, thisfeature automatically shuts down theengine if it has been idling for an extendedperiod. The ignition also turns off in orderto save battery power. Before your vehicleshuts down, a message appears in theinformation display showing a timercounting down from 30 seconds. If you donot intervene within 30 seconds, yourvehicle shuts down. Another messageappears in the information display toinform you that your vehicle has shut downto save fuel. Start your vehicle as younormally do.
Automatic Engine Shutdown Override
Note:You cannot permanently switch offthe automatic shutdown feature. When youswitch it off temporarily, it turns on at thenext ignition cycle.
You can stop the shutdown, or reset thetimer, at any point before the 30-secondcountdown has expired by doing any of thefollowing:
•You can reset the timer by interactingwith your vehicle, for example pressingthe brake or accelerator pedal.
•You can temporarily switch off theshutdown feature any time the ignitionis on using the information display. SeeInformation Displays (page 91). Thefeature only remains off for the currentignition cycle.
•During the 30-second countdown, thesystem prompts you to press OK orRESET to temporarily switch thefeature off for the current ignition cycleonly.
Stopping the Engine When YourVehicle is Stationary
Vehicles with an Ignition Key
1. Shift into park (P).
2. Switch the ignition off.
3. Apply the parking brake.
Vehicles with Keyless Start
1. Shift into park (P).
2. Press the push button ignition switch.
3. Apply the parking brake.
Note:The ignition, all electrical circuits andall warning lamps and indicators will beturned off.
Note:If the engine is idling for 30 minutes,the ignition and engine automatically shutdown.
147
Expedition (TB7) Canada/United States of America, enUSA, Edition date: 03/2016, First Printing
Starting and Stopping the Engine
Page 157 of 500
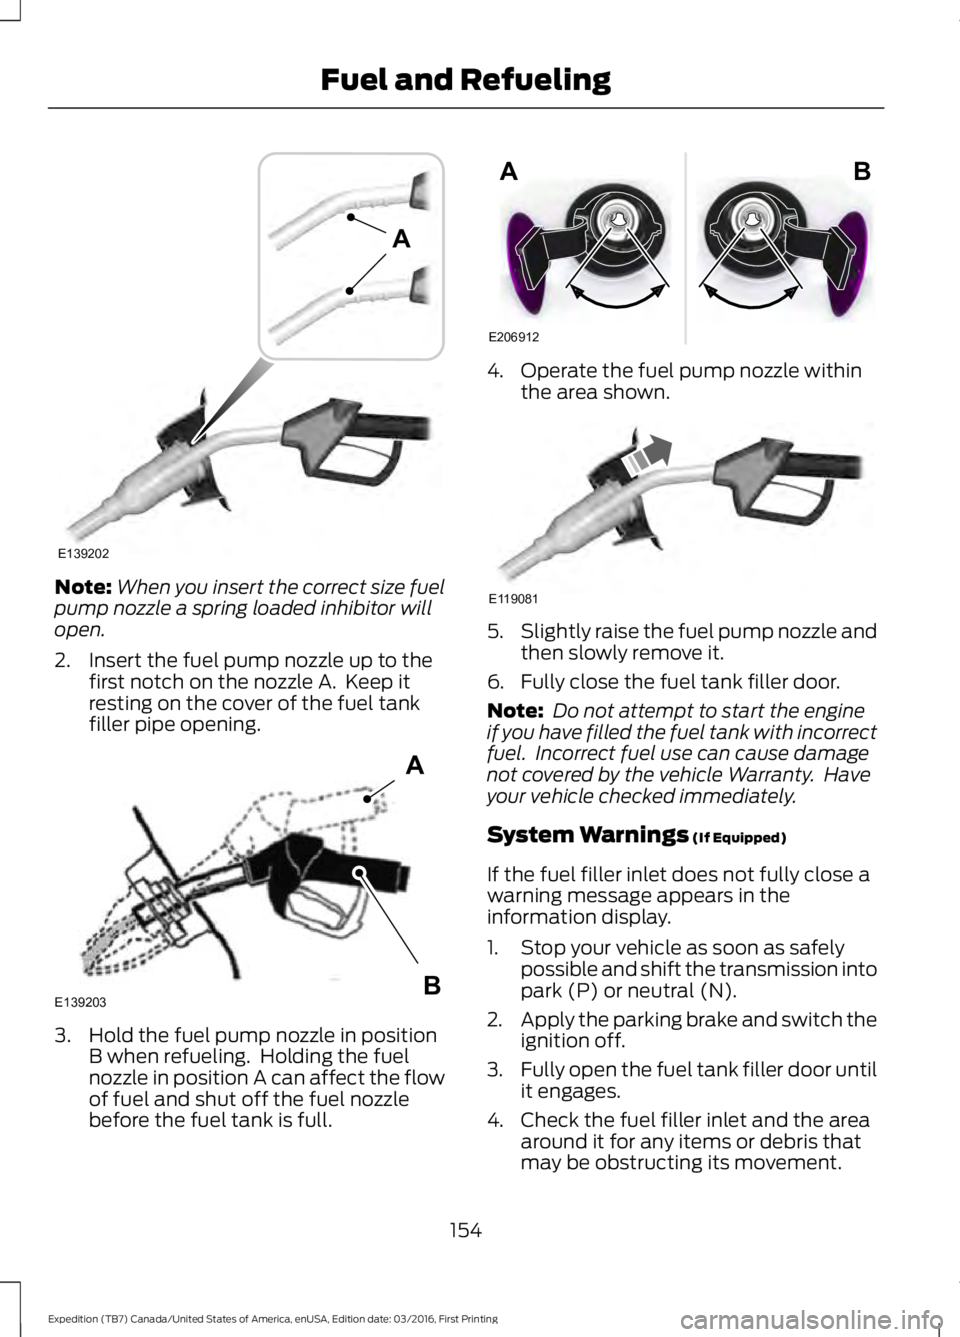
Note:When you insert the correct size fuelpump nozzle a spring loaded inhibitor willopen.
2. Insert the fuel pump nozzle up to thefirst notch on the nozzle A. Keep itresting on the cover of the fuel tankfiller pipe opening.
3. Hold the fuel pump nozzle in positionB when refueling. Holding the fuelnozzle in position A can affect the flowof fuel and shut off the fuel nozzlebefore the fuel tank is full.
4. Operate the fuel pump nozzle withinthe area shown.
5.Slightly raise the fuel pump nozzle andthen slowly remove it.
6. Fully close the fuel tank filler door.
Note: Do not attempt to start the engineif you have filled the fuel tank with incorrectfuel. Incorrect fuel use can cause damagenot covered by the vehicle Warranty. Haveyour vehicle checked immediately.
System Warnings (If Equipped)
If the fuel filler inlet does not fully close awarning message appears in theinformation display.
1. Stop your vehicle as soon as safelypossible and shift the transmission intopark (P) or neutral (N).
2.Apply the parking brake and switch theignition off.
3.Fully open the fuel tank filler door untilit engages.
4. Check the fuel filler inlet and the areaaround it for any items or debris thatmay be obstructing its movement.
154
Expedition (TB7) Canada/United States of America, enUSA, Edition date: 03/2016, First Printing
Fuel and RefuelingE139202
A E139203
A
B E206912
AB E119081
Page 158 of 500
5. Insert a fuel pump nozzle or the fuelfiller funnel provided with your vehiclein to the fuel tank filler pipe opening.This action should dislodge any debristhat may be preventing the fuel fillerinlet from fully closing.
Note: If this action corrects the problemthe message may not reset immediately. Ifthe message remains and the service enginesoon warning lamp appears in theinformation display, have your vehiclechecked as soon as possible.
FUEL CONSUMPTION
Empty reserve is the amount of fuelremaining in the tank after the fuel gaugeindicates empty. The amount of usablefuel in the empty reserve varies and shouldnot be relied upon to increase driving range.
•The usable capacity of the fuel tank isthe amount of fuel that you can add tothe fuel tank when the fuel gaugeindicates empty, before the first fuelfiller nozzle automatic shutoff event.
•The advertised capacity is equal to thevolumetric difference between actualfuel fill before the first fuel filler nozzleautomatic shutoff event and the fuelquantity when the fuel gauge indicatesempty. See Capacities andSpecifications (page 304). It is theusable capacity minus the emptyreserve.
•Due to the empty reserve, you may beable to add more fuel than theadvertised capacity of the fuel tankwhen the fuel gauge indicates empty.
Filling the Fuel Tank
For consistent results when refueling:
•Turn the ignition off before fueling; aninaccurate reading results if the engineis left running.
•Use the same fill rate(low-medium-high) each time the tankis filled.
•Allow no more than one automaticshut-off when refueling.
Results are most accurate when the fillingmethod is consistent.
Calculating Fuel Economy
Do not measure fuel economy during thefirst 1,000 mi (1,600 km) of driving (this isyour engine’s break-in period). A moreaccurate measurement is obtained after2,000 mi (3,200 km) to 3,000 mi(4,800 km). Also, fuel expense, frequencyof fill ups or fuel gauge readings are notaccurate ways to measure fuel economy.
1.Fill the fuel tank completely and recordthe initial odometer reading.
2. Each time you fill the fuel tank, recordthe amount of fuel added.
3. After at least three fill ups, fill the fueltank and record the current odometerreading.
4. Subtract your initial odometer readingfrom the current odometer reading.
To calculate L/100 km (liters per 100kilometers) fuel consumption, multiply theliters used by 100, then divide by kilometerstraveled. To calculate MPG (miles pergallon) fuel consumption, divide milestraveled by gallons used.
155
Expedition (TB7) Canada/United States of America, enUSA, Edition date: 03/2016, First Printing
Fuel and Refueling
Page 164 of 500
Automatic Transmission AdaptiveLearning
This feature may increase durability andprovide consistent shift feel over the lifeof your vehicle. A new vehicle ortransmission may have firm shifts, softshifts or both. This operation is considerednormal and will not affect function ordurability of the transmission. Over time,the adaptive learning process will fullyupdate transmission operation.
SelectShift™ AutomaticTransmission (If Equipped)
This feature gives you the ability to changegears up or down as desired.
As long as the engine speed does notexceed the maximum allowable limit youcan downshift. SelectShift automaticallydownshifts at low engine speeds in orderto prevent engine stalls.
Note:Engine damage may occur if youmaintain excessive engine revving withoutshifting.
SelectShift does not automatically upshift,even if the engine is approaching the RPMlimit, unless the accelerator pedal is at fulltravel. Take notice of the shift indicatorlamp, which alerts you when to shift tomake sure you achieve the highest level ofefficiency and fuel economy.
Press the + toggle switch on the sideof the gearshift lever to activateSelectShift.
•Press the (+) button to upshift.
•Press the (-) button to downshift.
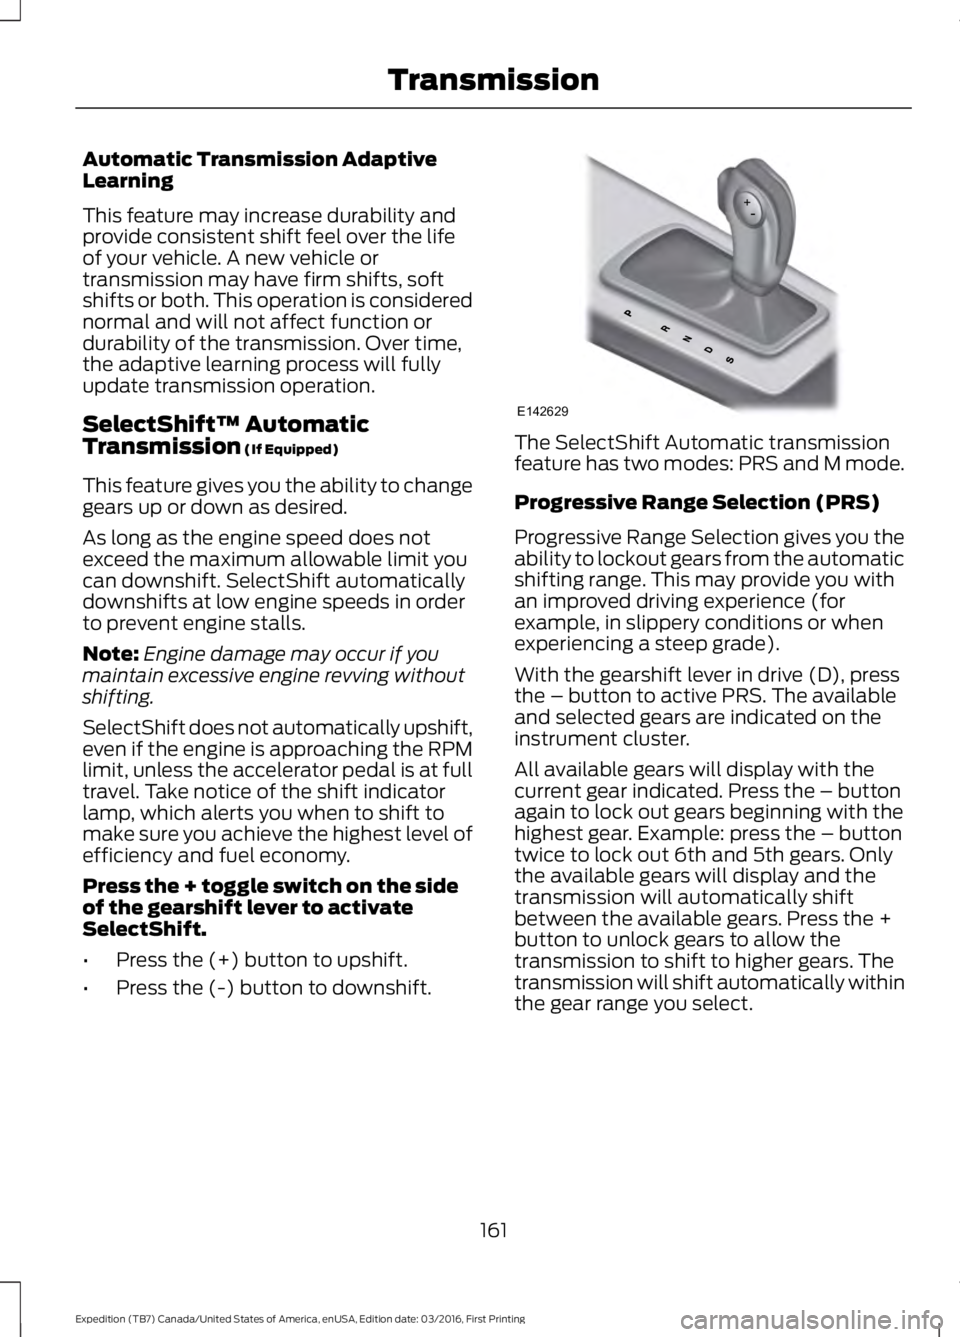
The SelectShift Automatic transmissionfeature has two modes: PRS and M mode.
Progressive Range Selection (PRS)
Progressive Range Selection gives you theability to lockout gears from the automaticshifting range. This may provide you withan improved driving experience (forexample, in slippery conditions or whenexperiencing a steep grade).
With the gearshift lever in drive (D), pressthe – button to active PRS. The availableand selected gears are indicated on theinstrument cluster.
All available gears will display with thecurrent gear indicated. Press the – buttonagain to lock out gears beginning with thehighest gear. Example: press the – buttontwice to lock out 6th and 5th gears. Onlythe available gears will display and thetransmission will automatically shiftbetween the available gears. Press the +button to unlock gears to allow thetransmission to shift to higher gears. Thetransmission will shift automatically withinthe gear range you select.
161
Expedition (TB7) Canada/United States of America, enUSA, Edition date: 03/2016, First Printing
TransmissionE142629
Page 165 of 500
Manual (M)
Moving the gearshift lever to the manual(M) position will allow you to manuallyselect the gear you desire. Only the currentgear will display. Use the buttons on thegearshift lever to manually select gears.
Press the + button to upshift or the –button to downshift. Return thetransmission to a different gearshiftposition to deactivate manual control.
Upshift to the recommended shift speedsaccording to the following chart:
Upshifts when accelerating (recommended for best fuel economy)
Shift from:
15 mph (24 km/h)1 – 2
25 mph (40 km/h)2 – 3
40 mph (64 km/h)3 – 4
45 mph (72 km/h)4 – 5
50 mph (80 km/h)5 – 6
Brake-Shift Interlock
WARNINGS
Do not drive your vehicle until youverify that the brake lamps areworking.
When doing this procedure, you needto take the transmission out of park(P) which means your vehicle canroll freely. To avoid unwanted vehiclemovement, always fully set the parkingbrake prior to doing this procedure. Usewheels chocks if appropriate.
If the parking brake is fully released,but the brake warning lamp remainsilluminated, the brakes may not beworking properly. Have your vehiclechecked as soon as possible.
Your vehicle is equipped with a brake-shiftinterlock feature that prevents moving thegearshift lever from park (P) when theignition is in the on position and the brakepedal is not pressed.
If you cannot move the gearshift lever outof park (P) position with the ignition in theon position and the brake pedal pressed,a malfunction may have occurred. It ispossible that a fuse has blown or yourvehicle’s brake lamps are not operatingproperly. See Fuse Specification Chart(page 233).
If the fuse is not blown and the brakelamps are working properly, the followingprocedure will allow you to move thegearshift lever from park (P):
Column-shifter
1. Apply the parking brake. Turn theignition key to the off position, thenremove the key.
2. Move the steering column to the fulldown and full rearward position(toward the driver’s seat).
3. Remove the gearshift lever boot.
162
Expedition (TB7) Canada/United States of America, enUSA, Edition date: 03/2016, First Printing
Transmission
Page 168 of 500
USING FOUR-WHEEL DRIVE
WARNING
For important information regardingsafe operation of this type of vehicle,see General Information in theWheels and Tires chapter.
Note:Do not use 4H or 4L mode on dry,hard surfaced roads. Doing so will produceexcessive noise, increase tire wear and maydamage drive components. 4H and 4L modeis only intended for consistently slippery orloose surfaces.
Note:If 4L mode is selected while yourvehicle is moving above 3 mph (5 km/h),the 4WD system will not perform a shift.This is normal and should be no reason forconcern. Refer to Shifting to or from 4L forproper operation.
4WD Indicator Lights
The indicator lights illuminate in theinformation display in the reconfigurabletelltale (RTT) location under the followingconditions. See Warning Lamps andIndicators (page 87).
Note:When a 4X4 system fault is present,the system will typically remain in whichever4WD mode was selected prior to the faultcondition occurring. It will not default to 4X2in all circumstances. When this warning isdisplayed, have your vehicle serviced by anauthorized dealer.
4X2
Momentarily illuminates when2H is selected.
4X4 AUTO
Continuously illuminates when4A is selected.
4X4 HIGH
Continuously illuminates when4H is selected.
4X4 LOW
Continuously illuminates when4L is selected.
4WD Switch Positions
WARNING
Utility and four-wheel drive vehiclesare not designed for cornering atspeeds as high as passenger cars anymore than low-slung sports cars aredesigned to perform satisfactorily underoff-road conditions. Avoid sharp turns orabrupt maneuvers in these vehicles.
Note:If your vehicle is equipped withAdvanceTrac® with RSC®, the system willautomatically turn off the stabilityenhancement feature when you shift the4WD system into 4L (4X4 LOW). You canmanually turn the system off by pressingthe AdvanceTrac button. See UsingTraction Control (page 176). This willdisable the engine management feature,allowing the vehicle to maintain full powerand enhanced momentum through theobstacle. The brake traction enhancementfeature will still be enabled.
Note:The Control Trac® selector switchshould not be changed while the rear wheelsare slipping.
165
Expedition (TB7) Canada/United States of America, enUSA, Edition date: 03/2016, First Printing
Four-Wheel Drive (If Equipped)E181778 E181781 E181779 E181780