2017 FORD EXPEDITION EL display
[x] Cancel search: displayPage 75 of 500

Keep the outside of the windshield clean.The rain sensor is very sensitive. If the areaaround the mirror is dirty, then the wipersmay operate if dirt, mist or insects hit thewindshield.
WINDSHIELD WASHERS
Note:Do not operate the wipers on a drywindshield. This may scratch the glass,damage the wiper blades or cause the wipermotor to burn out. Always use thewindshield washers before wiping a drywindshield.
Note:Do not operate the washers whenthe washer reservoir is empty. This maycause the washer pump to overheat.
Press the end of the wiper lever to activatethe washer:
•A brief press causes a single wipewithout washer fluid.
•A quick press and hold causes thewipers to swipe the windshield threetimes with washer fluid.
•A long press and hold activates thewipers and washer fluid for up to 10seconds.
A wipe occurs a few seconds after washingto clear any remaining washer fluid. Youcan switch this feature on and off throughthe information display. See InformationDisplays (page 91).
REAR WINDOW WIPER AND
WASHERS
Rear Window Wiper
Note:Make sure you switch off the wipersystem before using an automatic car wash.
Rotate the control to select:
Intermittent operation - theshortest pause between wipes.2
Intermittent operation - thelongest pause between wipes.1
Off.0
Rear Window Washer
Rotate and hold the control to the top orbottom position to activate the rearwasher. The control returns to the 2 or 0position when you release it.
72
Expedition (TB7) Canada/United States of America, enUSA, Edition date: 03/2016, First Printing
Wipers and WashersE205528 E205529 E205529
Page 77 of 500

Headlamp Flasher
Slightly pull the lever toward you andrelease it to flash the headlamps.
AUTOLAMPS (If Equipped)
WARNING
The autolamps switch position maynot activate the headlamps in all lowvisibility conditions, such as daytimefog. Make sure the headlamps areswitched to auto or on, as appropriate,during all low visibility conditions. Failureto do so may result in a crash.
When the lighting control is in theautolamps position, the headlampsautomatically turn on in low light situationsor when the wipers activate.
If equipped, the following also activatewhen the lighting control is in theautolamps position and you switch themon in the information display:
•Configurable daytime running lamps.
•Automatic high beam control.
•Adaptive headlamp control.
The headlamps remain on for a period oftime after you switch the ignition off. Usethe information display controls to adjustthe period of time that the headlampsremain on. See Information Displays(page 91).
Note:With the headlamps in theautolamps position, you cannot switch thehigh beam headlamps on until theautolamps system turns the low beamheadlamps on.
Windshield Wiper ActivatedHeadlamps
The windshield wiper activated headlampsturn on within 10 seconds when you switchthe windshield wipers on and the lightingcontrol is in the autolamps position. Theyturn off approximately 60 seconds afteryou switch the windshield wipers off.
The headlamps do not turn on by wiperactivation:
•During a mist wipe.
•When the wipers are on to clear washerfluid during a wash condition.
•If the wipers are in intermittent mode.
Note:If you switch autolamps andautowipers on, the headlamps willautomatically turn on when the windshieldwipers continuously operate.
74
Expedition (TB7) Canada/United States of America, enUSA, Edition date: 03/2016, First Printing
LightingE163268 E173258
A
Page 78 of 500
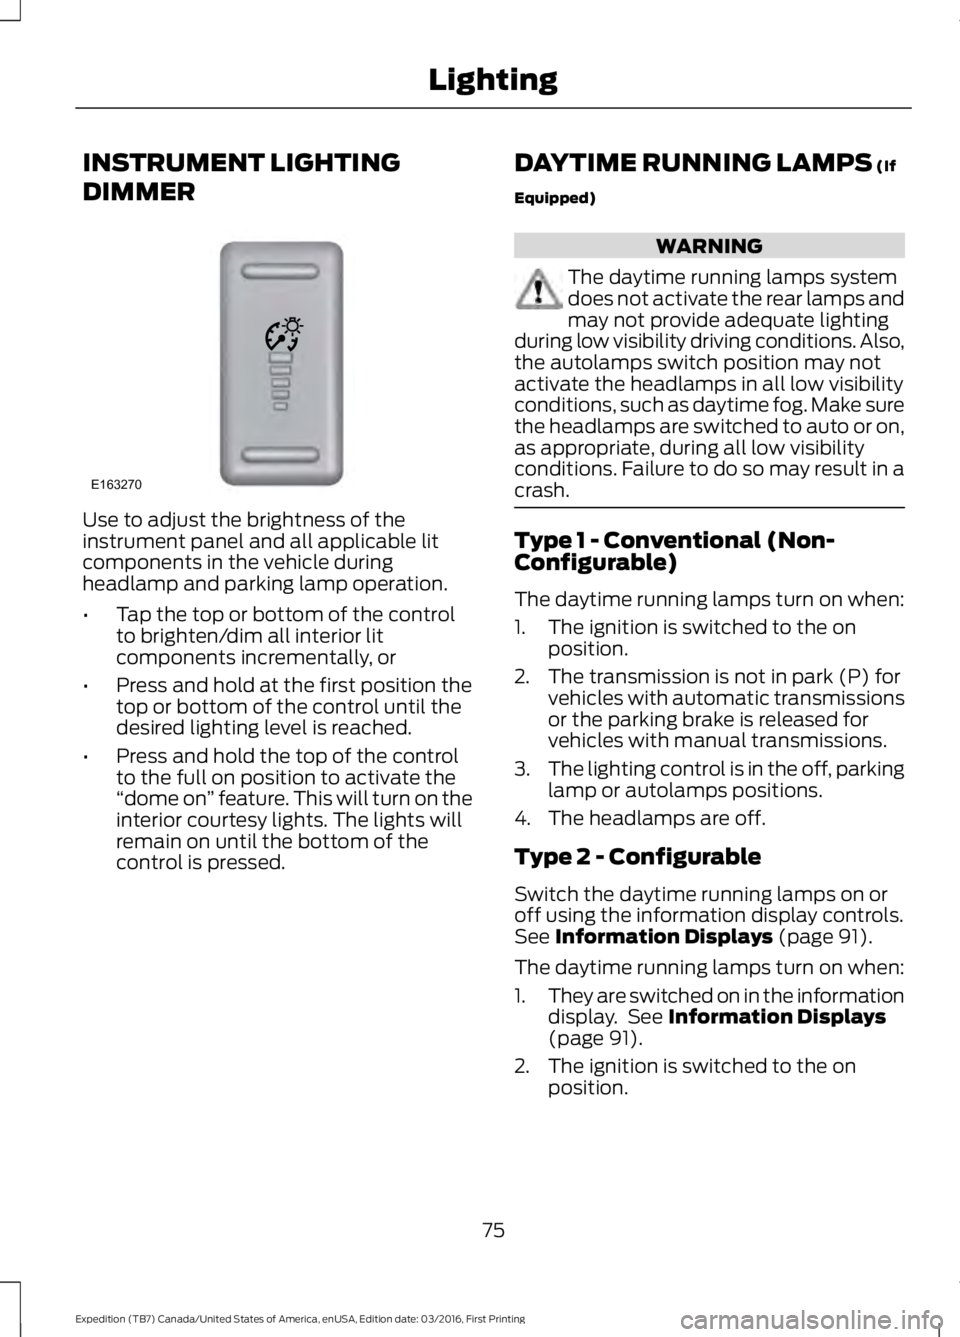
INSTRUMENT LIGHTING
DIMMER
Use to adjust the brightness of theinstrument panel and all applicable litcomponents in the vehicle duringheadlamp and parking lamp operation.
•Tap the top or bottom of the controlto brighten/dim all interior litcomponents incrementally, or
•Press and hold at the first position thetop or bottom of the control until thedesired lighting level is reached.
•Press and hold the top of the controlto the full on position to activate the“dome on” feature. This will turn on theinterior courtesy lights. The lights willremain on until the bottom of thecontrol is pressed.
DAYTIME RUNNING LAMPS (If
Equipped)
WARNING
The daytime running lamps systemdoes not activate the rear lamps andmay not provide adequate lightingduring low visibility driving conditions. Also,the autolamps switch position may notactivate the headlamps in all low visibilityconditions, such as daytime fog. Make surethe headlamps are switched to auto or on,as appropriate, during all low visibilityconditions. Failure to do so may result in acrash.
Type 1 - Conventional (Non-Configurable)
The daytime running lamps turn on when:
1. The ignition is switched to the onposition.
2. The transmission is not in park (P) forvehicles with automatic transmissionsor the parking brake is released forvehicles with manual transmissions.
3.The lighting control is in the off, parkinglamp or autolamps positions.
4. The headlamps are off.
Type 2 - Configurable
Switch the daytime running lamps on oroff using the information display controls.See Information Displays (page 91).
The daytime running lamps turn on when:
1.They are switched on in the informationdisplay. See Information Displays(page 91).
2. The ignition is switched to the onposition.
75
Expedition (TB7) Canada/United States of America, enUSA, Edition date: 03/2016, First Printing
LightingE163270
Page 79 of 500
3. The transmission is not in park (P) forvehicles with automatic transmissionsor the parking brake is released forvehicles with manual transmissions.
4.The lighting control is in the autolampsposition.
5. The headlamps are off.
The other lighting control switch positionsdo not activate the daytime running lamps,and you can use them to temporarilyoverride autolamp control.
When switched off in the informationdisplay, the daytime running lamps are offin all lighting control switch positions.
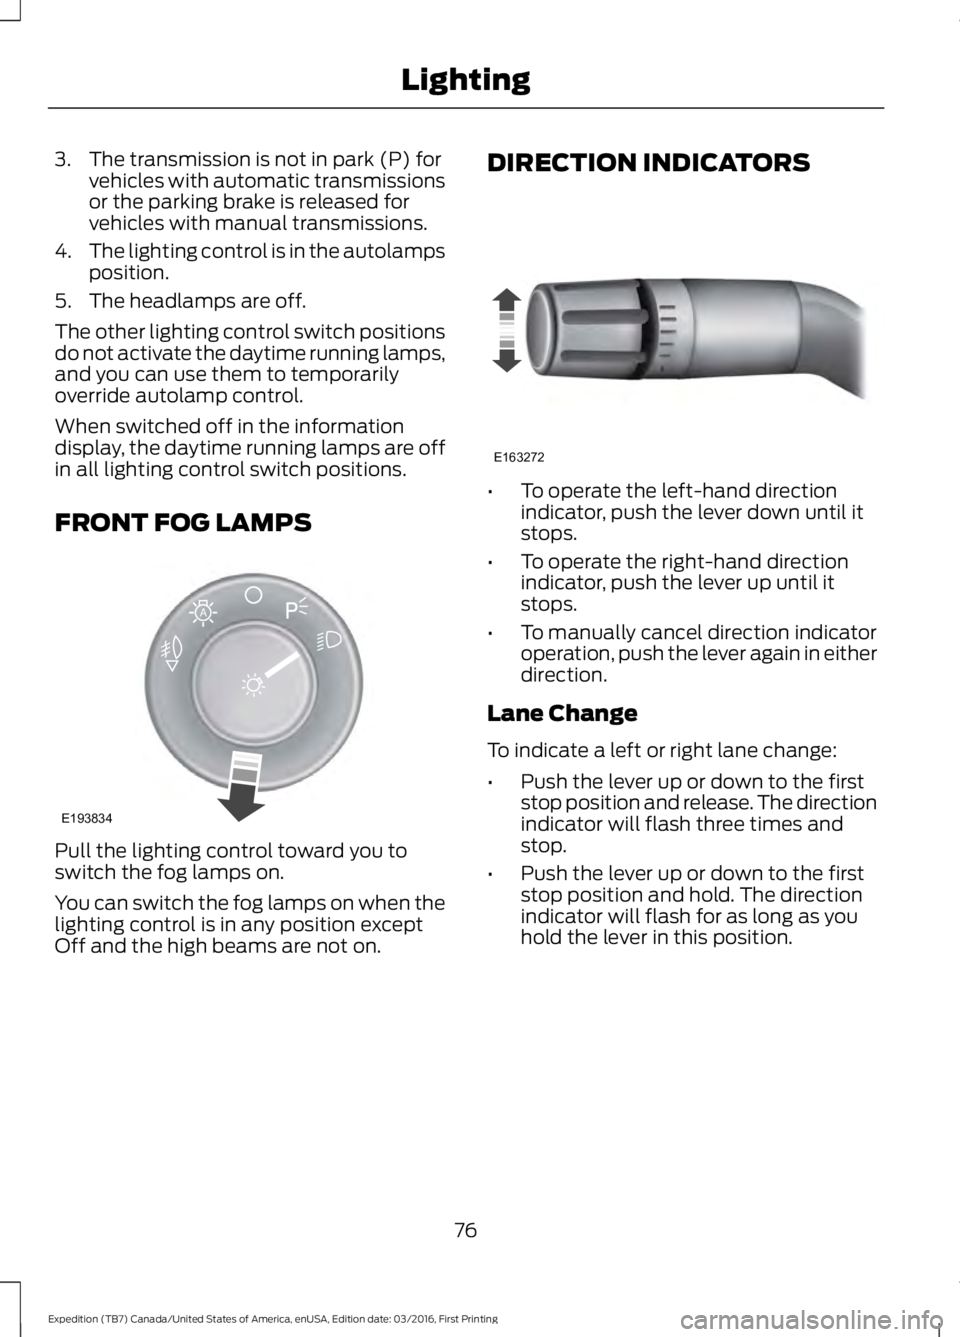
FRONT FOG LAMPS
Pull the lighting control toward you toswitch the fog lamps on.
You can switch the fog lamps on when thelighting control is in any position exceptOff and the high beams are not on.
DIRECTION INDICATORS
•To operate the left-hand directionindicator, push the lever down until itstops.
•To operate the right-hand directionindicator, push the lever up until itstops.
•To manually cancel direction indicatoroperation, push the lever again in eitherdirection.
Lane Change
To indicate a left or right lane change:
•Push the lever up or down to the firststop position and release. The directionindicator will flash three times andstop.
•Push the lever up or down to the firststop position and hold. The directionindicator will flash for as long as youhold the lever in this position.
76
Expedition (TB7) Canada/United States of America, enUSA, Edition date: 03/2016, First Printing
LightingE193834
A E163272
Page 87 of 500
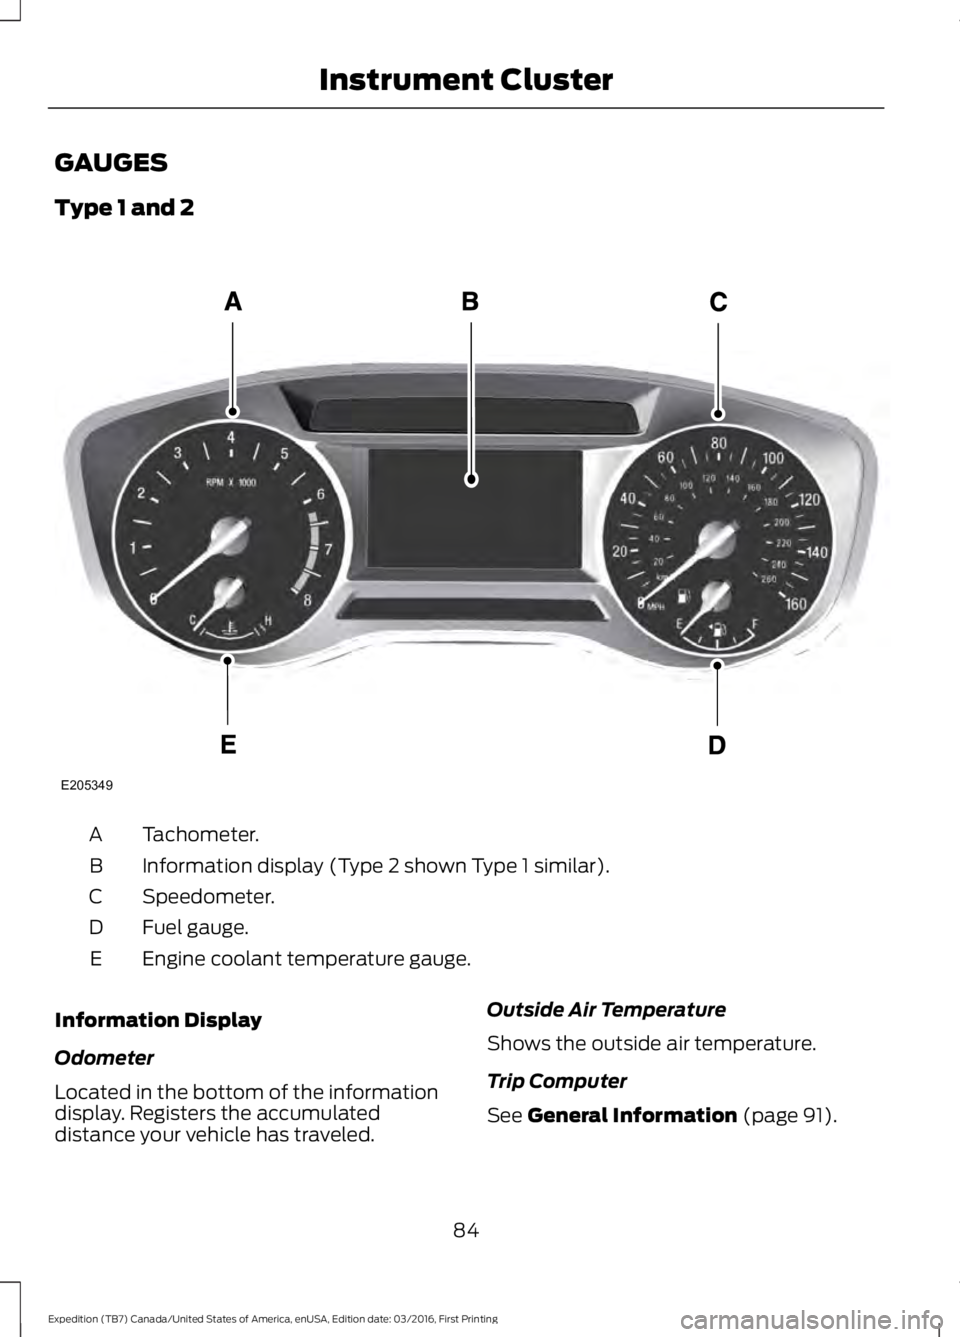
GAUGES
Type 1 and 2
Tachometer.A
Information display (Type 2 shown Type 1 similar).B
Speedometer.C
Fuel gauge.D
Engine coolant temperature gauge.E
Information Display
Odometer
Located in the bottom of the informationdisplay. Registers the accumulateddistance your vehicle has traveled.
Outside Air Temperature
Shows the outside air temperature.
Trip Computer
See General Information (page 91).
84
Expedition (TB7) Canada/United States of America, enUSA, Edition date: 03/2016, First Printing
Instrument ClusterE205349
Page 88 of 500
Vehicle Settings and Personalization
See General Information (page 91).
Fuel Gauge
Note:The fuel gauge may vary slightlywhen your vehicle is moving or on a gradient.
Switch the ignition on. The fuel gaugeindicates approximately how much fuelremains in the fuel tank. The arrowadjacent to the fuel pump symbolindicates on which side of your vehicle thefuel filler door is located.
The needle should move toward F whenyou refuel your vehicle. If the needle pointsto E after adding fuel, this indicates yourvehicle needs service soon.
After refueling, the needle may not alwaysreturn to the exact same position. This isnormal.
Note:It may take a short time for theneedle to reach F after leaving the gasstation. This is normal and depends uponthe slope of pavement at the gas station.
Note:The fuel amount dispensed into thetank is a little less or more than the gaugeindicated. This is normal and depends uponthe slope of pavement at the gas station.
Note:If the gas station nozzle shuts offbefore the tank is full, try a different gaspump nozzle.
Note:There is a small reserve left in thetank when the fuel gauge reaches empty.
Low Fuel Reminder
A low reminder displays when the distanceto empty reaches 50 miles (80 km) toempty.
Note:The low fuel reminder can appear atdifferent fuel gauge positions depending onfuel economy conditions. This variation isnormal.
Engine Coolant Temperature Gauge
Shows the temperature of the enginecoolant. At normal operating temperature,the needle remains in the center section.If the needle enters the red section, theengine is overheating. Stop the engine,switch the ignition off and determine thecause once the engine has cooled down.
Note:Do not restart the engine until youconclude the cause of overheating.
WARNING
Never remove the coolant reservoircap while the engine is running or hot.The hot coolant is under pressureand may cause serious burns.
85
Expedition (TB7) Canada/United States of America, enUSA, Edition date: 03/2016, First Printing
Instrument Cluster
Page 89 of 500
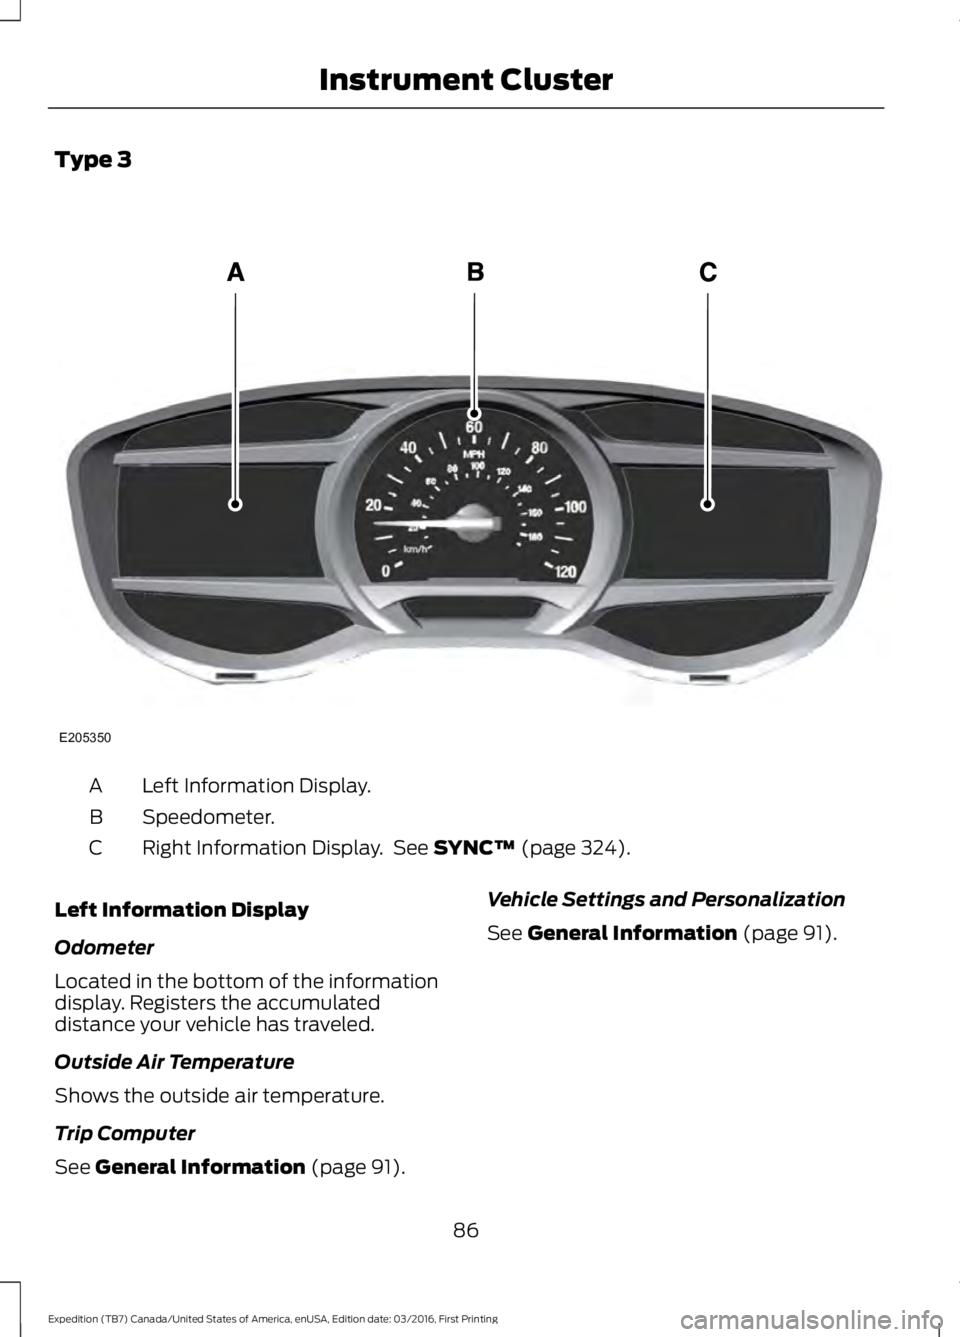
Type 3
Left Information Display.A
Speedometer.B
Right Information Display. See SYNC™ (page 324).C
Left Information Display
Odometer
Located in the bottom of the informationdisplay. Registers the accumulateddistance your vehicle has traveled.
Outside Air Temperature
Shows the outside air temperature.
Trip Computer
See General Information (page 91).
Vehicle Settings and Personalization
See General Information (page 91).
86
Expedition (TB7) Canada/United States of America, enUSA, Edition date: 03/2016, First Printing
Instrument ClusterE205350
Page 90 of 500
WARNING LAMPS AND
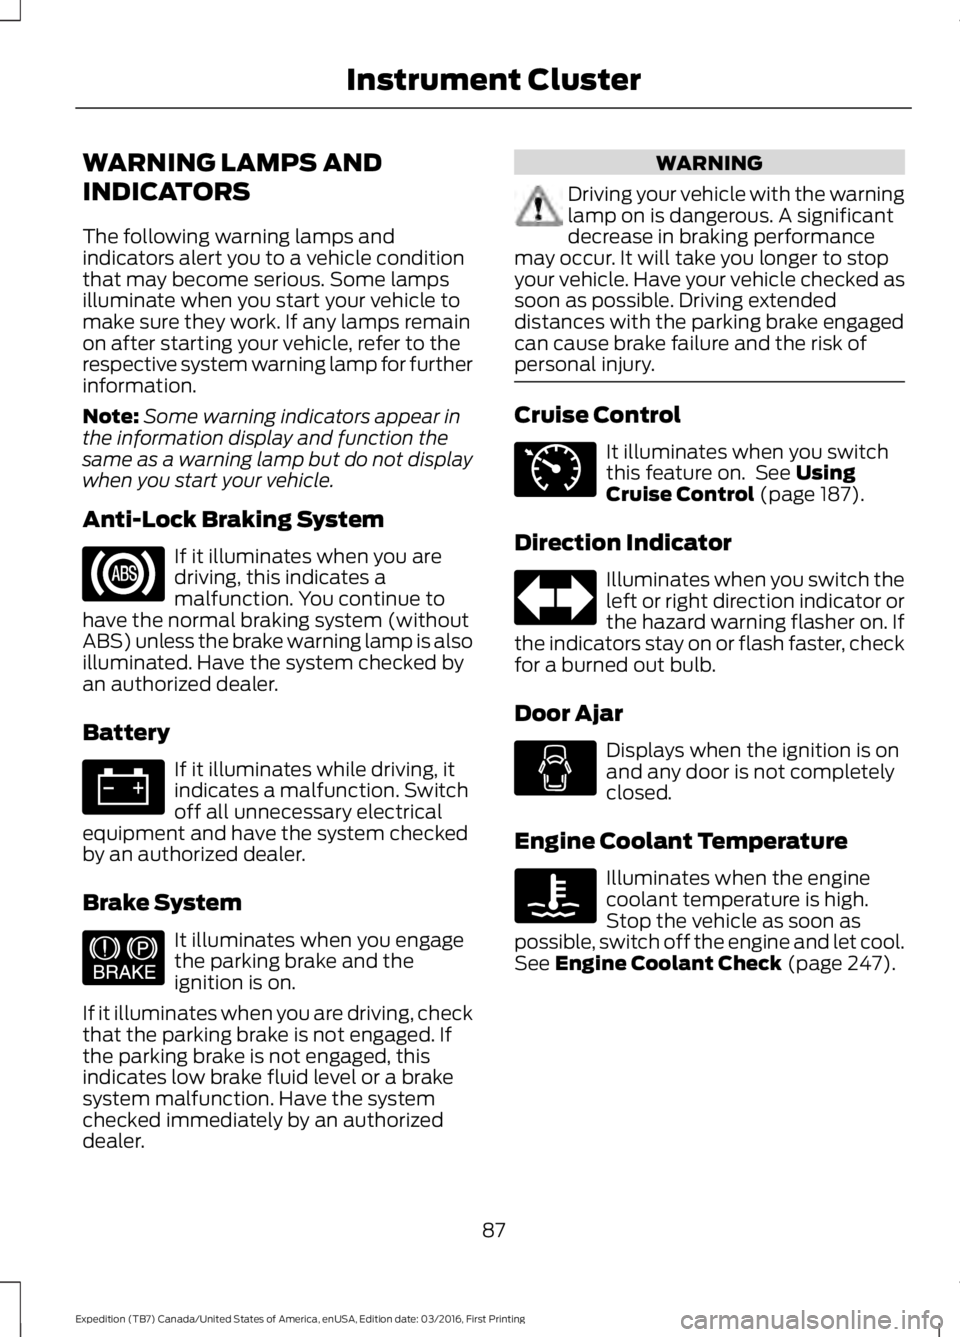
INDICATORS
The following warning lamps andindicators alert you to a vehicle conditionthat may become serious. Some lampsilluminate when you start your vehicle tomake sure they work. If any lamps remainon after starting your vehicle, refer to therespective system warning lamp for furtherinformation.
Note:Some warning indicators appear inthe information display and function thesame as a warning lamp but do not displaywhen you start your vehicle.
Anti-Lock Braking System
If it illuminates when you aredriving, this indicates amalfunction. You continue tohave the normal braking system (withoutABS) unless the brake warning lamp is alsoilluminated. Have the system checked byan authorized dealer.
Battery
If it illuminates while driving, itindicates a malfunction. Switchoff all unnecessary electricalequipment and have the system checkedby an authorized dealer.
Brake System
It illuminates when you engagethe parking brake and theignition is on.
If it illuminates when you are driving, checkthat the parking brake is not engaged. Ifthe parking brake is not engaged, thisindicates low brake fluid level or a brakesystem malfunction. Have the systemchecked immediately by an authorizeddealer.
WARNING
Driving your vehicle with the warninglamp on is dangerous. A significantdecrease in braking performancemay occur. It will take you longer to stopyour vehicle. Have your vehicle checked assoon as possible. Driving extendeddistances with the parking brake engagedcan cause brake failure and the risk ofpersonal injury.
Cruise Control
It illuminates when you switchthis feature on. See UsingCruise Control (page 187).
Direction Indicator
Illuminates when you switch theleft or right direction indicator orthe hazard warning flasher on. Ifthe indicators stay on or flash faster, checkfor a burned out bulb.
Door Ajar
Displays when the ignition is onand any door is not completelyclosed.
Engine Coolant Temperature
Illuminates when the enginecoolant temperature is high.Stop the vehicle as soon aspossible, switch off the engine and let cool.See Engine Coolant Check (page 247).
87
Expedition (TB7) Canada/United States of America, enUSA, Edition date: 03/2016, First Printing
Instrument Cluster E144522 E71340