Page 170 of 500

3. Move the 4WD switch to the desiredmode.
The information display will display amessage indicating a 4X4 shift is inprogress. The information display will thendisplay the system mode selected.
If any of the above shift conditions are notmet, the shift will not occur and theinformation display will display informationguiding the driver through the proper rangeof shifting procedures.
If SHIFT DELAYED PULL FORWARD isdisplayed in the information display,transfer case gear tooth blockage ispresent. To alleviate this condition, placethe transmission in a forward gear, movethe vehicle forward approximately 5 ft(2 m), and shift the transmission back toneutral (N) to allow the transfer case tocomplete the range shift.
How Your Vehicle Differs FromOther Vehicles
WARNING
Vehicles with a higher center ofgravity such as utility and four-wheeldrive vehicles handle differently thanvehicles with a lower center of gravity.Utility and four-wheel drive vehicles arenot designed for cornering at speeds ashigh as passenger cars any more thanlow-slung sports cars are designed toperform satisfactorily under off-roadconditions. Avoid sharp turns, excessivespeed and abrupt maneuvers in thesevehicles. Failure to drive cautiously couldresult in an increased risk of loss of vehiclecontrol, vehicle rollover, personal injury anddeath.
Truck and utility vehicles can differ fromsome other vehicles. Your vehicle may behigher to allow it to travel over roughterrain without getting hung up ordamaging underbody components.
The differences that make your vehicle soversatile also make it handle differentlythan an ordinary passenger car.
Maintain steering wheel control at alltimes, especially in rough terrain. Sincesudden changes in terrain can result inabrupt steering wheel motion, make sureyou grip the steering wheel from theoutside. Do not grip the spokes.
Drive cautiously to avoid vehicle damagefrom concealed objects such as rocks andstumps.
You should either know the terrain orexamine maps of the area before driving.Map out your route before driving in thearea. To maintain steering and brakingcontrol of your vehicle, you must have allfour wheels on the ground and they mustbe rolling, not sliding or spinning.
Driving Off-Road With Truck andUtility Vehicles
Note:On some models, the initial shift fromtwo-wheel drive to four-wheel drive whileyour vehicle is moving can cause somemomentary clunk and ratcheting sounds.This is the front drivetrain coming up tospeed and the automatic locking hubsengaging and is not cause for concern.
Note:Your vehicle may be equipped witha front air dam that can become damaged(due to reduced ground clearance) whentaking your vehicle off-road. You mayremove this air dam by removing eight bolts.
Four-wheel drive vehicles are speciallyequipped for driving on sand, snow, mudand rough terrain and have operatingcharacteristics that are somewhatdifferent from conventional vehicles, bothon and off the road.
167
Expedition (TB7) Canada/United States of America, enUSA, Edition date: 03/2016, First Printing
Four-Wheel Drive (If Equipped)
Page 301 of 500

When driving with one of the dissimilarspare tires listed above, do not:
•Exceed 50 mph (80 km/h).
•Load the vehicle beyond maximumvehicle load rating listed on the SafetyCompliance Label.
•Tow a trailer.
•Use snow chains on the end of thevehicle with the dissimilar spare tire.
•Use more than one dissimilar spare tireat a time.
•Use commercial car washingequipment.
•Try to repair the dissimilar spare tire.
Use of one of the dissimilar spare tireslisted above at any one wheel location canlead to impairment of the following:
•Handling, stability and brakingperformance.
•Comfort and noise.
•Ground clearance and parking at curbs.
•Winter weather driving capability.
•Wet weather driving capability.
•All-wheel driving capability.
3.Full-size dissimilar spare withoutlabel on wheel
When driving with the full-size dissimilarspare wheel and tire assembly, do not:
•Exceed 70 mph (113 km/h).
•Use more than one dissimilar sparewheel and tire assembly at a time.
•Use commercial car washingequipment.
•Use snow chains on the end of thevehicle with the dissimilar spare wheeland tire assembly.
The usage of a full-size dissimilar sparewheel and tire assembly can lead toimpairment of the following:
•Handling, stability and brakingperformance.
•Comfort and noise.
•Ground clearance and parking at curbs.
•Winter weather driving capability.
•Wet weather driving capability.
•All-wheel driving capability.
When driving with the full-size dissimilarspare wheel and tire assembly additionalcaution should be given to:
•Towing a trailer.
•Driving vehicles equipped with acamper body.
•Driving vehicles with a load on thecargo rack.
Drive cautiously when using a full-sizedissimilar spare wheel and tire assemblyand seek service as soon as possible.
Location of the Spare Tire andTools
The spare tire is located under the vehicle,just forward of the rear bumper. The jack,jack handle and lug wrench are located inthe following locations:
LocationItem
Under the vehicle, just forward of the rearbumperSpare tire
Under the access panel located in the floorcompartment behind the rear seatJack tools
298
Expedition (TB7) Canada/United States of America, enUSA, Edition date: 03/2016, First Printing
Wheels and Tires
Page 304 of 500

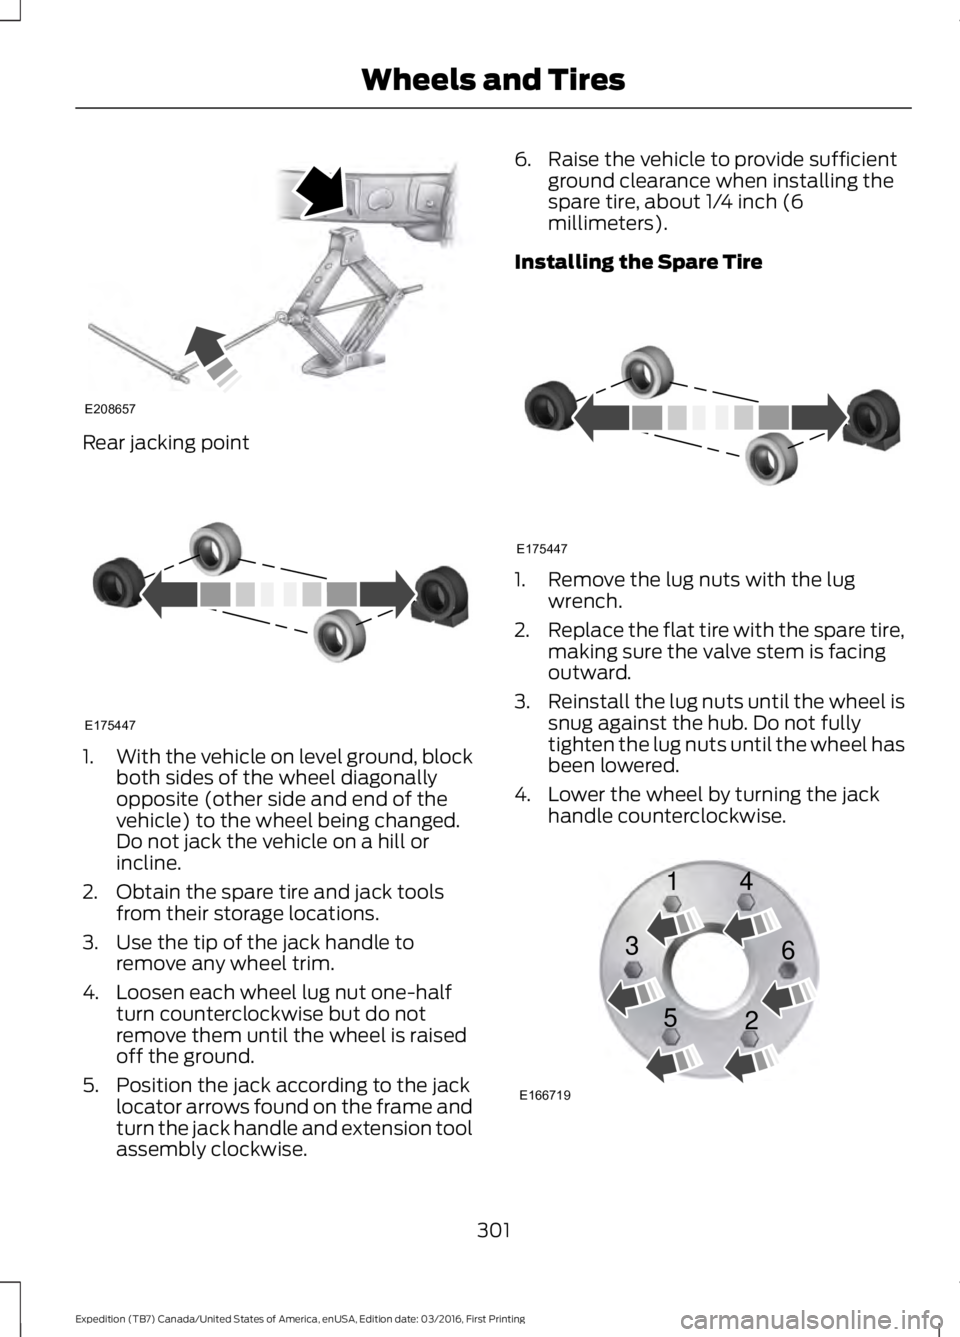
Rear jacking point
1.With the vehicle on level ground, blockboth sides of the wheel diagonallyopposite (other side and end of thevehicle) to the wheel being changed.Do not jack the vehicle on a hill orincline.
2. Obtain the spare tire and jack toolsfrom their storage locations.
3. Use the tip of the jack handle toremove any wheel trim.
4. Loosen each wheel lug nut one-halfturn counterclockwise but do notremove them until the wheel is raisedoff the ground.
5. Position the jack according to the jacklocator arrows found on the frame andturn the jack handle and extension toolassembly clockwise.
6. Raise the vehicle to provide sufficientground clearance when installing thespare tire, about 1/4 inch (6millimeters).
Installing the Spare Tire
1. Remove the lug nuts with the lugwrench.
2.Replace the flat tire with the spare tire,making sure the valve stem is facingoutward.
3.Reinstall the lug nuts until the wheel issnug against the hub. Do not fullytighten the lug nuts until the wheel hasbeen lowered.
4. Lower the wheel by turning the jackhandle counterclockwise.
301
Expedition (TB7) Canada/United States of America, enUSA, Edition date: 03/2016, First Printing
Wheels and TiresE208657 E175447 E175447 E166719
1
3
5 4
6
2