2017 FORD EXPEDITION EL bulb
[x] Cancel search: bulbPage 7 of 500

Economical Driving......................................218
Driving Through Water................................219
Floor Mats........................................................219
Roadside Emergencies
Roadside Assistance...................................221
Hazard Warning Flashers..........................222
Fuel Shutoff...................................................222
Jump Starting the Vehicle.........................223
Customer Assistance
Getting the Services You Need...............226
In California (U.S. Only).............................227
The Better Business Bureau (BBB) AutoLine Program (U.S. Only)......................228
Utilizing the Mediation/ArbitrationProgram (Canada Only).......................229
Getting Assistance Outside the U.S. andCanada........................................................229
Ordering Additional Owner'sLiterature....................................................230
Reporting Safety Defects (U.S.Only)..............................................................231
Reporting Safety Defects (CanadaOnly)..............................................................231
Fuses
Fuse Specification Chart...........................233
Changing a Fuse............................................241
Maintenance
General Information...................................243
Opening and Closing the Hood..............243
Under Hood Overview...............................244
Engine Oil Dipstick......................................245
Engine Oil Check..........................................245
Oil Change Indicator Reset......................246
Engine Coolant Check................................247
Automatic Transmission FluidCheck............................................................251
Transfer Case Fluid Check.........................251
Brake Fluid Check........................................252
Washer Fluid Check....................................252
Fuel Filter........................................................253
Changing the 12V Battery.........................253
Checking the Wiper Blades......................255
Changing the Wiper Blades.....................255
Adjusting the Headlamps........................256
Removing a Headlamp..............................257
Changing a Bulb...........................................257
Bulb Specification Chart..........................260
Changing the Engine Air Filter.................262
Vehicle Care
General Information...................................264
Cleaning Products.......................................264
Cleaning the Exterior..................................265
Waxing.............................................................266
Cleaning the Engine...................................266
Cleaning the Windows and WiperBlades..........................................................267
Cleaning the Interior...................................267
Cleaning the Instrument Panel andInstrument Cluster Lens.......................268
Cleaning Leather Seats.............................268
Repairing Minor Paint Damage...............270
Cleaning the Alloy Wheels.......................270
Vehicle Storage.............................................270
Wheels and Tires
General Information....................................273
Tire Care..........................................................276
Using Snow Chains......................................291
Tire Pressure Monitoring System...........292
Changing a Road Wheel............................297
Technical Specifications...........................302
Capacities and Specific-ations
Engine Specifications................................304
Motorcraft Parts..........................................304
4
Expedition (TB7) Canada/United States of America, enUSA, Edition date: 03/2016, First Printing
Table of Contents
Page 90 of 500
WARNING LAMPS AND
INDICATORS
The following warning lamps andindicators alert you to a vehicle conditionthat may become serious. Some lampsilluminate when you start your vehicle tomake sure they work. If any lamps remainon after starting your vehicle, refer to therespective system warning lamp for furtherinformation.
Note:Some warning indicators appear inthe information display and function thesame as a warning lamp but do not displaywhen you start your vehicle.
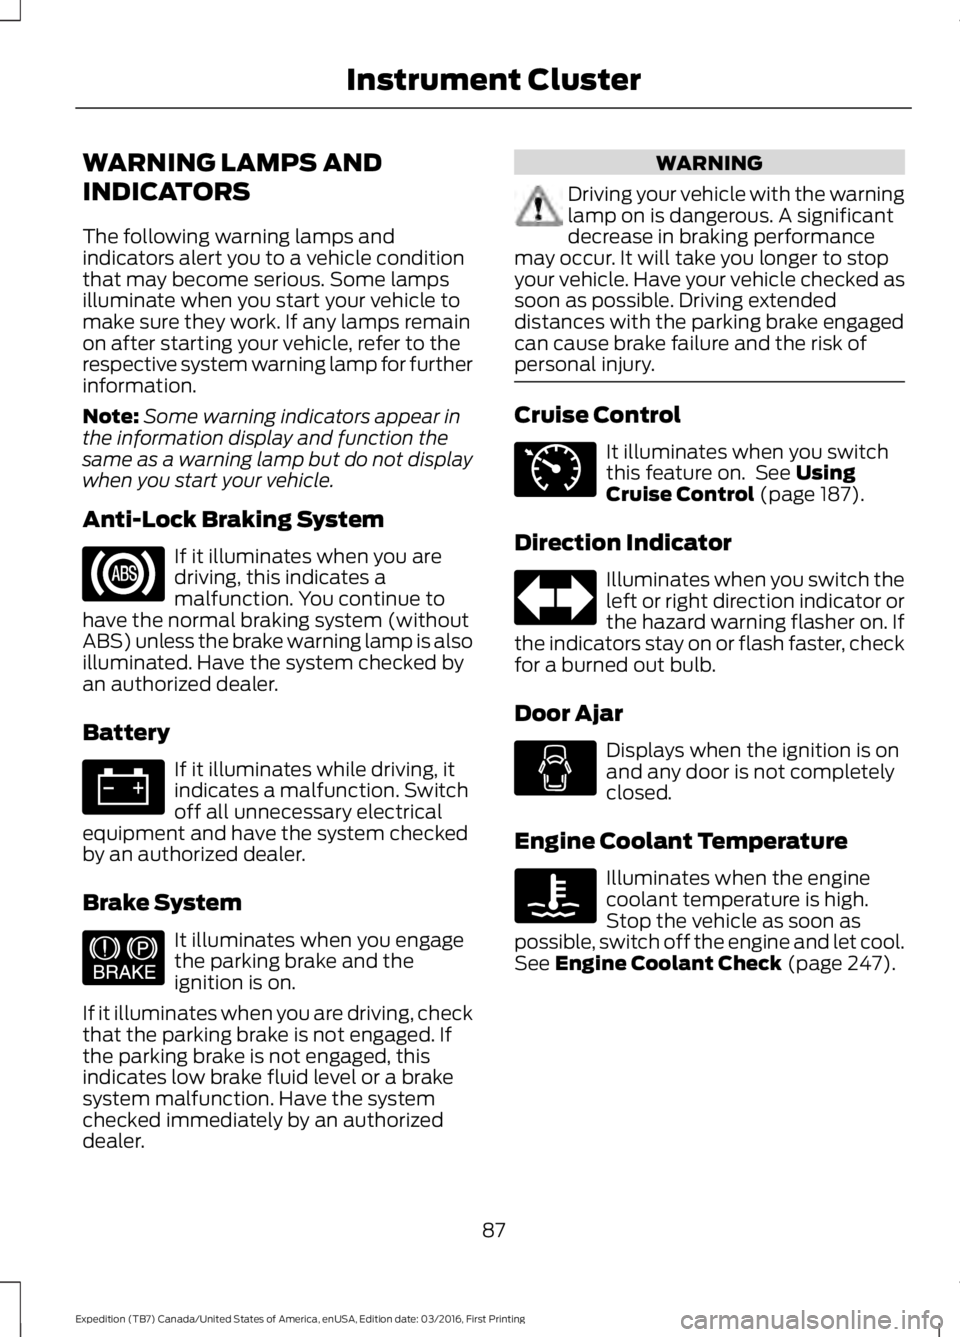
Anti-Lock Braking System
If it illuminates when you aredriving, this indicates amalfunction. You continue tohave the normal braking system (withoutABS) unless the brake warning lamp is alsoilluminated. Have the system checked byan authorized dealer.
Battery
If it illuminates while driving, itindicates a malfunction. Switchoff all unnecessary electricalequipment and have the system checkedby an authorized dealer.
Brake System
It illuminates when you engagethe parking brake and theignition is on.
If it illuminates when you are driving, checkthat the parking brake is not engaged. Ifthe parking brake is not engaged, thisindicates low brake fluid level or a brakesystem malfunction. Have the systemchecked immediately by an authorizeddealer.
WARNING
Driving your vehicle with the warninglamp on is dangerous. A significantdecrease in braking performancemay occur. It will take you longer to stopyour vehicle. Have your vehicle checked assoon as possible. Driving extendeddistances with the parking brake engagedcan cause brake failure and the risk ofpersonal injury.
Cruise Control
It illuminates when you switchthis feature on. See UsingCruise Control (page 187).
Direction Indicator
Illuminates when you switch theleft or right direction indicator orthe hazard warning flasher on. Ifthe indicators stay on or flash faster, checkfor a burned out bulb.
Door Ajar
Displays when the ignition is onand any door is not completelyclosed.
Engine Coolant Temperature
Illuminates when the enginecoolant temperature is high.Stop the vehicle as soon aspossible, switch off the engine and let cool.See Engine Coolant Check (page 247).
87
Expedition (TB7) Canada/United States of America, enUSA, Edition date: 03/2016, First Printing
Instrument Cluster E144522 E71340
Page 92 of 500
Service Engine Soon
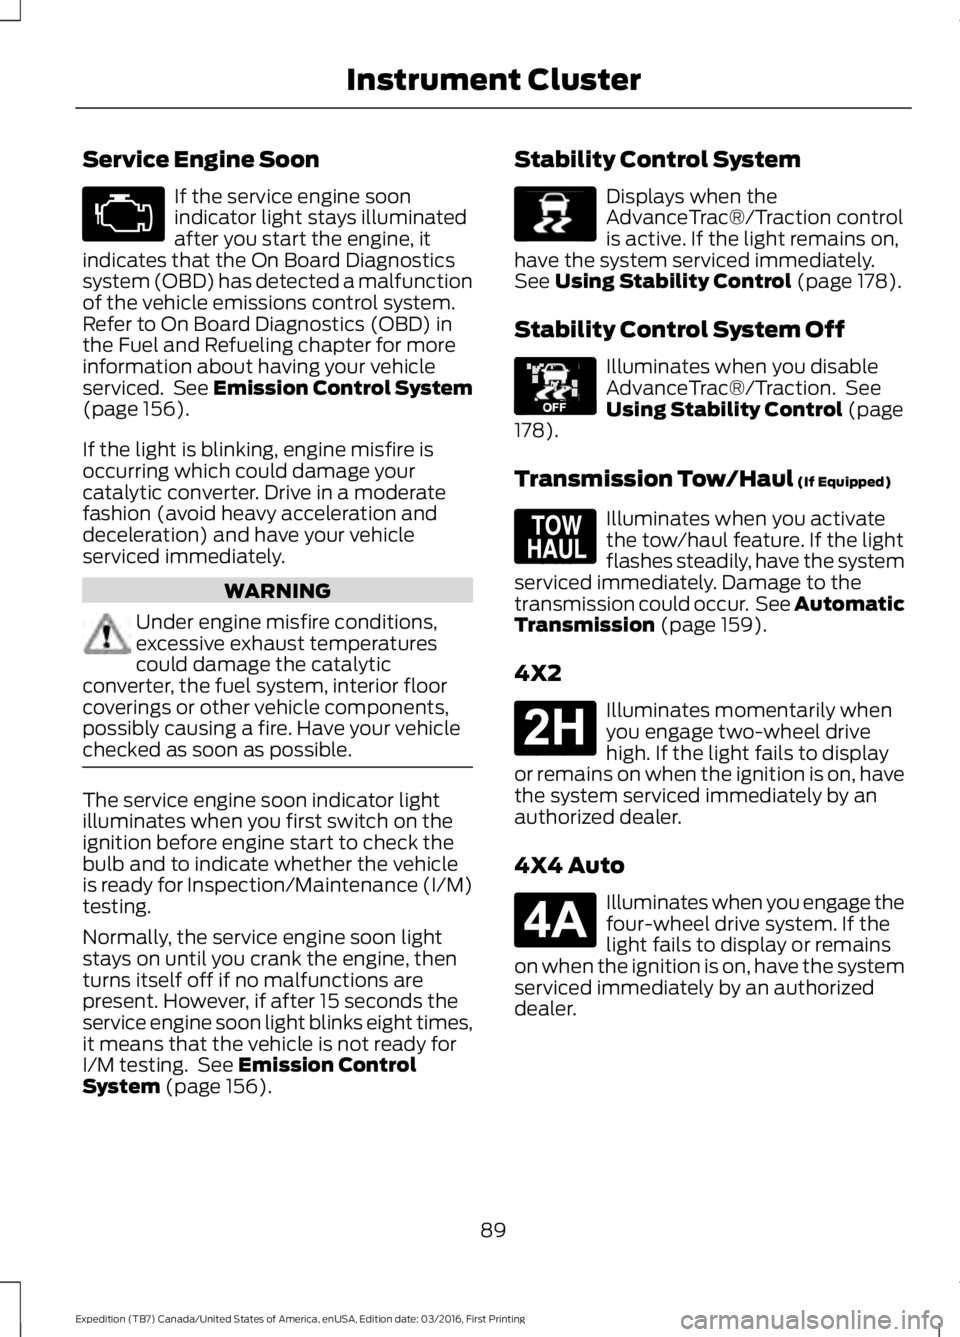
If the service engine soonindicator light stays illuminatedafter you start the engine, itindicates that the On Board Diagnosticssystem (OBD) has detected a malfunctionof the vehicle emissions control system.Refer to On Board Diagnostics (OBD) inthe Fuel and Refueling chapter for moreinformation about having your vehicleserviced. See Emission Control System(page 156).
If the light is blinking, engine misfire isoccurring which could damage yourcatalytic converter. Drive in a moderatefashion (avoid heavy acceleration anddeceleration) and have your vehicleserviced immediately.
WARNING
Under engine misfire conditions,excessive exhaust temperaturescould damage the catalyticconverter, the fuel system, interior floorcoverings or other vehicle components,possibly causing a fire. Have your vehiclechecked as soon as possible.
The service engine soon indicator lightilluminates when you first switch on theignition before engine start to check thebulb and to indicate whether the vehicleis ready for Inspection/Maintenance (I/M)testing.
Normally, the service engine soon lightstays on until you crank the engine, thenturns itself off if no malfunctions arepresent. However, if after 15 seconds theservice engine soon light blinks eight times,it means that the vehicle is not ready forI/M testing. See Emission ControlSystem (page 156).
Stability Control System
Displays when theAdvanceTrac®/Traction controlis active. If the light remains on,have the system serviced immediately.See Using Stability Control (page 178).
Stability Control System Off
Illuminates when you disableAdvanceTrac®/Traction. SeeUsing Stability Control (page178).
Transmission Tow/Haul (If Equipped)
Illuminates when you activatethe tow/haul feature. If the lightflashes steadily, have the systemserviced immediately. Damage to thetransmission could occur. See AutomaticTransmission (page 159).
4X2
Illuminates momentarily whenyou engage two-wheel drivehigh. If the light fails to displayor remains on when the ignition is on, havethe system serviced immediately by anauthorized dealer.
4X4 Auto
Illuminates when you engage thefour-wheel drive system. If thelight fails to display or remainson when the ignition is on, have the systemserviced immediately by an authorizeddealer.
89
Expedition (TB7) Canada/United States of America, enUSA, Edition date: 03/2016, First Printing
Instrument Cluster E138639 E130458 E161509 E181778 E181781
Page 160 of 500
an emission control device or prevent itfrom working. Information about yourvehicle’s emission system is on the VehicleEmission Control Information Decallocated on or near the engine. This decalalso lists engine displacement.
Please consult your warranty informationfor complete details.
On-Board Diagnostics (OBD-II)
Your vehicle has a computer known as theon-board diagnostics system (OBD-II) thatmonitors the engine’s emission controlsystem. The system protects theenvironment by making sure that yourvehicle continues to meet governmentemission standards. The OBD-II systemalso assists a service technician in properlyservicing your vehicle.
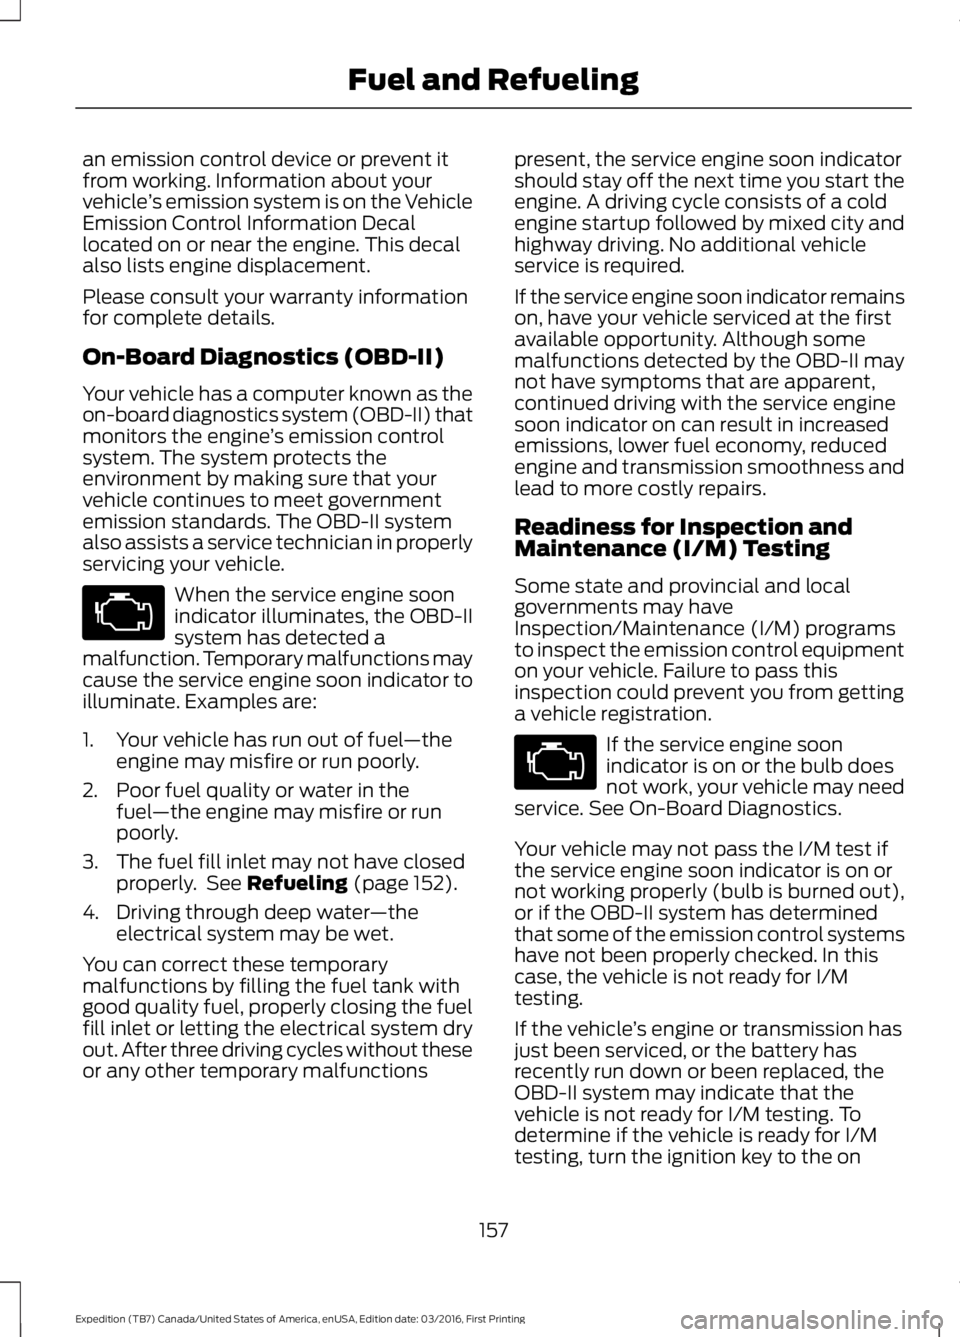
When the service engine soonindicator illuminates, the OBD-IIsystem has detected amalfunction. Temporary malfunctions maycause the service engine soon indicator toilluminate. Examples are:
1. Your vehicle has run out of fuel—theengine may misfire or run poorly.
2. Poor fuel quality or water in thefuel—the engine may misfire or runpoorly.
3. The fuel fill inlet may not have closedproperly. See Refueling (page 152).
4. Driving through deep water—theelectrical system may be wet.
You can correct these temporarymalfunctions by filling the fuel tank withgood quality fuel, properly closing the fuelfill inlet or letting the electrical system dryout. After three driving cycles without theseor any other temporary malfunctions
present, the service engine soon indicatorshould stay off the next time you start theengine. A driving cycle consists of a coldengine startup followed by mixed city andhighway driving. No additional vehicleservice is required.
If the service engine soon indicator remainson, have your vehicle serviced at the firstavailable opportunity. Although somemalfunctions detected by the OBD-II maynot have symptoms that are apparent,continued driving with the service enginesoon indicator on can result in increasedemissions, lower fuel economy, reducedengine and transmission smoothness andlead to more costly repairs.
Readiness for Inspection andMaintenance (I/M) Testing
Some state and provincial and localgovernments may haveInspection/Maintenance (I/M) programsto inspect the emission control equipmenton your vehicle. Failure to pass thisinspection could prevent you from gettinga vehicle registration.
If the service engine soonindicator is on or the bulb doesnot work, your vehicle may needservice. See On-Board Diagnostics.
Your vehicle may not pass the I/M test ifthe service engine soon indicator is on ornot working properly (bulb is burned out),or if the OBD-II system has determinedthat some of the emission control systemshave not been properly checked. In thiscase, the vehicle is not ready for I/Mtesting.
If the vehicle’s engine or transmission hasjust been serviced, or the battery hasrecently run down or been replaced, theOBD-II system may indicate that thevehicle is not ready for I/M testing. Todetermine if the vehicle is ready for I/Mtesting, turn the ignition key to the on
157
Expedition (TB7) Canada/United States of America, enUSA, Edition date: 03/2016, First Printing
Fuel and Refueling
Page 181 of 500
Traction Control
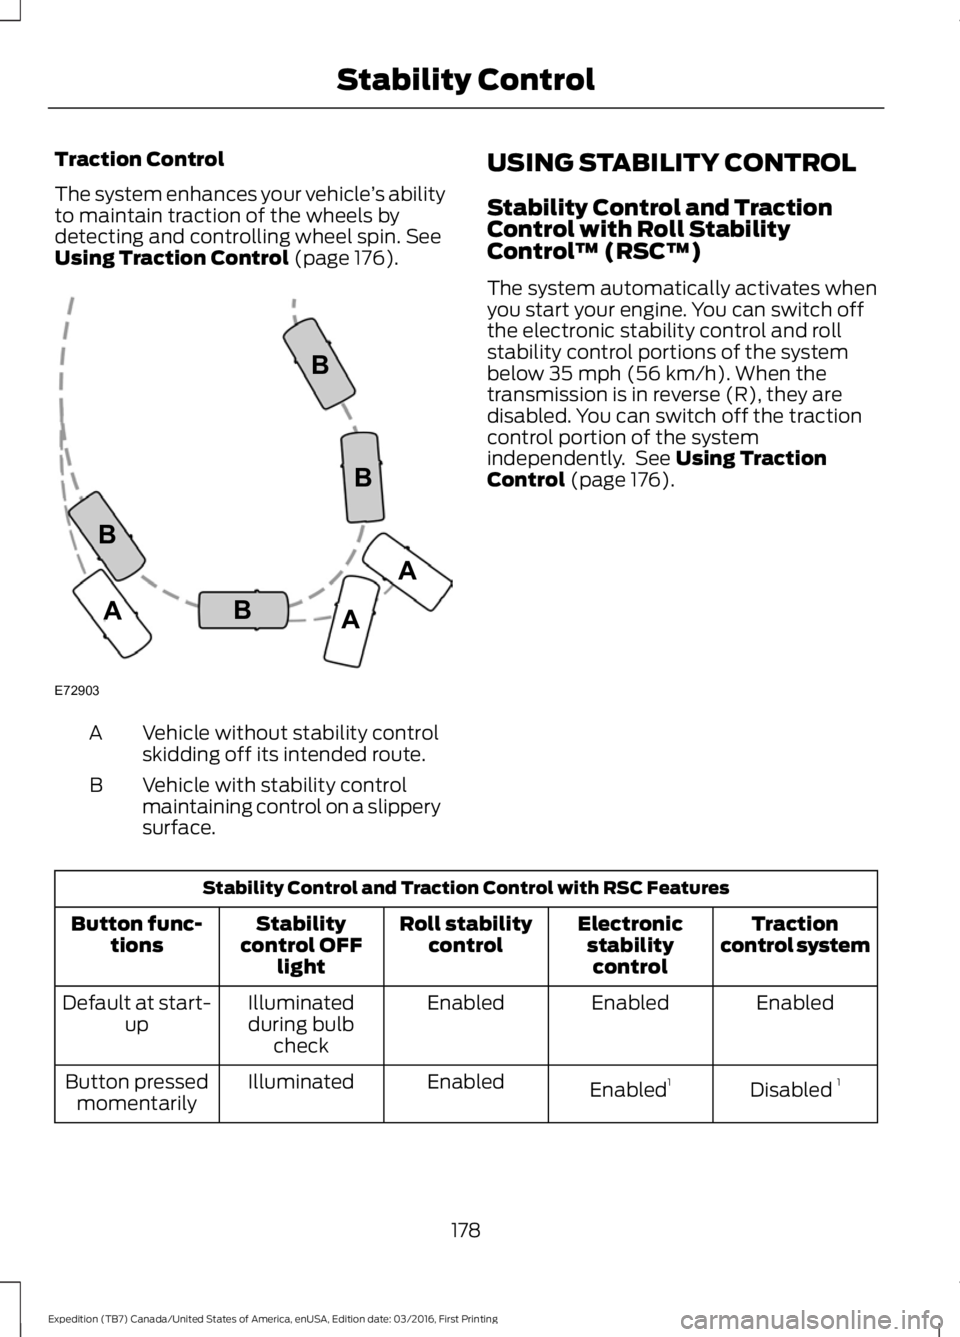
The system enhances your vehicle’s abilityto maintain traction of the wheels bydetecting and controlling wheel spin. SeeUsing Traction Control (page 176).
Vehicle without stability controlskidding off its intended route.A
Vehicle with stability controlmaintaining control on a slipperysurface.
B
USING STABILITY CONTROL
Stability Control and TractionControl with Roll StabilityControl™ (RSC™)
The system automatically activates whenyou start your engine. You can switch offthe electronic stability control and rollstability control portions of the systembelow 35 mph (56 km/h). When thetransmission is in reverse (R), they aredisabled. You can switch off the tractioncontrol portion of the systemindependently. See Using TractionControl (page 176).
Stability Control and Traction Control with RSC Features
Tractioncontrol systemElectronicstabilitycontrol
Roll stabilitycontrolStabilitycontrol OFFlight
Button func-tions
EnabledEnabledEnabledIlluminatedduring bulbcheck
Default at start-up
Disabled 1Enabled1EnabledIlluminatedButton pressedmomentarily
178
Expedition (TB7) Canada/United States of America, enUSA, Edition date: 03/2016, First Printing
Stability ControlE72903A
AA
B
BB
B
Page 260 of 500
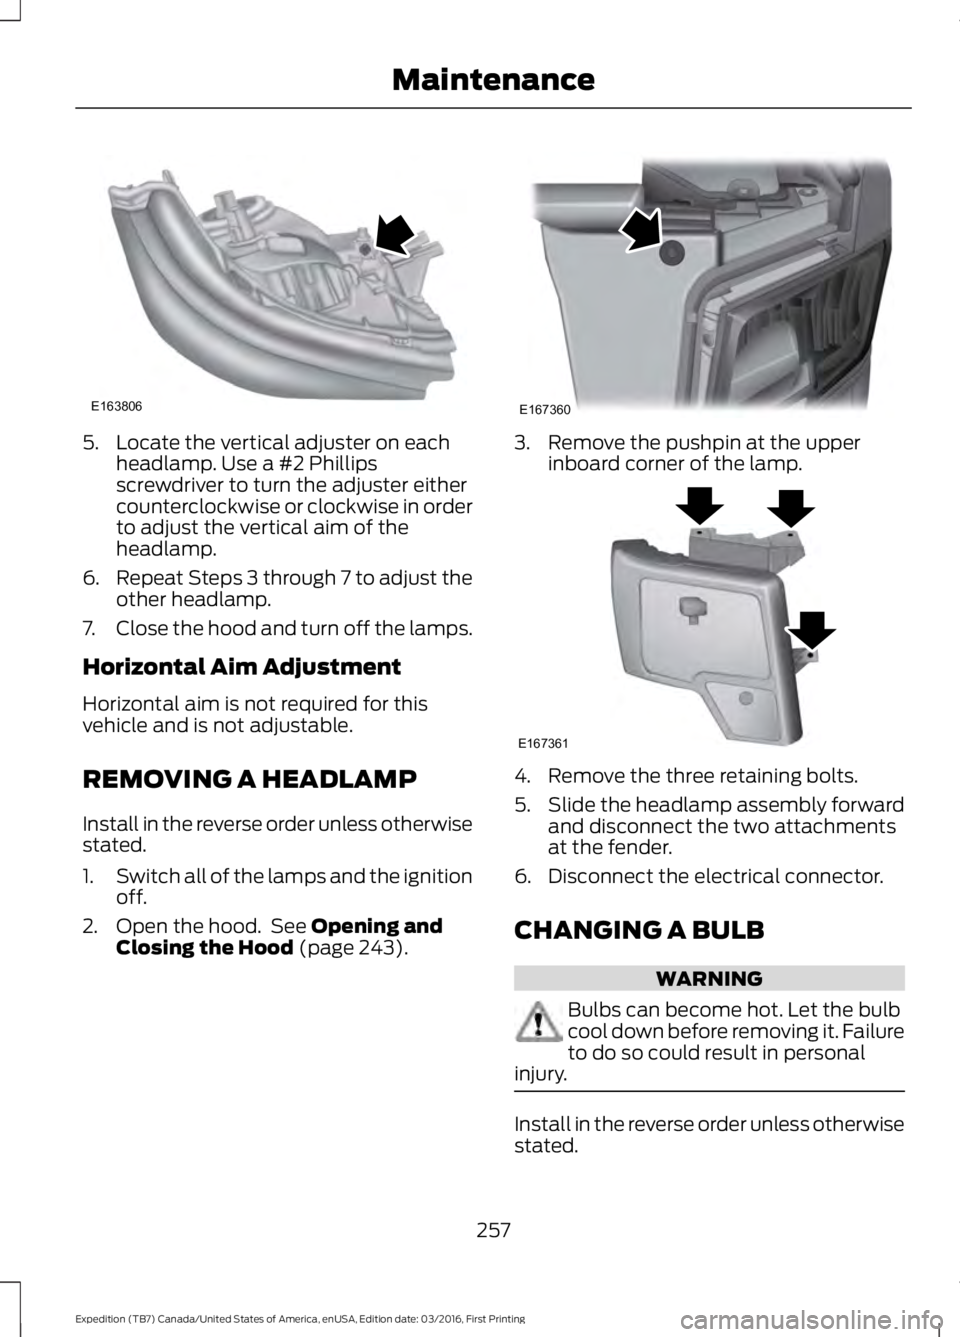
5. Locate the vertical adjuster on eachheadlamp. Use a #2 Phillipsscrewdriver to turn the adjuster eithercounterclockwise or clockwise in orderto adjust the vertical aim of theheadlamp.
6.Repeat Steps 3 through 7 to adjust theother headlamp.
7.Close the hood and turn off the lamps.
Horizontal Aim Adjustment
Horizontal aim is not required for thisvehicle and is not adjustable.
REMOVING A HEADLAMP
Install in the reverse order unless otherwisestated.
1.Switch all of the lamps and the ignitionoff.
2. Open the hood. See Opening andClosing the Hood (page 243).
3. Remove the pushpin at the upperinboard corner of the lamp.
4. Remove the three retaining bolts.
5.Slide the headlamp assembly forwardand disconnect the two attachmentsat the fender.
6. Disconnect the electrical connector.
CHANGING A BULB
WARNING
Bulbs can become hot. Let the bulbcool down before removing it. Failureto do so could result in personalinjury.
Install in the reverse order unless otherwisestated.
257
Expedition (TB7) Canada/United States of America, enUSA, Edition date: 03/2016, First Printing
MaintenanceE163806 E167360 E167361
Page 261 of 500
Note:If the bulb is accidentally touched,clean it with rubbing alcohol beforeinstalling it.
Headlamp Bulb
1.Switch all of the lamps and the ignitionoff.
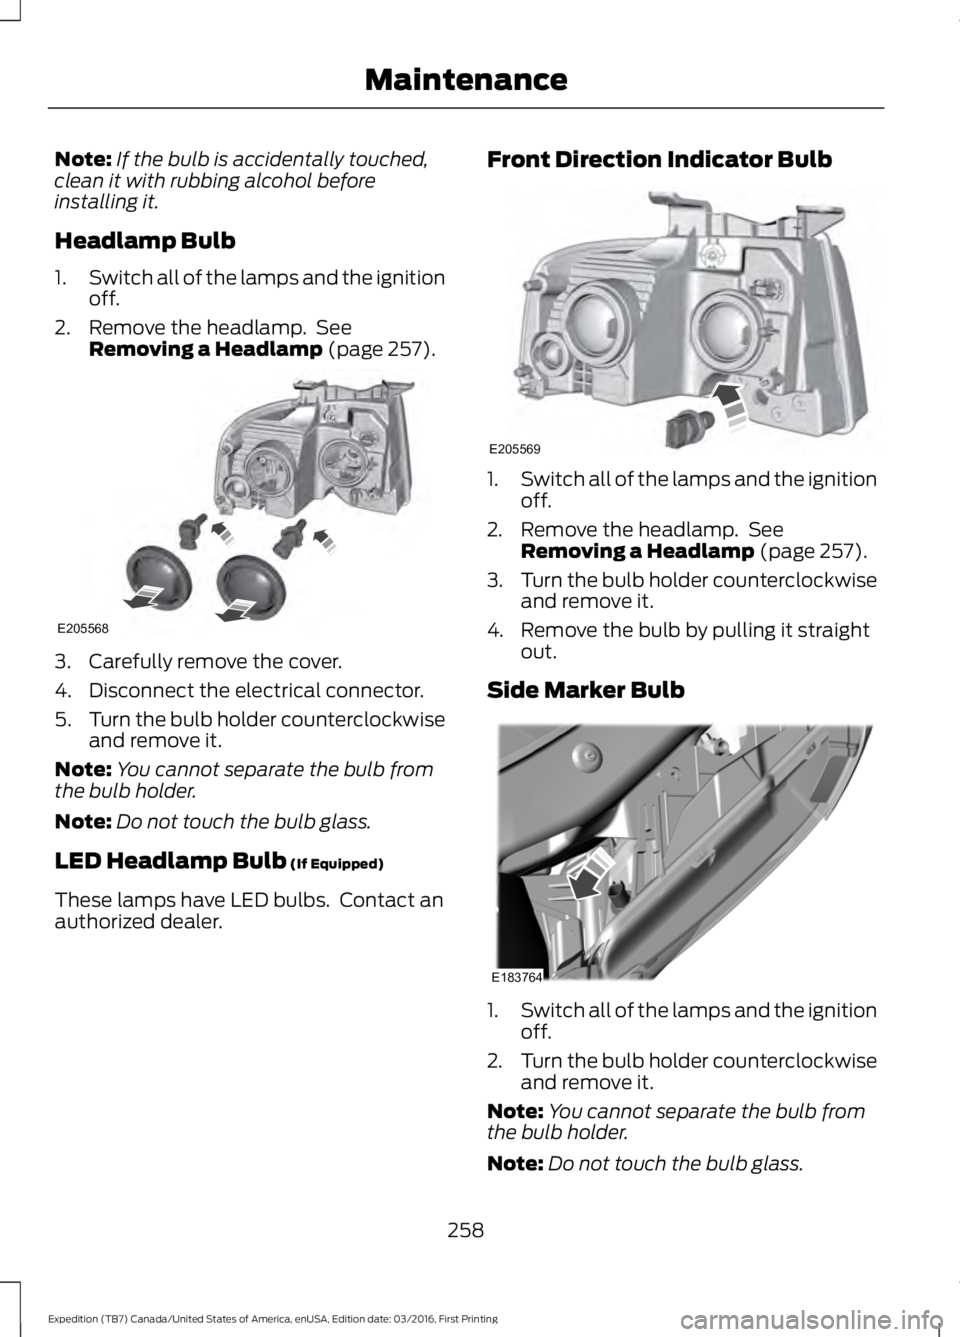
2. Remove the headlamp. SeeRemoving a Headlamp (page 257).
3. Carefully remove the cover.
4. Disconnect the electrical connector.
5.Turn the bulb holder counterclockwiseand remove it.
Note:You cannot separate the bulb fromthe bulb holder.
Note:Do not touch the bulb glass.
LED Headlamp Bulb (If Equipped)
These lamps have LED bulbs. Contact anauthorized dealer.
Front Direction Indicator Bulb
1.Switch all of the lamps and the ignitionoff.
2. Remove the headlamp. SeeRemoving a Headlamp (page 257).
3.Turn the bulb holder counterclockwiseand remove it.
4. Remove the bulb by pulling it straightout.
Side Marker Bulb
1.Switch all of the lamps and the ignitionoff.
2.Turn the bulb holder counterclockwiseand remove it.
Note:You cannot separate the bulb fromthe bulb holder.
Note:Do not touch the bulb glass.
258
Expedition (TB7) Canada/United States of America, enUSA, Edition date: 03/2016, First Printing
MaintenanceE205568 E205569 E183764
Page 262 of 500
LED Direction Indicator and SideMarker Bulbs (If Equipped)
These lamps have LED bulbs. Contact anauthorized dealer.
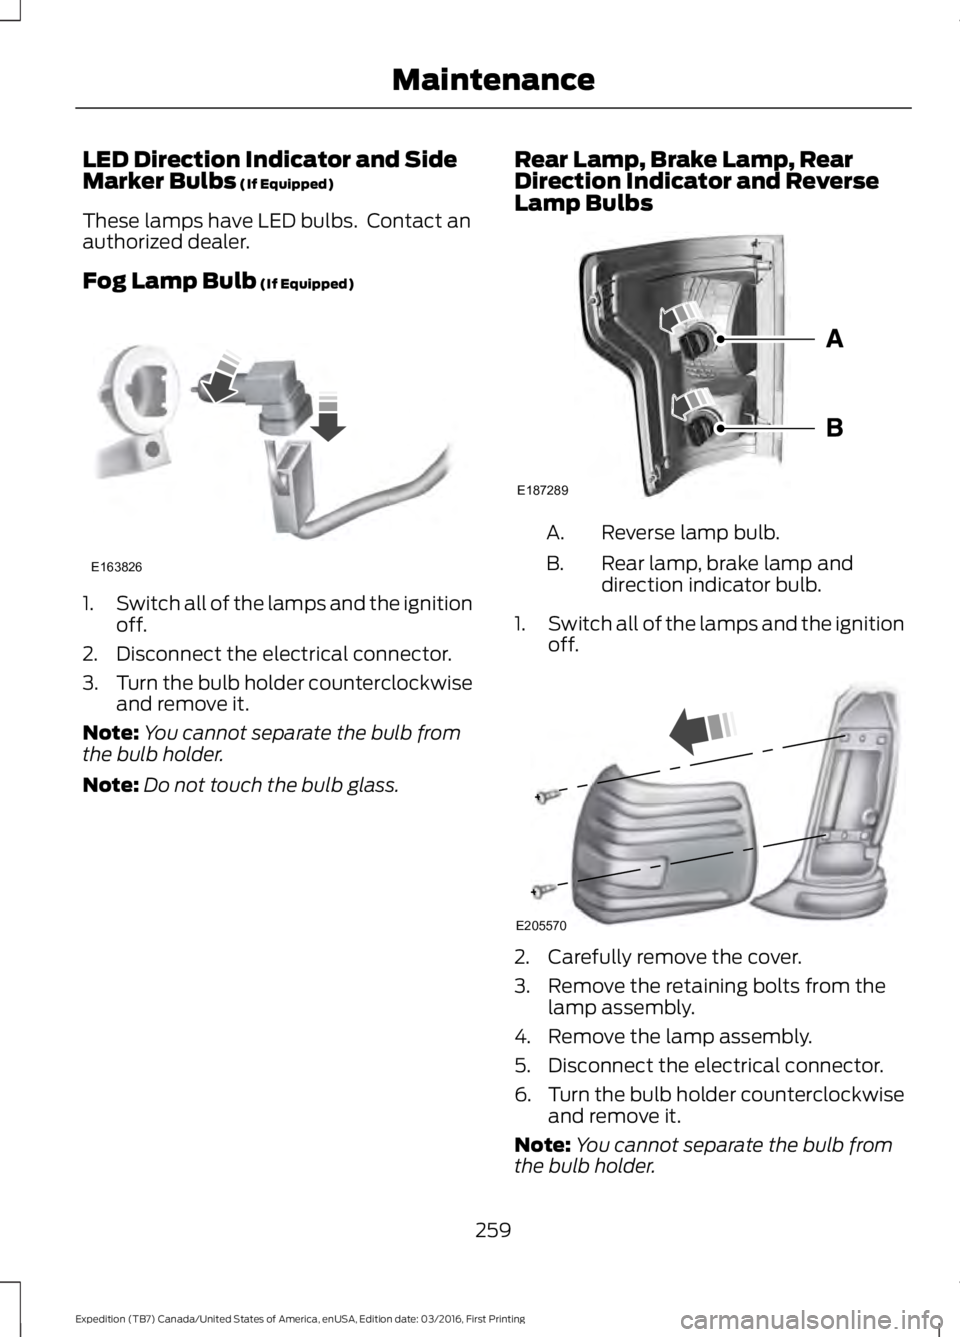
Fog Lamp Bulb (If Equipped)
1.Switch all of the lamps and the ignitionoff.
2. Disconnect the electrical connector.
3.Turn the bulb holder counterclockwiseand remove it.
Note:You cannot separate the bulb fromthe bulb holder.
Note:Do not touch the bulb glass.
Rear Lamp, Brake Lamp, RearDirection Indicator and ReverseLamp Bulbs
Reverse lamp bulb.A.
Rear lamp, brake lamp anddirection indicator bulb.B.
1.Switch all of the lamps and the ignitionoff.
2. Carefully remove the cover.
3. Remove the retaining bolts from thelamp assembly.
4. Remove the lamp assembly.
5. Disconnect the electrical connector.
6.Turn the bulb holder counterclockwiseand remove it.
Note:You cannot separate the bulb fromthe bulb holder.
259
Expedition (TB7) Canada/United States of America, enUSA, Edition date: 03/2016, First Printing
MaintenanceE163826 E187289 E205570