2017 FORD EXPEDITION EL display
[x] Cancel search: displayPage 207 of 500
RV & Trailer Towing Guide Online
http://www.fleet.ford.com/towing-guides/Website
TRAILER SWAY CONTROL
WARNING
Turning off trailer sway controlincreases the risk of loss of vehiclecontrol, serious injury or death. Forddoes not recommend disabling this featureexcept in situations where speed reductionmay be detrimental (such as hill climbing),the driver has significant trailer towingexperience, and can control trailer swayand maintain safe operation.
Note:This feature does not prevent trailersway, but reduces it once it begins.
Note:This feature cannot stop all trailersfrom swaying.
Note:In some cases, if vehicle speed is toohigh, the system may activate multipletimes, gradually reducing vehicle speed.
This feature applies your vehicle brakes atindividual wheels and, if necessary, reducesengine power. If the trailer begins to sway,the stability control light flashes and themessage TRAILER SWAY REDUCESPEED appears in the information display.The first thing to do is slow your vehicledown, then pull safely to the side of theroad and check for proper tongue load andtrailer load distribution. See LoadCarrying (page 196).
RECOMMENDED TOWING
WEIGHTS
Note:Do not exceed the trailerweight for your vehicleconfiguration listed in the chartbelow.
Note:Make sure to take intoconsideration trailer frontal area.Do not exceed 36.5 feet² (3.39meters²) if your vehicle is equippedwith the standard towing package,or 60 feet² (5.57 meters²) if yourvehicle is equipped with theoptional heavy duty package.
Note:Exceeding this limitationmay significantly reduce theperformance of your towingvehicle. Selecting a trailer with alow aerodynamic drag and roundedfront design helps optimizeperformance and fuel economy.
Note:For high altitude operation,reduce the gross combined weightby 2% per 1000 feet (300 meters)starting at the 1000 foot (300meter) elevation point.
204
Expedition (TB7) Canada/United States of America, enUSA, Edition date: 03/2016, First Printing
Towing
Page 213 of 500
Trailer Brakes
WARNING
Do not connect a trailer's hydraulicbrake system directly to yourvehicle's brake system. Your vehiclemay not have enough braking power andyour chances of having a collision greatlyincrease.
Electric brakes and manual, automatic orsurge-type trailer brakes are safe if youinstall them properly and adjust them tothe manufacturer's specifications. Thetrailer brakes must meet local and federalregulations.
The rating for the tow vehicle's brakingsystem operation is at the gross vehicleweight rating, not the gross combinedweight rating.
Separate functioning brake systemsare required for safe control of towedvehicles and trailers weighing morethan 1500 pounds (680 kilograms)when loaded.
Integrated Trailer Brake Controller (IfEquipped)
WARNING
The Ford trailer brake controller hasbeen verified to be compatible withtrailers having electric-actuateddrum brakes (one to four axles) and mostelectric-over-hydraulic brakes. It will notactivate hydraulic surge-style trailerbrakes. It is the responsibility of thecustomer to ensure that the trailer brakesare adjusted appropriately, functioningnormally and all electric connections areproperly made. Failure to do so may resultin loss of vehicle control, crash or seriousinjury.
When used properly, the trailer brakecontroller assists in smooth and effectivetrailer braking by powering the trailer’selectric or electric-over-hydraulic brakeswith a proportional output based on thetowing vehicle’s brake pressure.
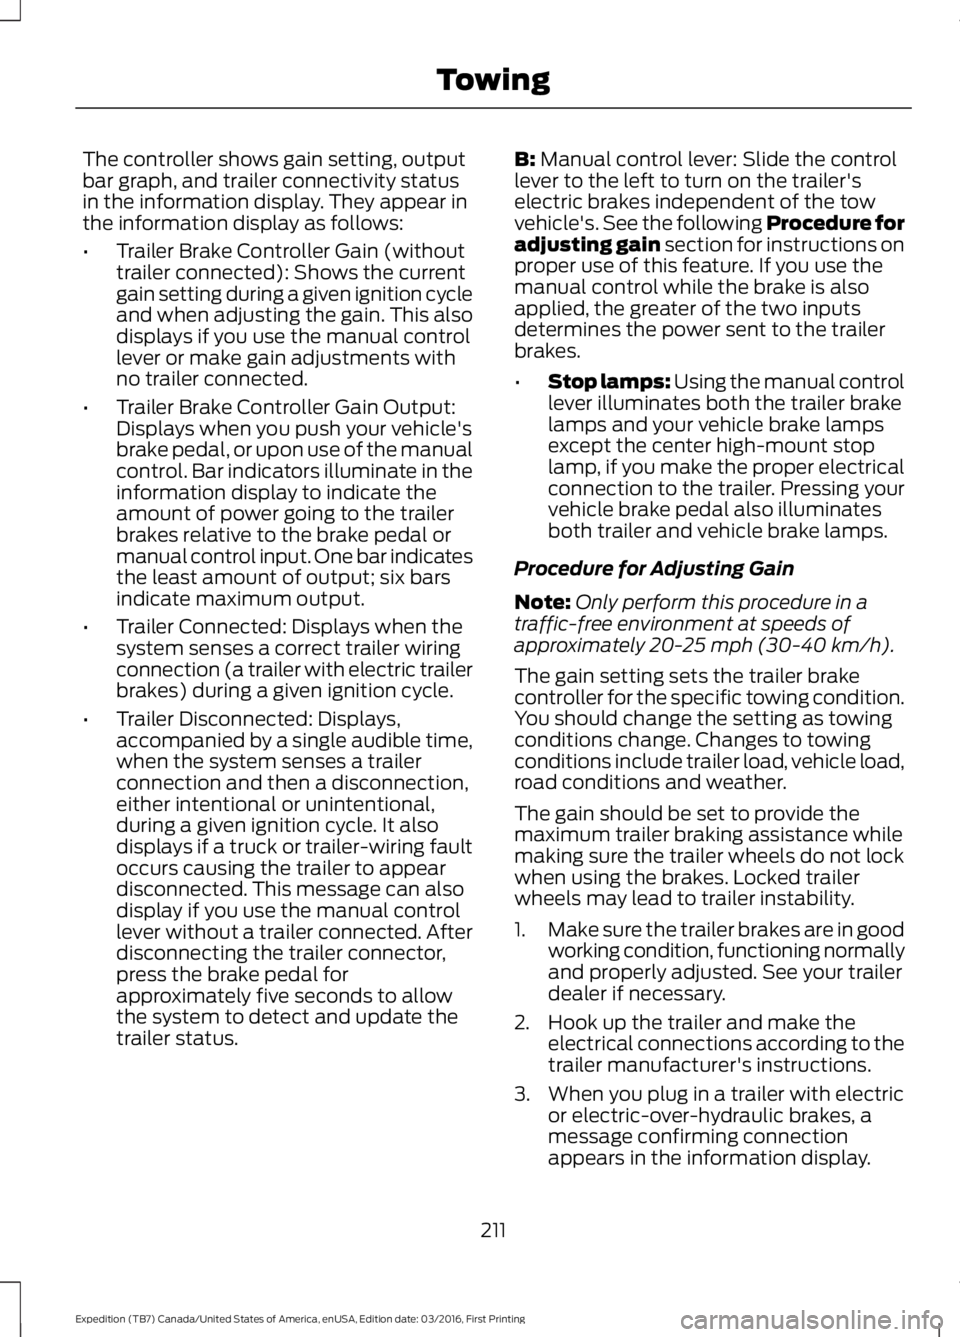
The controller user interface consists ofthe following:
A: + and - (Gain adjustment buttons):Pressing these buttons adjusts thecontroller's power output to the trailerbrakes in 0.5 increments. You can increasethe gain setting to 10.0 (maximum trailerbraking) or decrease it to 0 (no trailerbraking). The gain setting displays in themessage center.
210
Expedition (TB7) Canada/United States of America, enUSA, Edition date: 03/2016, First Printing
TowingE183395
Page 214 of 500
The controller shows gain setting, outputbar graph, and trailer connectivity statusin the information display. They appear inthe information display as follows:
•Trailer Brake Controller Gain (withouttrailer connected): Shows the currentgain setting during a given ignition cycleand when adjusting the gain. This alsodisplays if you use the manual controllever or make gain adjustments withno trailer connected.
•Trailer Brake Controller Gain Output:Displays when you push your vehicle'sbrake pedal, or upon use of the manualcontrol. Bar indicators illuminate in theinformation display to indicate theamount of power going to the trailerbrakes relative to the brake pedal ormanual control input. One bar indicatesthe least amount of output; six barsindicate maximum output.
•Trailer Connected: Displays when thesystem senses a correct trailer wiringconnection (a trailer with electric trailerbrakes) during a given ignition cycle.
•Trailer Disconnected: Displays,accompanied by a single audible time,when the system senses a trailerconnection and then a disconnection,either intentional or unintentional,during a given ignition cycle. It alsodisplays if a truck or trailer-wiring faultoccurs causing the trailer to appeardisconnected. This message can alsodisplay if you use the manual controllever without a trailer connected. Afterdisconnecting the trailer connector,press the brake pedal forapproximately five seconds to allowthe system to detect and update thetrailer status.
B: Manual control lever: Slide the controllever to the left to turn on the trailer'selectric brakes independent of the towvehicle's. See the following Procedure foradjusting gain section for instructions onproper use of this feature. If you use themanual control while the brake is alsoapplied, the greater of the two inputsdetermines the power sent to the trailerbrakes.
•Stop lamps: Using the manual controllever illuminates both the trailer brakelamps and your vehicle brake lampsexcept the center high-mount stoplamp, if you make the proper electricalconnection to the trailer. Pressing yourvehicle brake pedal also illuminatesboth trailer and vehicle brake lamps.
Procedure for Adjusting Gain
Note:Only perform this procedure in atraffic-free environment at speeds ofapproximately 20-25 mph (30-40 km/h).
The gain setting sets the trailer brakecontroller for the specific towing condition.You should change the setting as towingconditions change. Changes to towingconditions include trailer load, vehicle load,road conditions and weather.
The gain should be set to provide themaximum trailer braking assistance whilemaking sure the trailer wheels do not lockwhen using the brakes. Locked trailerwheels may lead to trailer instability.
1.Make sure the trailer brakes are in goodworking condition, functioning normallyand properly adjusted. See your trailerdealer if necessary.
2. Hook up the trailer and make theelectrical connections according to thetrailer manufacturer's instructions.
3. When you plug in a trailer with electricor electric-over-hydraulic brakes, amessage confirming connectionappears in the information display.
211
Expedition (TB7) Canada/United States of America, enUSA, Edition date: 03/2016, First Printing
Towing
Page 215 of 500
4. Use the gain adjustment (+ and -)buttons to increase or decrease thegain setting to the desired startingpoint. A gain setting of 6.0 is a goodstarting point for heavier loads.
5. In a traffic-free environment, tow thetrailer on a dry, level surface at a speedof 20-25 mph (30-40 km/h) andsqueeze the manual control levercompletely.
6. If the trailer wheels lock up, indicatedby squealing tires, reduce the gainsetting. If the trailer wheels turn freely,increase the gain setting. Repeat Steps5 and 6 until the gain setting is at apoint just below trailer wheel lock-up.If towing a heavier trailer, trailer wheellock-up may not be attainable evenwith the maximum gain setting of 10.
Explanation of Information DisplayWarning Messages
Note:An authorized dealer can diagnosethe trailer brake controller to determineexactly which trailer fault has occurred.However, your Ford warranty does not coverthis diagnosis if the fault is with the trailer.
A message indicating a trailer brakemodule fault may display in response tofaults sensed by the trailer brake controller,accompanied by a single tone. If thismessage appears, contact an authorizeddealer as soon as possible for diagnosisand repair. The controller may stillfunction, but performance may bedegraded.
A message indicating a trailer wiring faultmay display when there is a short circuiton the electric brake output wire. If thismessage displays, accompanied by asingle tone, with no trailer connected, theproblem is with your vehicle wiringbetween the trailer brake controller andthe 7-pin connector at the bumper. If themessage only displays with a trailerconnected, the problem is with the trailer
wiring. Consult your trailer dealer forassistance. This can be a short to ground(such as a chaffed wire), short to voltage(such as a pulled pin on trailer emergencybreakaway battery) or the trailer brakesmay be drawing too much current.
Points to Remember
Note:Do not attempt removal of the trailerbrake controller without consulting theWorkshop Manual. Damage to the unit mayresult.
•Adjust gain setting before using thetrailer brake controller for the first time.
•Adjust gain setting, using the procedureabove, whenever road, weather andtrailer or vehicle loading conditionschange from when the gain was initiallyset.
•Only use the manual control lever forproper adjustment of the gain duringtrailer setup. Misuse, such asapplication during trailer sway, couldcause instability of trailer or towvehicle.
•Avoid towing in adverse weatherconditions. The trailer brake controllerdoes not provide anti-lock control ofthe trailer wheels. Trailer wheels canlock up on slippery surfaces, resultingin reduced stability of trailer and towvehicle.
•The trailer brake controller is equippedwith a feature that reduces output atvehicle speeds below 11 mph (18 km/h)so trailer and vehicle braking is not jerkyor harsh. This feature is only availablewhen applying the brakes using yourvehicle's brake pedal, not thecontroller.
•The controller interacts with the brakecontrol system and powertrain controlsystem of your vehicle to provide thebest performance on different roadconditions.
212
Expedition (TB7) Canada/United States of America, enUSA, Edition date: 03/2016, First Printing
Towing
Page 216 of 500
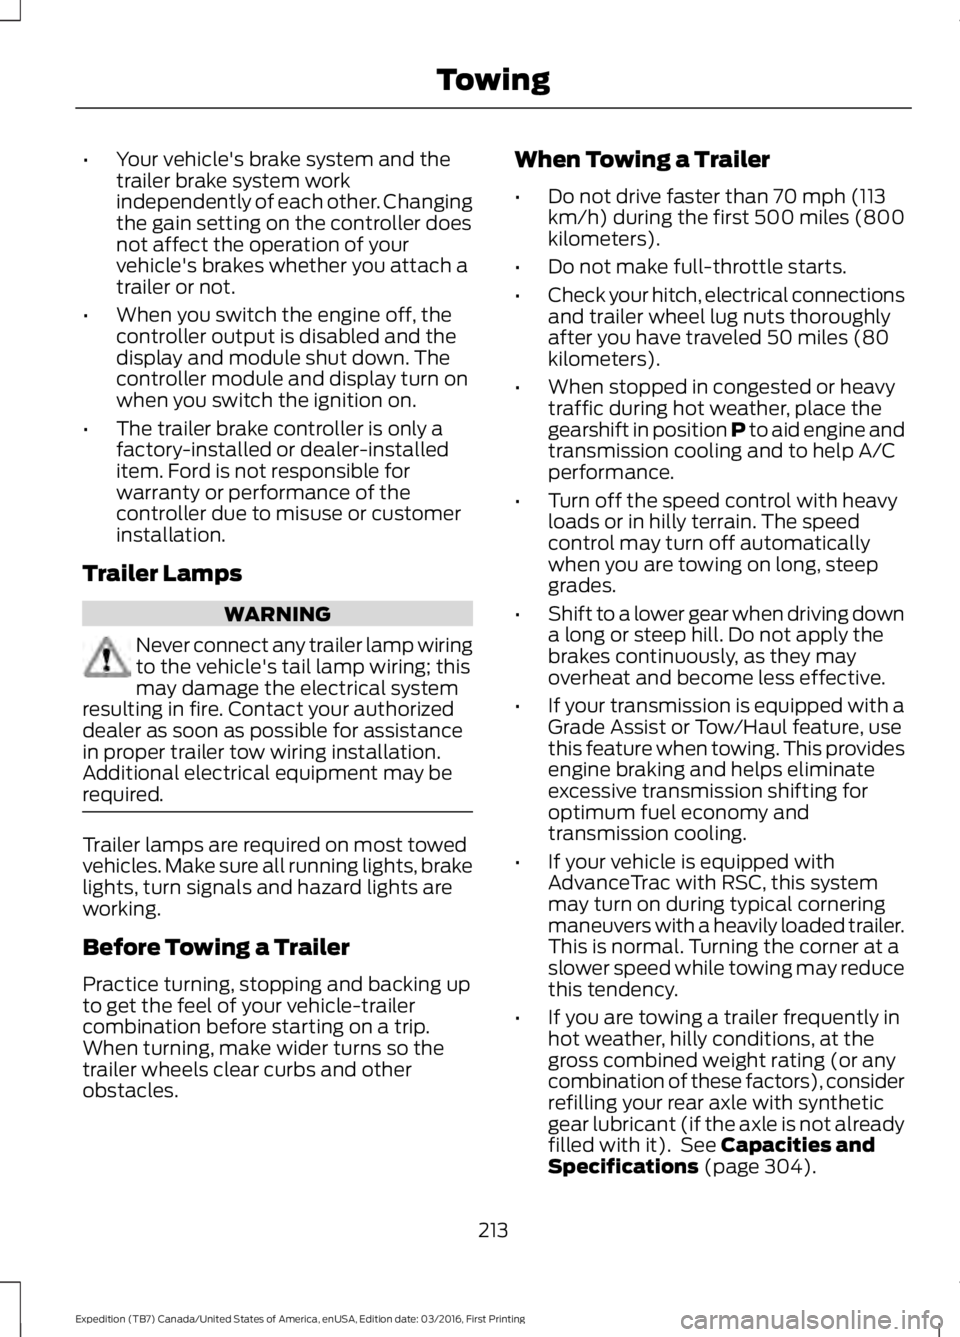
•Your vehicle's brake system and thetrailer brake system workindependently of each other. Changingthe gain setting on the controller doesnot affect the operation of yourvehicle's brakes whether you attach atrailer or not.
•When you switch the engine off, thecontroller output is disabled and thedisplay and module shut down. Thecontroller module and display turn onwhen you switch the ignition on.
•The trailer brake controller is only afactory-installed or dealer-installeditem. Ford is not responsible forwarranty or performance of thecontroller due to misuse or customerinstallation.
Trailer Lamps
WARNING
Never connect any trailer lamp wiringto the vehicle's tail lamp wiring; thismay damage the electrical systemresulting in fire. Contact your authorizeddealer as soon as possible for assistancein proper trailer tow wiring installation.Additional electrical equipment may berequired.
Trailer lamps are required on most towedvehicles. Make sure all running lights, brakelights, turn signals and hazard lights areworking.
Before Towing a Trailer
Practice turning, stopping and backing upto get the feel of your vehicle-trailercombination before starting on a trip.When turning, make wider turns so thetrailer wheels clear curbs and otherobstacles.
When Towing a Trailer
•Do not drive faster than 70 mph (113km/h) during the first 500 miles (800kilometers).
•Do not make full-throttle starts.
•Check your hitch, electrical connectionsand trailer wheel lug nuts thoroughlyafter you have traveled 50 miles (80kilometers).
•When stopped in congested or heavytraffic during hot weather, place thegearshift in position P to aid engine andtransmission cooling and to help A/Cperformance.
•Turn off the speed control with heavyloads or in hilly terrain. The speedcontrol may turn off automaticallywhen you are towing on long, steepgrades.
•Shift to a lower gear when driving downa long or steep hill. Do not apply thebrakes continuously, as they mayoverheat and become less effective.
•If your transmission is equipped with aGrade Assist or Tow/Haul feature, usethis feature when towing. This providesengine braking and helps eliminateexcessive transmission shifting foroptimum fuel economy andtransmission cooling.
•If your vehicle is equipped withAdvanceTrac with RSC, this systemmay turn on during typical corneringmaneuvers with a heavily loaded trailer.This is normal. Turning the corner at aslower speed while towing may reducethis tendency.
•If you are towing a trailer frequently inhot weather, hilly conditions, at thegross combined weight rating (or anycombination of these factors), considerrefilling your rear axle with syntheticgear lubricant (if the axle is not alreadyfilled with it). See Capacities andSpecifications (page 304).
213
Expedition (TB7) Canada/United States of America, enUSA, Edition date: 03/2016, First Printing
Towing
Page 219 of 500
Four Wheel Drive Vehicles
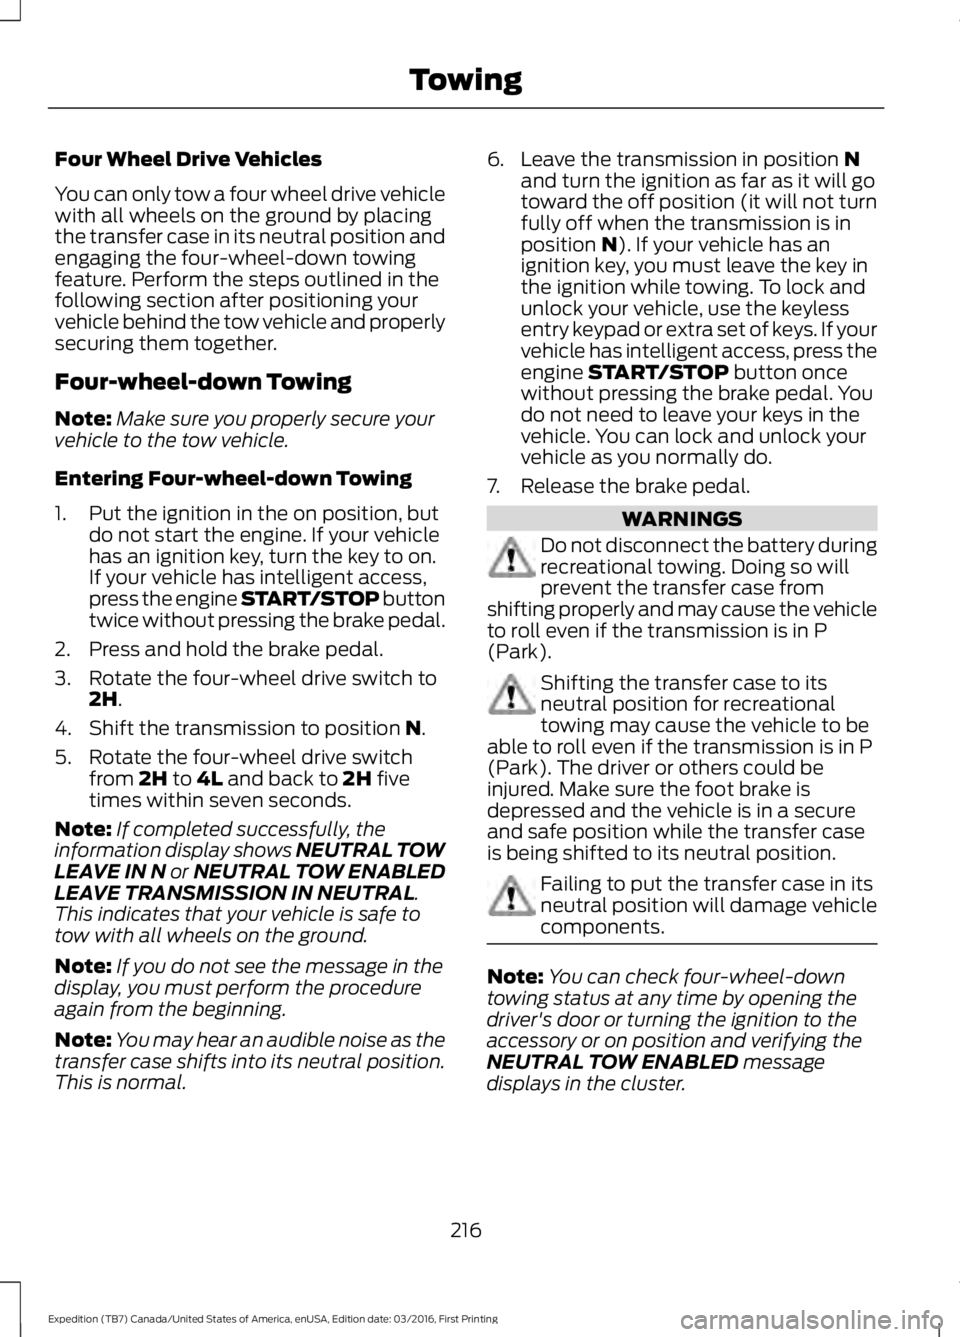
You can only tow a four wheel drive vehiclewith all wheels on the ground by placingthe transfer case in its neutral position andengaging the four-wheel-down towingfeature. Perform the steps outlined in thefollowing section after positioning yourvehicle behind the tow vehicle and properlysecuring them together.
Four-wheel-down Towing
Note:Make sure you properly secure yourvehicle to the tow vehicle.
Entering Four-wheel-down Towing
1. Put the ignition in the on position, butdo not start the engine. If your vehiclehas an ignition key, turn the key to on.If your vehicle has intelligent access,press the engine START/STOP buttontwice without pressing the brake pedal.
2. Press and hold the brake pedal.
3. Rotate the four-wheel drive switch to2H.
4. Shift the transmission to position N.
5. Rotate the four-wheel drive switchfrom 2H to 4L and back to 2H fivetimes within seven seconds.
Note:If completed successfully, theinformation display shows NEUTRAL TOWLEAVE IN N or NEUTRAL TOW ENABLEDLEAVE TRANSMISSION IN NEUTRAL.This indicates that your vehicle is safe totow with all wheels on the ground.
Note:If you do not see the message in thedisplay, you must perform the procedureagain from the beginning.
Note:You may hear an audible noise as thetransfer case shifts into its neutral position.This is normal.
6. Leave the transmission in position Nand turn the ignition as far as it will gotoward the off position (it will not turnfully off when the transmission is inposition N). If your vehicle has anignition key, you must leave the key inthe ignition while towing. To lock andunlock your vehicle, use the keylessentry keypad or extra set of keys. If yourvehicle has intelligent access, press theengine START/STOP button oncewithout pressing the brake pedal. Youdo not need to leave your keys in thevehicle. You can lock and unlock yourvehicle as you normally do.
7. Release the brake pedal.
WARNINGS
Do not disconnect the battery duringrecreational towing. Doing so willprevent the transfer case fromshifting properly and may cause the vehicleto roll even if the transmission is in P(Park).
Shifting the transfer case to itsneutral position for recreationaltowing may cause the vehicle to beable to roll even if the transmission is in P(Park). The driver or others could beinjured. Make sure the foot brake isdepressed and the vehicle is in a secureand safe position while the transfer caseis being shifted to its neutral position.
Failing to put the transfer case in itsneutral position will damage vehiclecomponents.
Note:You can check four-wheel-downtowing status at any time by opening thedriver's door or turning the ignition to theaccessory or on position and verifying theNEUTRAL TOW ENABLED messagedisplays in the cluster.
216
Expedition (TB7) Canada/United States of America, enUSA, Edition date: 03/2016, First Printing
Towing
Page 220 of 500
Exiting Four-wheel-down Towing
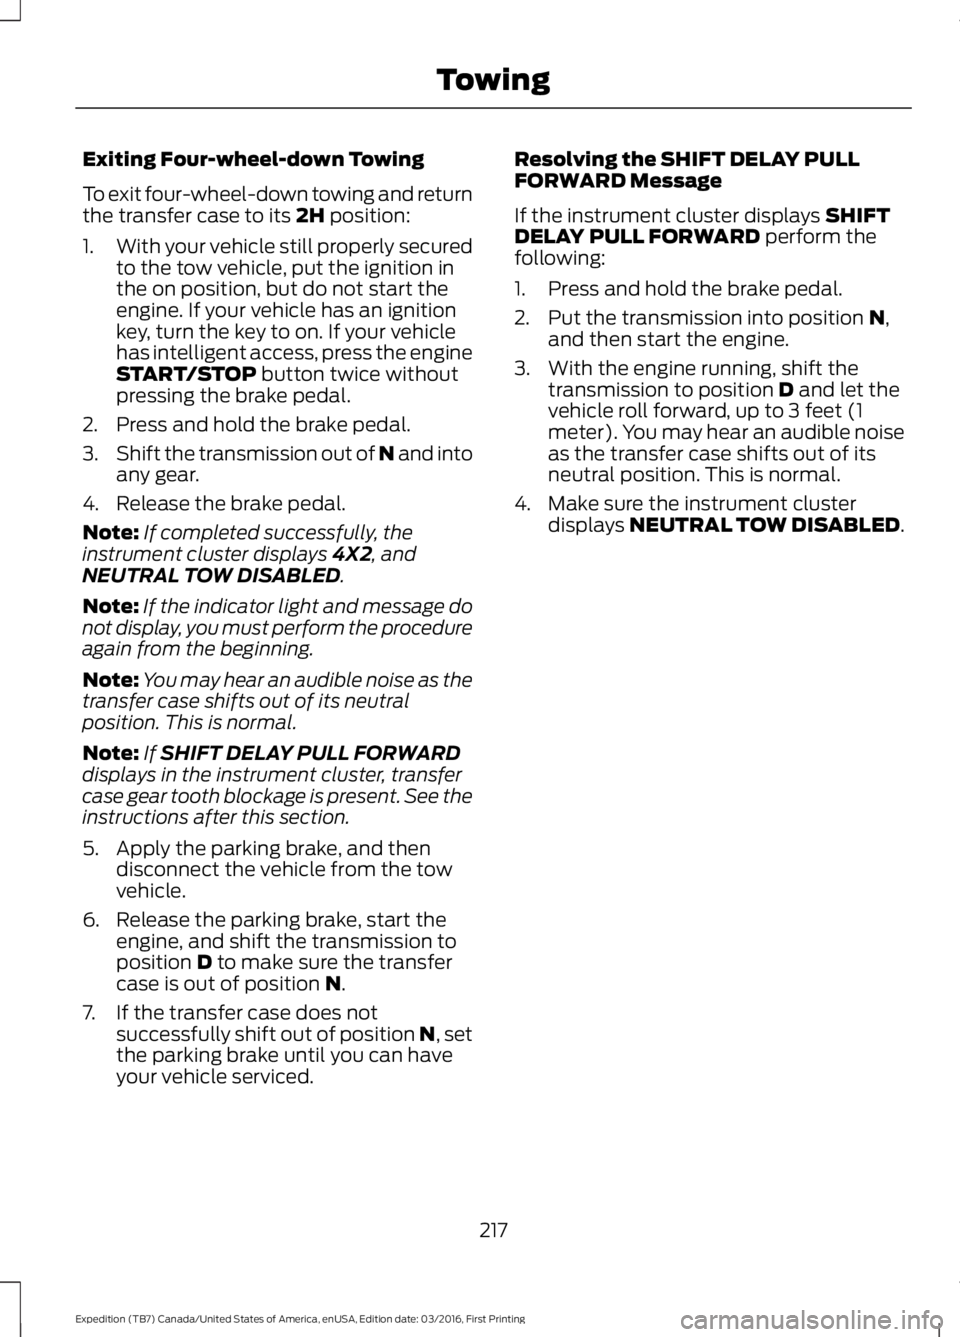
To exit four-wheel-down towing and returnthe transfer case to its 2H position:
1.With your vehicle still properly securedto the tow vehicle, put the ignition inthe on position, but do not start theengine. If your vehicle has an ignitionkey, turn the key to on. If your vehiclehas intelligent access, press the engineSTART/STOP button twice withoutpressing the brake pedal.
2. Press and hold the brake pedal.
3.Shift the transmission out of N and intoany gear.
4. Release the brake pedal.
Note:If completed successfully, theinstrument cluster displays 4X2, andNEUTRAL TOW DISABLED.
Note:If the indicator light and message donot display, you must perform the procedureagain from the beginning.
Note:You may hear an audible noise as thetransfer case shifts out of its neutralposition. This is normal.
Note:If SHIFT DELAY PULL FORWARDdisplays in the instrument cluster, transfercase gear tooth blockage is present. See theinstructions after this section.
5. Apply the parking brake, and thendisconnect the vehicle from the towvehicle.
6. Release the parking brake, start theengine, and shift the transmission toposition D to make sure the transfercase is out of position N.
7. If the transfer case does notsuccessfully shift out of position N, setthe parking brake until you can haveyour vehicle serviced.
Resolving the SHIFT DELAY PULLFORWARD Message
If the instrument cluster displays SHIFTDELAY PULL FORWARD perform thefollowing:
1. Press and hold the brake pedal.
2. Put the transmission into position N,and then start the engine.
3. With the engine running, shift thetransmission to position D and let thevehicle roll forward, up to 3 feet (1meter). You may hear an audible noiseas the transfer case shifts out of itsneutral position. This is normal.
4. Make sure the instrument clusterdisplays NEUTRAL TOW DISABLED.
217
Expedition (TB7) Canada/United States of America, enUSA, Edition date: 03/2016, First Printing
Towing
Page 242 of 500
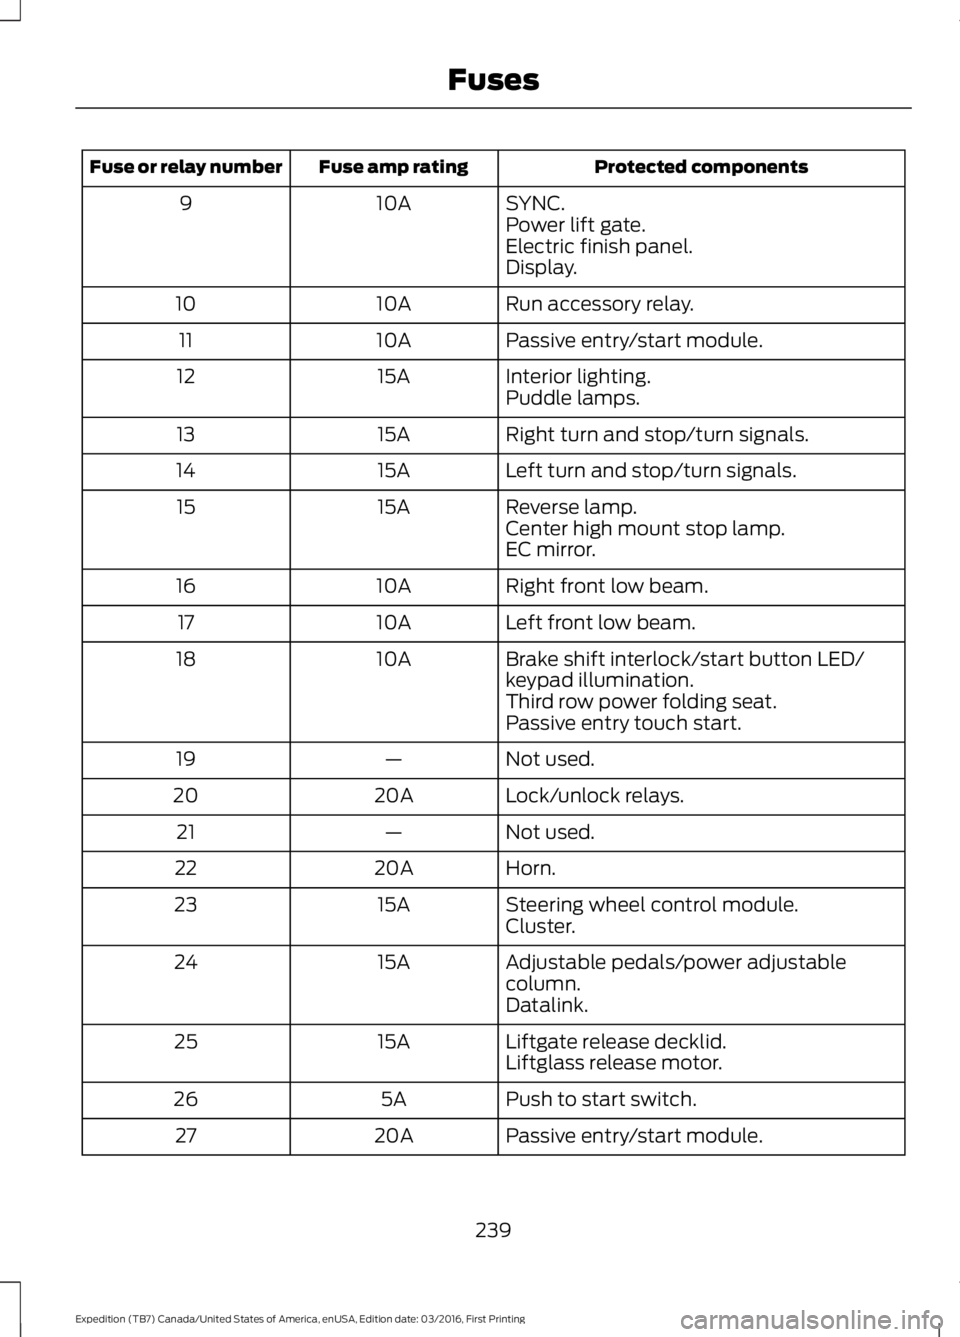
Protected componentsFuse amp ratingFuse or relay number
SYNC.10A9Power lift gate.Electric finish panel.Display.
Run accessory relay.10A10
Passive entry/start module.10A11
Interior lighting.15A12Puddle lamps.
Right turn and stop/turn signals.15A13
Left turn and stop/turn signals.15A14
Reverse lamp.15A15Center high mount stop lamp.EC mirror.
Right front low beam.10A16
Left front low beam.10A17
Brake shift interlock/start button LED/keypad illumination.10A18
Third row power folding seat.Passive entry touch start.
Not used.—19
Lock/unlock relays.20A20
Not used.—21
Horn.20A22
Steering wheel control module.15A23Cluster.
Adjustable pedals/power adjustablecolumn.15A24
Datalink.
Liftgate release decklid.15A25Liftglass release motor.
Push to start switch.5A26
Passive entry/start module.20A27
239
Expedition (TB7) Canada/United States of America, enUSA, Edition date: 03/2016, First Printing
Fuses