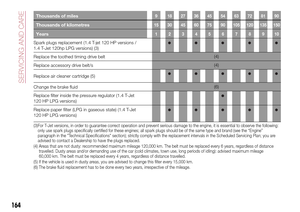
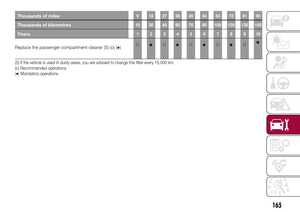
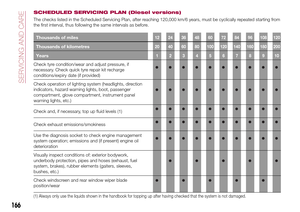
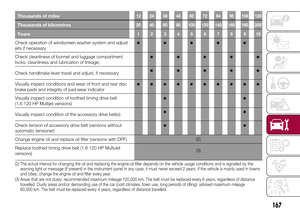
Page 17 of 264

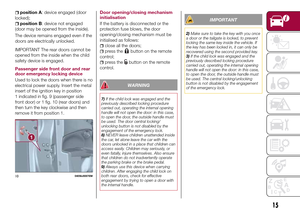
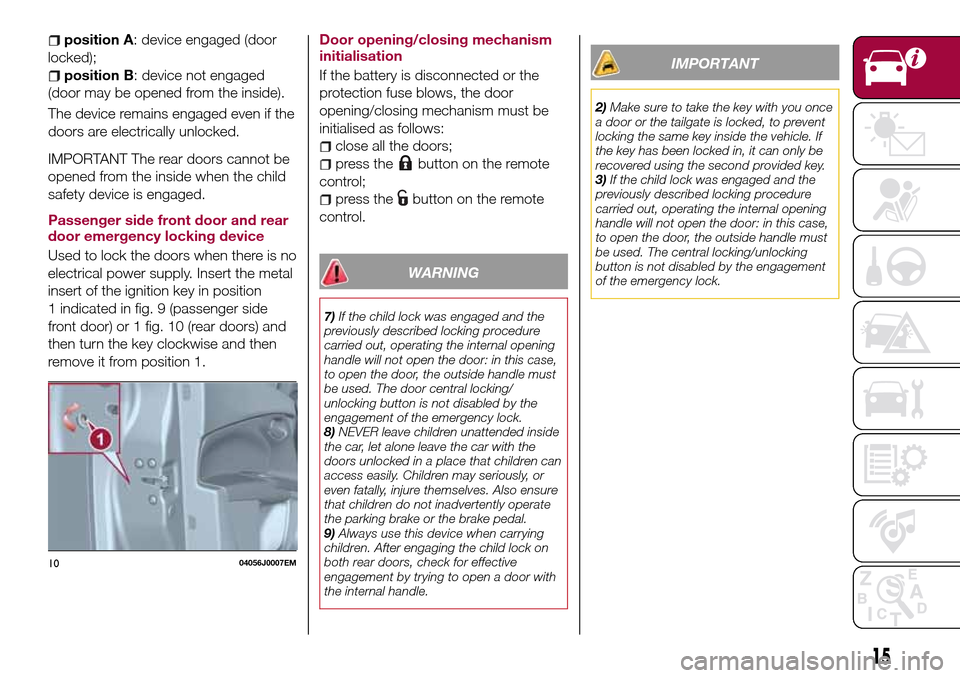
position A: device engaged (door
locked);
position B: device not engaged
(door may be opened from the inside).
The device remains engaged even if the
doors are electrically unlocked.
IMPORTANT The rear doors cannot be
opened from the inside when the child
safety device is engaged.
Passenger side front door and rear
door emergency locking device
Used to lock the doors when there is no
electrical power supply. Insert the metal
insert of the ignition key in position
1 indicated in fig. 9 (passenger side
front door) or 1 fig. 10 (rear doors) and
then turn the key clockwise and then
remove it from position 1.Door opening/closing mechanism
initialisation
If the battery is disconnected or the
protection fuse blows, the door
opening/closing mechanism must be
initialised as follows:
close all the doors;
press thebutton on the remote
control;
press thebutton on the remote
control.
WARNING
7)If the child lock was engaged and the
previously described locking procedure
carried out, operating the internal opening
handle will not open the door: in this case,
to open the door, the outside handle must
be used. The door central locking/
unlocking button is not disabled by the
engagement of the emergency lock.
8)NEVER leave children unattended inside
the car, let alone leave the car with the
doors unlocked in a place that children can
access easily. Children may seriously, or
even fatally, injure themselves. Also ensure
that children do not inadvertently operate
the parking brake or the brake pedal.
9)Always use this device when carrying
children. After engaging the child lock on
both rear doors, check for effective
engagement by trying to open a door with
the internal handle.
IMPORTANT
2)Make sure to take the key with you once
a door or the tailgate is locked, to prevent
locking the same key inside the vehicle. If
the key has been locked in, it can only be
recovered using the second provided key.
3)If the child lock was engaged and the
previously described locking procedure
carried out, operating the internal opening
handle will not open the door: in this case,
to open the door, the outside handle must
be used. The central locking/unlocking
button is not disabled by the engagement
of the emergency lock.
1004056J0007EM
15
Page 18 of 264

SEATS
The front seats can be adjusted so as
to ensure maximum comfort for the
occupants.
Driver seat adjustment must also be
carried out remembering that, keeping
the shoulders resting firmly against the
backrest, the wrists must be able to
reach the top of the steering wheel rim.
It must also be possible to fully depress
the clutch pedal with the left foot.
FRONT SEATS WITH
MANUAL ADJUSTMENT
10)
4)
Longitudinal adjustment
Lift lever 1 fig. 11 and push the seat
forwards or backwards.
11)
IMPORTANT Carry out the adjustment
while sitting on the seat involved (driver
side or passenger side).
Height adjustment
(where provided)
Move lever 2 upwards or downwards to
achieve the required height.
IMPORTANT Carry out the adjustment
while sitting on the seat involved (driver
side or passenger side).
Backrest angle adjustment
Pull lever 3 and accompanying the
backrest with the movement of your
torso (operate the lever until the desired
position is reached, then release it).
Electric lumbar adjustment
(where provided)
When the ignition device is at MAR,
press button 1 fig. 12 to adjust the
lumbar area support, until the maximum
driving comfort is achieved.FRONT SEAT ELECTRIC
HEATING
(where provided)
13) 14)
With ignition device in the MAR
position, press buttons
fig. 13 on the
dashboard.
After selecting seat heating, you need
to wait for two to five minutes until the
effect is noticed.
11P2000013-000-000
12P2000012-000-000
13P2000018-000-000
16
KNOWING YOUR CAR
Page 19 of 264

IMPORTANT To preserve the battery
charge, this function cannot be
activated when the engine is off.
REAR SEATS
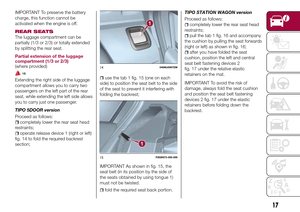
The luggage compartment can be
partially (1/3 or 2/3) or totally extended
by splitting the rear seat.
Partial extension of the luggage
compartment (1/3 or 2/3)
(where provided)
12)
Extending the right side of the luggage
compartment allows you to carry two
passengers on the left part of the rear
seat, while extending the left side allows
you to carry just one passenger.
TIPO 5DOOR version
Proceed as follows:
completely lower the rear seat head
restraints;
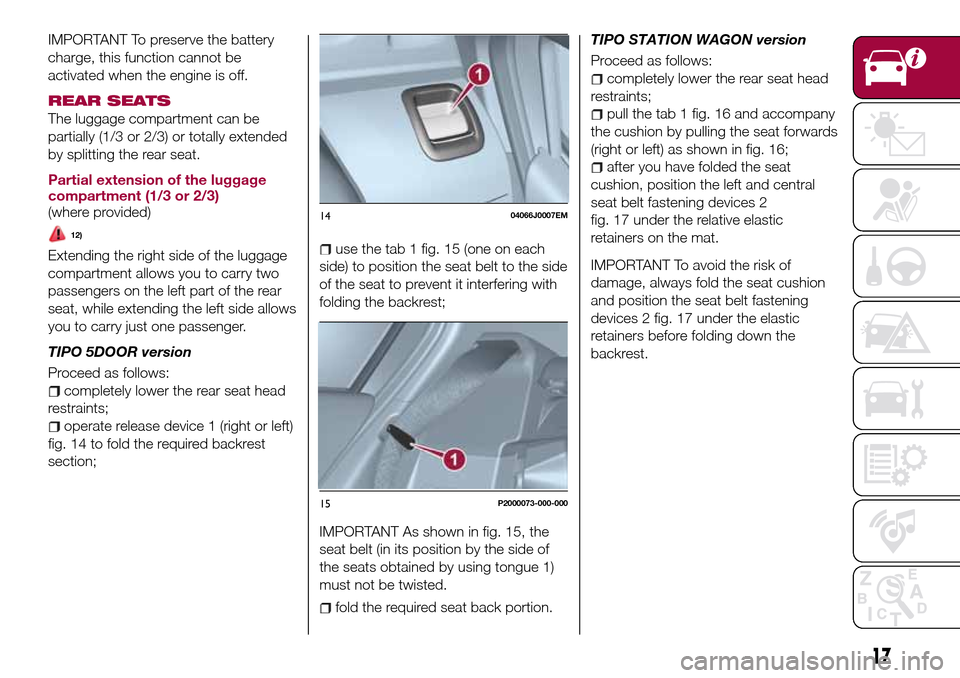
operate release device 1 (right or left)
fig. 14 to fold the required backrest
section;
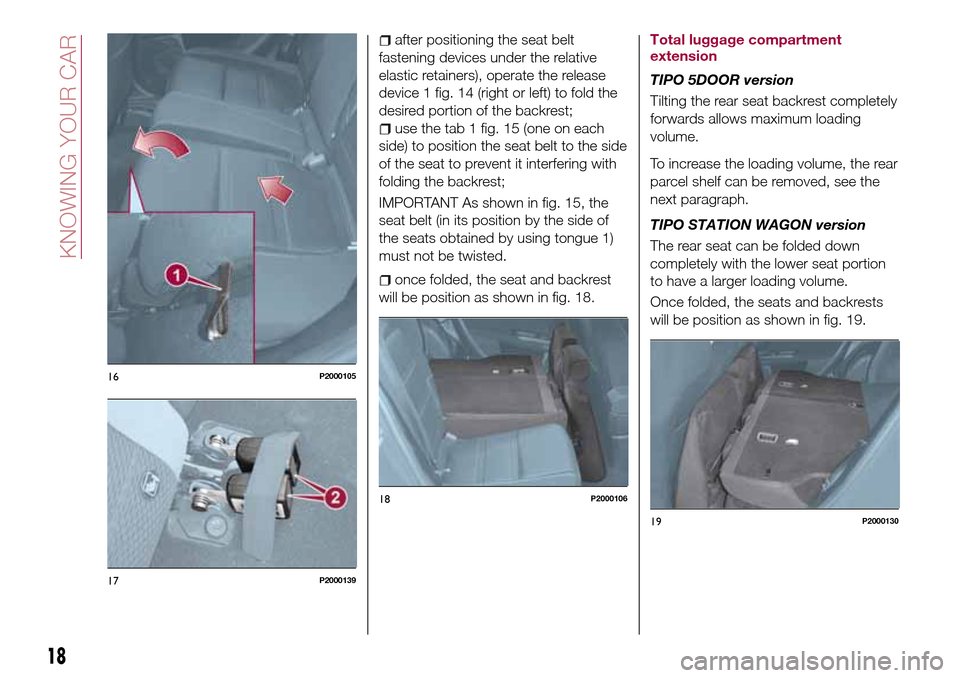
use the tab 1 fig. 15 (one on each
side) to position the seat belt to the side
of the seat to prevent it interfering with
folding the backrest;
IMPORTANT As shown in fig. 15, the
seat belt (in its position by the side of
the seats obtained by using tongue 1)
must not be twisted.
fold the required seat back portion.TIPO STATION WAGON version
Proceed as follows:
completely lower the rear seat head
restraints;
pull the tab 1 fig. 16 and accompany
the cushion by pulling the seat forwards
(right or left) as shown in fig. 16;
after you have folded the seat
cushion, position the left and central
seat belt fastening devices 2
fig. 17 under the relative elastic
retainers on the mat.
IMPORTANT To avoid the risk of
damage, always fold the seat cushion
and position the seat belt fastening
devices 2 fig. 17 under the elastic
retainers before folding down the
backrest.
1404066J0007EM
15P2000073-000-000
17
Page 20 of 264

after positioning the seat belt
fastening devices under the relative
elastic retainers), operate the release
device 1 fig. 14 (right or left) to fold the
desired portion of the backrest;
use the tab 1 fig. 15 (one on each
side) to position the seat belt to the side
of the seat to prevent it interfering with
folding the backrest;
IMPORTANT As shown in fig. 15, the
seat belt (in its position by the side of
the seats obtained by using tongue 1)
must not be twisted.
once folded, the seat and backrest
will be position as shown in fig. 18.Total luggage compartment
extension
TIPO 5DOOR version
Tilting the rear seat backrest completely
forwards allows maximum loading
volume.
To increase the loading volume, the rear
parcel shelf can be removed, see the
next paragraph.
TIPO STATION WAGON version
The rear seat can be folded down
completely with the lower seat portion
to have a larger loading volume.
Once folded, the seats and backrests
will be position as shown in fig. 19.
16P2000105
17P2000139
18P2000106
19P2000130
18
KNOWING YOUR CAR
Page 21 of 264

Removing the rear parcel shelf
(TIPO 5DOOR version)
To remove the parcel shelf, proceed as
follows:
open the tailgate and unhook the two
side cords (one on each side) from their
supports;
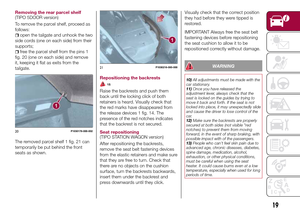
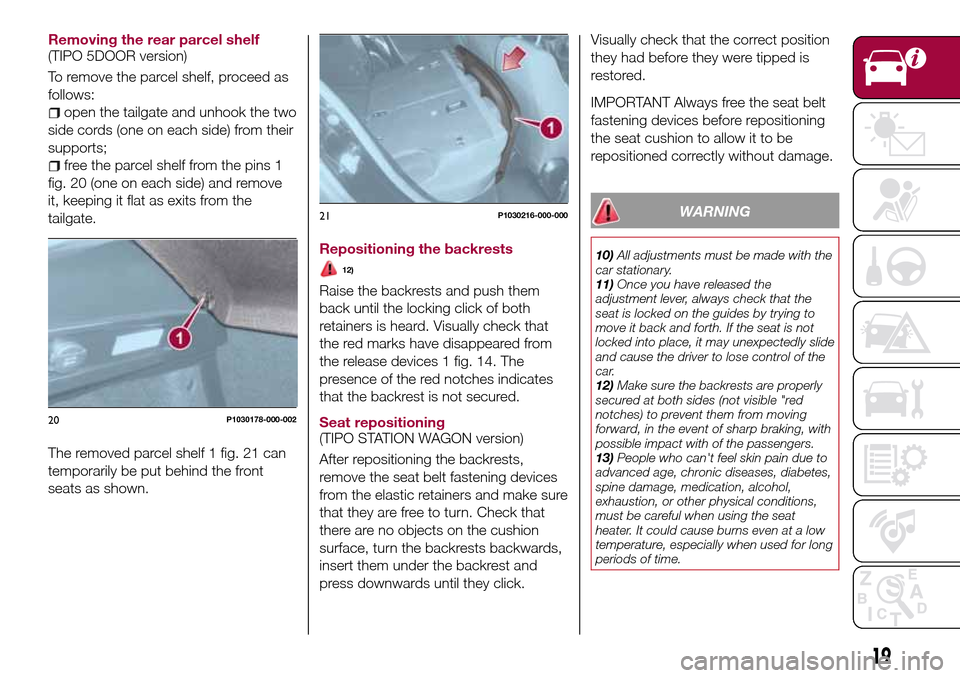
free the parcel shelf from the pins 1
fig. 20 (one on each side) and remove
it, keeping it flat as exits from the
tailgate.
The removed parcel shelf 1 fig. 21 can
temporarily be put behind the front
seats as shown.
Repositioning the backrests
12)
Raise the backrests and push them
back until the locking click of both
retainers is heard. Visually check that
the red marks have disappeared from
the release devices 1 fig. 14. The
presence of the red notches indicates
that the backrest is not secured.
Seat repositioning
(TIPO STATION WAGON version)
After repositioning the backrests,
remove the seat belt fastening devices
from the elastic retainers and make sure
that they are free to turn. Check that
there are no objects on the cushion
surface, turn the backrests backwards,
insert them under the backrest and
press downwards until they click.Visually check that the correct position
they had before they were tipped is
restored.
IMPORTANT Always free the seat belt
fastening devices before repositioning
the seat cushion to allow it to be
repositioned correctly without damage.
WARNING
10)All adjustments must be made with the
car stationary.
11)Once you have released the
adjustment lever, always check that the
seat is locked on the guides by trying to
move it back and forth. If the seat is not
locked into place, it may unexpectedly slide
and cause the driver to lose control of the
car.
12)Make sure the backrests are properly
secured at both sides (not visible "red
notches) to prevent them from moving
forward, in the event of sharp braking, with
possible impact with of the passengers.
13)People who can't feel skin pain due to
advanced age, chronic diseases, diabetes,
spine damage, medication, alcohol,
exhaustion, or other physical conditions,
must be careful when using the seat
heater. It could cause burns even at a low
temperature, especially when used for long
periods of time.
20P1030178-000-002
21P1030216-000-000
19
Page 22 of 264

14)Do not place objects on the seat or on
the backrest that may isolate the heat,
such as a cover or a pillow. It may cause
the seat heating device to overheat. Sitting
on an overheated seat may cause severe
burns due to the increase in temperature of
the seat surface.
IMPORTANT
4)The fabric upholstery of the seats has
been designed to withstand long-term wear
deriving from normal use of the car. Some
precautions are however required. Avoid
prolonged and/or excessive rubbing
against clothing accessories such as metal
buckles and Velcro strips which, by
applying a high pressure on the fabric in a
small area, could cause it to break, thereby
damaging the upholstery.
HEAD RESTRAINTS
15)
FRONT HEAD
RESTRAINTS
Adjustment
They can be adjusted to 4 height
positions (completely raised /
2 intermediate positions / completely
lowered).
Upward adjustment: raise the head
restraint until it clicks into place.
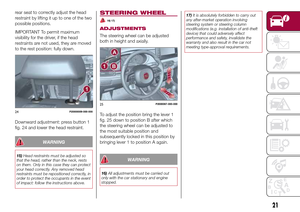
Downward adjustment: press button 1
fig. 22 and lower the head restraint.
Removal
Proceed as follows to remove the head
restraint:
tilt the backrest (to prevent it from
coming into contact with the roof);
press both buttons 1 and 2 fig. 22 at
the side of the two supports, thenremove the head restraint.
IMPORTANT Always reposition the
head restraints if they have been
removed before starting to drive
normally.
REAR HEAD RESTRAINTS
Adjustment
Two side and one central head
restraints (where present) can be
height-adjusted to 3 positions
(completely raised / intermediate /
completely lowered) are provided for
the rear seats
Upward adjustment: raise the head
restraint until it clicks into place.
Travelling with the head restraints in the
not-in-use position (all low) occupied
rear seats is not advised.
On some versions, the label shown in
fig. 23 reminds the passenger using the
2204076J0001EM
2304076J0002EM
20
KNOWING YOUR CAR
Page 23 of 264

rear seat to correctly adjust the head
restraint by lifting it up to one of the two
possible positions.
IMPORTANT To permit maximum
visibility for the driver, if the head
restraints are not used, they are moved
to the rest position: fully down.
Downward adjustment: press button 1
fig. 24 and lower the head restraint.
WARNING
15)Head restraints must be adjusted so
that the head, rather than the neck, rests
on them. Only in this case they can protect
your head correctly. Any removed head
restraints must be repositioned correctly, in
order to protect the occupants in the event
of impact: follow the instructions above.
STEERING WHEEL
16) 17)
ADJUSTMENTS
The steering wheel can be adjusted
both in height and axially.
To adjust the position bring the lever 1
fig. 25 down to position B after which
the steering wheel can be adjusted to
the most suitable position and
subsequently locked in this position by
bringing lever 1 to position A again.
WARNING
16)All adjustments must be carried out
only with the car stationary and engine
stopped.17)It is absolutely forbidden to carry out
any after-market operation involving
steering system or steering column
modifications (e.g. installation of anti-theft
device) that could adversely affect
performance and safety, invalidate the
warranty and also result in the car not
meeting type-approval requirements.
24P20000009-000-000
25P2000087-000-000
21
Page 24 of 264

REAR VIEW
MIRRORS
INTERIOR MIRROR
Manual adjustment
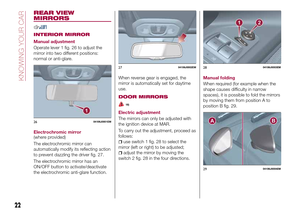
Operate lever 1 fig. 26 to adjust the
mirror into two different positions:
normal or anti-glare.
Electrochromic mirror
(where provided)
The electrochromic mirror can
automatically modify its reflecting action
to prevent dazzling the driver fig. 27.
The electrochromic mirror has an
ON/OFF button to activate/deactivate
the electrochromic anti-glare function.When reverse gear is engaged, the
mirror is automatically set for daytime
use.
DOOR MIRRORS
18)
Electric adjustment
The mirrors can only be adjusted with
the ignition device at MAR.
To carry out the adjustment, proceed as
follows:
use switch 1 fig. 28 to select the
mirror (left or right) to be adjusted;
adjust the mirror by moving the
switch 2 fig. 28 in the four directions.Manual folding
When required (for example when the
shape causes difficulty in narrow
spaces), it is possible to fold the mirrors
by moving them from position A to
position B fig. 29.
2604106J0001EM
2704106J0002EM2804106J0003EM
2904106J0004EM
22
KNOWING YOUR CAR