Page 169 of 272

vehicle 12V socket. Remove the cap from the
valve of repaired tyre, disconnect and pull out the
black inflation tube fig. 154, connect it to the
valve and lock it with the lever. Inspect the
pressure gauge F to check the tyre pressure
fig. 153;
if the pressure indicated is lower than 1.8 bar / 26
psi, the TYRE IS TOO DAMAGED AND
CANNOT BE REPAIRED. Remove and place the
kit in the specific compartment and contact a Fiat
Dealership;
if the pressure indicated is equal to or higher than
1.8 bar / 26 psi, switch on the compressor and
reach the required pressure. Disconnect and
replace the kit in the specific compartment.
Carefully drive and reach the Fiat Dealership as
soon as possible;PRESSURE RESTORING
The compressor can also be used to check and, if
necessary, restore the tyre pressure. Disconnect and
pull out the black inflation tube, connect and block
it to the tyre valve fig. 154 with the lever. With
the same procedure it is possible to inflate bicycle
tyres and balloons. The kit should be used by adults
and cannot be used by children.
CARTRIDGE REPLACEMENT
Only use Fix&Go original cartridges which can be
purchased at Fiat Dealership. To remove the
cartridge, disengage the coupling of the black
inflation tube B fig. 155, rotate the cartridge
anticlockwise and then lift it; insert the new
cartridge, rotate it clockwise to end of travel
position, insert the coupling of the black inflation
tube blocking it with the stalk and then rewind the
transparent tube A in the compressor site.
fig. 153F0T0131fig. 154F0T0192
165
KNOWING YOUR
VEHICLE
SAFETY
STARTING AND
DRIVING
WARNING LIGHTS
AND MESSAGES
IN AN
EMERGENCY
SERVICING AND
CARE
TECHNICAL DATA
INDEX
Page 170 of 272

CHANGING A BULB
GENERAL INSTRUCTIONS
Before changing a bulb check the contacts for
oxidation;
burnt bulbs must be replaced by others of the
same type and power;
always check the height of the headlight beam
after changing a bulb, for reasons of safety;
when a light is not working, check that the
corresponding fuse is intact before changing the
bulb. For the location of fuses, refer to the
“Changing a fuse” paragraph in this section;
WARNING
Modifications or repairs to the electrical
system that are not carried out
properly or do not take the system's technical
specifications into account can cause
malfunctions leading to the risk of fire.
WARNING
Halogen bulbs contain pressurised gas
which may cause small fragments of
glass to be projected outwards if the bulb is
broken.
Halogen bulbs must be handled holding
the metallic part only.Touching the
transparent part of the bulb with your
fingers may reduce the intensity of the emitted
light and even reduce the lifespan of the bulb.
If you do touch it accidentally, rub the bulb with
an alcohol-soaked cloth and leave to dry.
If possible, we recommend have bulbs
replaced by a Fiat Dealership. Proper
operation and orientation of the external
lights are essential for the safety of the running
vehicle, and to avoid incurring legal sanctions.
fig. 155F0T0132
166
KNOWING YOUR
VEHICLE
SAFETY
STARTING AND
DRIVING
WARNING LIGHTS
AND MESSAGES
IN AN
EMERGENCY
SERVICING AND
CARE
TECHNICAL DATA
INDEX
Page 171 of 272
IMPORTANT The internal surface of the light may
appear slightly misty: this does not indicate a fault,
and is actually caused by low temperature and the
degree of humidity in the air. Misting will rapidly
disappear when the headlights are switched on. The
presence of drops inside the headlights indicates
infiltration of water. Go to a Fiat Dealership.
167
KNOWING YOUR
VEHICLE
SAFETY
STARTING AND
DRIVING
WARNING LIGHTS
AND MESSAGES
IN AN
EMERGENCY
SERVICING AND
CARE
TECHNICAL DATA
INDEX
Page 172 of 272
TYPES OF BULBS
Various types of bulbs are fitted to your car:
Glass bulbs:(type A) clipped into position. Pull to remove.
Bayonet bulbs:(type B) press the bulb and turn
anticlockwise to extract.
Tubular bulbs:(type C) release them from their contacts
to remove.
Halogen bulbs:(type D) to remove the bulb, release the
clip holding the bulb in place.
Halogen bulbs:(type E) to remove the bulb, release the
clip holding the bulb in place.
Xenon gas discharge lamps:(type F) go to a Fiat
Dealership for replacement.
168
KNOWING YOUR
VEHICLE
SAFETY
STARTING AND
DRIVING
WARNING LIGHTS
AND MESSAGES
IN AN
EMERGENCY
SERVICING AND
CARE
TECHNICAL DATA
INDEX
Page 173 of 272
Bulbs
Bulbs Type Power Figure ref.
Main beams H4 55W E
Dipped beams H4 60W D
Front side lights W5W 5W A
Front direction indicators PY21W 2IW B
Side direction indicators WY5W 5W A
Rear direction indicators PY2IW 21W B
Tail lights/rear fog lights P4/21W 4W/21W B
Brake light P21W 21W B
Number plate W5W 5W C
3rd brake light
(*)W5W 5W A
Reverse light P21W 21W B
Front fog lights (for versions/markets where
provided)H1 55W E
Front ceiling light with movable lens C 10W C
Front ceiling light with spot lights (for
versions/markets, where provided)C 10W C
Rear ceiling light (for versions/markets,
where provided)C 10W C
(*)IMPORTANT For versions/markets, where provided, in versions with tinted windows, replace the whole light unit, since it is sealed.
169
KNOWING YOUR
VEHICLE
SAFETY
STARTING AND
DRIVING
WARNING LIGHTS
AND MESSAGES
IN AN
EMERGENCY
SERVICING AND
CARE
TECHNICAL DATA
INDEX
Page 174 of 272

CHANGING AN EXTERIOR BULB
For the type of bulb and corresponding power rating,
see the paragraph "Changing a bulb".
FRONT LIGHT CLUSTERS
The front light clusters fig. 156 contain sidelight,
dipped beam, main beam and direction indicator
bulbs.
The bulbs are arranged inside the light cluster as
follows:
A Side lights/tail lights and main/dipped beam
headlights;
B Direction indicators.
SIDE LIGHTS - TAIL LIGHTS
To change the bulb, proceed as follows:
remove the protective lid A fig. 156;
turn the bulb holder A fig. 157 anticlockwise and
remove it;
remove the bulb B and replace it;
refit the new bulb, insert the bulb holder A
fig. 157 again and then refit the protective lid A
fig. 156 correctly.
DIPPED/MAIN BEAM HEADLIGHTS
To change the bulb (double filament), proceed as
follows:
remove the protective lid A fig. 156;
release the bulb holder clip;
remove the bulb A fig. 158 from connector B and
replace it;
refit the new bulb by inserting it on connector B
and then make the contour of the metallic part
mate with the grooves obtained on the headlight
parabola;
fig. 156F0T0093fig. 157F0T0094
170
KNOWING YOUR
VEHICLE
SAFETY
STARTING AND
DRIVING
WARNING LIGHTS
AND MESSAGES
IN AN
EMERGENCY
SERVICING AND
CARE
TECHNICAL DATA
INDEX
Page 175 of 272
refit the bulb holder clip and refit the protective
lid A fig. 156 correctly.
DIRECTION INDICATORS
Front
To change the bulb, proceed as follows:
turn the protective lid B fig. 156 anticlockwise;
remove the bulb A fig. 159 and replace it;
refit the protective lid B correctly.
Side lights
To change the bulb, proceed as follows:
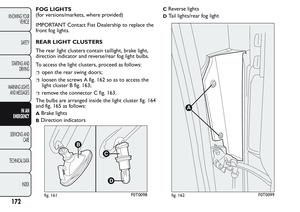
operate the lens A fig. 160 to press in the internal
catch B fig. 161, then pull the unit outwards;
turn the bulb holder C anti-clockwise, extract
bulb D and replace it;
refit the bulb holder C in the lens and turn it
clockwise;
refit the unit making sure that the internal catch B
clips into position.
fig. 158F0T0095
fig. 159F0T0096
fig. 160F0T0097
171
KNOWING YOUR
VEHICLE
SAFETY
STARTING AND
DRIVING
WARNING LIGHTS
AND MESSAGES
IN AN
EMERGENCY
SERVICING AND
CARE
TECHNICAL DATA
INDEX
Page 176 of 272
FOG LIGHTS
(for versions/markets, where provided)
IMPORTANT Contact Fiat Dealership to replace the
front fog lights.
REAR LIGHT CLUSTERS
The rear light clusters contain taillight, brake light,
direction indicator and reverse/rear fog light bulbs.
To access the light clusters, proceed as follows:
open the rear swing doors;
loosen the screws A fig. 162 so as to access the
light cluster B fig. 163;
remove the connector C fig. 163.
The bulbs are arranged inside the light cluster fig. 164
and fig. 165 as follows:
ABrake lights
BDirection indicators
CReverse lights
DTail lights/rear fog light
fig. 161F0T0098fig. 162F0T0099
172
KNOWING YOUR
VEHICLE
SAFETY
STARTING AND
DRIVING
WARNING LIGHTS
AND MESSAGES
IN AN
EMERGENCY
SERVICING AND
CARE
TECHNICAL DATA
INDEX