2017 FIAT 124 SPIDER lock
[x] Cancel search: lockPage 70 of 300
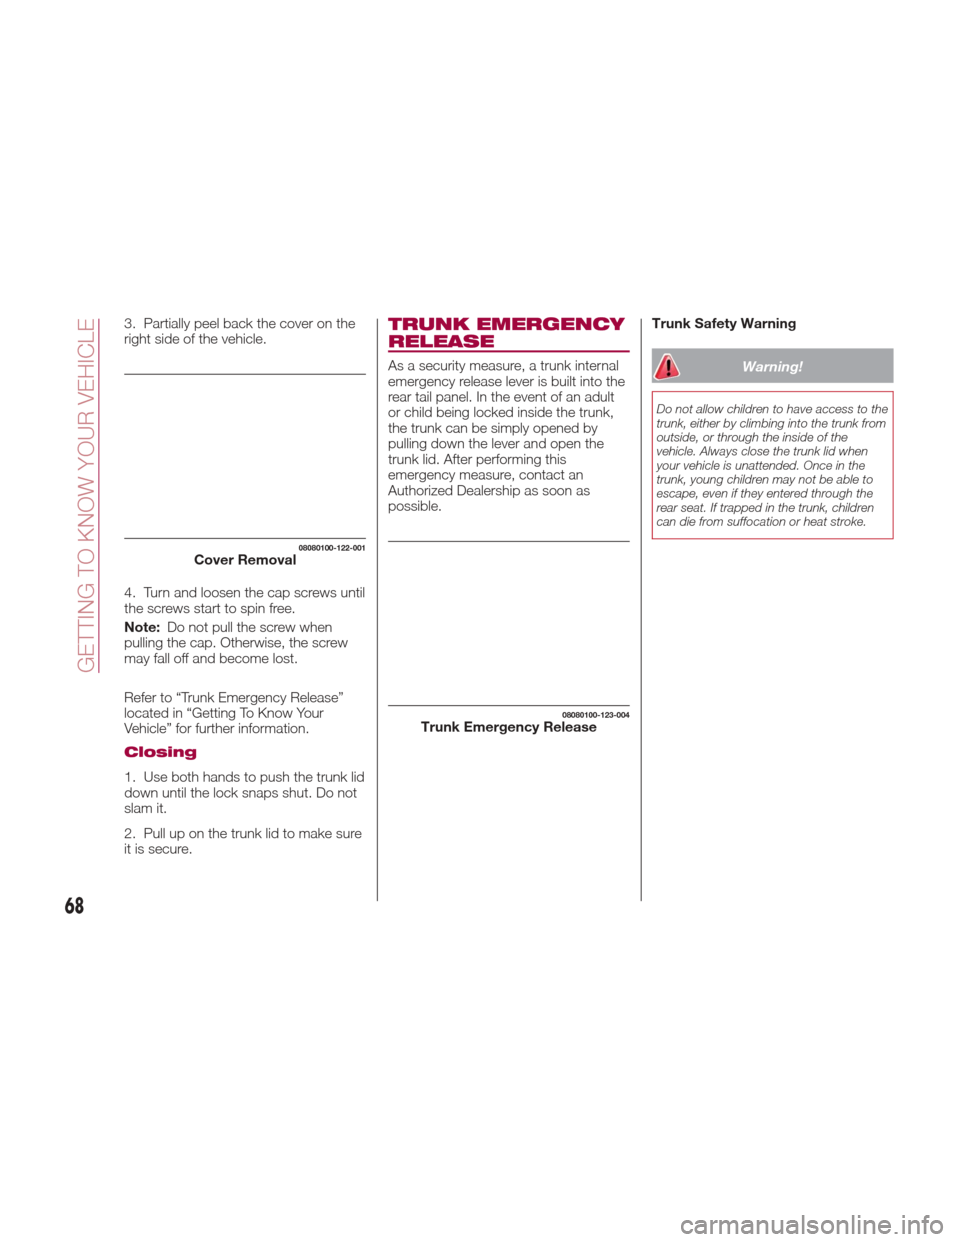
3. Partially peel back the cover on the
right side of the vehicle.
4. Turn and loosen the cap screws until
the screws start to spin free.
Note:Do not pull the screw when
pulling the cap. Otherwise, the screw
may fall off and become lost.
Refer to “Trunk Emergency Release”
located in “Getting To Know Your
Vehicle” for further information.
Closing
1. Use both hands to push the trunk lid
down until the lock snaps shut. Do not
slam it.
2. Pull up on the trunk lid to make sure
it is secure.
TRUNK EMERGENCY
RELEASE
As a security measure, a trunk internal
emergency release lever is built into the
rear tail panel. In the event of an adult
or child being locked inside the trunk,
the trunk can be simply opened by
pulling down the lever and open the
trunk lid. After performing this
emergency measure, contact an
Authorized Dealership as soon as
possible. Trunk Safety WarningWarning!
Do not allow children to have access to the
trunk, either by climbing into the trunk from
outside, or through the inside of the
vehicle. Always close the trunk lid when
your vehicle is unattended. Once in the
trunk, young children may not be able to
escape, even if they entered through the
rear seat. If trapped in the trunk, children
can die from suffocation or heat stroke.
08080100-122-001Cover Removal
08080100-123-004Trunk Emergency Release
68
GETTING TO KNOW YOUR VEHICLE
Page 72 of 300
3. Lower the hood slowly to a height of
about 8 in (20 cm) above its closed
position and then let it drop.
Warning!
Be sure the hood is fully latched before
driving your vehicle. If the hood is not fully
latched, it could open when the vehicle is
in motion and block your vision. Failure to
follow this warning could result in serious
injury or death.
Caution!
To prevent possible damage, do not slam
the hood to close it. Lower hood to
approximately 8 in (20 cm) and drop the
hood to close. Make sure hood is fully
closed for both latches. Never drive vehicle
unless hood is fully closed, with both
latches engaged.
CONVERTIBLE TOP
(SOFT TOP)
Lowering The
Convertible Top
Warning!
Do not sit on the folded convertible top,
otherwise the convertible top could be
damaged or you may fall off and be injured.
Proceed as follows:
1. Make sure the parking brake is
applied and the engine is off.
2. Make sure there are no objects
which have been placed in the area
where the convertible top is to be
retracted.
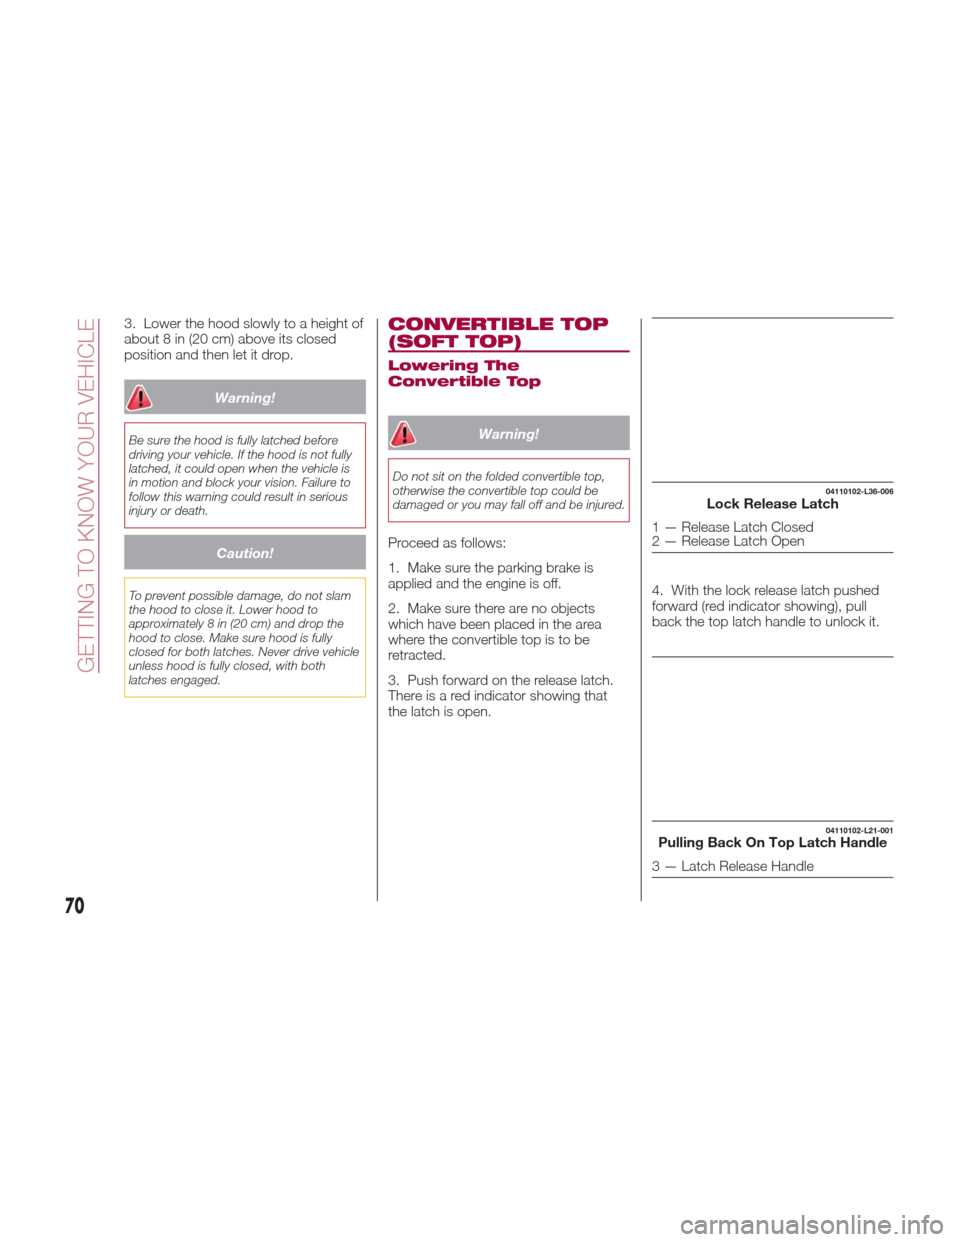
3. Push forward on the release latch.
There is a red indicator showing that
the latch is open.4. With the lock release latch pushed
forward (red indicator showing), pull
back the top latch handle to unlock it.
04110102-L36-006Lock Release Latch
1 — Release Latch Closed
2 — Release Latch Open
04110102-L21-001Pulling Back On Top Latch Handle
3 — Latch Release Handle
70
GETTING TO KNOW YOUR VEHICLE
Page 73 of 300
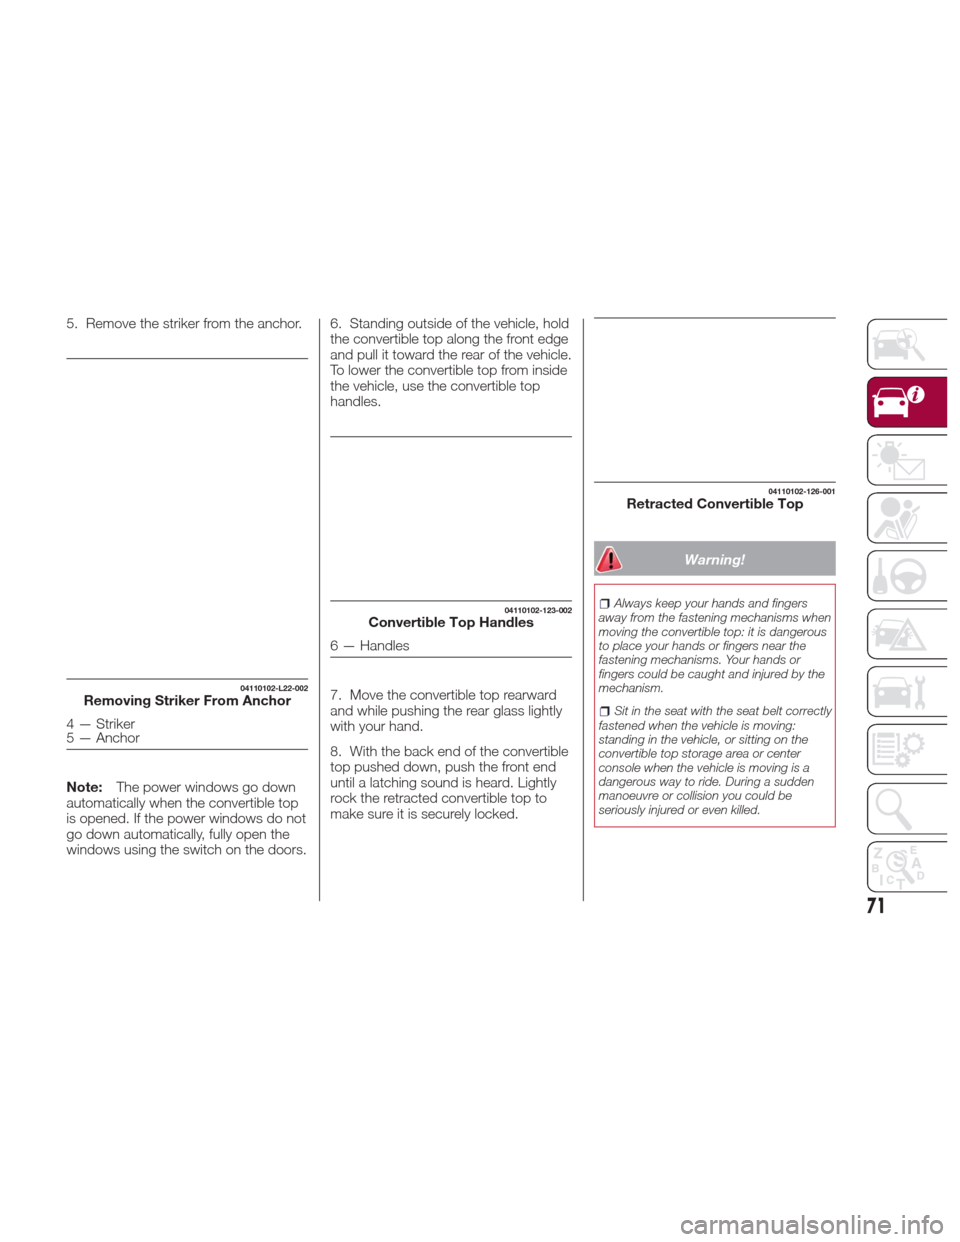
5. Remove the striker from the anchor.
Note:The power windows go down
automatically when the convertible top
is opened. If the power windows do not
go down automatically, fully open the
windows using the switch on the doors. 6. Standing outside of the vehicle, hold
the convertible top along the front edge
and pull it toward the rear of the vehicle.
To lower the convertible top from inside
the vehicle, use the convertible top
handles.
7. Move the convertible top rearward
and while pushing the rear glass lightly
with your hand.
8. With the back end of the convertible
top pushed down, push the front end
until a latching sound is heard. Lightly
rock the retracted convertible top to
make sure it is securely locked.
Warning!
Always keep your hands and fingers
away from the fastening mechanisms when
moving the convertible top: it is dangerous
to place your hands or fingers near the
fastening mechanisms. Your hands or
fingers could be caught and injured by the
mechanism.
Sit in the seat with the seat belt correctly
fastened when the vehicle is moving:
standing in the vehicle, or sitting on the
convertible top storage area or center
console when the vehicle is moving is a
dangerous way to ride. During a sudden
manoeuvre or collision you could be
seriously injured or even killed.
04110102-L22-002Removing Striker From Anchor
4 — Striker
5 — Anchor
04110102-123-002Convertible Top Handles
6 — Handles
04110102-126-001Retracted Convertible Top
71
Page 74 of 300

Raising The Convertible
To p
Proceed as follows:
1. Make sure the parking brake is
applied and the engine is turned off.
2. Pull the unlock lever upward to
disengage the lock.
3. Standing outside of the vehicle, hold
the convertible top along the front edge
and pull it towards the vehicle front. To
raise the convertible top from inside the
vehicle, use the convertible top
handles.4. Sitting in a seat, grasp the
convertible top handles, and push the
convertible top against the windshield.
Make sure the striker engages with the
anchor, move the top latch slowly, and
then push the top latch upward until a
latching sound is heard.
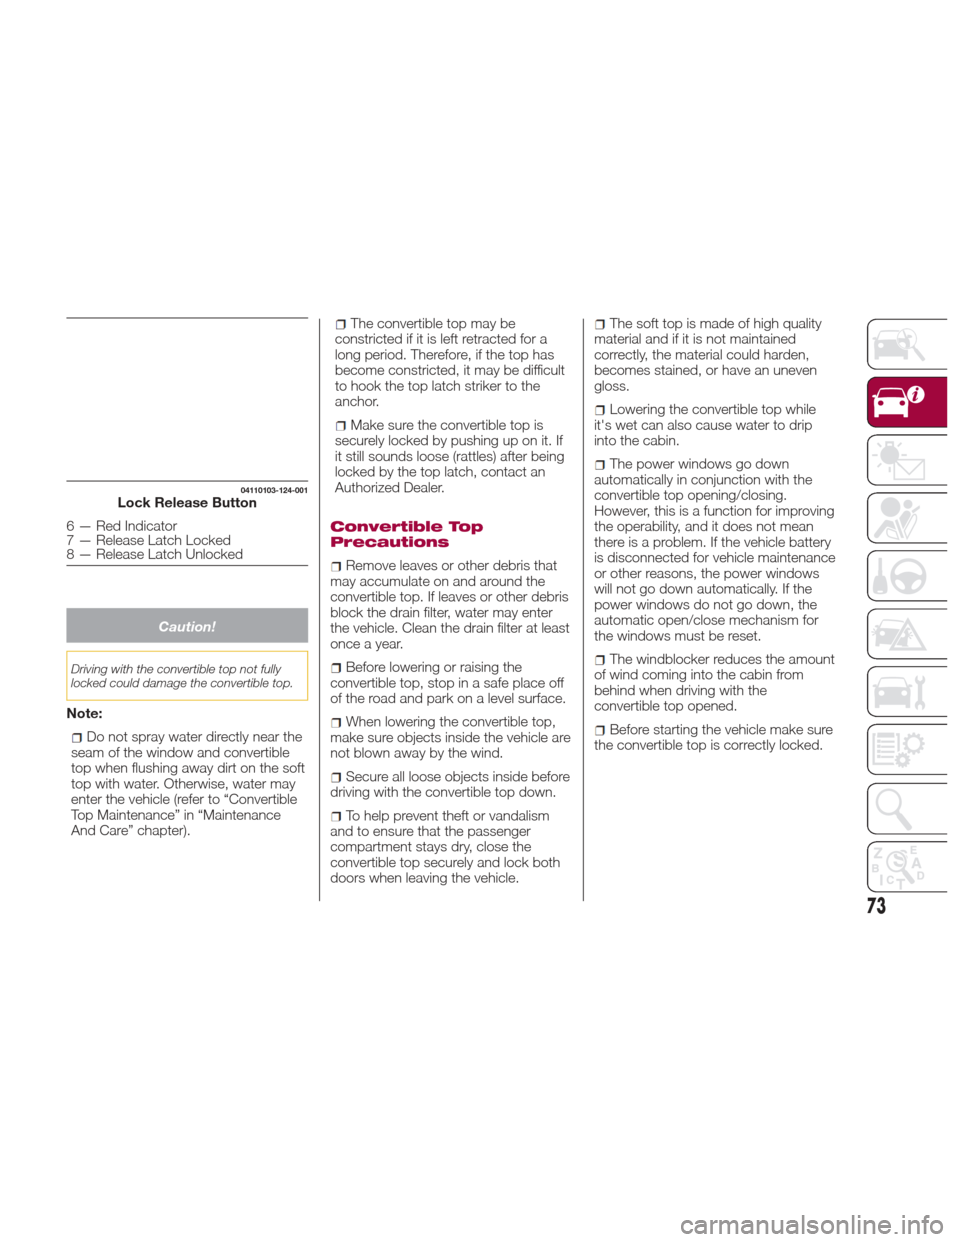
5. If the red indicator is visible on the
lock release button, the convertible top
is not locked. After locking the
convertible top, verify that the red
indicator is not visible.
04110103-121-004Unlock Lever Location
1 — Unlock Lever
04110103-L23-002Convertible Handle Location
2 — Convertible Top Handles
04110103-L24-003Convertible Top Components
4 — Closing Release Latch
5 — Striker
6 — Anchor
72
GETTING TO KNOW YOUR VEHICLE
Page 75 of 300
Caution!
Driving with the convertible top not fully
locked could damage the convertible top.
Note:
Do not spray water directly near the
seam of the window and convertible
top when flushing away dirt on the soft
top with water. Otherwise, water may
enter the vehicle (refer to “Convertible
Top Maintenance” in “Maintenance
And Care” chapter).
The convertible top may be
constricted if it is left retracted for a
long period. Therefore, if the top has
become constricted, it may be difficult
to hook the top latch striker to the
anchor.
Make sure the convertible top is
securely locked by pushing up on it. If
it still sounds loose (rattles) after being
locked by the top latch, contact an
Authorized Dealer.
Convertible Top
Precautions
Remove leaves or other debris that
may accumulate on and around the
convertible top. If leaves or other debris
block the drain filter, water may enter
the vehicle. Clean the drain filter at least
once a year.
Before lowering or raising the
convertible top, stop in a safe place off
of the road and park on a level surface.
When lowering the convertible top,
make sure objects inside the vehicle are
not blown away by the wind.
Secure all loose objects inside before
driving with the convertible top down.
To help prevent theft or vandalism
and to ensure that the passenger
compartment stays dry, close the
convertible top securely and lock both
doors when leaving the vehicle.
The soft top is made of high quality
material and if it is not maintained
correctly, the material could harden,
becomes stained, or have an uneven
gloss.
Lowering the convertible top while
it's wet can also cause water to drip
into the cabin.
The power windows go down
automatically in conjunction with the
convertible top opening/closing.
However, this is a function for improving
the operability, and it does not mean
there is a problem. If the vehicle battery
is disconnected for vehicle maintenance
or other reasons, the power windows
will not go down automatically. If the
power windows do not go down, the
automatic open/close mechanism for
the windows must be reset.
The windblocker reduces the amount
of wind coming into the cabin from
behind when driving with the
convertible top opened.
Before starting the vehicle make sure
the convertible top is correctly locked.
04110103-124-001Lock Release Button
6 — Red Indicator
7 — Release Latch Locked
8 — Release Latch Unlocked
73
Page 87 of 300
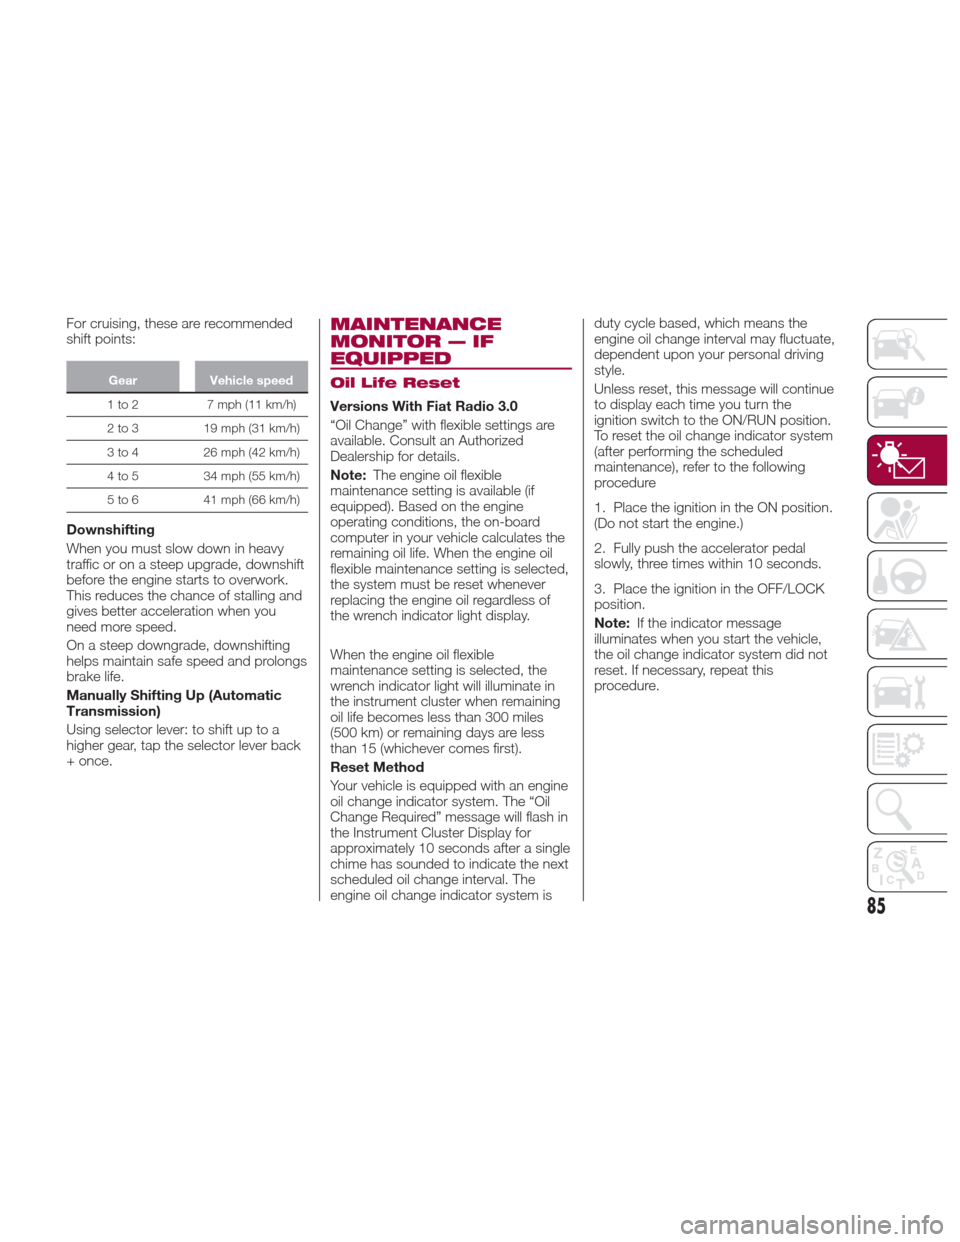
For cruising, these are recommended
shift points:
GearVehicle speed
1to2 7mph(11km/h)
2
to 3 19 mph (31 km/h)
3 to 4 26 mph (42 km/h)
4 to 5 34 mph (55 km/h)
5 to 6 41 mph (66 km/h)
Downshifting
When you must slow down in heavy
traffic or on a steep upgrade, downshift
before the engine starts to overwork.
This reduces the chance of stalling and
gives better acceleration when you
need more speed.
On a steep downgrade, downshifting
helps maintain safe speed and prolongs
brake life.
Manually Shifting Up (Automatic
Transmission)
Using selector lever: to shift up to a
higher gear, tap the selector lever back
+ once.
MAINTENANCE
MONITOR — IF
EQUIPPED
Oil Life Reset
Versions With Fiat Radio 3.0
“Oil Change” with flexible settings are
available. Consult an Authorized
Dealership for details.
Note:The engine oil flexible
maintenance setting is available (if
equipped). Based on the engine
operating conditions, the on-board
computer in your vehicle calculates the
remaining oil life. When the engine oil
flexible maintenance setting is selected,
the system must be reset whenever
replacing the engine oil regardless of
the wrench indicator light display.
When the engine oil flexible
maintenance setting is selected, the
wrench indicator light will illuminate in
the instrument cluster when remaining
oil life becomes less than 300 miles
(500 km) or remaining days are less
than 15 (whichever comes first).
Reset Method
Your vehicle is equipped with an engine
oil change indicator system. The “Oil
Change Required” message will flash in
the Instrument Cluster Display for
approximately 10 seconds after a single
chime has sounded to indicate the next
scheduled oil change interval. The
engine oil change indicator system is duty cycle based, which means the
engine oil change interval may fluctuate,
dependent upon your personal driving
style.
Unless reset, this message will continue
to display each time you turn the
ignition switch to the ON/RUN position.
To reset the oil change indicator system
(after performing the scheduled
maintenance), refer to the following
procedure
1. Place the ignition in the ON position.
(Do not start the engine.)
2. Fully push the accelerator pedal
slowly, three times within 10 seconds.
3. Place the ignition in the OFF/LOCK
position.
Note:
If the indicator message
illuminates when you start the vehicle,
the oil change indicator system did not
reset. If necessary, repeat this
procedure.
85
Page 93 of 300
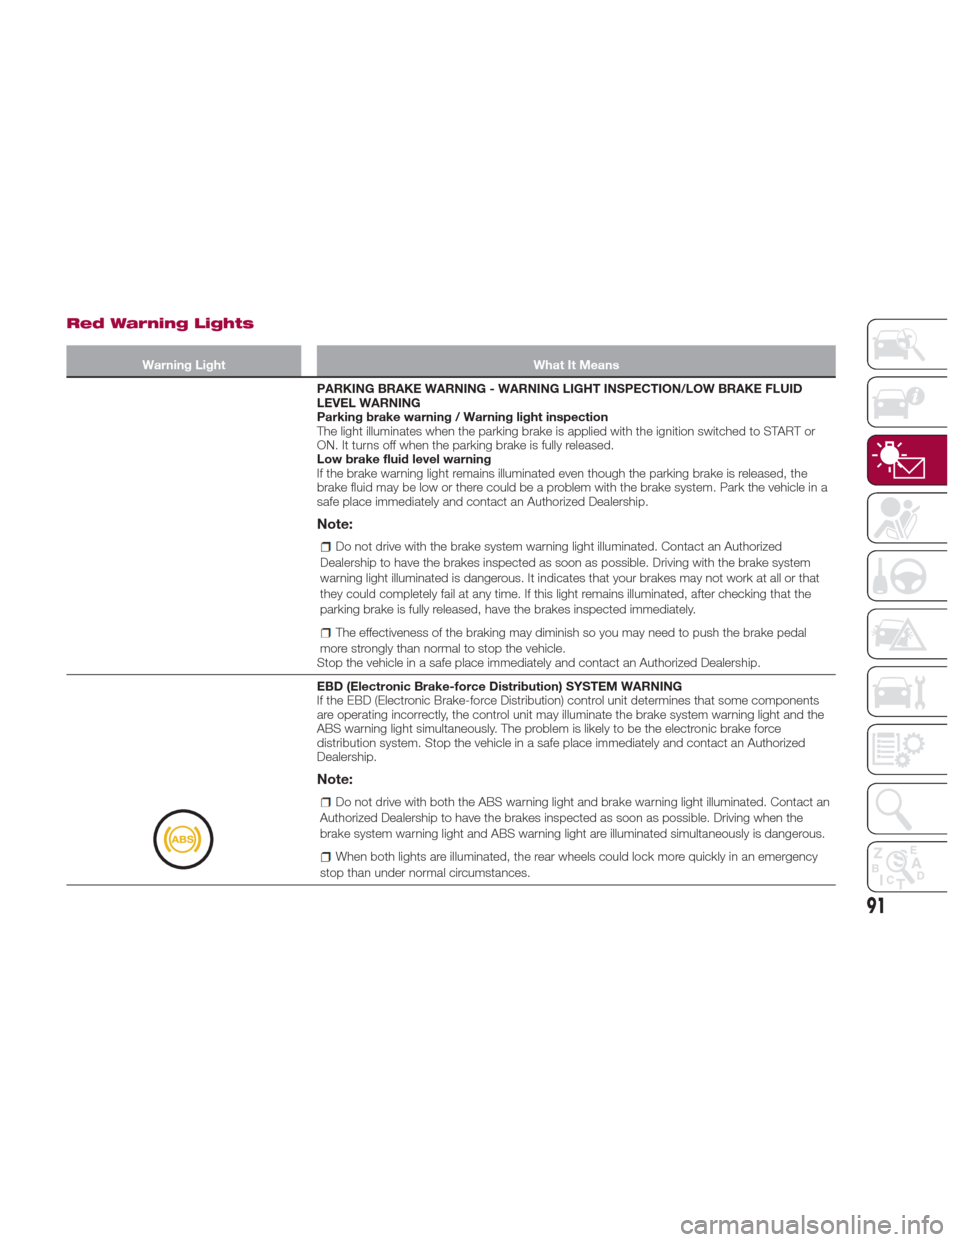
Red Warning Lights
Warning LightWhat It Means
PARKING BRAKE WARNING - WARNING LIGHT INSPECTION/LOW BRAKE FLUID
LEVEL WARNING
Parking brake warning / Warning light inspection
The light illuminates when the parking brake is applied with the ignition switched to START or
ON. It turns off when the parking brake is fully released.
Low brake fluid level warning
If the brake warning light remains illuminated even though the parking brake is released, the
brake fluid may be low or there could be a problem with the brake system. Park the vehicle in a
safe place immediately and contact an Authorized Dealership.
Note:
Do not drive with the brake system warning light illuminated. Contact an Authorized
Dealership to have the brakes inspected as soon as possible. Driving with the brake system
warning light illuminated is dangerous. It indicates that your brakes may not work at all or that
they could completely fail at any time. If this light remains illuminated, after checking that the
parking brake is fully released, have the brakes inspected immediately.
The effectiveness of the braking may diminish so you may need to push the brake pedal
more strongly than normal to stop the vehicle.
Stop the vehicle in a safe place immediately and contact an Authorized Dealership.
EBD (Electronic Brake-force Distribution) SYSTEM WARNING
If the EBD (Electronic Brake-force Distribution) control unit determines that some components
are operating incorrectly, the control unit may illuminate the brake system warning light and the
ABS warning light simultaneously. The problem is likely to be the electronic brake force
distribution system. Stop the vehicle in a safe place immediately and contact an Authorized
Dealership.
Note:
Do not drive with both the ABS warning light and brake warning light illuminated. Contact an
Authorized Dealership to have the brakes inspected as soon as possible. Driving when the
brake system warning light and ABS warning light are illuminated simultaneously is dangerous.
When both lights are illuminated, the rear wheels could lock more quickly in an emergency
stop than under normal circumstances.
91
Page 108 of 300

passengers seat. The sensor may not
function properly because the
additional seat cushion could cause
sensor interference.
If a small child is seated on the
passengers seat, the warning beep
may not operate.
Mexico
If the vehicle speed exceeds about
12 MPH (20 km/h) with the driver or
passengers seat belt unfastened, a
warning beep sounds continuously. If
the seat belt remains unfastened, the
beep sound stops once and then
continues for about 90 seconds. The
beep stops after the driver or
passengers seat belt is fastened.
Until a seat belt is fastened or a given
period of time has elapsed, the beep
sound will not stop even if the vehicle
speed falls below 12 MPH (20 km/h).
Warning!
Placing heavy items on the front
passenger seat may cause the front
passenger seat belt warning function to
operate depending on the weight of the
item.
To allow the front passenger seat weight
sensor to function properly, do not place
and sit on an additional seat cushion on the
front passenger seat. The sensor may not
function properly because the additional
seat cushion could cause sensor
interference.
When a small child sits on the front
passenger seat, it is possible that the
warning beep will not operate.
Ignition Not Switched OFF
If the driver's door is opened while the
ignition is placed in the ACC position, a
continuous beep sound will be heard to
notify the driver that the ignition has not
been placed in the OFF position.
Left in this condition, the keyless entry
system will not operate, the car cannot
be locked, and the battery power will
be depleted.
Key Removed From Vehicle
Warning Beep
A beep sound will be heard 6 times
and the
warning light (red) will flash
continuously if the ignition has not been
placed in the OFF position, all the doors
are closed, and the key fob is removed
from the vehicle.
This is to notify the driver that the key
fob has been removed from the vehicle
and the ignition has not been placed in
the OFF position. Note:
Because the key fob uses
low-intensity radio waves, the
warning may activate if the key fob
is carried together with a metal object
or it is placed in a poor signal reception
area.
Request Switch Inoperable Warning
Beep — If Equipped With Advanced
Keyless Function
If the request switch on the exterior
door handle is pushed with a door
open, or the ignition has not been
placed in the OFF position, a beep will
be heard for about 2 seconds to
indicate that the doors, and trunk lid
cannot be locked.
Key Left-In-Trunk Compartment
Warning Beep — If Equipped With
Advanced Keyless Function
If the key fob is left in the trunk with all
doors locked and the trunk lid closed, a
beep sound is heard for about
10 seconds to remind the driver the key
fob has been left in the trunk.
If this happens, open the trunk lid by
pushing the electric trunk lid opener
and remove the key fob.
A key fob removed from the trunk may
not function because its functions may
have been temporarily suspended. To
restore the key fob function, perform
the applicable procedure (see
paragraph “Keys” in “Getting to know
your vehicle” chapter).
106
GETTING TO KNOW YOUR INSTRUMENT PANEL