2017 FIAT 124 SPIDER lock
[x] Cancel search: lockPage 35 of 300
SEATS
Manual Adjustment
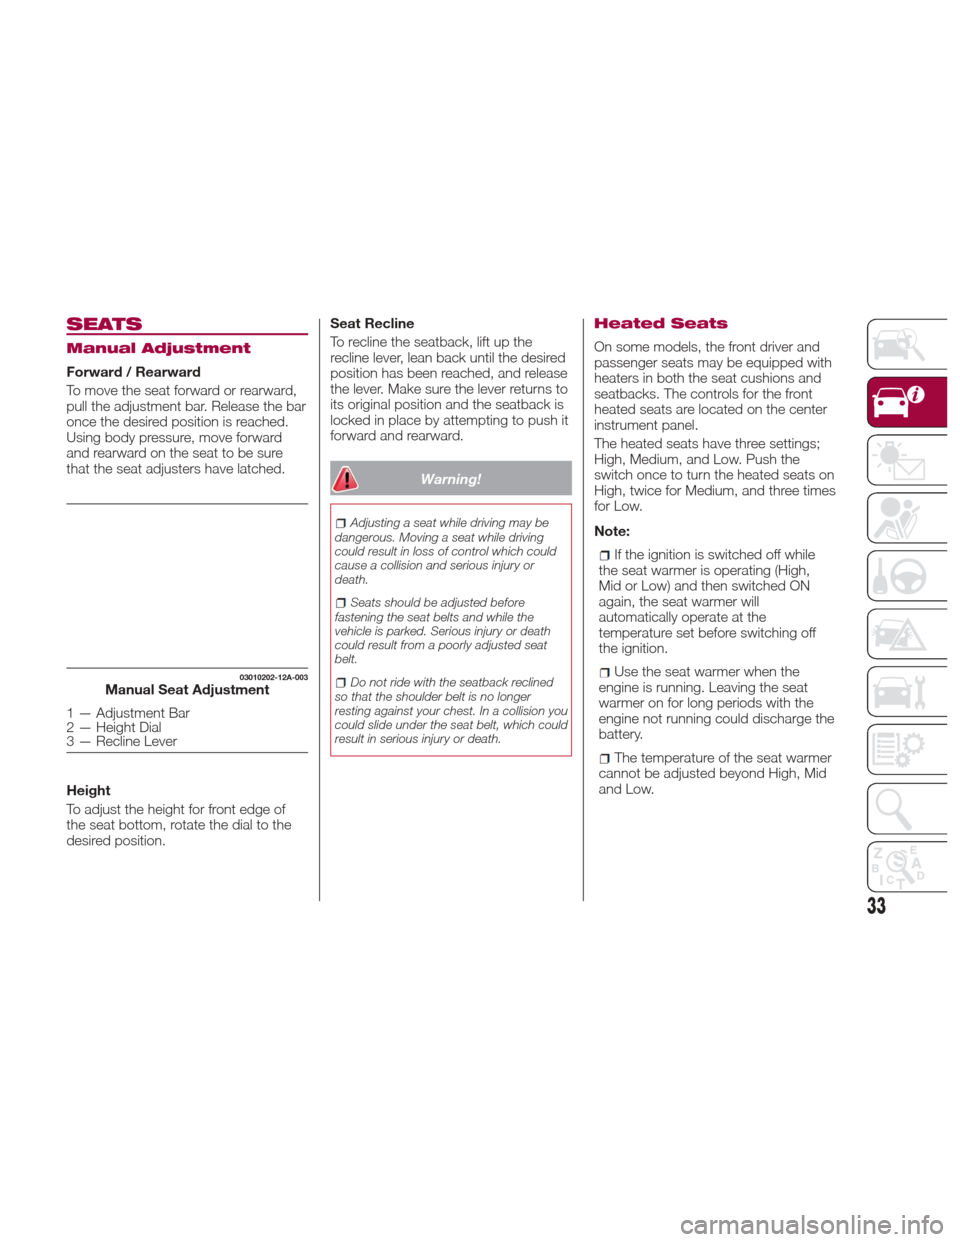
Forward / Rearward
To move the seat forward or rearward,
pull the adjustment bar. Release the bar
once the desired position is reached.
Using body pressure, move forward
and rearward on the seat to be sure
that the seat adjusters have latched.
Height
To adjust the height for front edge of
the seat bottom, rotate the dial to the
desired position.Seat Recline
To recline the seatback, lift up the
recline lever, lean back until the desired
position has been reached, and release
the lever. Make sure the lever returns to
its original position and the seatback is
locked in place by attempting to push it
forward and rearward.
Warning!
Adjusting a seat while driving may be
dangerous. Moving a seat while driving
could result in loss of control which could
cause a collision and serious injury or
death.
Seats should be adjusted before
fastening the seat belts and while the
vehicle is parked. Serious injury or death
could result from a poorly adjusted seat
belt.
Do not ride with the seatback reclined
so that the shoulder belt is no longer
resting against your chest. In a collision you
could slide under the seat belt, which could
result in serious injury or death.
Heated Seats
On some models, the front driver and
passenger seats may be equipped with
heaters in both the seat cushions and
seatbacks. The controls for the front
heated seats are located on the center
instrument panel.
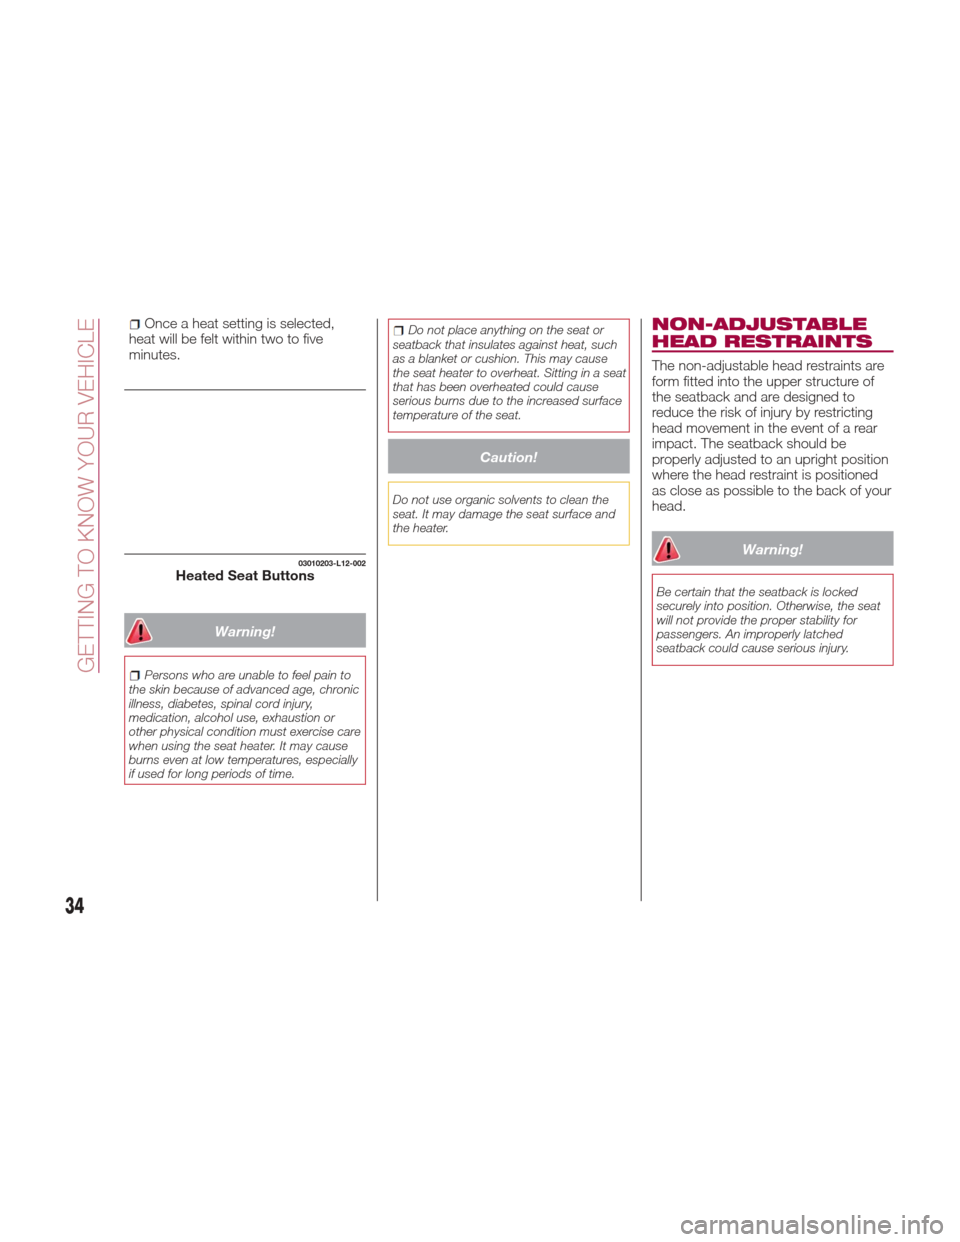
The heated seats have three settings;
High, Medium, and Low. Push the
switch once to turn the heated seats on
High, twice for Medium, and three times
for Low.
Note:
If the ignition is switched off while
the seat warmer is operating (High,
Mid or Low) and then switched ON
again, the seat warmer will
automatically operate at the
temperature set before switching off
the ignition.
Use the seat warmer when the
engine is running. Leaving the seat
warmer on for long periods with the
engine not running could discharge the
battery.
The temperature of the seat warmer
cannot be adjusted beyond High, Mid
and Low.
03010202-12A-003Manual Seat Adjustment
1 — Adjustment Bar
2 — Height Dial
3 — Recline Lever
33
Page 36 of 300
Once a heat setting is selected,
heat will be felt within two to five
minutes.
Warning!
Persons who are unable to feel pain to
the skin because of advanced age, chronic
illness, diabetes, spinal cord injury,
medication, alcohol use, exhaustion or
other physical condition must exercise care
when using the seat heater. It may cause
burns even at low temperatures, especially
if used for long periods of time.
Do not place anything on the seat or
seatback that insulates against heat, such
as a blanket or cushion. This may cause
the seat heater to overheat. Sitting in a seat
that has been overheated could cause
serious burns due to the increased surface
temperature of the seat.
Caution!
Do not use organic solvents to clean the
seat. It may damage the seat surface and
the heater.
NON-ADJUSTABLE
HEAD RESTRAINTS
The non-adjustable head restraints are
form fitted into the upper structure of
the seatback and are designed to
reduce the risk of injury by restricting
head movement in the event of a rear
impact. The seatback should be
properly adjusted to an upright position
where the head restraint is positioned
as close as possible to the back of your
head.
Warning!
Be certain that the seatback is locked
securely into position. Otherwise, the seat
will not provide the proper stability for
passengers. An improperly latched
seatback could cause serious injury.
03010203-L12-002Heated Seat Buttons
34
GETTING TO KNOW YOUR VEHICLE
Page 37 of 300
Driver And Passenger
Head Restraints
Your vehicle is equipped with
non-adjustable head restraints on the
driver's and passenger's seatbacks.
The non-adjustable head restraints
consist of a trimmed foam covering
over the upper structure of the
seatbacks and are intended to help
protect you and the passenger from
neck injury.
Adjust the seatbacks to their upright,
on-road positions so that the head
restraint is positioned as close as
possible to the back of your head.
Warning!
Be certain that the seatback is locked
securely into position. Otherwise, the seat
will not provide the proper stability for
passengers. An improperly latched
seatback could cause serious injury.
STEERING WHEEL
Steering Wheel
Adjustment
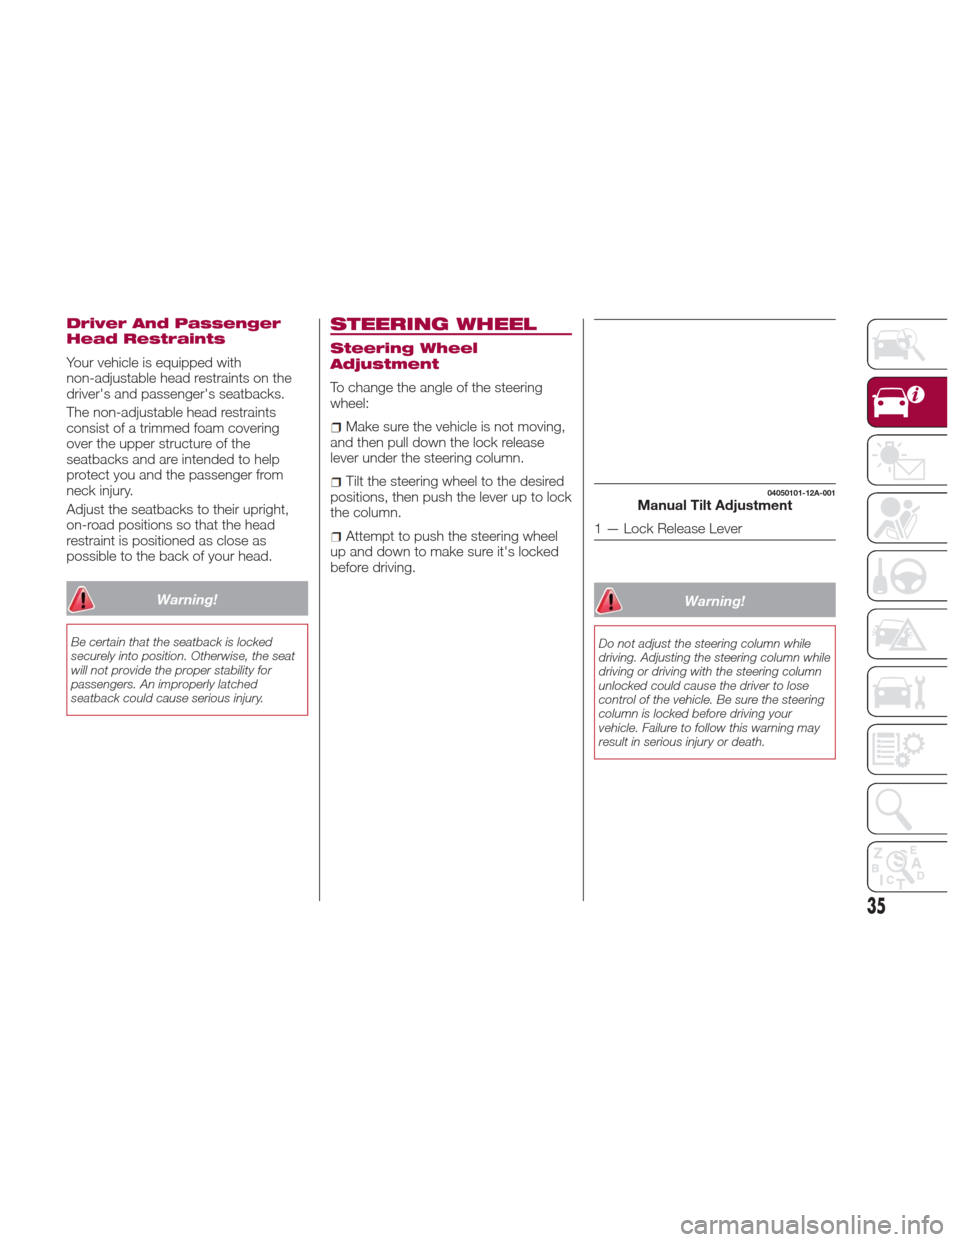
To change the angle of the steering
wheel:
Make sure the vehicle is not moving,
and then pull down the lock release
lever under the steering column.
Tilt the steering wheel to the desired
positions, then push the lever up to lock
the column.
Attempt to push the steering wheel
up and down to make sure it's locked
before driving.
Warning!
Do not adjust the steering column while
driving. Adjusting the steering column while
driving or driving with the steering column
unlocked could cause the driver to lose
control of the vehicle. Be sure the steering
column is locked before driving your
vehicle. Failure to follow this warning may
result in serious injury or death.
04050101-12A-001Manual Tilt Adjustment
1 — Lock Release Lever
35
Page 40 of 300
Power Mirrors
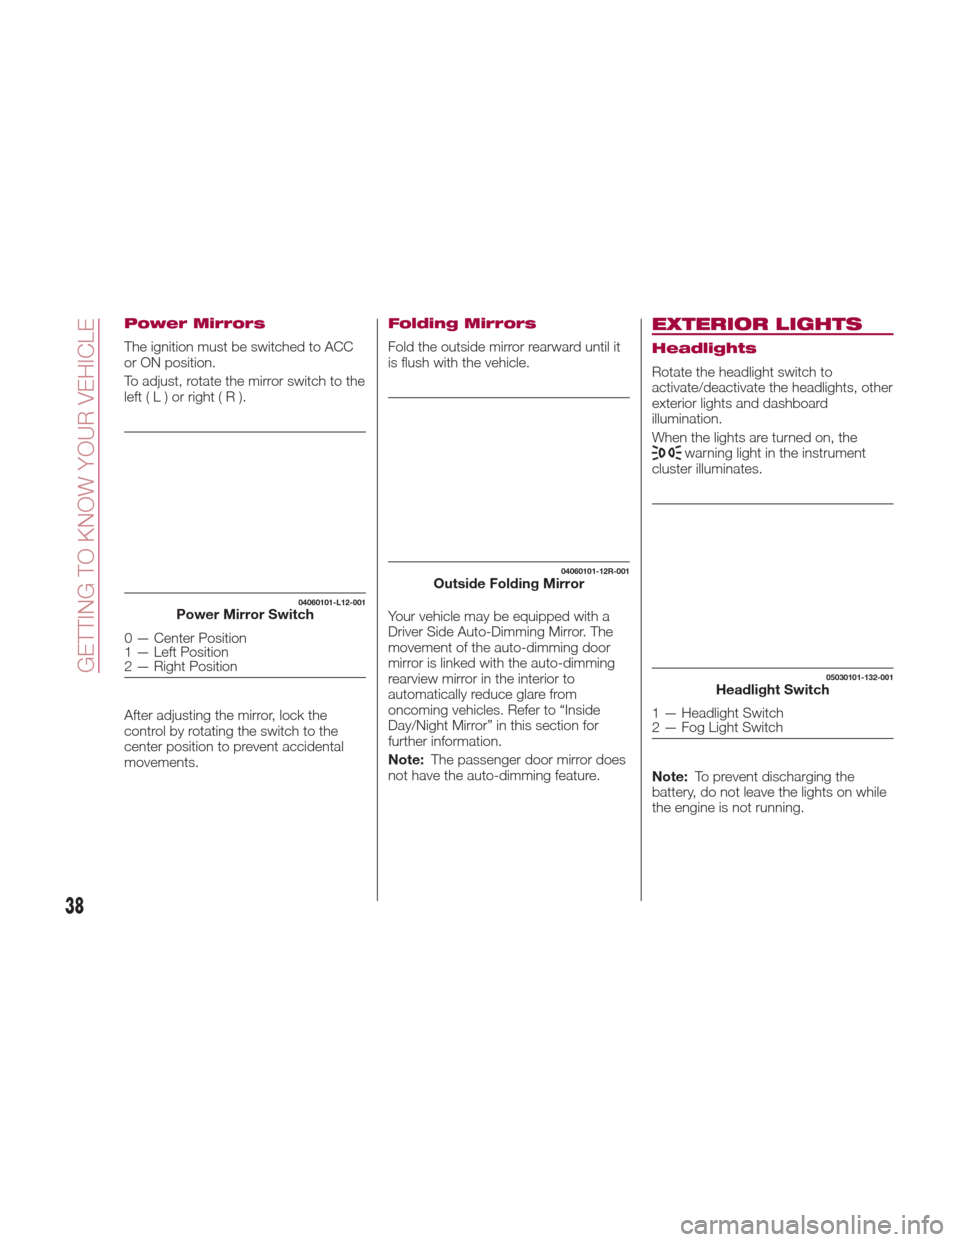
The ignition must be switched to ACC
or ON position.
To adjust, rotate the mirror switch to the
left(L)orright(R).
After adjusting the mirror, lock the
control by rotating the switch to the
center position to prevent accidental
movements.
Folding Mirrors
Fold the outside mirror rearward until it
is flush with the vehicle.
Your vehicle may be equipped with a
Driver Side Auto-Dimming Mirror. The
movement of the auto-dimming door
mirror is linked with the auto-dimming
rearview mirror in the interior to
automatically reduce glare from
oncoming vehicles. Refer to “Inside
Day/Night Mirror” in this section for
further information.
Note:The passenger door mirror does
not have the auto-dimming feature.
EXTERIOR LIGHTS
Headlights
Rotate the headlight switch to
activate/deactivate the headlights, other
exterior lights and dashboard
illumination.
When the lights are turned on, the
warning light in the instrument
cluster illuminates.
Note: To prevent discharging the
battery, do not leave the lights on while
the engine is not running.
04060101-L12-001Power Mirror Switch
0 — Center Position
1 — Left Position
2 — Right Position
04060101-12R-001Outside Folding Mirror
05030101-132-001Headlight Switch
1 — Headlight Switch
2 — Fog Light Switch
38
GETTING TO KNOW YOUR VEHICLE
Page 44 of 300

The operation can be cancelled by
moving the lever in the direction
opposite to which it was operated.
The three-flash turn signal function can
be turned on or off using the
personalization function in the radio.
AFS (Adaptive Front
Lighting System) — If
Equipped
This system directs the main light beam
and adapts it to the driving conditions
around bends/when cornering,
continuously and automatically.
The system directs the light beam to
illuminate the road in the best way,
taking into account the speed of the
car, the bend/corner angle and the
speed of steering.
The adaptive lights are automatically
activated when the vehicle is started.
Leaving Home Light
System
The leaving home light system turns on
the lights when the key fob unlock
button is pushed while away from the
vehicle.
Activation
When the ignition switch is in the OFF
position and the headlight switch is in
orposition, the headlights
will illuminate when the key fob unlock
button is pushed and the vehicle
receives the key fob signal. The headlights turn off after
30 seconds.
The following lights turn on when the
leaving home light system is operated:
low beams/parking lights/taillights/
license lights.
Operation of the leaving home light
system can be turned on or off.
When the key fobbutton is
pushed and the vehicle receives the key
fob signal, the headlights turn off.
When the headlight switch is in a
position other than
or,the
headlights turn off.
Headlamp Leveling
System — If Equipped
Automatic Headlamp Leveling
System
On some models, the angle of the
headlights will be automatically adjusted
when turning on the headlights.
Adjusting The Headlight
When Abroad
Dipped headlights are adjusted for
driving in the country where the vehicle
was originally purchased.
When travelling in countries with
opposite driving direction, to avoid
flashing the drivers on the other side of
the road, you need to cover areas of
the headlight. For this operation contact
an Authorized Dealer.
WINDSHEILD
WIPERS / WASHER
Windshield Wipers
Washer
The ignition must be in the ON position
to use the wipers.
Windshield Wipers
Turn the wipers on by pushing the lever
up or down.
With intermittent wiper
Switch positions:
or MIST: operation while
pulling up lever
OFF: stop
--- orINT: intermittent operation
05030101-122-001Windshield Wiper Switch
1 — Intermittent Switch
42
GETTING TO KNOW YOUR VEHICLE
Page 51 of 300
Controls
1 – Temperature Control Knob
This dial controls the interior temperature
of the vehicle.
Turn it clockwise for hotter
temperatures and counterclockwise for
colder temperatures.
MAX A/C – If Equipped: When the
Mode Selector Knob is set to
or,
the fan control knob is in a position
other than 0, and the temperature
control knob is in the maximum cold
position, the Recirculation Button will
activate and the A/C will turn on
automatically. If A/C is not desired,
press the A/C Button to turn it off.
2 – Blower Control Knob
The blower has seven speeds. Turn the
knob clockwise to increase blower
speed or counterclockwise to decrease
blower speed.
3 – Mode Selector Knob
Turn the Mode Selector Knob to select
the air flow mode.
The mode selector dial can be set at
the intermediate positions ( ●) between
each mode.
Set the knob to an intermediate
position if you want to split the air flow
between the two modes.
For example, when the Mode Selector
Knob is at the intermediate position ( ●)
between the
andpositions, air
flow from the floor vents is less than
that of the
position. 4 – Rear Window Defrost Button
The Rear Window Defrost Button clears
fog and frost from the rear window. The
ignition must be ON to use the
defroster.
Push the button to turn on the Rear
Window Defroster. The Rear Window
Defroster operates for about
15 minutes and then turns off
automatically. The button LED will
illuminate when the defroster is
operating.
To turn off the Rear Window Defroster
before the end of 15 minutes, push the
button again.
Caution!
Failure to follow these cautions can cause
damage to the heating elements:
Use care when washing the inside of the
rear window. Do not use abrasive window
cleaners on the interior surface of the
window. Use a soft cloth and a mild
washing solution, wiping parallel to the
heating elements. Labels can be peeled off
after soaking with warm water.
Do not use scrapers, sharp instruments,
or abrasive window cleaners on the interior
surface of the window.
Keep all objects a safe distance from the
window.
Note:
Before opening the convertible top,
make sure the Rear Window Defrost
Button is turned off. Otherwise, the
heat generated from the defroster
could damage the convertible top and
the internal material.
This defroster is not designed for
melting snow. If there is an
accumulation of snow on the rear
window, remove it before using the
defroster.
Mirror Defroster — If Equipped :To
turn on the mirror defroster, switch the
ignition ON and push the Rear Window
Defroster Button.
5 – Air Recirculation Button
Press the Air Recirculation Button to
select between outside air and
recirculated air positions.
Recirculated Air Position : (LED on)
Outside air is shut off when this position
has been activated. Use this position
when going through tunnels, driving in
congested traffic (high engine exhaust
areas), or when quick cooling of the
vehicle is desired.
49
Page 52 of 300
Outside Air Position: (LED off)
Outside air is allowed to enter the
cabin. Use this mode for ventilation or
windshield defrosting.
Note:
Do not use the Outside Air Position in
cold or rainy weather is dangerous as it
will cause the windows to fog up. Your
vision will be hampered, which could
lead to a serious accident.
6 – A/C Button
Push the A/C Button to turn on the air
conditioner.
The LED on the switch will illuminate
when the Blower Control Knob is in any
position except the OFF position.
Push the button again to turn off the air
conditioner.
Note: The air conditioner may not
function when the outside temperature
approaches 32 °F (0 °C).
Heating
Proceed as follows:
1. Set the Mode Selector Knob to
the
position.
2. Set the Air Recirculation Button to
the outside air position.
3. Set the Temperature Control Dial to
the hot position. 4. Set the Blower Control Knob to the
desired speed.
5. If dehumidified heating is desired,
turn on the air conditioner.
If the windshield fogs up easily, set the
Mode Selector Knob to the
position.
If cooler air is desired at face level, set
the Mode Selector Knob to the
position and adjust the Temperature
Control Knob to maintain comfort.
The floor vents will blow warmer air
while the side air vents will blow cooler
air (except when the temperature
control dial is set at the maximum hot
or cold position).
Cooling (With Air
Conditioner)
Proceed as follows:
1. Set the Mode Selector Knob to
the
position.
2. Set the Temperature Control Knob
to the cold position.
3. Set the Blower Control Knob to the
desired speed.
4. Turn on the air conditioner by
pushing the A/C Button.
5. After cooling begins, adjust the
Blower Control Knob and Temperature
Control Knob as needed to maintain
comfort. Note:
If the air conditioner is used while
driving up large hills or in heavy traffic,
monitor the Engine Coolant
Temperature Warning Light to see if it
is illuminated or flashing. The air
conditioner may cause engine
overheating in these situations. If the
warning light is illuminated or flashing,
turn the air conditioning off
immediately.
When maximum cooling is desired,
set the Temperature Control Knob to
the extreme cold position, push the Air
Recirculation Button to activate the
recirculated air position, and then turn
the fan control dial fully clockwise.
If warmer air is desired at floor level,
set the Mode Selector Knob to the
position, and adjust the
Temperature Control Knob to maintain
comfort.
The floor vents will blow warmer air
while the side air vents will blow cooler
air (except when the temperature
control dial is set at the maximum hot
or cold position).
50
GETTING TO KNOW YOUR VEHICLE
Page 53 of 300
Ventilation
Proceed as follows:
1. Set the Mode Selector Knob to
the
position.
2. Set the Air Recirculation Button to
the outside air position.
3. Set the Temperature Control Knob
to the desired position.
4. Set the Blower Control Knob to the
desired speed.
Windshield Defrosting
And Defogging
Proceed as follows:
1. Set the Mode Selector Knob to the
Front Defrost
position.
2. Set the Temperature Control Knob to
the desired position.
3. Set the Blower Control Knob to the
desired speed.
4. If dehumidified heating is desired,
turn on the air conditioner.
Warning!
Set the temperature control to the hot or
warm position when defogging (Front
Defrost position). Using the Front Defrost
position with the temperature control set to
the cold position is dangerous as it will
cause the outside of the windscreen to fog
up. Your vision will be hampered, which
could lead to a serious accident.
Note:
For maximum defrosting, turn on
the air conditioner, set the Temperature
Control Knob to the extreme hot
position, and turn the Blower Control
Knob fully clockwise.
If warm air is desired from the floor
vents, set the Mode Selector Knob to
the
position.
If equipped with MAX A/C, the
Recirculation Button can be set to the
Recirculated Air position, when the
Blower Control Knob is ON, and the
Mode Selector Knob is set to the Front
Defrost position.
Dehumidifying (With Air
Conditioner)
Operate the air conditioner in cool or
cold weather to help defog the
windshield and side windows.
Proceed as follows:
1. Set the Mode Selector Knob to the
desired position.
2. Set the Air Recirculation Knob to the
outside air position.
3. Set the Temperature Control Knob
to the desired position.
4. Set the Blower Control Knob to the
desired speed.
5. Turn on the air conditioner by
pressing the A/C Button.
Note: One of the functions of the air
conditioner is dehumidifying the air. To
use this function, the temperature does
not have to be set to cold. Set the
Temperature Control Knob to the
desired position (hot or cold), and turn
on the air conditioner to dehumidify the
cabin air.
51