2017 FIAT 124 SPIDER oil
[x] Cancel search: oilPage 71 of 300
HOOD
Opening The Hood
Proceed as follows:
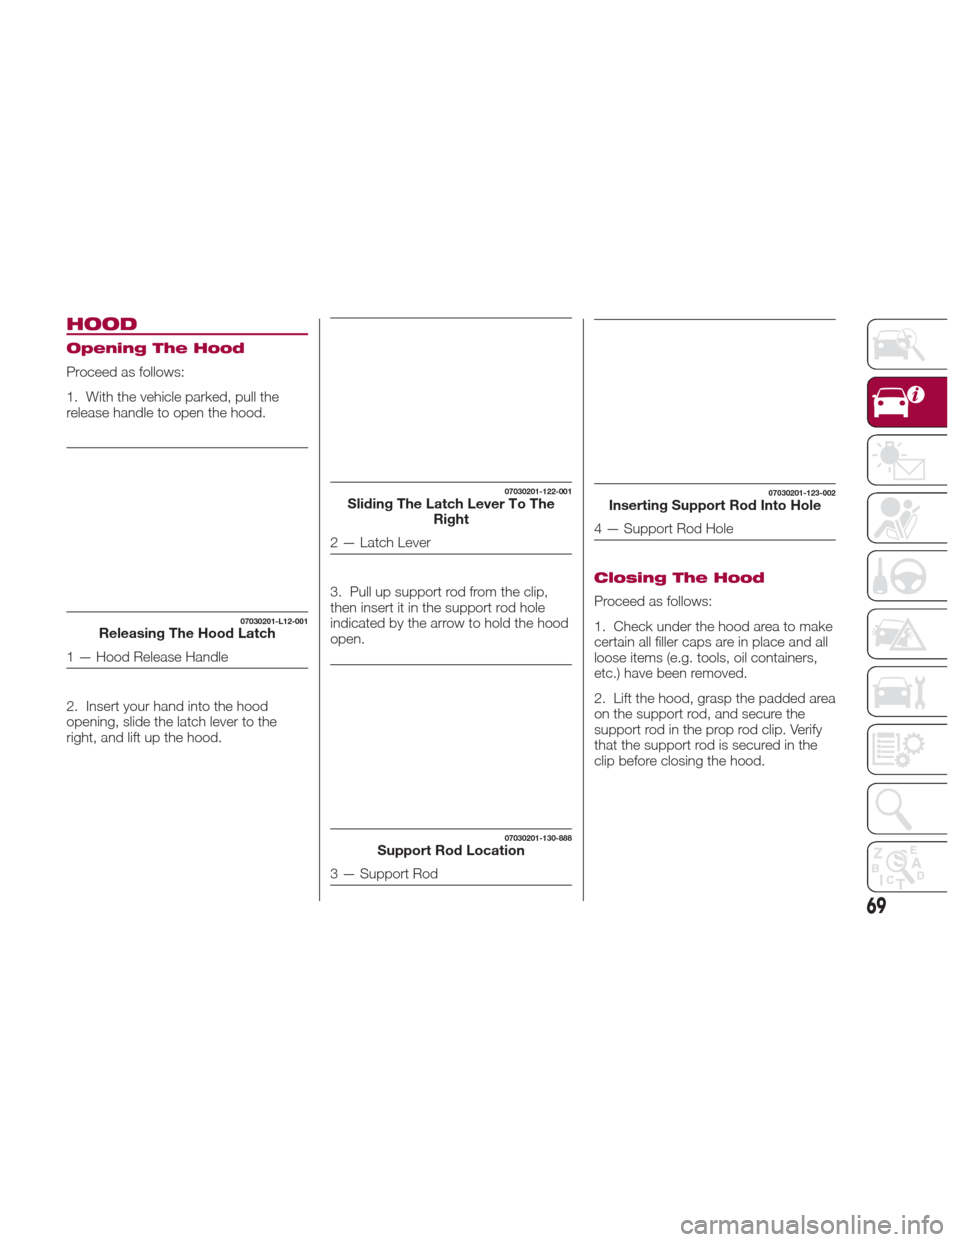
1. With the vehicle parked, pull the
release handle to open the hood.
2. Insert your hand into the hood
opening, slide the latch lever to the
right, and lift up the hood.3. Pull up support rod from the clip,
then insert it in the support rod hole
indicated by the arrow to hold the hood
open.
Closing The Hood
Proceed as follows:
1. Check under the hood area to make
certain all filler caps are in place and all
loose items (e.g. tools, oil containers,
etc.) have been removed.
2. Lift the hood, grasp the padded area
on the support rod, and secure the
support rod in the prop rod clip. Verify
that the support rod is secured in the
clip before closing the hood.
07030201-L12-001Releasing The Hood Latch
1 — Hood Release Handle
07030201-122-001Sliding The Latch Lever To The
Right
2 — Latch Lever
07030201-130-888Support Rod Location
3 — Support Rod
07030201-123-002Inserting Support Rod Into Hole
4 — Support Rod Hole
69
Page 87 of 300
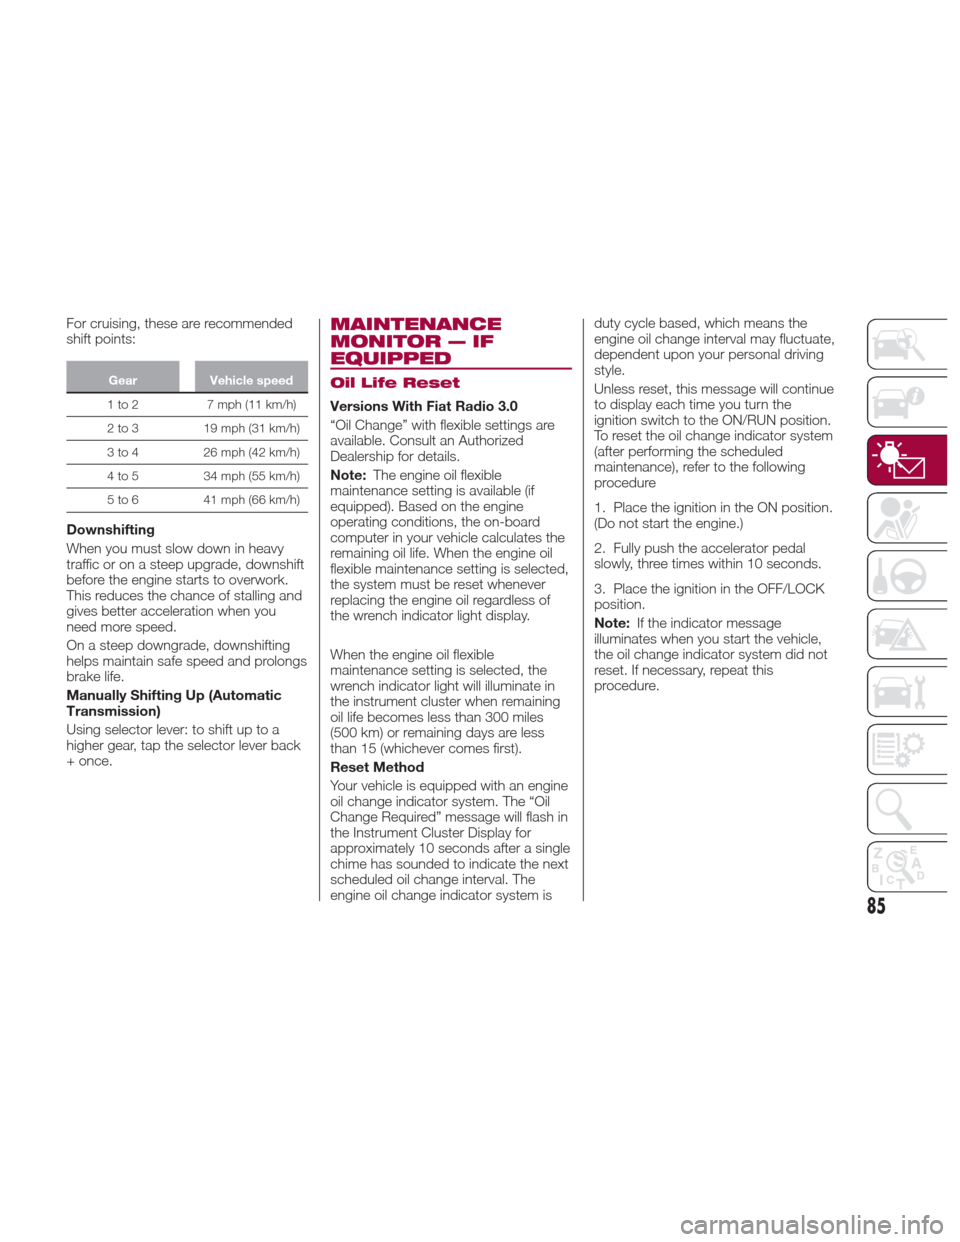
For cruising, these are recommended
shift points:
GearVehicle speed
1to2 7mph(11km/h)
2
to 3 19 mph (31 km/h)
3 to 4 26 mph (42 km/h)
4 to 5 34 mph (55 km/h)
5 to 6 41 mph (66 km/h)
Downshifting
When you must slow down in heavy
traffic or on a steep upgrade, downshift
before the engine starts to overwork.
This reduces the chance of stalling and
gives better acceleration when you
need more speed.
On a steep downgrade, downshifting
helps maintain safe speed and prolongs
brake life.
Manually Shifting Up (Automatic
Transmission)
Using selector lever: to shift up to a
higher gear, tap the selector lever back
+ once.
MAINTENANCE
MONITOR — IF
EQUIPPED
Oil Life Reset
Versions With Fiat Radio 3.0
“Oil Change” with flexible settings are
available. Consult an Authorized
Dealership for details.
Note:The engine oil flexible
maintenance setting is available (if
equipped). Based on the engine
operating conditions, the on-board
computer in your vehicle calculates the
remaining oil life. When the engine oil
flexible maintenance setting is selected,
the system must be reset whenever
replacing the engine oil regardless of
the wrench indicator light display.
When the engine oil flexible
maintenance setting is selected, the
wrench indicator light will illuminate in
the instrument cluster when remaining
oil life becomes less than 300 miles
(500 km) or remaining days are less
than 15 (whichever comes first).
Reset Method
Your vehicle is equipped with an engine
oil change indicator system. The “Oil
Change Required” message will flash in
the Instrument Cluster Display for
approximately 10 seconds after a single
chime has sounded to indicate the next
scheduled oil change interval. The
engine oil change indicator system is duty cycle based, which means the
engine oil change interval may fluctuate,
dependent upon your personal driving
style.
Unless reset, this message will continue
to display each time you turn the
ignition switch to the ON/RUN position.
To reset the oil change indicator system
(after performing the scheduled
maintenance), refer to the following
procedure
1. Place the ignition in the ON position.
(Do not start the engine.)
2. Fully push the accelerator pedal
slowly, three times within 10 seconds.
3. Place the ignition in the OFF/LOCK
position.
Note:
If the indicator message
illuminates when you start the vehicle,
the oil change indicator system did not
reset. If necessary, repeat this
procedure.
85
Page 88 of 300
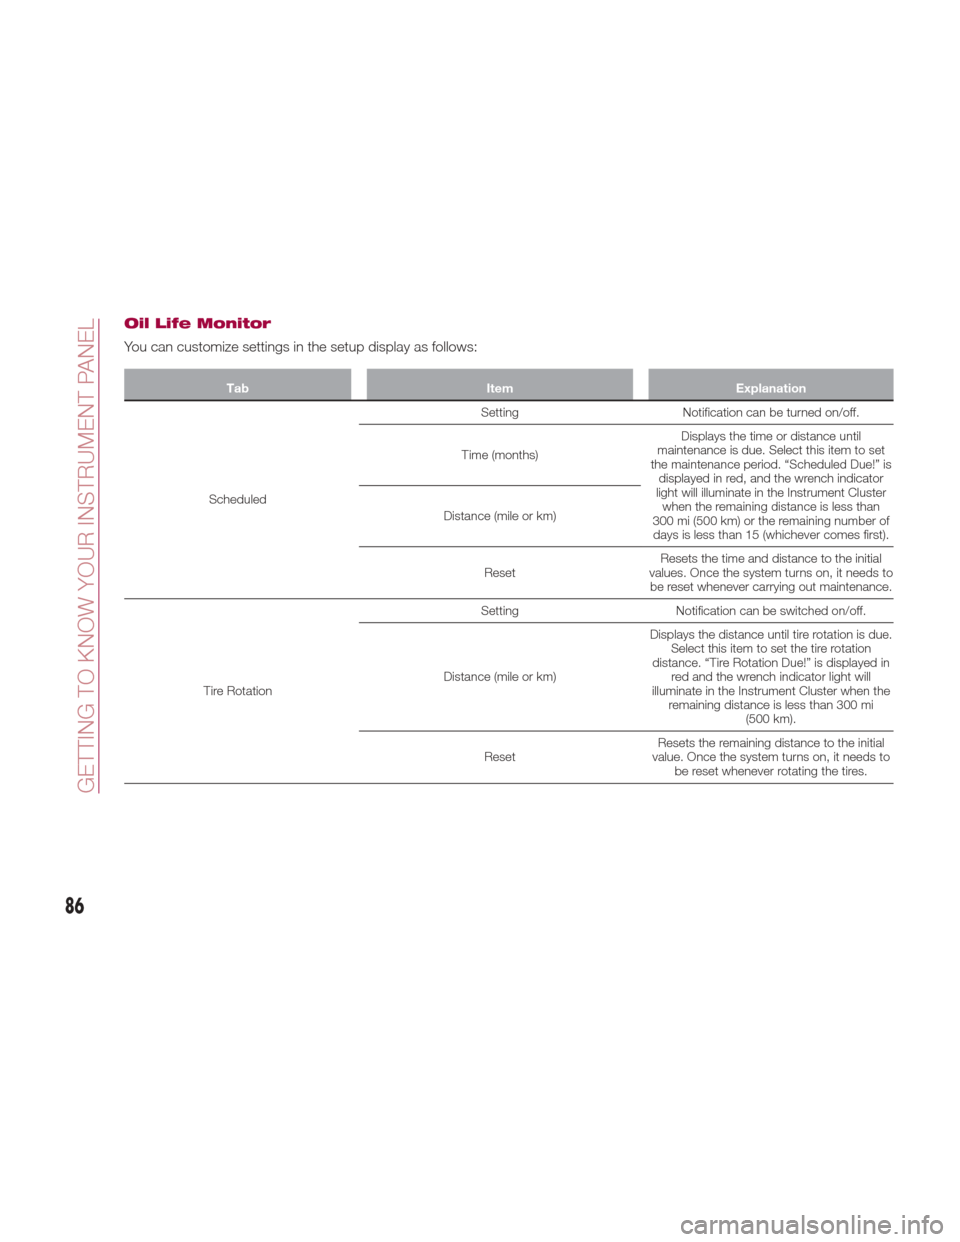
Oil Life Monitor
You can customize settings in the setup display as follows:
TabItemExplanation
Scheduled Setting
Notification can be turned on/off.
Time (months) Displays the time or distance until
maintenance is due. Select this item to set
the maintenance period. “Scheduled Due!” is displayed in red, and the wrench indicator
light will illuminate in the Instrument Cluster when the remaining distance is less than
300 mi (500 km) or the remaining number of days is less than 15 (whichever comes first).
Distance (mile or km)
Reset Resets the time and distance to the initial
values. Once the system turns on, it needs to be reset whenever carrying out maintenance.
Tire Rotation Setting
Notification can be switched on/off.
Distance (mile or km) Displays the distance until tire rotation is due.
Select this item to set the tire rotation
distance. “Tire Rotation Due!” is displayed in red and the wrench indicator light will
illuminate in the Instrument Cluster when the remaining distance is less than 300 mi (500 km).
Reset Resets the remaining distance to the initial
value. Once the system turns on, it needs to be reset whenever rotating the tires.
86
GETTING TO KNOW YOUR INSTRUMENT PANEL
Page 89 of 300
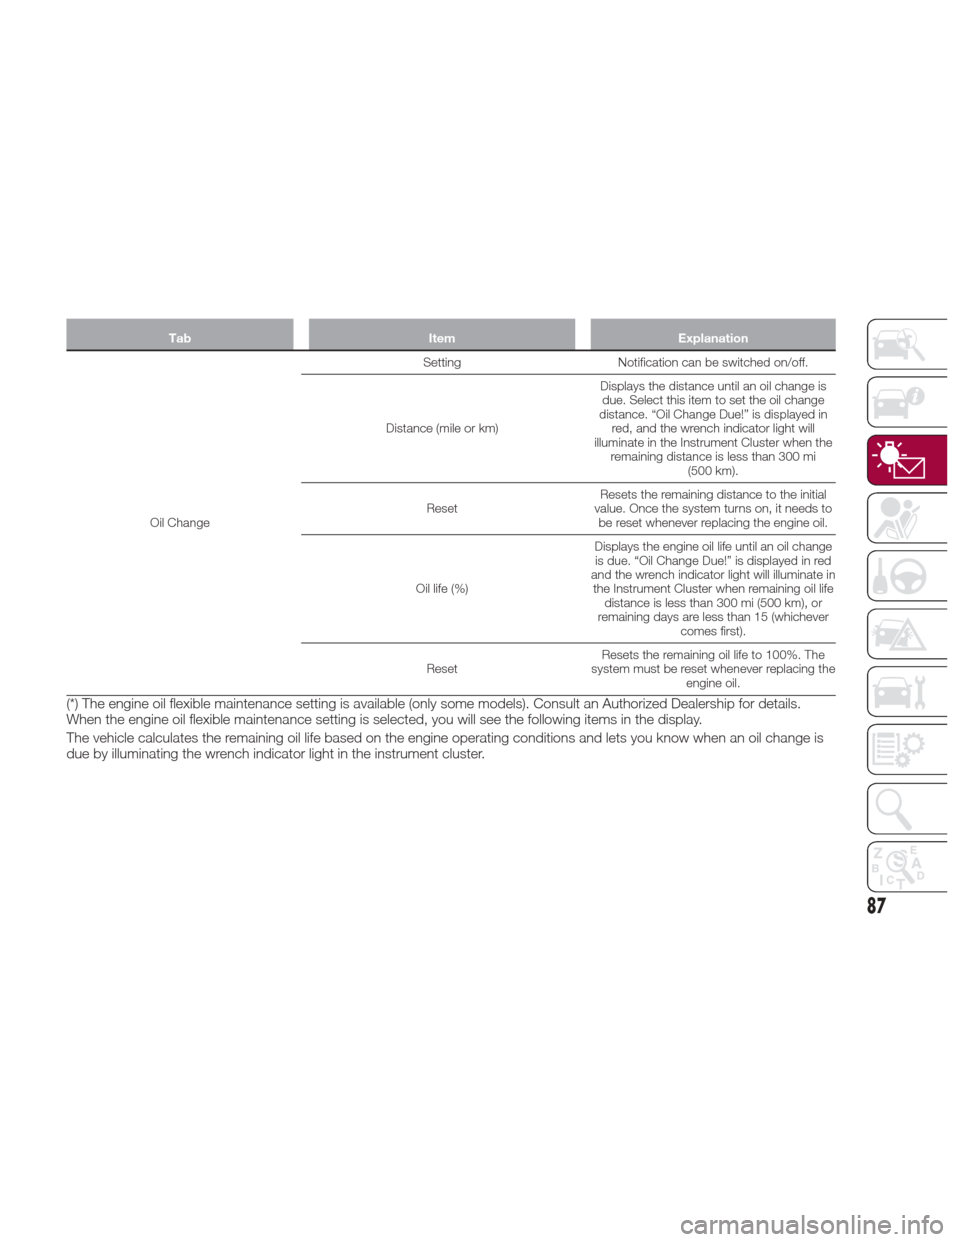
TabItemExplanation
Oil Change Setting
Notification can be switched on/off.
Distance (mile or km) Displays the distance until an oil change is
due. Select this item to set the oil change
distance. “Oil Change Due!” is displayed in red, and the wrench indicator light will
illuminate in the Instrument Cluster when the remaining distance is less than 300 mi (500 km).
Reset Resets the remaining distance to the initial
value. Once the system turns on, it needs to be reset whenever replacing the engine oil.
Oil life (%) Displays the engine oil life until an oil change
is due. “Oil Change Due!” is displayed in red
and the wrench indicator light will illuminate in the Instrument Cluster when remaining oil life distance is less than 300 mi (500 km), or
remaining days are less than 15 (whichever comes first).
Reset Resets the remaining oil life to 100%. The
system must be reset whenever replacing the engine oil.
(*) The engine oil flexible maintenance setting is available (only some models). Consult an Authorized Dealership for details.
When the engine oil flexible maintenance setting is selected, you will see the following items in the display.
The vehicle calculates the remaining oil life based on the engine operating conditions and lets you know when an oil change is
due by illuminating the wrench indicator light in the instrument cluster.
87
Page 92 of 300

WARNING LIGHTS
AND MESSAGES
Warning Lights And
Messages
Note:
The warning light in the instrument
panel appears together with a
dedicated message and/or acoustic
signal when applicable. These
indications are indicative and
precautionary and as such must not be
considered as exhaustive and/or
alternative to the information contained
in the Owner’s Manual, which you are
advised to read carefully in all cases.
Always refer to the information in this
chapter in the event of a failure
indication.
Failure indications displayed are
divided into two categories: serious
and less serious failures. Serious
failures are indicated by a repeated
and prolonged warning "cycle". Less
serious failures are indicated by a
warning "cycle" with a shorter duration.
The display cycle of both categories
can be interrupted. The instrument
panel warning light will stay on until the
cause of the failure is eliminated. Vehicles With Fiat Connect 7.0
The warning contents can be verified
on the audio system.
Proceed as follows:
If the warning light is turned on,
selecticon on the home screen to
display the application screen.
Select “ Warning Guidance ”to
display the current warnings.
Select the applicable warning to view
the warning details.
For the following warning/indicator lights:
Master Warning Light
Brake System Warning Light
ABS Warning Light
Charging System Warning Light
Engine Oil Warning Light
Electric Throttle Warning Light
Cold Start Warning Light
Check Engine Warning Light
Coolant Temperature Warning Light
Automatic Transmission Warning
Light
Power Steering Malfunction Indicator
Light
Air Bag/Seat Belt Pretensioner
System Warning Light
Check Fuel Cap Warning Light
Low Fuel Warning Light
Seat Belt Warning Light
Door Ajar Warning Light
Low Washer Fluid Level Warning
Light
Tire Pressure Monitoring System
Warning Light
KEY Warning Light
LED Headlight KEY Warning Light
BSM (Blind Spot Monitoring) OFF
Indicator Light
Wrench Indicator Light
TCS/DSC Indicator Light
DSC OFF Indicator Light
Security Indicator Light
Indicator Light
Passenger Air Bag Deactivation
Warning Light
The light turns on when the ignition is
switched on for an operation check,
and turns off a few seconds later or
when the engine is started. If the light
does not turn on or remains turned on,
have the vehicle inspected at an
Authorized Dealership.
Note:
Only for “Brake System Warning Light”:
the light turns on continuously when the
parking brake is applied.
90
GETTING TO KNOW YOUR INSTRUMENT PANEL
Page 94 of 300

Warning LightWhat It Means
ALTERNATOR FAILURE
If the warning light illuminates while driving, it indicates a malfunction of the alternator or of the
charging system. Drive to the side of the road and park off the right-of-way. Stop the vehicle in a
safe place immediately and contact an Authorized Dealership.
Note:Do not continue driving when the charging system warning light is illuminated because the
engine could stop unexpectedly.
LOW ENGINE OIL PRESSURE
This warning light indicates low engine oil pressure.
Note:Do not run the engine if the oil pressure is low. Otherwise, it could result in extensive engine
damage.
If the light illuminates or the warning indication is displayed while driving:
Drive to the side of the road and park off the right-of-way on level ground.
Turn off the engine and wait five minutes for the oil to drain back into the sump.
Inspect the engine oil level. If it's low, add the appropriate amount of engine oil while being
careful not to overfill.
Start the engine and check the warning light.
Note:
Do not run the engine if the oil level is low. Otherwise, it could result in extensive engine damage.
If the light remains illuminated even though the oil level is normal or after adding oil, stop the
engine immediately and contact an Authorized Dealership.
DOOR-OPEN WARNING LIGHT
The light turns on if any door is not closed securely.
Close the door securely.
Warning!
Driving a vehicle with the red brake light on is dangerous. Part of the brake system may have failed. It will take longer to stop the vehicle. You
could have a collision. Have the vehicle checked immediately.
92
GETTING TO KNOW YOUR INSTRUMENT PANEL
Page 126 of 300
SEAT BELT
SYSTEMS
Buckle up even though you are an
excellent driver, even on short trips.
Someone on the road may be a poor
driver and could cause a collision that
includes you. This can happen far away
from home or on your own street.
Research has shown that seat belts
save lives, and they can reduce the
seriousness of injuries in a collision.
Some of the worst injuries happen
when people are thrown from the
vehicle. Seat belts reduce the possibility
of ejection and the risk of injury caused
by striking the inside of the vehicle.
Everyone in a motor vehicle should be
belted at all times.
Seat Belt Precautions
Seat belts help to decrease the
possibility of severe injury during
accidents and sudden stops. FCA
recommends that the driver and
passengers always wear seat belts.
Mexico
All the seats have lap/shoulder belts.
These belts have retractors with inertia
locks that keep them out of the way
when not in use.
The locks allow the belts to remain
comfortable on users, but they will lock
in position during a collision.Except Mexico
All of the seat belt retractors are
designed to keep the lap/shoulder belts
out of the way when not in use.
The driver's seat belt has no provisions
for child-restraint systems and has only
an emergency locking mode.
The driver may wear it comfortably, and
it will lock during a collision.
However, the passenger's seat
lap/shoulder belt retractor operates in
two modes: emergency locking mode,
and for child-restraint systems,
automatic locking mode. If you must
use the passenger seat for a child, slide
the passenger seat as far back as
possible and make sure any child
restraint system is secured properly.
Belt retraction may become difficult if
the belts and seat belt guides are
soiled, so try to keep them clean. Refer
to “Cleaning the lap/shoulder belt
webbing” in “Maintenance and care” for
further information.
Warning!
Relying on the air bags alone could lead
to more severe injuries in a collision. The air
bags work with your seat belt to restrain
you properly. In some collisions, the air
bags won’t deploy at all. Always wear your
seat belt even though you have air bags.
In a collision, you and your passengers
can suffer much greater injuries if you are
not properly buckled up. You can strike the
interior of your vehicle or other passengers,
or you can be thrown out of the vehicle.
Always be sure you and others in your
vehicle are buckled up properly.
It is dangerous to ride in a cargo area,
inside or outside of a vehicle. In a collision,
people riding in these areas are more likely
to be seriously injured or killed.
03020100-12A-001Spider Seat Belt Routing Guide
124
SAFETY
Page 182 of 300

ONLY use the driver’s side floor mat on
the driver’s side floor area. To check for
interference, with the vehicle properly
parked with the engine off, fully depress the
accelerator, the brake, and the clutch pedal
(if present) to check for interference. If your
floor mat interferes with the operation of
any pedal, or is not secure to the floor,
remove the floor mat from the vehicle and
place the floor mat in your trunk.
ONLY use the passenger’s side floor
mat on the passenger’s side floor area.
ALWAYS make sure objects cannot fall
or slide into the driver’s side floor area
when the vehicle is moving. Objects can
become trapped under accelerator, brake,
or clutch pedals and could cause a loss of
vehicle control.
NEVER place any objects under the
floor mat (e.g., towels, keys, etc.). These
objects could change the position of the
floor mat and may cause interference with
the accelerator, brake, or clutch pedals.
If the vehicle carpet has been removed
and re-installed, always properly attach
carpet to the floor and check the floor mat
fasteners are secure to the vehicle carpet.
Fully depress each pedal to check for
interference with the accelerator, brake, or
clutch pedals then re-install the floor mats.
It is recommended to only use mild soap
and water to clean your floor mats. After
cleaning, always check your floor mat has
been properly installed and is secured to
your vehicle using the floor mat fasteners
by lightly pulling mat.
Rocking The Vehicle
Note: Too much rocking may cause
engine overheating, transmission failure,
and tire damage.
If you must rock the vehicle to free it
from snow, sand or mud, depress the
accelerator slightly and slowly move the
gear selector from 1 (D) to R.
Warning!
Fast spinning tires can be dangerous.
Forces generated by excessive wheel
speeds may cause damage, or even
failure, of the axle and tires. A tire could
explode and injure someone. Do not spin
your vehicle's wheels faster than 30 mph
(48 km/h) or for longer than 30 seconds
continuously without stopping when you
are stuck and do not let anyone near a
spinning wheel, no matter what the speed.
Caution!
When “rocking” a stuck vehicle by
shifting between DRIVE and REVERSE, do
not spin the wheels faster than 15 mph
(24 km/h), or drivetrain damage may result.
Revving the engine or spinning the
wheels too fast may lead to transmission
overheating and failure. It can also damage
the tires. Do not spin the wheels above
30 mph (48 km/h) while in gear (no
transmission shifting occurring).
Winter Driving
Carry emergency gear, including tire
chains, window scraper, flares, a small
shovel, jumper leads, and a small bag
of sand or salt.
Contact an Authorized Dealer to check
the following:
Have the proper ratio of antifreeze in
the radiator.
Inspect the battery and its leads.
Cold reduces battery capacity.
Use an engine oil appropriate for the
lowest ambient temperatures that the
vehicle will be driven in.
Inspect the ignition system for
damage and loose connections.
Use winter windshield washer fluid
that will not freeze.
180
STARTING AND OPERATING