2017 FIAT 124 SPIDER recommended oil
[x] Cancel search: recommended oilPage 87 of 300

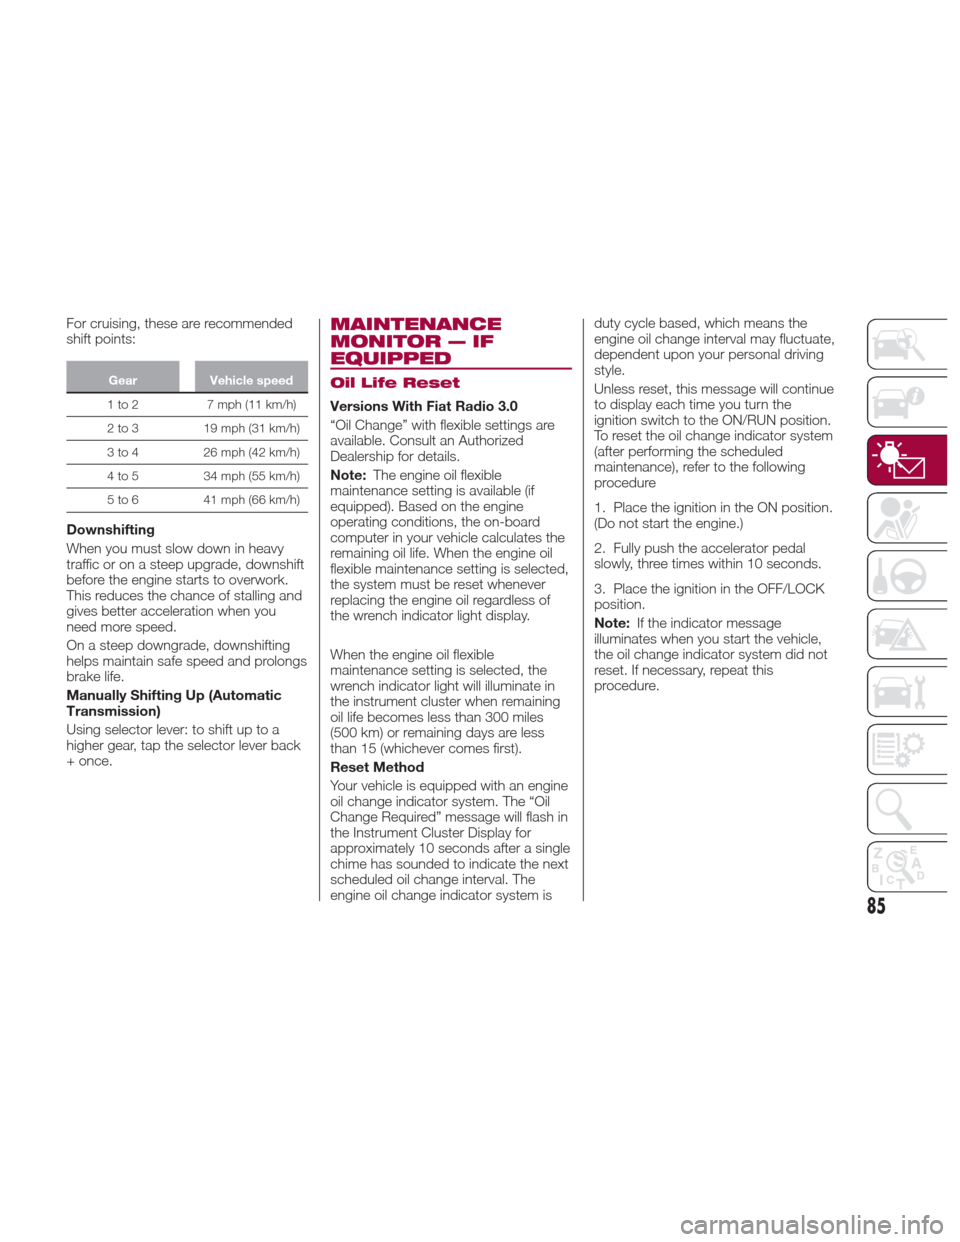
For cruising, these are recommended
shift points:
GearVehicle speed
1to2 7mph(11km/h)
2
to 3 19 mph (31 km/h)
3 to 4 26 mph (42 km/h)
4 to 5 34 mph (55 km/h)
5 to 6 41 mph (66 km/h)
Downshifting
When you must slow down in heavy
traffic or on a steep upgrade, downshift
before the engine starts to overwork.
This reduces the chance of stalling and
gives better acceleration when you
need more speed.
On a steep downgrade, downshifting
helps maintain safe speed and prolongs
brake life.
Manually Shifting Up (Automatic
Transmission)
Using selector lever: to shift up to a
higher gear, tap the selector lever back
+ once.
MAINTENANCE
MONITOR — IF
EQUIPPED
Oil Life Reset
Versions With Fiat Radio 3.0
“Oil Change” with flexible settings are
available. Consult an Authorized
Dealership for details.
Note:The engine oil flexible
maintenance setting is available (if
equipped). Based on the engine
operating conditions, the on-board
computer in your vehicle calculates the
remaining oil life. When the engine oil
flexible maintenance setting is selected,
the system must be reset whenever
replacing the engine oil regardless of
the wrench indicator light display.
When the engine oil flexible
maintenance setting is selected, the
wrench indicator light will illuminate in
the instrument cluster when remaining
oil life becomes less than 300 miles
(500 km) or remaining days are less
than 15 (whichever comes first).
Reset Method
Your vehicle is equipped with an engine
oil change indicator system. The “Oil
Change Required” message will flash in
the Instrument Cluster Display for
approximately 10 seconds after a single
chime has sounded to indicate the next
scheduled oil change interval. The
engine oil change indicator system is duty cycle based, which means the
engine oil change interval may fluctuate,
dependent upon your personal driving
style.
Unless reset, this message will continue
to display each time you turn the
ignition switch to the ON/RUN position.
To reset the oil change indicator system
(after performing the scheduled
maintenance), refer to the following
procedure
1. Place the ignition in the ON position.
(Do not start the engine.)
2. Fully push the accelerator pedal
slowly, three times within 10 seconds.
3. Place the ignition in the OFF/LOCK
position.
Note:
If the indicator message
illuminates when you start the vehicle,
the oil change indicator system did not
reset. If necessary, repeat this
procedure.
85
Page 182 of 300

ONLY use the driver’s side floor mat on
the driver’s side floor area. To check for
interference, with the vehicle properly
parked with the engine off, fully depress the
accelerator, the brake, and the clutch pedal
(if present) to check for interference. If your
floor mat interferes with the operation of
any pedal, or is not secure to the floor,
remove the floor mat from the vehicle and
place the floor mat in your trunk.
ONLY use the passenger’s side floor
mat on the passenger’s side floor area.
ALWAYS make sure objects cannot fall
or slide into the driver’s side floor area
when the vehicle is moving. Objects can
become trapped under accelerator, brake,
or clutch pedals and could cause a loss of
vehicle control.
NEVER place any objects under the
floor mat (e.g., towels, keys, etc.). These
objects could change the position of the
floor mat and may cause interference with
the accelerator, brake, or clutch pedals.
If the vehicle carpet has been removed
and re-installed, always properly attach
carpet to the floor and check the floor mat
fasteners are secure to the vehicle carpet.
Fully depress each pedal to check for
interference with the accelerator, brake, or
clutch pedals then re-install the floor mats.
It is recommended to only use mild soap
and water to clean your floor mats. After
cleaning, always check your floor mat has
been properly installed and is secured to
your vehicle using the floor mat fasteners
by lightly pulling mat.
Rocking The Vehicle
Note: Too much rocking may cause
engine overheating, transmission failure,
and tire damage.
If you must rock the vehicle to free it
from snow, sand or mud, depress the
accelerator slightly and slowly move the
gear selector from 1 (D) to R.
Warning!
Fast spinning tires can be dangerous.
Forces generated by excessive wheel
speeds may cause damage, or even
failure, of the axle and tires. A tire could
explode and injure someone. Do not spin
your vehicle's wheels faster than 30 mph
(48 km/h) or for longer than 30 seconds
continuously without stopping when you
are stuck and do not let anyone near a
spinning wheel, no matter what the speed.
Caution!
When “rocking” a stuck vehicle by
shifting between DRIVE and REVERSE, do
not spin the wheels faster than 15 mph
(24 km/h), or drivetrain damage may result.
Revving the engine or spinning the
wheels too fast may lead to transmission
overheating and failure. It can also damage
the tires. Do not spin the wheels above
30 mph (48 km/h) while in gear (no
transmission shifting occurring).
Winter Driving
Carry emergency gear, including tire
chains, window scraper, flares, a small
shovel, jumper leads, and a small bag
of sand or salt.
Contact an Authorized Dealer to check
the following:
Have the proper ratio of antifreeze in
the radiator.
Inspect the battery and its leads.
Cold reduces battery capacity.
Use an engine oil appropriate for the
lowest ambient temperatures that the
vehicle will be driven in.
Inspect the ignition system for
damage and loose connections.
Use winter windshield washer fluid
that will not freeze.
180
STARTING AND OPERATING
Page 227 of 300

INTRODUCTION
Be extremely careful and prevent injury
to yourself and others or damage to
your vehicle when using this Owner’s
Manual for inspection and maintenance.
If you are unsure about any procedure it
describes, we strongly urge you to have
a reliable and qualified service shop
perform the work, preferably at your
Authorized Dealer.
Factory-trained FCA technicians and
genuine FCA parts are best for your
vehicle. Without this expertise and the
parts that have been designed and
made especially for your vehicle,
inadequate, incomplete, and insufficient
servicing may result in problems. This
could lead to vehicle damage or an
accident and injuries.
For expert advice and quality service,
contact your Authorized Dealer.
To continue New Vehicle Limited
Warranty eligibility and to protect your
investment, it is your responsibility to
properly maintain your vehicle
according to factory recommended
schedules outlined in this Owner’s
Manual. As part of this you must keep
your maintenance records, receipts,
repair orders and any other documents
as evidence this maintenance was
performed. You must present these
documents, should any New Vehicle
Limited Warranty coverage
disagreement occur. Failure to do so
can result in your New Vehicle LimitedWarranty being voided either in whole
or in part.
This evidence may consist of the
following:
The FCA Scheduled Maintenance
Record, refer to the Warranty Booklet,
must be completely filled out showing
mileage, repair order number, date for
each service, and signed by a qualified
automotive service technician who
service vehicles.
Original copies of repair orders or
other receipts that include the mileage
and date the vehicle was serviced.
Each receipt should be signed by a
qualified automotive service technician.
For self maintenance, a statement
that you completed the maintenance
yourself, displaying mileage and the
date the work was performed. Also,
receipts for the replacement parts (fluid,
filters, etc.) indicating the date and
mileage must accompany this
statement.
Note:
If you elect to perform maintenance
yourself or have your vehicle serviced at
a location other than an Authorized
Dealer, FCA requires that all fluids, parts
and materials must meet FCA
standards for durability and
performance as described in this
Owner’s Manual. Claims against the warranty resulting
from lack of maintenance, as opposed
to defective materials or authorized FCA
workmanship, will not be honored.
Any auto repair shop using parts
equivalent to your vehicle's original
equipment may perform maintenance.
But we recommend that it always be
done by an Authorized Dealer using
genuine FCA parts. Selecting
“Maintenance Monitor” enables the
system to notify you of your vehicle's
approaching inspection/servicing
period.
Owner Maintenance
Precautions
The owner or a qualified service
technician should make these vehicle
inspections at the indicated intervals to
ensure safe and dependable operation.
Bring any problem to the attention of an
Authorized Dealer or qualified service
technician as soon as possible.
When refueling perform inspection
of:
Brake and clutch fluid level
Engine coolant level
Engine oil level
Washer fluid level
At least monthly perform inspection
of:
Tire inflation pressures
225
Page 235 of 300

Engine Oil
Warning!
Be very careful when working in the
engine compartment when the engine is
hot: you may get burned.
Do not get too close to the radiator
cooling fan: the electric fan may start;
danger of injury.
Loose clothing might be pulled by
moving parts.
Recommended Oil
Refer to “Fluids and Lubricants”
paragraph in “Technical Specifications”
chapter.
Inspecting engine oil level
Proceed as follows:
1. Be sure the vehicle is on a level
surface.
2. Warm up the engine to normal
operating temperature.
3. Turn it off and wait at least five
minutes for the oil to return to the
sump.
4. Pull out the dipstick, wipe it clean,
and reinsert it fully. 5. Pull the dipstick out again and
examine the level. The level is normal if
it is between Low and Full. If it is near
or below Low, open the engine oil
cap/filler 2 and add enough oil to bring
the level to Full.
Note:
Do not overfill the engine oil.
This may cause engine damage.
6. Make sure the O-ring on the dipstick
is positioned properly before reinserting
the dipstick.
7. Reinsert the dipstick fully.
Engine oil consumption
During the initial period of use the
engine oil consumption conditions
should stabilize after the first 3000 –
3500 miles (5000 – 6000 km).
Engine Coolant
Warning!
You or others can be badly burned by hot
engine coolant (antifreeze) or steam from
your radiator. If you see or hear steam
coming from under the hood, do not open
the hood until the radiator has had time to
cool. Never try to open a cooling system
pressure cap when the radiator or coolant
bottle is hot.
Inspecting Coolant Level
Note: Changing the coolant should be
done by your Authorized Dealer.
Inspect the antifreeze protection and
coolant level in the coolant reservoir at
least once a year, at the beginning of
the winter season, and before traveling
where temperatures may drop below
freezing.
Inspect the condition and connections
of all cooling system and heater hoses.
Replace any that are worn or
deteriorated.
07030403-121-001Engine Compartment
1 — Engine Oil Dipstick
2 — Engine Oil Cap
233
Page 236 of 300

Warning!
Do not open hot engine cooling system.
Never add engine coolant (antifreeze) when
the engine is overheated. Do not loosen or
remove the cap to cool an overheated
engine. Heat causes pressure to build up in
the cooling system. To prevent scalding or
injury, do not remove the pressure cap
while the system is hot or under pressure.
Do not use a pressure cap other than
the one specified for your vehicle. Personal
injury or engine damage may result.
The coolant should be at full in the
radiator and between the F (Full) and L
(Low) marks on the coolant reservoir
when the engine is cool. If it is at or near L (Low), add coolant by
mixing a minimum solution of 50%
Mopar Long Life Coolant Concentrate
for FIAT Spider. Use higher
concentrations (not to exceed 70%) if
temperatures below −34°F (−37°C) are
anticipated. Bring the level to F (Full).
Please contact your Authorized Dealer
for assistance.
Securely tighten the coolant reservoir
tank cap after adding coolant.
If the coolant reservoir is empty or new
coolant is required frequently, contact
your Authorized Dealer.
Brake/Clutch Fluid
Inspecting Brake/Clutch Fluid Level
The brakes and clutch draw fluid
from the same reservoir.
Inspect the fluid level in the reservoir
regularly.
It should be kept between the MAX
and MIN lines.
The level normally drops with
accumulated use, a condition
associated with wear of brake and
clutch linings. If it is excessively low,
have the brake/clutch system
inspected. Contact your Authorized
Dealer.
Warning!
Use only manufacturer's recommended
brake fluid. Refer to “Fluids And Lubricants”
in “Technical Specifications” for further
information. Using the wrong type of brake
fluid can severely damage your brake
system and/or impair its performance. The
proper type of brake fluid for your vehicle is
also identified on the original factory
installed hydraulic master cylinder reservoir.
To avoid contamination from foreign
matter or moisture, use only new brake
fluid or fluid that has been in a tightly
closed container. Keep the master cylinder
reservoir cap secured at all times. Brake
fluid in a open container absorbs moisture
from the air resulting in a lower boiling
point. This may cause it to boil
unexpectedly during hard or prolonged
braking, resulting in sudden brake failure.
This could result in a collision.
07030501-121-001Coolant Reservoir
07030601-121-002Brake Fluid Reservoir
234
SERVICING AND MAINTENANCE
Page 249 of 300

Warning!
Tires and the spare tire should be replaced
after six years, regardless of the remaining
tread. Failure to follow this warning can
result in sudden tire failure. You could lose
control and have a collision resulting in
serious injury or death.
Keep dismounted tires in a cool, dry
place with as little exposure to light as
possible. Protect tires from contact with
oil, grease, and gasoline.
Replacement Tires
The tires on your new vehicle provide a
balance of many characteristics. They
should be inspected regularly for wear
and correct cold tire inflation pressures.
The manufacturer strongly recommends
that you use tires equivalent to the
originals in size, quality and
performance when replacement is
needed. Refer to the paragraph on
“Tread Wear Indicator”. Refer to the Tire
and Loading Information placard or the
Vehicle Certification Label for the size
designation of your tire. The Load Index
and Speed Symbol for your tire will be
found on the original equipment tire
sidewall. See the Tire Sizing Chart
example found in the “Tire Safety
Information” section of this manual for
more information relating to the Load
Index and Speed Symbol of a tire.It is recommended to replace the two
front tires or two rear tires as a pair.
Replacing just one tire can seriously
affect your vehicle’s handling. If you
ever replace a wheel, make sure that
the wheel’s specifications match those
of the original wheels.
It is recommended you contact your
authorized tire dealer or original
equipment dealer with any questions
you may have on tire specifications or
capability. Failure to use equivalent
replacement tires may adversely affect
the safety, handling, and ride of your
vehicle.Warning!
Do not use a tire, wheel size, load rating,
or speed rating other than that specified for
your vehicle. Some combinations of
unapproved tires and wheels may change
suspension dimensions and performance
characteristics, resulting in changes to
steering, handling, and braking of your
vehicle. This can cause unpredictable
handling and stress to steering and
suspension components. You could lose
control and have a collision resulting in
serious injury or death. Use only the tire
and wheel sizes with load ratings approved
for your vehicle.
Never use a tire with a smaller load
index or capacity, other than what was
originally equipped on your vehicle. Using a
tire with a smaller load index could result in
tire overloading and failure. You could lose
control and have a collision.
Failure to equip your vehicle with tires
having adequate speed capability can
result in sudden tire failure and loss of
vehicle control.
Caution!
Replacing original tires with tires of a
different size may result in false
speedometer and odometer readings.
Tire Types
All Season Tires — If Equipped
All Season tires provide traction for all
seasons (Spring, Summer, Fall and
Winter). Traction levels may vary
between different all season tires. All
season tires can be identified by the
M+S, M&S, M/S or MS designation on
the tire sidewall. Use all season tires
only in sets of four; failure to do so may
adversely affect the safety and handling
of your vehicle.
247
Page 263 of 300

Plastic And Coated
Parts
Clean interior plastic parts with a damp
cloth (if possible made from microfiber),
and a solution of water and neutral,
non-abrasive detergent.
To clean oily or persistent stains, use
specific products free from solvents and
designed to maintain the original
appearance and color of the
components.
Remove any dust using a microfiber
cloth, if necessary moistened with
water. The use of paper tissues is not
recommended as these may leave
residues.
Instrument panel precautions
Prevent caustic solutions such as
perfume and cosmetic oils from
contacting the instrument panel. They
will damage and discolor the instrument
panel. If these solutions get on the
instrument panel, wipe them off
immediately.
Note:Never use alcohol, gasoline and
derivatives to clean the instrument
panel lens.
Caution!
Do not use glazing agents. Glazing agents
contain ingredients which may cause
discoloration, wrinkling, cracks and peeling.
Instrument Panel Top
When cleaning, it is recommended that
you use a clean towel dampened in a
mild detergent to remove debris.
Caution!
If the surface is rubbed harshly, it could
result in the surface being damaged leaving
white scratch marks.
Window Interiors
If the windows become covered with an
oily, greasy, or waxy film, clean them
with glass cleaner. Follow the directions
on the container.
Note: Do not scrape or scratch the
inside of the window glass. It could
damage the thermal filaments.
Caution!
When washing the inside of the window
glass, use a soft cloth dampened in
lukewarm water, gently wiping the thermal
filaments. Use of glass cleaning products
could damage the thermal filaments.
Leather Parts(If — Equipped)
Caution!
Do not use Alcohol and Alcohol-based
and/or Keton based cleaning products to
clean leather seats, as damage to the seat
may result.
Remove dust and sand first using a
vacuum cleaner or other means, then
wipe dirt off using a soft cloth with a
leather cleaner or a soft cloth soaked in
mild soap.
Wipe off the remaining cleaner or soap
using a cloth soaked in clean water and
wrung out well.
261
Page 264 of 300

Remove moisture with a dry, soft cloth
and allow the leather to further dry in a
well-ventilated, shaded area.
If the leather gets wet such as from
rain, also remove moisture and dry it as
soon as possible.
Note:
Because genuine leather is a natural
material, its surface is not uniform and
it may have natural scars, scratches,
and wrinkles.
To maintain the quality for as long
as possible, periodical maintenance,
about twice a year, is recommended.
Caution!
Sand and dust on the seat surface may
damage the overcoat of the genuine
leather surfaces and accelerate wear
.
Greasy soiling on genuine leather may
cause molding and stains.
Rubbing hard with a stiff brush or cloth
may cause damage.
Do not wipe the leather using alcohol,
chlorine bleach, or organic solvents such
as thinner, benzene, or gasoline. Otherwise,
it may cause discoloration or stains.
If the seats get wet, promptly remove
moisture with a dry cloth. Remaining
moisture on the surface may cause
deterioration such as hardening and
shrinkage.
Exposure to direct sunlight for long
periods may cause deterioration and
shrinkage. When parking the car under
direct sunlight for long periods, shade the
interior using sunshades.
Do not leave vinyl products on the seats
for long periods as they may affect the
leather quality and coloring. If the cabin
temperature becomes hot, the vinyl may
deteriorate and adhere to the genuine
leather.
262
SERVICING AND MAINTENANCE