Page 33 of 81
31
e-mehari_en_Chap01_faite-connaissance_ed02-2016
3. Push the charging nozzle (2) i nto the
charging socket until it clicks in place.
4.
Char
ging starts automatically. The
CHARGING indicator on the control unit
comes on to indicate that charging is in
progress.
Two signals indicate that the vehicle's battery
is charging:
-
Th
e right-hand rear lamp flashes 5
t
imes at
the start of the charge.
-
Th
e connection indicator (green plug) in the
display screen flashes continuously.
Stopping the charge
1. Press the unlocking button on the back of
t he charging nozzle then pull it out. The
charging nozzle disengages only if your
E-MEHARI has been unlocked using your
personal RFID key ring. 2. Re
fit the protective cover on the charging
nozzle.
3.
Di
sconnect the plug from the power point.
1
Get to know your E-MEHARI
Page 34 of 81
 32
e-mehari_en_Chap01_faite-connaissance_ed02-2016
Comparison of charging
times
Type of chargeEstimated charging
time (0-100%)
Charging point :
16 A 8
t
o 9
h
ours
220V – 10A power point 13")
32
e-mehari_en_Chap01_faite-connaissance_ed02-2016
Comparison of charging
times
Type of chargeEstimated charging
time (0-100%)
Charging point :
16 A 8
t
o 9
h
ours
220V – 10A power point 13
h
our s
When charging the vehicle, particularly
at the roadside, be especially careful of
children when handling the cable and
the charging point.
The cable reel can operate sharply and
cause injury.
Children could trap their fingers in the
charging point closing mechanism.Indications given by the LEDs on the control panel
Green LED Ye l l o w L E D Red LED Description
On for ½
s
ec. On for ½
s
ec. On for ½
s
ec. All of the LEDs come on for ½ second to verify that they work, when the charging cable is
plugged into the power point.
On Off OffThe charging cable is plugged into the power
point. If the YA Z AKI connector is in the vehicle's
charging socket, the charge has finished.
On OnOffThe vehicle's battery is charging.
On OffOn / flashing Fault with the charging cable. Stop using
the charging cable immediately and contact
CITRÖEN ASSISTANCE.
Off OffOffNo electrical power supply is detected at the
power point by the charging cable. Check the
circuit breaker for the power point. If the electrical
power supply is working correctly and none of
the LEDs come on for ½ second to verify that
they are working, it is possible that the charging
cable is damaged. Stop using it immediately and
contact CITRÖEN ASSISTANCE.
Get to know your E-MEHARI
Page 35 of 81
33
e-mehari_en_Chap02_conduite_ed02-2016
Starting / Switching off the vehicle
Before moving off, check that the
position of the drive selector agrees
with your intention.
The drive direction is indicated on the
drive selector by illumination of the ring
in green.
The starting switch (1) is located to the right of
the steering wheel.Starting switch
(1) STOP position: your E-MEHARI is
stationary.
(2) MAR: the 12V battery is connected and the
accessories can be used.
(3) AV V position: switching on the electric
motor.
2
Driving
Page 36 of 81
 34
e-mehari_en_Chap02_conduite_ed02-2016
Your E-MEHARI is a silent electric
vehicle.
Your E-MEHARI produces no noise
from its electric motor.
For any manoeuvre: take particular
care in checking you")
34
e-mehari_en_Chap02_conduite_ed02-2016
Your E-MEHARI is a silent electric
vehicle.
Your E-MEHARI produces no noise
from its electric motor.
For any manoeuvre: take particular
care in checking your surroundings,
particularly for pedestrians, cyclists and
other road users.
Moving off
To move off in your E-MEHARI, you should:
1. Unlock your E-MEHARI using your personal
RFID key ring.
2.
In
sert the key in the starting switch then turn
it to the MAR position. The welcome screen
appears.
3.
Wh
en you are invited to do it, turn the key to
the AV V position, holding it until your hear
an audible signal (beep). Release the key,
the switch automatically returns to the MAR
position. The following image appears in the
instrument panel screen: 4. Pr
ess the brake pedal.
5. Pl ace the drive selector at position "D"
(for ward drive) or "R" (reverse).
6.
Re
lease the manual parking brake.Switching off the vehicle
To park your E-MEHARI, you should:
1. Place the vehicle in a secure area suitable
for parking.
2.
Immo
bilise the vehicle.
3.
Pl
ace the drive selector at position
"
N".
4.
Ap
ply the manual parking brake.
5.
Sw
itch off and remove the key from the
starting switch.
Driving
Page 37 of 81
35
e-mehari_en_Chap02_conduite_ed02-2016
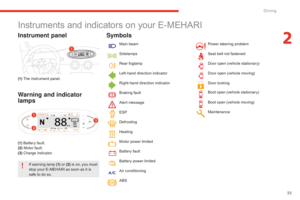
Instruments and indicators on your E-MEHARI
Instrument panel
(1) The instrument panel.
Warning and indicator
lamps
(1) Battery fault.
(2) Motor fault.
(3) Charge indicator.
If warning lamp (1) or (2)
i
s on, you must
stop your E-MEHARI as soon as it is
safe to do so.
Symbols
Main beam
Sidelamps
Rear foglamp
Left-hand direction indicator
Right-hand direction indicator
Braking fault
Alert message
ESP
Defrosting
Heating
Motor power limited
Battery fault
Battery power limited Door locking
Air
c
onditioning
ABS Power steering problem
Seat belt not fastened
Door open (vehicle stationary)
Door open (vehicle moving)
Boot open (vehicle stationary)
Boot open (vehicle moving)
Maintenance
2
Driving
Page 38 of 81
36
e-mehari_en_Chap02_conduite_ed02-2016
Distance recorders
(1) Total distance covered (in km).
(2) Di stance covered since the last reset
(in
k
m).
Speedometer, temperature
indicator and clock
(1) Clock.
(2 ) Ri sk of ice indicator.
(3)
Ambi
ent temperature indicator.
(4)
Curr
ent speed.
Consumption, charge,
state of charge indicators
(1) Image of power demand.
(2 ) Im age of energy recovery.
(3) LMP
® battery state of charge indicator.
(4) Pe
rcentage charge remaining.
Driving
Page 39 of 81
 37
e-mehari_en_Chap02_conduite_ed02-2016
Parking brake
Always check that your manual parking
brake is applied before leaving the
vehicle.Note
In very cold conditions, the manual parking
brake could")
37
e-mehari_en_Chap02_conduite_ed02-2016
Parking brake
Always check that your manual parking
brake is applied before leaving the
vehicle.Note
In very cold conditions, the manual parking
brake could freeze and be impossible to
release.
When parking on a slope, turn the front
wheels into the kerb, apply the parking
brake and switch off at the starting
switch.
Check that the parking brake is
released before moving off.
Not releasing the parking brake could
result in its failure and cause an
accident.
Never release the parking brake from
outside the vehicle. Never leave children unsupervised
inside the vehicle.
They might release the parking brake
and cause an accident.
Only release the brake pedal once the
parking brake has been fully applied.
Failure to apply the parking brake could
allow the vehicle to move on its own
and cause an accident.Applying the parking brake
To apply the manual parking brake and
immobilise your vehicle, pull the lever (1)
fully
up.
An indicator lamp appears in the
instrument panel once the parking
brake is applied.
2
Driving
Page 40 of 81
38
e-mehari_en_Chap02_conduite_ed02-2016
Releasing the parking brake
To release the manual parking brake:
1. Pull slightly on the lever (1) .
2.
Pr
ess the release button (2) .
3.
Lo
wer the lever.
Once the parking brake is completely released,
the indicator lamp goes off in the instrument
panel.
Drive selector
Do not press the accelerator pedal
when moving the selector lever from
position "N" to position "D" or "R".
All changes of drive selector position
must be made with the vehicle
stationary.
Failure to follow this advice introduces
the risk of an accident.
Do not change drive direction with the
selector when the accelerator pedal is
pressed down.
This can cause the vehicle to move off
suddenly and cause an accident.
(1)
Drive selector.
Selector positions
(N): "NEUTR AL" position: no drive engaged.
(D): "DRIVE" position: for ward drive.
(R): "REVERSE" position: reverse drive.
It is essential to keep the brake pedal applied
when changing selector position.
Driving


 31
e-mehari_en_Chap01_faite-connaissance_ed02-2016
3. Push the charging nozzle (2) i nto the
charging socket until it clicks in place.
4.
Char
ging starts automatically. The
CHARGING indicator on")
 33
e-mehari_en_Chap02_conduite_ed02-2016
Starting / Switching off the vehicle
Before moving off, check that the
position of the drive selector agrees
with your intention.
The drive direction is indi")
 35
e-mehari_en_Chap02_conduite_ed02-2016
Instruments and indicators on your E-MEHARI
Instrument panel
(1) The instrument panel.
Warning and indicator
lamps
(1) Battery fault.
(2) Motor fault.
(3) C")
 36
e-mehari_en_Chap02_conduite_ed02-2016
Distance recorders
(1) Total distance covered (in km).
(2) Di stance covered since the last reset
(in
k
m).
Speedometer, temperature
indicator and clock
(1")
 38
e-mehari_en_Chap02_conduite_ed02-2016
Releasing the parking brake
To release the manual parking brake:
1. Pull slightly on the lever (1) .
2.
Pr
ess the release button (2) .
3.
Lo
wer the lever")