Page 57 of 348

55
C5_en_Chap02_ouverture_ed01-2016
Unlocking
F Press button A again to unlock the vehicle.
The red indicator lamp on the button
switches off.
Automatic central locking
Locking
When the speed exceeds 6 mph (10 km/h), the
doors and the boot lock automatically.
If one of the doors is open, the automatic
central locking does not take place.
If the boot is open, the automatic central
locking of the doors is active.
Unlocking
F Above 6 mph (10 km/h), press button A to unlock the doors and the boot temporarily.
Activation
F Press button A for more than two seconds.
A confirmation message appears on the
instrument panel screen, accompanied by an
audible signal.
Deactivation
F Press button A again for more than two seconds.
A confirmation message appears on the
instrument panel screen, accompanied by an
audible signal.
If the vehicle is locked or deadlocked
from the outside, the red indicator lamp
flashes and button A is inactive.
F
I
n this case, use the remote control
or the key to unlock the vehicle. System which provides full automatic locking
or unlocking of the doors and the boot while
driving.
You can activate or deactivate this function.
2
Access
Page 58 of 348

56
C5_en_Chap02_ouverture_ed01-2016
System allowing the doors to be locked and
unlocked manually in the event of a malfunction
of the central locking system or battery failure.
Locking the driver's door
F Insert the key in the door lock, then turn it to the rear.
You can also apply the procedure described for
the passenger doors.
Unlocking the driver's door
F Insert the key in the door lock, then turn it to the front.
Locking the passenger doors
F Open the doors.
F O n the rear doors, check that the child lock
is not on.
For more information on the Child lock , refer
to the corresponding section.
F
R
emove the black cap, located on the edge
of the door, using the key.
F
I
nsert the key in the socket without forcing
it, then without turning it, move the latch
sideways towards the inside of the door.
F
R
emove the key and refit the cap.
F
C
lose the doors and check that the vehicle
has locked correctly from the outside.
Unlocking the passenger doors
F Pull the interior door opening control.
Back-up control
Access
Page 59 of 348
57
C5_en_Chap02_ouverture_ed01-2016
Boot (Saloon)
F Press upwards on lever 1 and lift up the boot lid. With the vehicle stationary, this is carried out
using:
-
T
he remote control.
-
T
he key in a door lock.
-
T
he interior central locking/ unlocking control.
The boot automatically locks when the vehicle
is moving at a speed of over 6 mph (10 km/h),
even if automatic central locking is deactivated.
It is unlocked when a door is opened or when
the central locking button is pressed (speed
lower than 6 mph (10 km/h)).
Opening Locking/unlocking Emergency boot release
Unlocking
F Fold back the rear seats to gain access to
the lock from inside the boot.
F
I
nsert a small screwdriver into hole A of the
lock to unlock the tailgate.
F
P
ush the white part, located inside the
lock, to the left to unlock the boot.
System for mechanical unlocking of the boot
in the event of a battery or central locking
malfunction.
2
Access
Page 60 of 348
58
C5_en_Chap02_ouverture_ed01-2016
Motorised opening
Boot (Tourer)
Manual opening
F Press upwards on lever A and lift up the tailgate. F
P ress upwards on lever A, or press of more
than one second on button B of the remote
control.
Manual closing
F Lower the tailgate using the interior handle C.
Motorised closing
F Press the push-button D to close the
tailgate.
Do not interrupt the closing of the tailgate;
if any obstacle prevents it closing, the
operation will stop and the tailgate will
automatically rise by a few centimetres.
Do not attempt to help the opening of
the tailgate manually after pressing the
control A
.
Access
Page 61 of 348

59
C5_en_Chap02_ouverture_ed01-2016
Cancelling the
memorisation
With the tailgate in the intermediate position,
you can cancel the stored position:
F
M
ake a long press on push-button D .
The system emits a long audible beep.
F
R
elease the push-button D . The tailgate
will return to the fully open position at the
next use.
Electrical protection of the
motor
If the tailgate is repeatedly opened and closed
in quick succession, the motor can start to
overheat and then cut out, preventing opening
and closing of the tailgate.
Allow the motor to cool down for ten minutes
without opening or closing the tailgate.
Closing in manual back-up mode remains
possible.
To avoid risk of injury, make sure that
no one is in the vicinity of the boot while
opening and closing.
If the tailgate is carrying extra weight
(snow, bicycle carrier, etc.) there is a
risk of it closing under this load. Support
the tailgate or first unload the bicycle
carrier or clear the snow.
When using an automatic car wash,
don’t forget to lock the vehicle so as to
avoid any risk of motorised opening of
the tailgate.
Memorisation of an
intermediate position
You can store an opening angle for the tailgate:
F M anually or automatically move the tailgate
to the required position.
F
M
ake a long press on push-button D .
The system emits a short audible beep.
F
R
elease the push-button D .
Interrupting the opening /
closing of the tailgate
When the tailgate is being opened or closed
electrically, you can interrupt its movement
at any point by pressing push-button D , the
control A or button B .
You can then open or close the tailgate
electrically or manually, if necessary moving it
in the opposite direction to release it.
Locking/unlocking
With the vehicle stationary, this is carried out
using:
-
T
he remote control.
-
T
he key in a door lock.
-
T
he interior central locking/ unlocking
control.
The boot automatically locks when the vehicle
is moving at a speed of over 6 mph (10 km/h),
even if automatic central locking is deactivated.
It is unlocked when a door is opened or when
the central locking button is pressed (at a
speed of less than 6 mph (10 km/h)).
2
Access
Page 62 of 348

60
C5_en_Chap03_ergonomie-et-confort_ed01-2016
Front seats
Manual adjustments
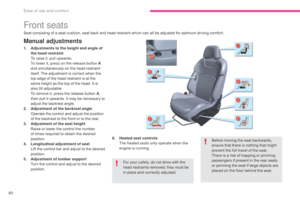
1. Adjustments to the height and angle of the head restraint
T
o raise it, pull upwards.
T
o lower it, press on the release button A
and simultaneously on the head restraint
itself. The adjustment is correct when the
top edge of the head restraint is at the
same height as the top of the head. It is
also tilt adjustable.
T
o remove it, press the release button A ,
then pull it upwards. It may be necessary to
adjust the backrest angle.
2.
A
djustment of the backrest angle
O
perate the control and adjust the position
of the backrest to the front or to the rear.
3.
A
djustment of the seat height
R
aise or lower the control the number
of times required to obtain the desired
position.
4.
L
ongitudinal adjustment of seat
L
ift the control bar and adjust to the desired
position.
5.
A
djustment of lumbar support
T
urn the control and adjust to the desired
position.
Seat consisting of a seat cushion, seat back and head restraint which can all be adjusted for optimum driving comfort.
For your safety, do not drive with the
head restraints removed; they must be
in place and correctly adjusted.Before moving the seat backwards,
ensure that there is nothing that might
prevent the full travel of the seat.
There is a risk of trapping or pinching
passengers if present in the rear seats
or jamming the seat if large objects are
placed on the floor behind the seat.
6.
H
eated seat controls
T
he heated seats only operate when the
engine is running.
Ease of use and comfort
Page 63 of 348

61
C5_en_Chap03_ergonomie-et-confort_ed01-2016
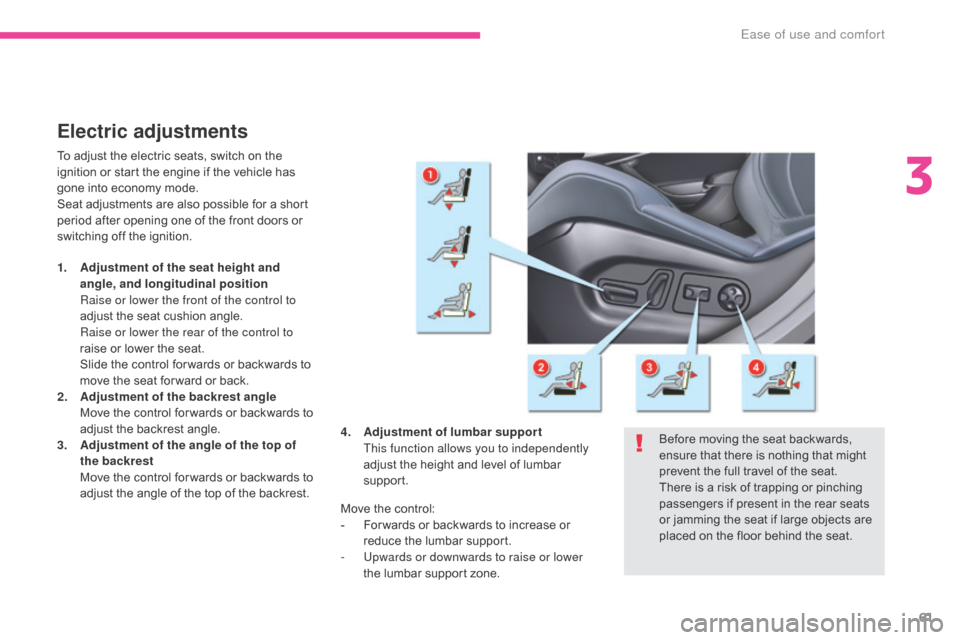
Electric adjustments
To adjust the electric seats, switch on the
ignition or start the engine if the vehicle has
gone into economy mode.
Seat adjustments are also possible for a short
period after opening one of the front doors or
switching off the ignition.
1.
A
djustment of the seat height and
angle, and longitudinal position
R
aise or lower the front of the control to
adjust the seat cushion angle.
R
aise or lower the rear of the control to
raise or lower the seat.
S
lide the control for wards or backwards to
move the seat for ward or back.
2.
A
djustment of the backrest angle
M
ove the control for wards or backwards to
adjust the backrest angle.
3.
A
djustment of the angle of the top of
the backrest
M
ove the control for wards or backwards to
adjust the angle of the top of the backrest. Before moving the seat backwards,
ensure that there is nothing that might
prevent the full travel of the seat.
There is a risk of trapping or pinching
passengers if present in the rear seats
or jamming the seat if large objects are
placed on the floor behind the seat.
Move the control:
-
F
or wards or backwards to increase or
reduce the lumbar support.
-
U
pwards or downwards to raise or lower
the lumbar support zone.
4.
A
djustment of lumbar support
T
his function allows you to independently
adjust the height and level of lumbar
support.
3
Ease of use and comfort
Page 64 of 348

62
C5_en_Chap03_ergonomie-et-confort_ed01-2016
Head restraint height and angle
adjustments
(electric seats)
F To adjust the angle of the head restraint, push back or pull for ward section B of the
head restraint until you reach the desired
position.
F
T
o raise it, pull upwards.
F
T
o lower it, press on the control C to
release it, and simultaneously on the head
restraint itself.
F
T
o remove it, press on the control C to
release it, then pull it upwards.
Heated seats control
With the engine running, the front seats can
operate separately.
F
U
se the corresponding adjustment dial,
placed on the outer side of each front seat,
to switch on and select the level of heating
required:
0: Off.
1 : Low.
2 : Medium.
3 : High.
Do not use the function if the seat is not
occupied.
Reduce the level of heating as soon as
possible.
Once the seat and passenger
compartment are at a comfortable
temperature, you can switch off the
function; reducing electric current
consumption also reduces fuel
consumption. Prolonged use at the highest setting
is not recommended for those with
sensitive skin.
There is a risk of burns for those that
do not have normal perception of heat
(illness, taking medicines, ...).
There is a risk of overheating the
system if material with insulating
properties is used, such as cushions or
seat covers.
Do not use the system:
-
i
f wearing damp clothing,
-
i
f child seats are fitted.
To avoid breaking the heating element
in the seat:
-
d
o not place heavy objects on the
seat,
-
d
o not kneel or stand on the seat,
-
d
o not place sharp objects on the
seat,
-
d
o not spill liquids onto the seat.
To avoid the risk of short-circuit:
-
d
o not use liquid products for
cleaning the seat,
-
n
ever use the heating function
when the seat is damp.
Ease of use and comfort