Page 57 of 266

a:,
a:,
...... N
" N ...... 0
0
LL co
.. Se lect: I CARI function button> Car system s*
contro l button > S erv ici ng & checks > Wip er
s ervice po sition
> On /Off .
Removing th e wiper blade
.. Lift the windshield wipe r a rm up from the
windsh ield.
.. Press the locking knob@¢
fig. 63 on the wiper
blade. Hold the wiper blade firm ly.
.. Remove the wiper blade in the direct ion of the
arrow.
Attaching the wiper blade
.. Install the new wiper b lade in the reta iner on
the wiper arm @unti l you hear it click into
place on the wiper arm .
.. Place the wiper arm back on the windshie ld.
.. Turn the serv ice position off.
A WARNING
For your safety, you should rep lace the wipe r
blades once or tw ice a year . See yo ur aut ho r
ized Aud i dea le r fo r rep lacement blades.
(D Note
- The windshield wiper blades must only be
replaced when in the service position! Oth
erwise, you risk damag ing the pa int on the
hood or the windshield wipe r motor .
- You should not move yo ur vehicle o r press
the w indshie ld w iper lever when the wiper
a rms are fo lded away from the w indshield .
The w inds hield wipers would move back in
to their orig inal posi tion and cou ld damage
t h e hood and windshield.
- To hel p prevent d amage t o th e wiper sys
tem, always loosen blades which are frozen
to the windshie ld befo re operating wipers .
- To hel p preve nt d amage to wiper blades, do
not use gasoline, kerosene, pain t thinner, o r
other solvents on or nea r th e wiper blades .
- To he lp preve nt damage to t he wiper arms
or othe r compo nents, do not a ttempt to
move the wipers by hand .
Lights and Vision
(D Tips
- Commercia l hot waxes applied by automatic
car washes affect the how easily the glass
surface can be cleaned.
- Yo u ca n also use the service posit io n, for ex
ample, if you want to protect the windshield
from icing by using a cover .
Digital compass
Switching the compass on and off
Applies to: veh icles w ith dig ital compass
The compass direction is shown in the rearview
mirror.
Fig. 64 Rearview mirror: Digital compass activated
M
-
.. To switch the compass on or off, press and ho ld
the button ® unti l the compass disp lay in the
m irror ¢
fig. 64 appears or disappea rs.
T he dig ita l compass on ly works when t he ignit ion
is on. The directions are indicated with abbrevia
t ions: N (north), NE (northeast), E (east), SE
(southeast) ,
S (south), SW (southwest), W
(west), NW (northwest) .
@ Tips
To prevent inaccurate compass read ings, do
not br ing any remote contro ls, electrical devi
ces or metallic objects near the mirror.
55
Page 58 of 266

Lights and Vision
Adjusting the magnetic zone
Applies to: ve hicles w ith d ig ital compass
The magnetic zone must be adjusted correctly
for the compass to read accurately .
~
LIU ®
Fig. 65 No rt h Amer ica : ma gnetic def lect ion zone bounda
ri es
"' Press and hold the button@~ fig. 65 unt il the
number of the magne tic zone appears in t he
rearview mirro r.
"' Press the b utton @ repeatedly to select the
correct magnetic zone . The selection mode
turns off after a few seconds.
Calibrating the compass
A pp lies to: ve hicles w ith d ig ital compass
You must recalibrate the compass if it does not
display the correct direction.
"' Press and hold the button @until a C appears
in the rearview mirror .
"' Drive in a circle at about 6 mph (10 km/h) unti l
a d irection is displayed in the rearview mirror .
A WARNING
-To avo id endangering yourse lf and other
dr ivers, calibrate the compass in an area
whe re t here is no traffic.
56
- The digital compass is to be used as a direc
tional a id on ly. Even though you may want
to look at it while you are driving, you must
still pay attent ion to traffic, road and
weather conditions as well
as other possible
hazards .
Page 59 of 266

a:,
a:,
...... N r--. N ...... 0
0
LL 00
Seats and storage
General information
Why is your seat adjustment so important?
The safety belts and the airbag system can only
provide maximum protection if the front seats are corr ectly adjusted .
There are various ways of adjusting the front
seats to provide safe and comfortable support
for the driver and the front passenger . Adjust
your seat properly so that:
- you can easily and quickly reach all the switches
and controls in the instrument panel
- your body is properly supported thus reducing
physical stress and fatigue
- the safety belts and a irbag system can offer
maximum protection
Q page 130.
In the following sections, you will see exact ly
how you can best adjust your seats.
There are spec ial regulations and instr uctions for
installing a child safety seat on the front pas
senger's seat . Always fo llow the information re
garding child safety provided in
¢ page 150,
Child safety.
A WARNING -
Refer to Q page 111, Driving safety for im
portant information, tips, suggestions and
warnings that you should read and follow for
your own safety and the safety of yo ur pas
senge rs.
A WARNING
Incorrect seat ing position of the driver and all
other passengers can result in serious person
al injury .
- Always keep yo ur feet on the floor when the
vehicle is in motion -never pu t your feet on
top of the instrument pane l, out o f the win
dow or on top of the seat cushion. This ap
plies especially to the passengers. If your
seating pos it ion is incorrect, you increase
the risk of injury in the case of sudden brak
ing or an accident. If the airbag inflates and
Seat s and sto rage
the seating position is incorrect, this could
result in persona l injury or even death.
- It is important for both the driver and front
passenger to keep a distance of at least
10 inches (25 cm) between themselves and
the steering wheel and/or instrument pan
el. If you're sitt ing any closer than this, the
airbag system cannot protect you properly .
In addition, the front seats and head re
stra ints must be adjusted to you r body
he ight so that they can g ive you maximum
p rotection.
- Always try to keep as much dis tance as pos
sible between yourself and the steer ing
wheel or instrument pane l.
- Do not adjust the driver's o r front passeng
er 's seat while the veh icle is moving . Your
seat may move unexpectedly, causing sud
den loss of vehicle contro l and personal in
jury. If you ad just your seat while the veh icle
is moving, you are out of pos ition.
Driver's seat
The correct seat position is important for safe
and relaxed driving.
We recommend that you adjust the driver's seat
in the following manner:
.,. Adjust the seat in fo re and aft direction so tha t
you c an ea sil y push the pedals to the floor
while keeping yo ur knees s light ly bent ¢.&.
in
Why is your seat adjustment so important? on
page
57.
.,. Adj ust the seatback so that when you sit with
your back against the seatback, you can still
grasp the top of the steering wheel.
.,. App lies to ve hicles w ith ad justable head re
stra ints: Adjust the head rest raint so the upper
edge is as even as possible w ith the top of your
head. If t hat is not possible , try to adjust the
he ad restraint so that it is as close to this pos i
tion as possible ¢
page 60.
A WARNING ~
Never place any objects in the driver 's foot-
well. An object could get into the pedal area and interfere with pedal function. In case of
57
Page 60 of 266

Sea ts and stor age
sudden braking or an accident, you would not
be able to brake or accelerate.
Front passenger's seat
Always move the front passenger seat into the
rearmost position.
To avoid contact with the a irbag while it is de
p loying, do not sit any closer to the instrument
panel than necessary and a lways wear the three
point safety belt provided adjusted correctly. We
recommend that you adjust the passenger's seat
in the following manner:
.,. Bring the backrest up to an (a lmost) upright
position .
Do not ride with the seat reclined.
.,. Applies to vehicles with adjustable head re
straints: Adjust the head restra int so the upper
edge is as even as poss ible with the top of your
head. If that is not possible, try to adjust the
head restraint so that it is as close to th is posi
tion as poss ible
¢ page 60.
.,. Place your feet on the floor in front of the pas
senger's seat.
Front seats
Power seat adjustment
App lies to: vehicles with power adjustable seats
Fig . 66 Fro nt seats: power seat adjustment
Controls
@ -Adjusting the lumba r support*: press the
button in the corresponding position¢& .
@-Movi ng the seat up/down: p ress the but ton
up/down¢ &.
@ -Moving the seat forward/back: press the but
ton forwa rd/back ¢,& .
58
©-Adjusting the backrest ang le: press the but
ton forward/back ¢
.&..
©-Raising/ lower ing* the head restra ints: press
the button up/down ¢& .
@ -Lengthening/sho rtening the upper th igh
suppo rt*: lift the handle. A spr ing moves the
front seat cushion forward ¢
,&.
& WARNING
-Never ad just the driver's or front passeng
er's seat while the vehicle is moving.
If you
do this while the veh icle is moving, you will
be out of posit ion. Always ad just the driver's
or front passenger's seat when the vehicle is
not moving .
- Be carefu l when adjusting the seat height .
Check to see that no one is in the way, or se
rious injury could result!
- Because the seats can be electrically adjust
ed w ith the ignition off or with the ig nition
key removed, never leave children unattend
ed in the vehicle. Unsupe rvised use of the
electric seat adj ustments may cause ser ious
m Jur y.
- To red uce the r isk of injury in the case of
sudden b raking or acc ident, front passen
ge rs must neve r ride in a moving ve hicle
w it h the backrest reclined. Sa fety belts and
the airbag system on ly offer maximum pro
tect ion when the backrest is upr ight and the
safety belts are properly positioned on the
body. The more the backrest is reclined, the
greater the risk of personal injury from an
incorrect seating position and improper ly
positioned safety belts.
-
Page 61 of 266

a:,
a:,
...... N
" N ...... 0
0
LL co
Power easy entry function
Applies to: vehicles with power adjustable seats
The easy entry function makes it easier for the
rear passengers to enter and leave the vehicle .
Fig. 67 Comfort seats •: easy e ntry co ntro ls
F ig. 68 Sport sea ts •: easy en try co ntro ls
.. To fo ld the front seat backrests forward/back,
lift the latch @¢ fig. 67 or ¢ fig. 68 and fold
the backrest forward .
.,. To move the front seats forward/back, press
and hold the @ button until the seat has
reached the desired pos ition .
When the front seats are moved forward, their or iginal pos ition is stored. When it is moved
back, the seat automatically stops in this pos i
tion . To move the seat even further back, you
have to release the switch @ and reactivate it .
Applies to vehicles w ith adjustab le head re
stra ints: The head restraints from the fro nt
seats, depend ing on the seat he ight that has
been set, are automatically retracted when the
seatbacks are folded dow n. Th ey retu rn to their
or iginal pos ition aga in when the seatbac ks for
the fro nt sea ts ar e raised.
Seats and storag e
(D Tips
With the dr iver's or passenger's door closed,
the corresponding sw itch to move the seat is
i noperative.
Seat adjustments in MMI
Appl ies to : vehicles with seat memory and MMI
The passenger's seat can be adjusted to various
positions by the driver.
Convenience side view
.,. Select: !CAR ! func tion button> Seat adju st
ment > Passenger' s seat > Convenience side
view.
O r
.. Select: !CAR ! function button > Car systems *
control button > Vehicle settings > Seats >
Passenger's seat > Conven ience side view .
.,. Continue to press the control knob until the ad
justment process
is comp lete .
Seat symmetry
.. Select: Function button !CAR !> Seat adjust ·
ment
> Pa ssenger 's seat > Seat symmetry . Or
.. Select: !CAR ! function button> Car systems *
control button > Vehicle settings > Seats >
Pas senger's seat> Align with driver's seat .
.,. Continue to press the control knob unt il the ad-
justment process is comp lete.
U si ng the
Convenience side view funct ion, the
passenger's sea t is adjusted so that the driver
has the best poss ib le view to the right . When the
Convenience side view is se t, the spe cific pos ition
of the dr iver's seat is taken into conside ra t ion.
U sing the
Seat symmetry function, the passeng
er's seat can be moved to the same pos ition as
the driver 's sea t. The settings for the drive r's seat
are impo rted and set au to ma tically.
59
Page 62 of 266

Sea ts and stor age
Center armrest
The center armrest can be adjusted to several
levels.
F ig . 6 9 Armrest between the driver's/front passenger's
seats.
Adjust ing th e cente r armre st
.. To adjust the angle, raise the armrest from the
start ing position¢
fig, 69 detent by detent .
.. To bring the armrest back i nto the starti ng po
s ition, raise it out of the top detent and fold it
back down.
The armrest can slide forward and back .
Head restraints
Front head restraints
Applies to: v ehicles with a djustable head res traints
Head restraints that are adjusted according to
body size, along with the seat belt, offer effec
tive protection .
Fig. 70 Fro nt seat: adjust ing the manual head rest rain ts
60
Fig. 71 Fro nt seat: adjusting th e power head restraint
Adjust the head restraint so the upper edge is as
even as possible w ith the top of you r head . If tha t
i s not possib le, try to adjust the head res tra int so
that it is as clo se to th is position as possible
¢ page 60.
.,. To adjust the he igh t of the manua l head re
s t rai nt*, g rip the head restra int on the sides
with both hands and slide it up/down until it
locks into place ¢
fig. 70.
.. To adjust the height of the power head re-
straint*, press the button up/down¢
fig. 71.
Refer to ¢ page 114, Proper adjustment of head
restraints
for guidelines on how to adjust the
height of the front head restraints to suit the oc
cupant's body size.
A WARNING
- Dr iving without head restraints or with head
restraints that are not properly ad justed in
creases the risk of serious or fatal neck in
jury d ramat ically .
- Read and heed all WARNINGS
¢page 114,
Proper adjustment of head restraints.
@ Tips
- To prevent the head restraints from running
into the headliner, they retract automat ica l
ly when moving the seat fo rward or upwa rd .
- Correct ly adjusted head restraints and safe
ty be lts are an extremely effective combina
t ion of safety fea tures.
Page 63 of 266

a:,
a:,
,....,
N
" N ,....,
0
0
LL co
Memory function
Description
Applies to: vehicles with memory function
The memory funct ion allows yo u to qu ickly and
eas ily store and recall personal seat ing profi les
for the driver. The memory function is operated
through the master key and the memory buttons
in the driver 's door.
The drive r's seating profile is stored and assigned
to the maste r key each t ime the vehicle is locked.
When you open the door, the seat profile is auto
matica lly recalled.
If two people use one vehicle,
it is recomm ended that each person a lways uses
"their own" master key .
Up to 2 seat prof iles can be stored in the memory
buttons in the driver 's door . Once they are stor
ed, these s eat profiles can be selected at any
time.
I n addition to the driver 's seat settings, you can
a lso store and access the exterior mirror adjust
ment settings* using the remote control key or
memory button .
Remote control key
Applies to: veh icles with seat memory
To assign the driver 's seat settings to the remote
control key when locking the vehicle, the function
must be act ivated in the rad io or MMI*
.. Select :
I CARI function button > Seat adjust
ment > Driver's seat > Remote con trol ke y
>
on .Or
.,. Select :
- 1 C_ A_ R_ I funct io n button > Car sy stem s*
contro l button > Vehicl e sett ing s > Seat s>
Driv er' s s eat > Remote control key > On .
@ Tips
If you do not wa nt another driver 's settings to
be assigned to the remo te key, switch off the
memory fu nction us ing t he radio o r MMI* or
t he
I ON/OF F I button ¢ page 61.
Seats and storag e
Memory buttons
Applies to: vehicles with seat memory
Fig. 72 D river 's doo r: memo ry fu ncti on butto ns
The memory buttons are located in the driver's
door .
Switching th e m emo ry functi on on /off
.. Press the ION/O FF I button to switch the memo
ry function on/off. The word
OFF lights up
when the memory function is swit ched off . Seat
profiles are nei ther stored nor recalled.
Storing a seat p rofil e
.. Press the ISE TI button. When the word S ET
lights up, the memory is ready to store set
tings.
.,. Press a memory button
tone confirms that the sett ings were sto red.
Accessing a sea t profile
.. If the driver's door is open and the ignition is
switched off, press th e memory button .
.. If the driver's door is closed or the ignition is
sw itched on, press and hold the memory but
ton u ntil the seat adjustment is complete .
.&_ WARNING
-For safety reasons, the seat sett ing can only
be reca lled when the vehicle is st ationa ry -
o therwise yo u ris k hav ing an accident.
- I n an emergency the recall proced ure can be
cancelled by pressi ng the
I ON/OF F I switch or
by tapping the memory bu ttons.
61
Page 64 of 266

Sea ts and stor age
Ashtray
Fig. 73 Center console: as htray
Opening /closing
.,. To open the ashtray, slide the cover up
~fig . 73 .
.,. To close the ashtray, p ress down o n the cover .
Emptying th e ashtra y
.,. To remove the insert, slide the latch to the
right
<=> fig . 73 -arrow -.
.,. To install the insert , press it dow n into the
mount.
,&. WARNING
-
Never put waste paper in the ash tray. Hot
ashes o r other hot objects in the ashtray could
set waste paper on fire.
Cigarette lighter
Fig. 74 Fr ont ce nte r console: cigarette l ighte r
.,. Press the cigarette lighter in .
.,. Remove the cigarette lighter when it pops out .
62
,&. WARNING
The cigarette lighter only works when the ig
ni tion is switched on. Incorrect usage can lead
to serious injuries or burns. For this reason,
ch ild ren should never be left unattended in
the vehicle because th is increases the ris k of
in jury.
(D Note
The cigarette lighter can be damaged if you
connect electrical accesso ries to it.
Storing
General overview
,&. WARNING
- Always remove objects from the instrument
panel. Any items not put away could slide
around inside the vehi cle while driving or
when acce lerating or when applying the
brakes or when driving around a corner .
- When you are d riving ma ke sure that any
thing you may have placed in the center con
sole or other storage locations cannot fall
out into the footwells. In case of sudden
braking you wo uld not be able to brake or
accelerate.
 1
1 2
2 3
3 4
4 5
5 6
6 7
7 8
8 9
9 10
10 11
11 12
12 13
13 14
14 15
15 16
16 17
17 18
18 19
19 20
20 21
21 22
22 23
23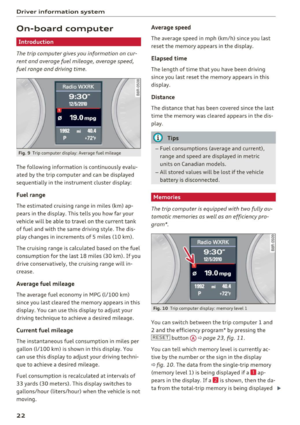 24
24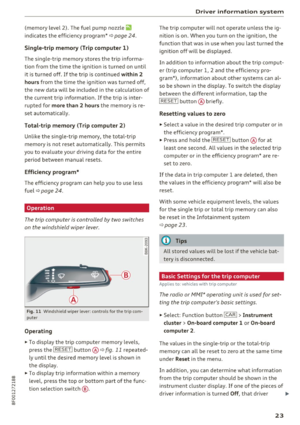 25
25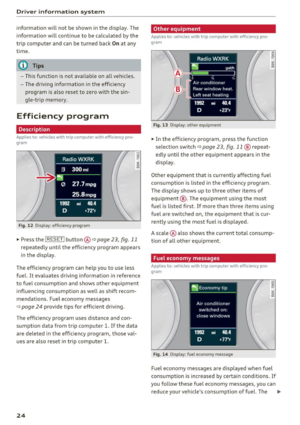 26
26 27
27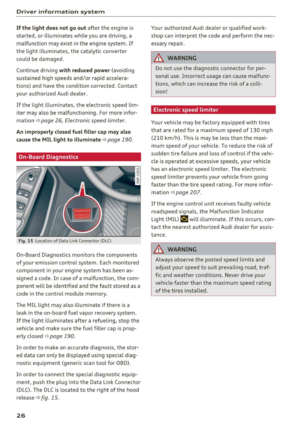 28
28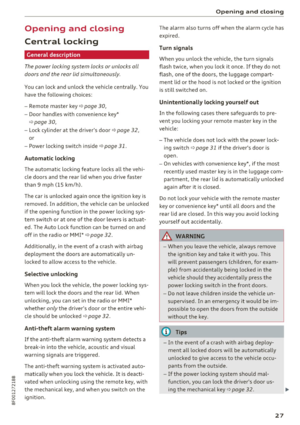 29
29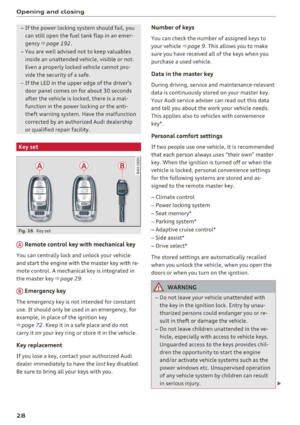 30
30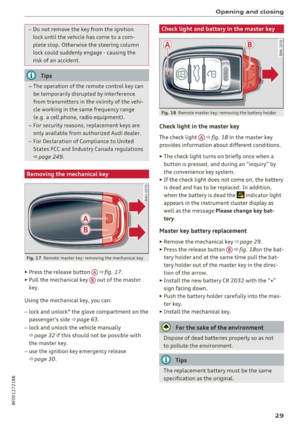 31
31 32
32 33
33 34
34 35
35 36
36 37
37 38
38 39
39 40
40 41
41 42
42 43
43 44
44 45
45 46
46 47
47 48
48 49
49 50
50 51
51 52
52 53
53 54
54 55
55 56
56 57
57 58
58 59
59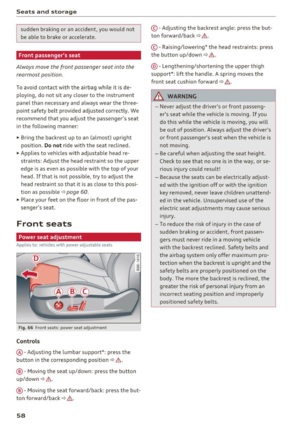 60
60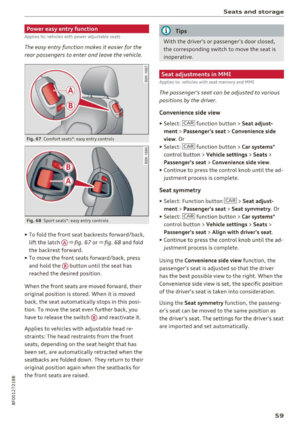 61
61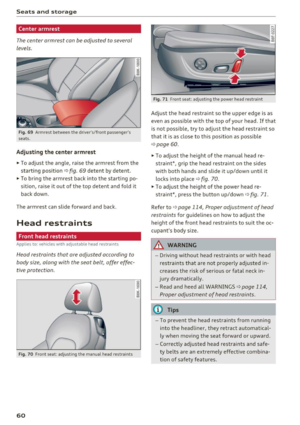 62
62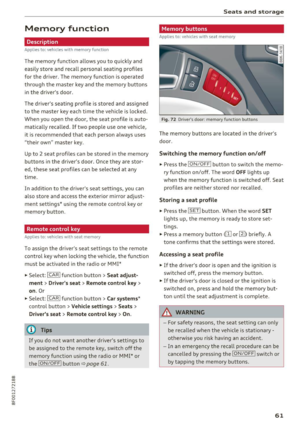 63
63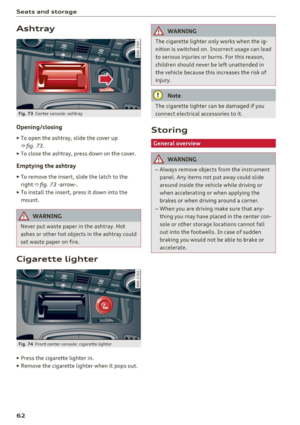 64
64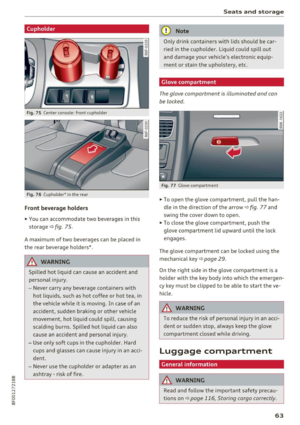 65
65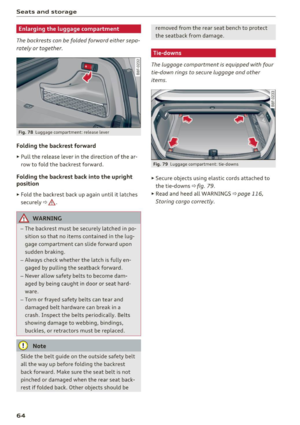 66
66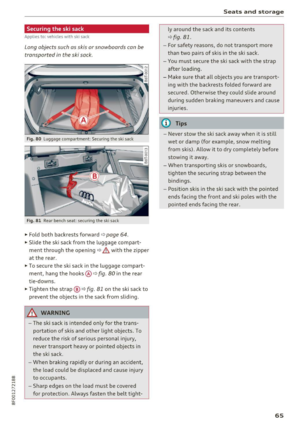 67
67 68
68 69
69 70
70 71
71 72
72 73
73 74
74 75
75 76
76 77
77 78
78 79
79 80
80 81
81 82
82 83
83 84
84 85
85 86
86 87
87 88
88 89
89 90
90 91
91 92
92 93
93 94
94 95
95 96
96 97
97 98
98 99
99 100
100 101
101 102
102 103
103 104
104 105
105 106
106 107
107 108
108 109
109 110
110 111
111 112
112 113
113 114
114 115
115 116
116 117
117 118
118 119
119 120
120 121
121 122
122 123
123 124
124 125
125 126
126 127
127 128
128 129
129 130
130 131
131 132
132 133
133 134
134 135
135 136
136 137
137 138
138 139
139 140
140 141
141 142
142 143
143 144
144 145
145 146
146 147
147 148
148 149
149 150
150 151
151 152
152 153
153 154
154 155
155 156
156 157
157 158
158 159
159 160
160 161
161 162
162 163
163 164
164 165
165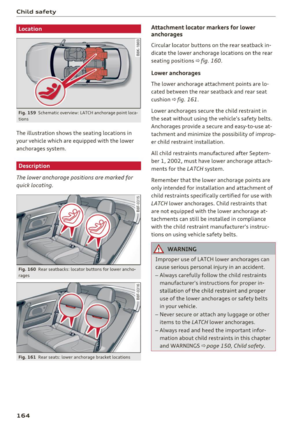 166
166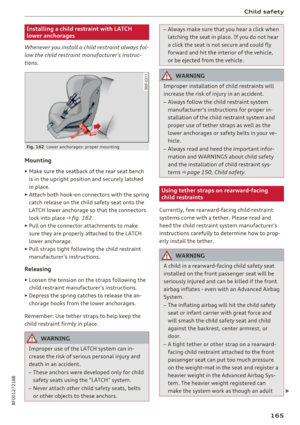 167
167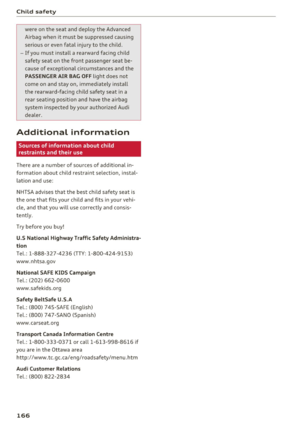 168
168 169
169 170
170 171
171 172
172 173
173 174
174 175
175 176
176 177
177 178
178 179
179 180
180 181
181 182
182 183
183 184
184 185
185 186
186 187
187 188
188 189
189 190
190 191
191 192
192 193
193 194
194 195
195 196
196 197
197 198
198 199
199 200
200 201
201 202
202 203
203 204
204 205
205 206
206 207
207 208
208 209
209 210
210 211
211 212
212 213
213 214
214 215
215 216
216 217
217 218
218 219
219 220
220 221
221 222
222 223
223 224
224 225
225 226
226 227
227 228
228 229
229 230
230 231
231 232
232 233
233 234
234 235
235 236
236 237
237 238
238 239
239 240
240 241
241 242
242 243
243 244
244 245
245 246
246 247
247 248
248 249
249 250
250 251
251 252
252 253
253 254
254 255
255 256
256 257
257 258
258 259
259 260
260 261
261 262
262 263
263 264
264 265
265


