Page 145 of 170

138 |
MAINTENANCE
*if equipped
Maintenance Minder
Service Codes
These codes indicate what services are due on your vehicle.
*1: If the message Maintenance Due Now does not appear more than 12 months after the display is reset, change the engine oil every year.
#: See information on maintenance and emissions warranty.
*2:If you drive in dusty conditions, replace the air cleaner element every \
15,000 miles (24,000 km).*3:If you drive primarily in urban areas that have high concentrations of s\
oot in the air from industry and diesel-powered vehicles, replace the dust and pollen lter every \
15,000 miles (24,000 km).
CODEMaintenance Main Items
A
Replace engine oi l*1
B Replace engine oil*1 and oil lter
Inspect front and rear brakes Check expiration date for TRK bottle*
Inspect tie rod ends, steering gearbox, and boots
Inspect suspension component s
Inspect driveshaft boots
Inspect brake hoses and lines (Including ABS/VSA)
Inspect all uid levels and condition of uids
Inspect exhaust system#
Inspect fuel lines and connections#
*4:Driving in mountainous areas at very low vehicle speeds or trailer towing results in higher
transmission temperature. This requires transmission uid changes mor\
e frequently than
recommended by the Maintenance Minder. If you regularly drive your vehic\
le under these
conditions, have the transmission uid changed at 30,000 miles (48,0\
00 km).
*5:If you drive regularly in very high temperatures (over 110°F, 43°\
C), in very low temperatures
(under -20°F, -29°C), replace every 60,000 miles/100,000 km.
*6:Driving in mountainous areas at very low vehicle speeds or trailer towin\
g results in higher level
of mechanical (Shear) stress to uid. This requires differential \
uid changes more frequently
than recommended by the Maintenance Minder. If you regularly drive your \
vehicle under these
conditions, have the differential uid changed at 7,500 miles (12,00\
0 km), then every 15,000
miles (24,000 km).
CODEMaintenance Sub Items
1
Rotate tires
2 Replace air cleaner element*2
Replace dust and pollen lter*3
Inspect drive belt
3
Replace transfer-case uid and transmission ui d*4
4 Replace spark plugs
Replace timing belt and inspect water pum p*5
Inspect valve clearance
5
Replace engine coolant
6 Replace rear differential uid*, *6
*
Page 146 of 170

| 139
MAINTENANCE
Under the Hood
Brake Fluid
Washer Fluid
Radiator Cap
Engine Coolant
Reserve Tan
k Batter
y
Engine Oil Dipstick
(Orange) Engine Oil Fill Ca
p
Opening the Hood
1.
Park the
vehicle on a level surface, and set the
parking brake.
2.
Pull the hood release handle under
the lower left
corner of the dashboard.
3.
Push up the hood latch lever in
the center of the
hood to release the lock mechanism, and open
the hood.
4.
Lift the hood up about halfway.
The hydraulic
supports will continue to lift and hold it up.
When closing, lower the hood to approximately
12 inches (30 cm), then press down firmly with
your hands.
Lever
Hood release handle
Pull
Lever
Engine Compartment CoverCertain parts in the engine compartment are
protected by a cover. You may need to remove the
cover when you perform certain maintenance work.
Pull up on the engine cover, and remove it from the
pins.
Do not open the hood when the wiper arms are raised. The hood will strike the
wipers, and may damage either the hood or the wipers. Do not open the hood
during auto idle stop operation.*
NOTICE
*if equipped
Page 147 of 170

140 |
MAINTENANCE
Engine Oil
Park the vehicle on level ground, and wait approximately three minutes after
turning the engine off before you check the oil.
Checking the Oil
1.
Remov
e the dipstick (orange loop).
2.
Wipe the dipstick
with a clean cloth or paper
towel.
3.
Insert the dipstick all
the way back into its hole.
4.
Remov
e the dipstick again, and check the level. It
should be between the upper and lower marks.
Add oil if necessary.
Upper mark
Lower mark
Recommended Engine Oil
•
Genuine Acura Motor
Oil
•
Premium-grade 0W-20 deter
gent oil with an API Certification Seal on the
container
This seal indicates the oil is energy conserving and
that it meets the American Petroleum Institute’s
latest requirements.
Use Genuine Acura Motor Oil or another
commercial engine oil of suitable viscosity for the
ambient temperature as shown.
You may also use synthetic motor oil if it is labeled with the API Certification Seal
and is of the specified viscosity grade.
Ambient temperature
Page 148 of 170
| 141
MAINTENANCE
Adding Oil
1.
Unscrew and remove the engine oil fill cap.
2.
Add oil slowly.
3.
Reinstall the engine oil fill cap, and tighten it
securely.
4.
Wait for three minutes and recheck the engine
oil dipstick.
Do not fill the engine oil above the upper mark. Overfilling the engine oil can result
in leaks and engine damage.
NOTICE
Failure to reset the engine oil life after a maintenance service results in the system
showing incorrect maintenance intervals, which can lead to serious mechanical
problems.
NOTICE
Resetting the Engine Oil Life If you change or replace the vehicle’s engine oil yourself, you must reset the
engine oil life. Use the right selector wheel on the steering wheel to make
selections in the MID.
1.
Scroll to Maintenance Info and select it to
display the oil life reset mode.
2.
Select Reset. The service code disappears and
the oil life returns to 100%.
Engine Oil Fill Cap
Page 149 of 170

142 |
MAINTENANCE
Adding Coolant
1.
Make sure
the engine and radiator are cool.
2.
Remov
e the engine compartment cover (see
page 139).
3.
Turn the radiator cap counterclockwise and
r
elieve any pressure in the coolant system. Do
not push the cap down when turning.
4.
Continue turning
the cap counterclockwise until
you can remove it.
5.
The coolant level should be up to
the base of the
filler neck. Add coolant if it is low.
6.
Put the radiator cap back on, and
tighten it fully.
7.
Pour coolant into the r
eserve tank until it
reaches the MAX mark. Put the cap back on the
reserve tank.
Removing the radiator cap while the engine is hot can cause the coolant to
spray out, seriously scalding you.
Always let the engine and radiator cool down before removing the radiator cap.
Pour the fluid slowly and carefully so you do not spill any. Clean up any spills
immediately; they can damage components in the engine compartment.
Radiator cap
WARNING
Engine Coolant
Park the vehicle on level ground. Check the reserve tank and the coolant level in the
radiator. We recommend Acura Long Life Antifreeze/Coolant Type 2.
Checking the Reserve Tank
1.
Check the amount of coolant
in the reserve tank.
2.
If the coolant level is below
the MIN mark, add
the specified coolant until it reaches the MAX
mark.
3.
Inspect the cooling system for leaks.
Reserve TankMAX MIN
MIN
For vehicles used in temperatures below -31°F (-35°C), change the coolant from
the standard 50:50 antifreeze:water mix to one with added antifreeze. Consult a
dealer for more information.
NOTICE
NOTICE
Page 150 of 170

| 143
MAINTENANCE
Window Washer Fluid
Add washer fluid as necessary (see page 139). Pour it carefully, and do not
overflow the reservoir.
For Jump starting, see page 120.
Checking the Battery
The battery condition is monitored by the sensor on the negative terminal. If there
is a problem with the sensor, have your vehicle checked by a dealer. Check the
battery terminals monthly for corrosion.
The battery gives off explosive hydrogen gas during normal operation.
A spark or flame can cause the battery to explode with enough force to kill or
seriously hurt you.
When conducting any battery maintenance, wear protective clothing and a
face shield, or have a skilled technician do it.
WARNING
If the washer fluid is low,
a message appears on the
multi-information display.Wa sher Fluid Lo w
WARNING: Battery posts, terminals, and related accessories contain lead and lead
compounds. Wash your hands after handling.
If there is a problem with
the battery sensor, a
message appears on the
multi-information display.Charging
System Problem
Do not use engine antifreeze or a vinegar/water solution in the windshield washer
reservoir. Antifreeze can damage your vehicle’s paint. A vinegar/water solution can
damage the windshield washer pump.
NOTICE
If your battery is labeled AGM, consult your dealer before you connect a battery
charger. AGM batteries require compatible chargers.
Page 151 of 170

144 |
MAINTENANCE
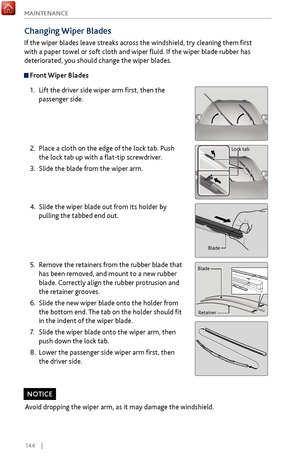
Changing Wiper Blades
If the wiper blades leave streaks across the windshield, try cleaning them first
with a paper towel or soft cloth and wiper fluid. If the wiper blade rubber has
deteriorated, you should change the wiper blades.
Front Wiper Blades
1.
Lift the driver side
wiper arm first, then the
passenger side.
2.
Place a cloth on the
edge of the lock tab. Push
the lock tab up with a flat-tip screwdriver.
3.
Slide the blade fr
om the wiper arm.
4.
Slide the wiper blade
out from its holder by
pulling the tabbed end out.
5.
Remov
e the retainers from the rubber blade that
has been removed, and mount to a new rubber
blade. Correctly align the rubber protrusion and
the retainer grooves.
6.
Slide the new wiper
blade onto the holder from
the bottom end. The tab on the holder should fit
in the indent of the wiper blade.
7.
Slide the wiper blade onto the
wiper arm, then
push down the lock tab.
8.
Lower the passenger side wiper arm
first, then
the driver side.
Lock tab
Blade
Retainer
Blade
Avoid dropping the wiper arm, as it may damage the windshield.
NOTICE
Page 152 of 170
| 145
MAINTENANCE
Rear Wiper Blade
1.
Raise the wiper arm off the
window.
2.
Slide the wiper blade out
from the end with the
indent.
3.
Remov
e the retainers from the wiper blade and
mount to a new rubber blade.
4.
Slide the wiper blade
onto the holder. Make sure
it is engaged correctly, then install the wiper
blade assembly onto the wiper arm.
Blade
Retainer
Rubber