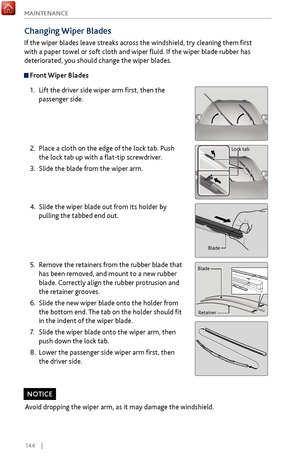
Page 129 of 170

122 |
HANDLING THE UNEXPECTED
Overheating
If you see the multi-information display (MID) message “Stop Driving When Safe.
Engine Temperature Too Hot,” your engine is overheating. You may also notice the
temperature gauge is at the H mark, the engine suddenly loses power, or steam or
spray comes out from under the hood.
1.
Immediately park the
vehicle in a safe place. Turn
off all accessories and turn on the hazard warning
lights.
2. If no steam or spray is present: Keep the engine
running and open the hood (see page 139).
If steam or spray is present
: Turn off the engine
and wait until it subsides. Then, open the hood.
3.
Check that the cooling
fan is operating. If it is not, immediately stop the engine.
Otherwise, idle the engine until the MID message goes off.
4. Once the engine has cooled down, inspect
the coolant level and check the
cooling system components for leaks. If the coolant level in the reserve tank
is low, add coolant until it reaches the MAX mark. If there is no coolant in the
reserve tank, make sure the radiator is cool, then cover the radiator cap with a
heavy cloth and open the cap. If necessary, add coolant up to the base of the
filler neck, and put the cap back on. Then, fill the reserve tank to the MAX mark.
Once the engine has cooled sufficiently, restart it and check the temperature
gauge. If the temperature needle has gone down, resume driving. If it has not gone
down, contact a dealer for repairs.
Removing the radiator cap while the engine is hot can cause the coolant to
spray out, seriously scalding you.
Always let the engine and radiator cool down before removing the radiator
cap.
WARNING
Steam and spray from an overheated engine can seriously scald you.
Do not open the hood if steam is coming out.
WARNING
Continuing to drive with the temperature gauge needle at the H mark may damage
the engine.
NOTICE
MAX MIN
Reserve tank
Page 130 of 170

| 123
HANDLING THE UNEXPECTED
Tire Pressure Monitoring System (TPMS)
Monitors the tire pressure while you are driving.
If your vehicle’s tire pressure becomes significantly low, the low tire pressure
indicator appears with a message in the multi-information display. Use the right
selector wheel on the steering wheel to scroll to the tire pressure monitor to see
pressure readings for each tire (see page 30).
The specific tire with low
pressure is displayed.
What to Do
Stop your vehicle in a safe place. Adjust the tire pressure to the level specified on
a label on the driver’s doorjamb.
Tire Fill AssistYour vehicle gives you visual and audible alerts to help you adjust the tire
pressure to its appropriate level when the vehicle is on.
While inflating: The system beeps and the exterior lights flash once every 5
seconds.
When the correct pressure is reached: The system beeps and the exterior lights
flash continuously for 5 seconds. Stop filling the tire.
If you overinflate: The system beeps and the exterior lights flash twice every 3
seconds.
Driving on an extremely underinflated tire can cause it to overheat. An overheated
tire can fail. Always inflate your tires to the specified pressure.
NOTICE
Page 131 of 170

124 |
HANDLING THE UNEXPECTED
Tire Pressure Monitoring System (TPMS) - Required Federal Explanation
Each tire, including the spare (if provided), should be checked monthly
when cold and inflated to the inflation pressure recommended by the
vehicle manufacturer on the vehicle placard or tire inflation pressure
label.
(If your vehicle has tires of a different size than the size indicated on the
vehicle placard or tire inflation pressure label, you should determine the
proper tire inflation pressure for those tires.)
As an added safety feature, your vehicle has been equipped
with a tire pressure monitoring system (TPMS) that
illuminates a low tire pressure telltale when one or more of
your tires is significantly under-inflated.
Accordingly, when the low tire pressure telltale illuminates, you should
stop and check your tires as soon as possible, and inflate them to the
proper pressure.
Driving on a significantly under-inflated tire causes the tire to overheat
and can lead to tire failure. Under-inflation also reduces fuel efficiency
and tire tread life, and may affect the vehicle’s handling and stopping
ability.
Please note that the TPMS is not a substitute for proper tire
maintenance, and it is the driver’s responsibility to maintain correct
tire pressure, even if under-inflation has not reached the level to trigger
illumination of the TPMS low tire pressure telltale.
Your vehicle has also been equipped with a TPMS malfunction indicator
to indicate when the system is not operating properly. The TPMS
malfunction indicator is combined with the low tire pressure telltale.
When the system detects a malfunction, the telltale will flash for
approximately one minute and then remain continuously illuminated.
This sequence will continue upon subsequent vehicle start-ups as long as
the malfunction exists.
When the malfunction indicator is illuminated, the system may not be
able to detect or signal low tire pressure as intended.
TPMS malfunctions may occur for a variety of reasons, including the
installation of replacement or alternate tires or wheels on the vehicle
that prevent the TPMS from functioning properly.
Always check the TPMS malfunction telltale after replacing one or
more tires or wheels on your vehicle to ensure that the replacement
or alternate tires and wheels allow the TPMS to continue to function
properly.
Page 132 of 170

| 125
HANDLING THE UNEXPECTED
Refueling from a Portable Fuel Container
When you refuel from a portable fuel container, use the funnel provided with your
vehicle. 1.
Turn off the engine.
2.
Press the fuel fill
door release button. The fuel
fill door opens.
3.
Take
the funnel out of its clip in the cargo area
(see page 126).
4.
Remov
e the funnel from the case.
5.
Place the end of the funnel on the
lower part
of filler opening, then insert it slowly and
completely. Make sure that the end of the funnel
goes down along with the filler pipe.
6.
Fill the tank
with fuel from the portable fuel
container. Pour fuel carefully so you do not spill
any.
7.
Remov
e the funnel from the filler neck. Wipe up
any fuel from the funnel before storing it.
8.
Shut the fuel fill door
by hand.
Do not insert the nozzle of a portable fuel container or any funnel other than the
one provided with your vehicle. Doing so can damage the fuel system.
Do not try to pry open or push open the sealed fuel tank with foreign objects.
This can damage the fuel system and its seal.
NOTICE
Funnel
Page 133 of 170

126 |
HANDLING THE UNEXPECTED
Handling a Flat Tire
If a tire goes flat while driving, grasp the steering wheel firmly, and brake gradually
to reduce speed. Stop in a safe place. Replace the flat tire with a compact spare tire.
Go to a dealer as soon as possible to have the full-size tire repaired or replaced.
Changing a Flat Tire*
Before Changing the Tire
1.
Park the
vehicle on firm, level, and non-slippery surface.
2.
Change the gear to P
ark (P), and apply the parking brake.
3.
Turn on the hazard
warning lights and turn the vehicle off.
Getting Ready to Change the Tire1.
Open the tailgate. Turn on the car
go lights
located on the inside of the tailgate, if necessary
(see page 40). Push the rear edge of the
handle on the floor lid and open the lid.
2.
Take out the
cargo floor box.
3.
Take
the jack, wheel nut wrench, and jack handle
bar out of the tool case.
4.
Remov
e the cover on the cargo area lining to
access the shaft for the spare tire hoist.
Handl e
Cargo Floor Box
Tool Case
Cove r
Wheel Nut Wrench
Jack Handle Bar
Bracket
Handl e
Cargo Floor Box
Tool Case
Cove r
Wheel Nut Wrench
Jack Handle Bar
Bracket
*if equipped
HandleHandl e
Cargo Floor Box
Tool Case
Cove r
Wheel Nut Wrench
Jack Handle Bar
Bracket
Tool case
Handl e
Cargo Floor Box
Tool Case
Cove r
Wheel Nut Wrench
Jack Handle Bar
Bracket
Cover
Page 134 of 170
| 127
HANDLING THE UNEXPECTED
5. Put the wheel nut wrench with the jack handle
bar on the hoist
shaft. Turn the wrench to the
left (counter-clockwise) to lower the spare tire
to the ground.
6.
Keep turning the wheel
nut wrench to create
slack in the cable. Remove the bracket from the
spare tire.
7.
Place the compact
spare tire wheel side up under
the vehicle body, near the tire that needs to be
replaced.
8.
Loosen each wheel nut about one
turn using the
wheel nut wrench.
Handl e
Cargo Floor Box
Tool Case
Cove r
Wheel Nut Wrench
Jack Handle Bar
Bracket
Handl e
Cargo Floor Box
Tool Case
Cove r
Wheel Nut Wrench
Jack Handle Bar
Bracket
Handl e
Cargo Floor Box
Tool Case
Cove r
Wheel Nut Wrench
Jack Handle Bar
Bracket
Handl e
Cargo Floor Box
Tool Case
Cove r
Wheel Nut Wrench
Jack Handle Bar
Bracket
Page 135 of 170

128 |
HANDLING THE UNEXPECTED
Setting Up the Jack
1.
Place the jack under the jacking point closest
to
the tire to be changed.
2.
Turn the end bracket clockwise (as shown in
the
image) until the top of the jack contacts the
jacking point. Make sure that the jacking point
tab is resting in the jack notch.
3.
Assemble the jack, jack handle bar, and jack
handle as shown. Raise
the vehicle until the tire
is off the ground.
The following instructions must be followed to use the jack safely:
•
Do not use the jack with people
or luggage in the vehicle.
•
Use the jack pro
vided in your vehicle. Other jacks may not support the weight
(load) or fit the jacking point.
•
Do not use while the engine is running.
•
Use only
where the ground is firm and level.
•
Use only at
the jacking points.
•
Do not get in the v
ehicle while using the jack.
•
Do not put
anything on top of or underneath the jack.
Jacking PointsJacking PointsJacking Points
Jack handle
barWheel nut wrench
as jack handle
The vehicle can easily roll off the jack, seriously injuring anyone underneath.
Follow the directions for changing a tire exactly, and never get under the
vehicle when it is supported only by the jack.
WARNING
Do not use the jack if it doesn’t work properly. Call your dealer or a professional
towing service.
NOTICE
Page 136 of 170

| 129
HANDLING THE UNEXPECTED
Replacing the Flat Tire
1.
Remov
e the wheel nuts and flat tire.
2.
Mount the compact spar
e tire. Replace the wheel
nuts, and lightly tighten them.
3.
Lower the v
ehicle and remove the jack. Tighten
the wheel nuts in the order indicated in the
image. Go around, tightening the nuts, two to
three times in this order. Do not over tighten the
wheel nuts.
If you drive with the spare tire installed, the low tire pressure/TPMS indicator
appears. The indicator stays on until a regular tire is installed.
Storing the Flat Tire
1.
Remov
e the center cap and place the flat tire
face up under the hoist.
2.
Insert the hoist bracket into
the center hole of
the flat tire.
3.
Turn the wheel nut
wrench clockwise (using the
jack handle bar) until the flat tire rests against
the underbody of the vehicle and you hear the
hoist click.
4.
Securely stor
e the jack and wheel nut wrench
back in the tool case. Store the case in the cargo
area.
Wheel Nut Wrench
Ja ck Handle Bar
Loose items can fly around the interior in a crash and can seriously injure the
occupants.
Store the wheel, jack, and tools securely before driving.
WARNING
Center cap