Page 121 of 170
114 |
DRIVING
Parking Sensor System*
When the system senses an object when you are parking or backing up, an indicator
appears on the upper display and a series of beeps will sound. As you get closer to
the object, the beep rate increases.
Turning the System On or Off
Press the parking sensor button. A green indicator
light appears on the button when the system is on.
Indicators appear when the
sensor device detects an
obstacle.
*if equipped
Page 122 of 170

| 115
DRIVING
Multi-View Rear Camera*
When you change the gear to Reverse (R), a real-time image of the area behind
your vehicle is shown in the display, along with helpful parking guidelines.
The rear camera view is restricted. You cannot see the corner ends of the bumper or what is underneath
the bumper. Its unique lens also makes objects appear closer or farther than they actually are.
Visually confirm that it is safe to drive before backing up. Certain conditions (such as weather, lighting,
and high temperatures) may also restrict the rear view. Do not rely on the rearview display, which does
not give you all information about conditions at the rear of your vehicle.
Wide view
Normal view Top down view
Press the
interface dial to
toggle between
views.
Changing Guidelines
Turn the guidelines on or off. Use the interface dial to make and enter selections.
1.
Press SETTINGS.
2.
Select Camera Settings
3.
Select one of the options.
Fixed Guidelines:
Guidelines appear when you
change the gear to Reverse. Select On or Off.
Dynamic Guidelines: Guidelines move as you turn
the steering wheel. Select On or Off.
4.
Press BACK
to exit the menu.
*if equipped
Page 123 of 170

116 |
DRIVING
Cross Traffic Monitor*
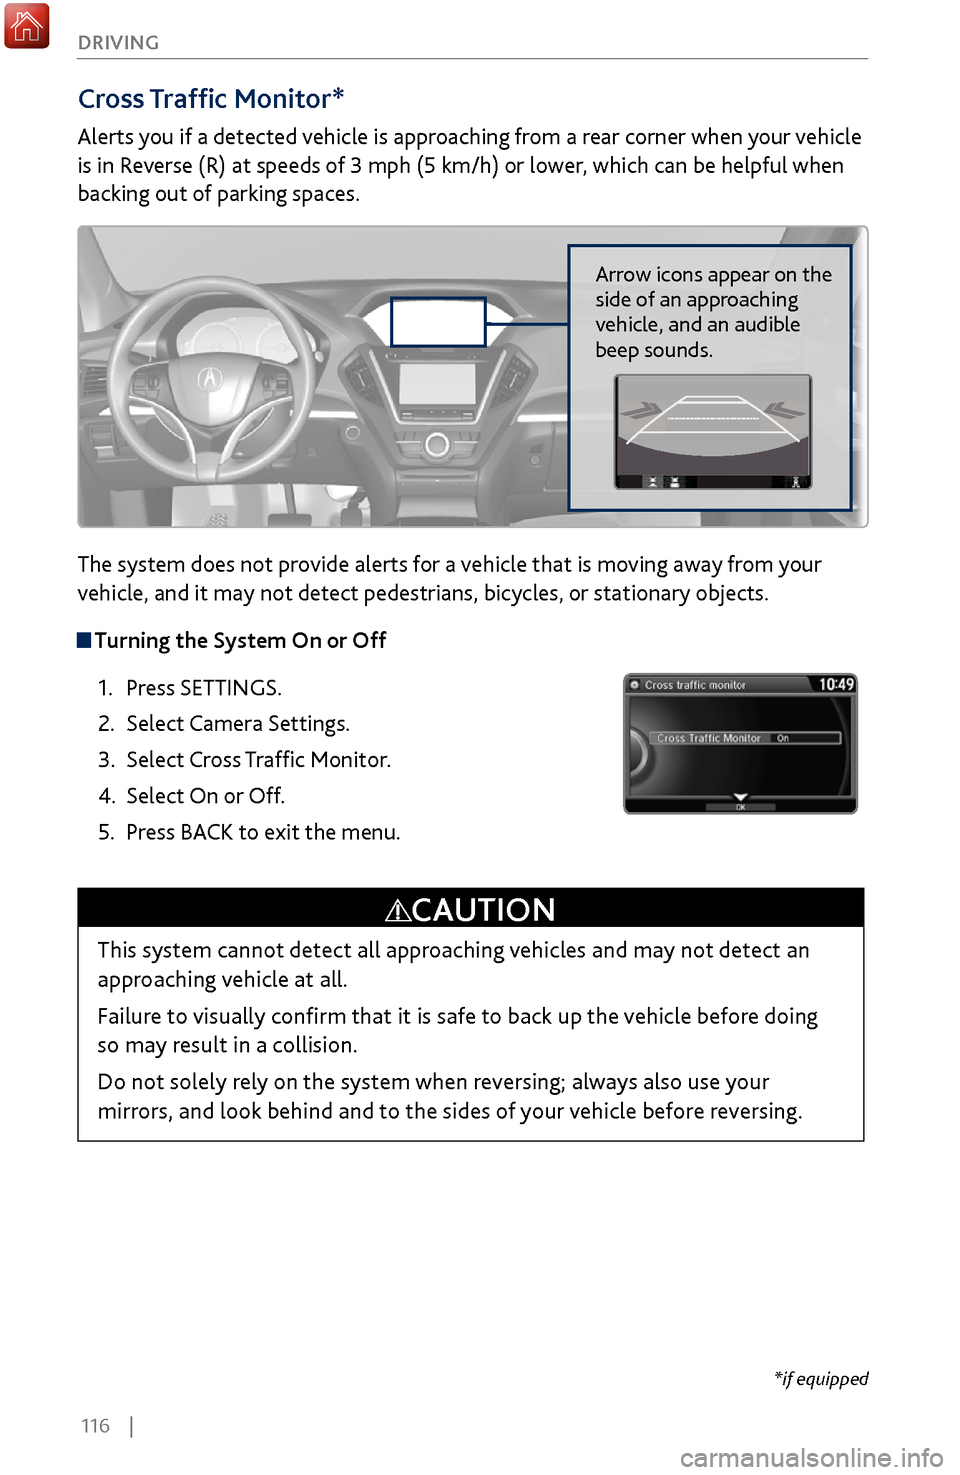
Alerts you if a detected vehicle is approaching from a rear corner when your vehicle
is in Reverse (R) at speeds of 3 mph (5 km/h) or lower, which can be helpful when
backing out of parking spaces.
The system does not provide alerts for a vehicle that is moving away from your
vehicle, and it may not detect pedestrians, bicycles, or stationary objects.
Turning the System On or Off
1.
Press SETTINGS.
2.
Select Camera Settings.
3.
Select Cross T
raffic Monitor.
4.
Select On or Off.
5.
Press BACK
to exit the menu.
This system cannot detect all approaching vehicles and may not detect an
approaching vehicle at all.
Failure to visually confirm that it is safe to back up the vehicle before doing
so may result in a collision.
Do not solely rely on the system when reversing; always also use your
mirrors, and look behind and to the sides of your vehicle before reversing.
CAUTION
Arrow icons appear on the
side of an approaching
vehicle, and an audible
beep sounds.
*if equipped
Page 124 of 170

| 117
DRIVING
Surround View Camera*
Four cameras assist in helping you view blind spots around the vehicle.
*if equipped
The surround view camera does not eliminate all blind spots. Visually confirm safety around the vehicle
with your own eyes and the mirrors. Do not rely on the camera view.
Front ground view Front wide view Right side viewCheck
Your Surr oundingsCheck Your Surr oundings
Check Your Surr oundingsCh eck Yo ur Surroundi ngs
Displaying Front or Side Views
Press the CAMERA button when the vehicle is
stationary or moving at 12 mph (20 km/h) or
less. Press the button again or the interface dial
to switch camera views.
Displaying the Rear ViewChange the gear to Reverse (R) to display the rear view. Press CAMERA or the
interface dial to switch rear views.
Left/right side views
Front and side views
Rear ground view Rear view Rear wide view
Rear viewsCheck
Your Surr oundingsCheck Your Surr oundings
Check Your Surr oundingsCh eck Yo ur Surroundi ngs
Check Your Surr oundingsCheck Your Surr oundings
Check Your Surr oundingsCh eck Yo ur Surroundi ngs
Check Your Surr oundingsCheck Your Surr oundings
Check Your Surr oundingsCh eck Yo ur Surroundi ngs
Check Your Surroundings
Page 125 of 170

118 |
DRIVING
Changing Camera Settings
Use the interface dial to make and enter selections.
1.
Press SETTINGS.
2.
Select Camera Settings.
3.
Select Surround View
Camera.
4.
Select one of the options:
Guidelines:
Turn guidelines on or off.
Preferences: Choose additional settings.
5.
Select an option to mak
e your preferred changes.
6.
Press BACK
to exit the menu.
Failure to visually assess the area around the vehicle (directly or by use of the
mirrors) may result in a crash causing serious injury or death.
The areas shown in the surround view camera system display are limited. The
display may not show all pedestrians or other objects around your vehicle.
Do not solely rely only on the surround view camera system display to assess
whether it is safe to move your vehicle.
WARNING
Failure to pay proper attention to your surroundings while driving may result
in a crash causing serious injury or death.
To help mitigate the chances of a collision, only look at the surround view
camera system display when it is safe to do so.
WARNING
Page 126 of 170

| 119
DRIVING
How to Refuel
Your fuel tank is not equipped with a fuel fill cap.
You can insert the filler nozzle directly into the filler
pipe. The tank seals itself again when you pull out
the filler nozzle.
1.
The fuel fill
door is located at the left rear of the
vehicle. Park next to the service pump that is
most accessible, and turn off the engine.
2.
Press the fuel fill
door release button. The fuel
fill door opens.
3.
Place the end of the filler
nozzle on the lower
part of the filler opening, then insert it slowly
and fully. Make sure that the end of the filler
nozzle goes down along with the filler pipe.
4.
After filling,
wait about 5 seconds before removing the filler nozzle. Close the
fuel fill door by hand.
Refueling
Use the proper fuel and refueling procedure to ensure the best performance and
safety of your vehicle.
Fuel Information
Use of unleaded premium gasoline of 91 octane or higher is recommended.
•
Acura recommends
TOP TIER Detergent Gasoline where available.
•
Do NOT use gasoline containing more
than 15% ethanol.
•
Do NOT use gasoline containing methanol.
•
Do NOT use gasoline containing MMT.
Gasoline is highly flammable and explosive. You can be burned or seriously
injured when handling fuel.
•
Stop the engine, and keep heat
, sparks, and flame away.
•
Handle fuel only outdoors.
•
Wipe up spills immediately.
WARNING
We recommend quality gasoline containing detergent additives that help
prevent fuel system and engine deposits. In addition, in order to maintain good
performance, fuel economy, and emissions control, we strongly recommend the
use of gasoline that does NOT contain harmful manganese-based fuel additives
such as MMT, if such gasoline is available.
NOTICE
Page 127 of 170

120 |
HANDLING THE UNEXPECTED
Jump Starting
Turn off the power to all electric devices, including audio and lights. Turn off the
engine, then open the hood (see page 139).
1.
Remov
e the engine cover (see page 139).
2.
Connect the first
jumper cable to your vehicle’s
battery (+) terminal.
3.
Connect the other end of the
first jumper cable
to the booster battery (+) terminal. Use a 12-volt
booster battery only.
4.
Connect the second jumper cable
to the booster
battery (-) terminal.
5.
Connect the other end of the
second jumper cable
to the engine hanger as shown. Do not connect
this jumper cable to any other part.
6.
If your
vehicle is connected to another vehicle,
start the assisting vehicle’s engine and increase its
rpm slightly.
7.
Attempt to start
your vehicle’s engine. If it turns
over slowly, make sure that the jumper cables
have good metal-to-metal contact.
WARNING: Battery posts, terminals, and related accessories contain lead and lead
compounds. Wash your hands after handling.
HANDLING THE UNEXPECTED
Learn about what to do in critical or emergency situations.
Keyless Access Remote Battery Strength
If the battery life in your remote transmitter is weak, a message appears in the MID
with information on how to start the engine.
1.
Touch the back of the
remote transmitter to the
ENGINE START/STOP button while the indicator
is flashing.
2.
With the brake pedal pr
essed, press the ENGINE
START/STOP button within 10 seconds.
Booster battery
Engine
hanger
Engine coverPin
Page 128 of 170

| 121
HANDLING THE UNEXPECTED
After the Engine Starts
Once your vehicle’s engine has started, remove the jumper cables in the following
order:
1.
Disconnect the jumper cable fr
om your vehicle’s ground.
2.
Disconnect the other end
of the jumper cable from the booster battery (-)
terminal.
3.
Disconnect the jumper cable fr
om your vehicle’s battery (+) terminal.
4.
Disconnect the other end
of the jumper cable from the booster battery (+)
terminal.
5.
Have y
our vehicle inspected by a nearby service station or a dealer.
A battery can explode if you do not follow the correct procedure, seriously
injuring anyone nearby.
Keep all sparks, open flames, and smoking materials away from the battery.
WARNING
Emergency Engine Stop
The ENGINE START/STOP button may be used to stop the engine due to an
emergency situation even while driving. If you must stop the engine, choose one of
the following operations:
•
Press and hold the ENGINE
START/STOP button
for two seconds, OR
•
Firmly press
the ENGINE START/STOP button three
times.
The steering wheel will not lock. The power mode changes to ACCESSORY, unless
the gear is in Park, in which case the power mode changes to VEHICLE OFF.
Because turning off the engine also disables the power assist the engine provides to
the steering and braking systems, it will require significantly more physical effort
and time to steer and slow the vehicle. Downshift gears and use both feet on the
brake pedal, if necessary, to slow the vehicle and stop immediately in a safe place.
Do not press the button while driving unless it is absolutely necessary for the
engine to be switched off.
NOTICE