Page 8 of 170

| 1
V
ISUAL INDEX
Quickly locate items in the vehicle’s interior.
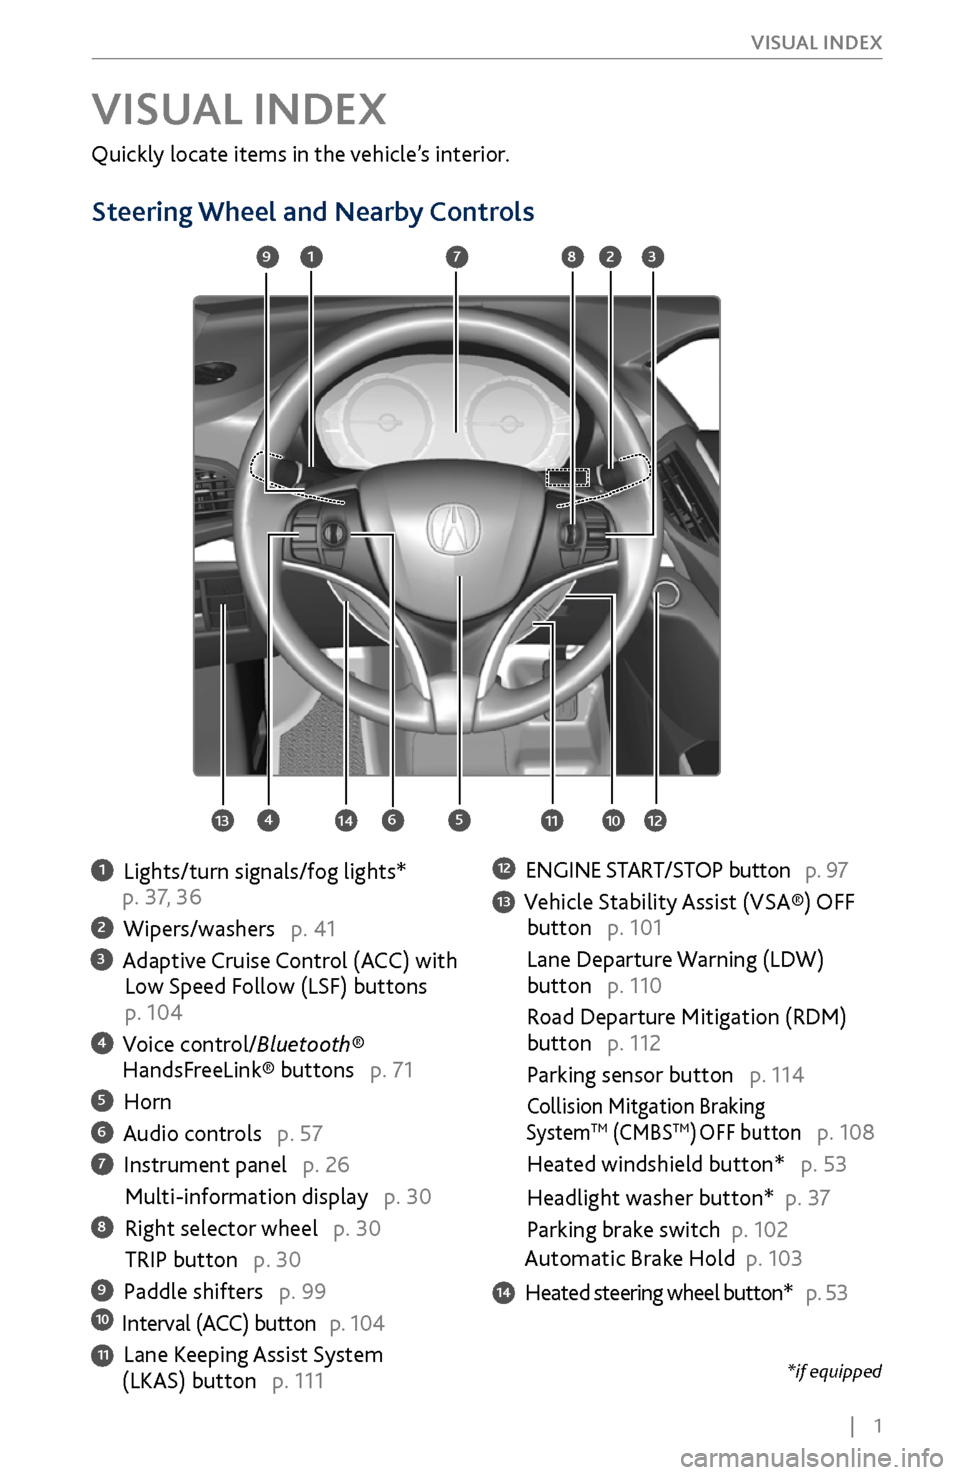
Steering Wheel and Nearby Controls
1 Lights/turn signals/fog lights*
p. 37, 36
2 Wipers/washers p. 41
3 Adaptive Cruise Control (ACC) with Low Speed Follow (LSF) buttons
p. 104
4 Voice control/Bluetooth® HandsFreeLink® buttons p. 71
5 Horn
6 Audio controls p. 57
7 Instrument panel p. 26
Multi-information display p. 30
8 Right selector wheel p. 30
TRIP button p. 30
9 Paddle shifters p. 9910 Interval (ACC) button p. 104
11 Lane Keeping Assist System (LKAS) button p. 111
12 ENGINE START/STOP button p. 97
13 Vehicle Stability Assist (VSA®) OFF
button p. 101
Lane Departure W
arning (LDW)
button p. 110
Road Departure Mitigation (RDM)
button p. 112
Parking sensor button p. 114
Collision Mitgation Braking SystemTM (CMBSTM) OFF button p. 108
Heated windshield button* p. 53
Headlight washer button* p. 3
7
Parking brake switch
p. 102
Automatic Brake Hold p. 103
14 Heated steering wheel button* p. 53
VISUAL INDEX
1
45
9
61011
7283
131412
*if equipped
Page 9 of 170
2 |
V
ISUAL INDEX
Dashboard and Ceiling Controls
1 Color information display
2 On-Demand Multi-Use DisplayTM
(ODMD) p. 58
3 Hazard warning button
4 Climate control buttons p. 51
5 Moonroof switch p. 36
Map lights p. 40
HomeLink® buttons p. 50
AcuraLink® buttons* p. 79
6 Power window switches p. 35
Door lock switches p. 34
Door mirror controls
p. 46
Power folding mirr
or button* p. 46
7 Power tailgate button p. 33
Fuel fill door r
elease button p. 119
8 Hood release handle p. 139
9 Driving Position Memory System
buttons p. 47
10 Integrated Dynamics System
(D
YNAMIC MODE) button p. 101
Electronic gear selector p. 98
Auto idle stop OFF button* p. 100
11 Audio/phone/navigation/
Surround View Camera*
buttons
p. 50, 65, 75, 105
12 Rear entertainment system* p. 67
13 (inside center console)
USB ports p. 57
Auxiliary input jack p. 57
Accessory power socket
p. 57
1
2834
5
67
9
101112
*if equipped
13
Page 54 of 170

| 47
V
EHICLE CONTROLS
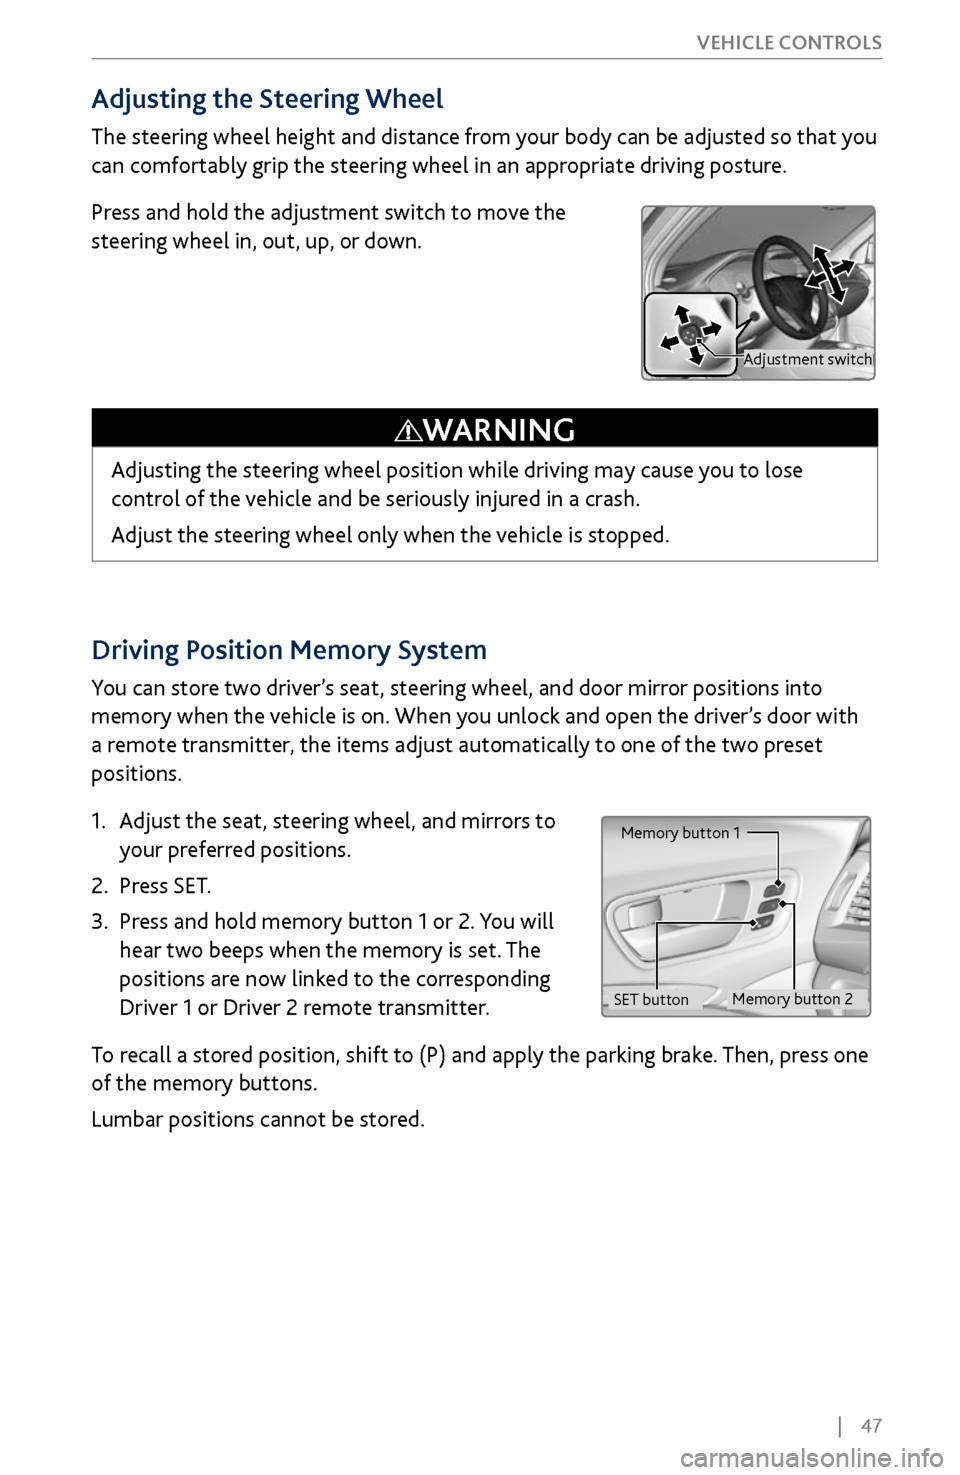
Driving Position Memory System
You can store two driver’s seat, steering wheel, and door mirror positions into
memory when the vehicle is on. When you unlock and open the driver’s door with
a remote transmitter, the items adjust automatically to one of the two preset
positions.
1.
Adjust the seat
, steering wheel, and mirrors to
your preferred positions.
2.
Press SET.
3.
Press and hold memory button 1 or 2.
You will
hear two beeps when the memory is set. The
positions are now linked to the corresponding
Driver 1 or Driver 2 remote transmitter.
To recall a stored position, shift to (P) and apply the parking brake. Then, press one
of the memory buttons.
Lumbar positions cannot be stored.
Memory button 1
Memory button 2
SET button
Adjusting the Steering Wheel
The steering wheel height and distance from your body can be adjusted so that you
can comfortably grip the steering wheel in an appropriate driving posture.
Press and hold the adjustment switch to move the
steering wheel in, out, up, or down.
Adjusting the steering wheel position while driving may cause you to lose
control of the vehicle and be seriously injured in a crash.
Adjust the steering wheel only when the vehicle is stopped.
WARNING
Adjustment switch
Page 57 of 170

50 |
V
EHICLE CONTROLS
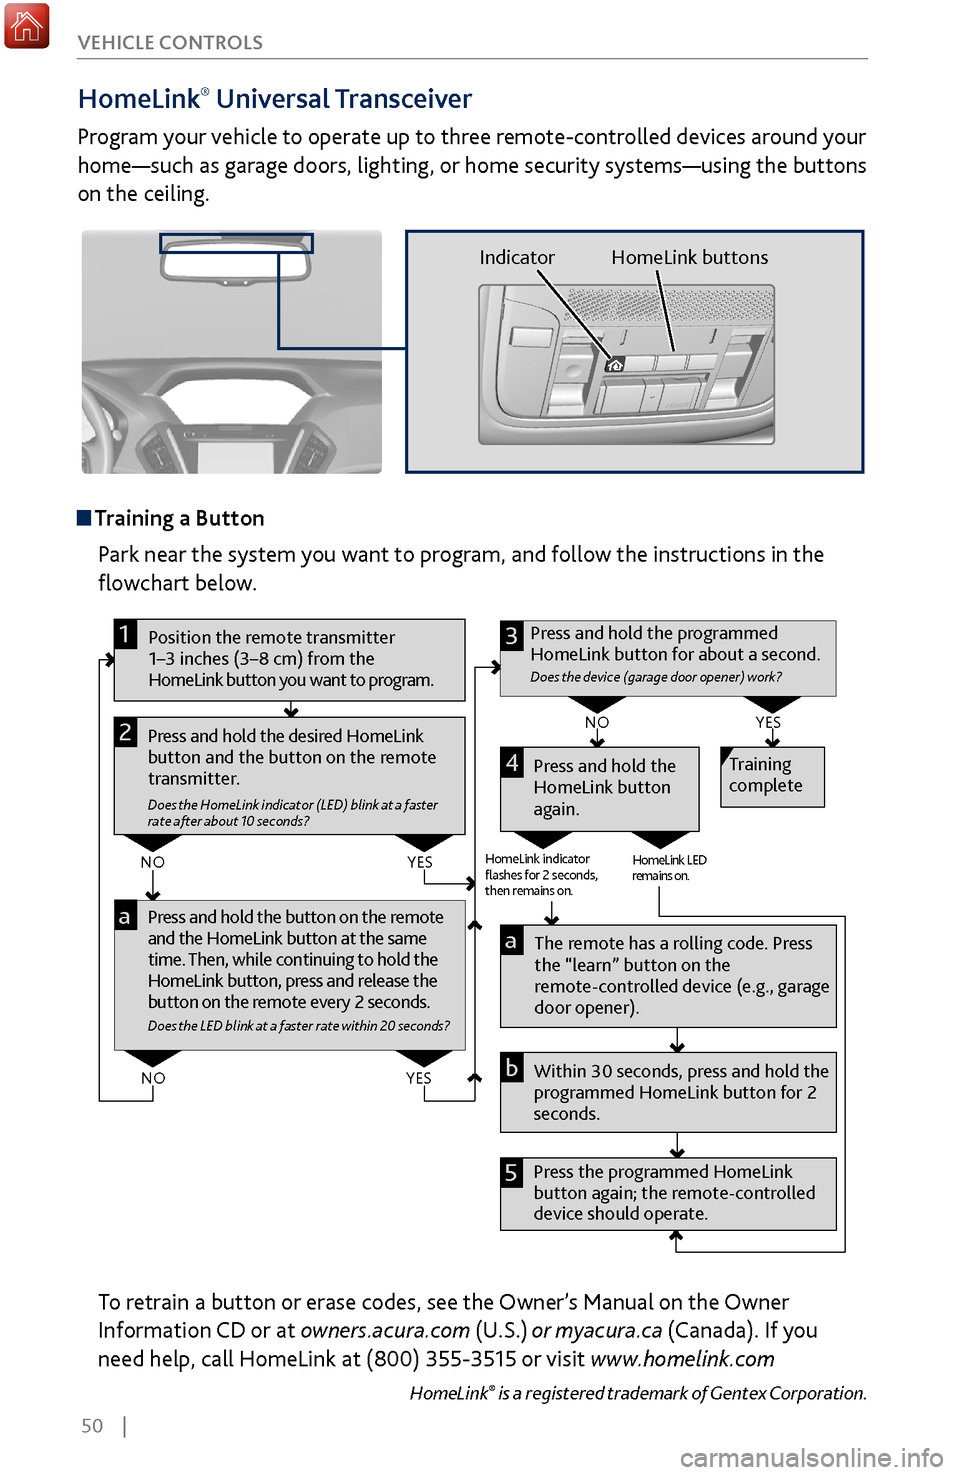
HomeLink®
Universal Transceiver
Program your vehicle to operate up to three remote-controlled devices around your
home—such as garage doors, lighting, or home security systems—using the buttons
on the ceiling.
Training a Button
Park near the system you want to program, and follow the instructions in the
flowchart below.
Pr ess and hold the button on the r emote
and the HomeLink button at the same
time. Then, while continuing to hold the
HomeLink button, press and r elease the
button on the remote every 2 seconds.
Does the LED blink at a faster ra te within 20 seconds ?
Press and hold the
HomeLink button
again. Training
complete
YES
NO
HomeLink indicator
�ashes for 2 seconds,
then rem ains on. HomeLink LED
r
emains on.YES
NO
YES
NO
Position the remote transmitter
1–3 inches (3–8 cm) from the
HomeLink button you want to program.1
Press and hold the desired HomeLink
button and the button on the remote
transmitter.
Does the HomeLink indicator (LED) blink at a f aster
rate after about 10 seconds ?
2
a
The remote has a ro lling code. Press
the “learn” button on the
remote-controlled device (e.g., garage
door opener).
Press the programmed HomeLink
button again; the re mote-controlled
device should operate. Within 30 seconds, press and hold the
programmed HomeLink button for 2
seconds.a
Press and hold the programmed
HomeLink button for about a second.
Does the devic e (garage door opener) work ?
3
b
4
5
To retrain a button or erase codes, see the Owner’s Manual on the Owner
Information CD or at owners.acura.com (U.S.) or myacura.ca (Canada). If you
need help, call HomeLink at (800) 355-3515 or visit www.homelink.com
HomeLink® is a registered trademark of Gentex Corporation.
Indicator HomeLink buttons
Page 58 of 170
| 51
V
EHICLE CONTROLS
Climate Control System
Set your preferred interior temperature by selecting the proper mix of heated or
cooled air and fan speed.
Front Operation
Use the On-Demand Multi-Use Display (ODMD) touchscreen or the buttons
below the screen to operate the system.
Recirculation/
fresh air mode
Driver’s side
temperature
On-Demand Multi-Use Display (ODMD)
When you select a climate control icon, a new screen appears where you can make
adjustments or change settings.
Airflow
control mode
AC: Turn the air conditioning on or off.
SYNC: Set the passenger’s side temperature
to the same as the driver’s side.
Fan
speedRear temperature
Passenger’s side
temperature
Windshield
defroster
button
Driver’s side
temperature switch
Climate control buttons
ON/OFF
buttonAUTO button: Press, then
adjust the temperature to
your preferred setting.
Rear window
defogger/heated
mirror buttonPassenger’s side
temperature switch
Page 59 of 170
52 |
V
EHICLE CONTROLS
Rear Operation
Use the On-Demand Multi-Use Display (ODMD) touchscreen to operate the
system.
Rear Lock: Disable
operation from the
rear.
Rear temperature
up/down
On-Demand Multi-Use Display (ODMD)
Close the menu Rear ON/OFF
Rear AUTO
Fan speed Airflow control
mode
If Rear Lock is turned on in the front, rear controls
cannot be operated.
ODMD screen
Select the REAR icon to
enter the rear climate
control screen.
Rear Climate Control ButtonsUse the buttons on the back of the center console to operate the rear system.
Temperature
controlRear
AUTO ON/OFF
button
Airflow
control
mode Fan speed
buttons
Page 63 of 170
56 |
AUDIO AND CONNECTIVITY
Learn how to operate the vehicle’s audio system.
Basic
Audio Operation
Connect audio devices and operate buttons and displays for the audio system.
USB Ports
The center console has three USB ports. All of them can charge a device. Connect
an audio device to the right-hand port for audio playback..
1.
Slide back the center console cov
er. Open a
USB port cover.
2.
Install the device to charge or
for playback.
The back of the second-row console* has two USB
ports. They are for charging devices.
Auxiliary Input Jack
Connect standard audio devices with a 1/8-inch (3.5 mm) stereo miniplug.
1.
Slide back the center console cov
er. Open the
AUX cover.
2.
Connect the device to the input
jack.
3.
Use the device to control the
audio.
*if equipped. Applicable laws may prohibit the operation of handheld electronic devices while operating a vehicle.
AUDIO AND CONNECTIVITY
for chargingfor audio
AUX jack
for charging
Page 65 of 170

58 |
AUDIO AND CONNECTIVITY
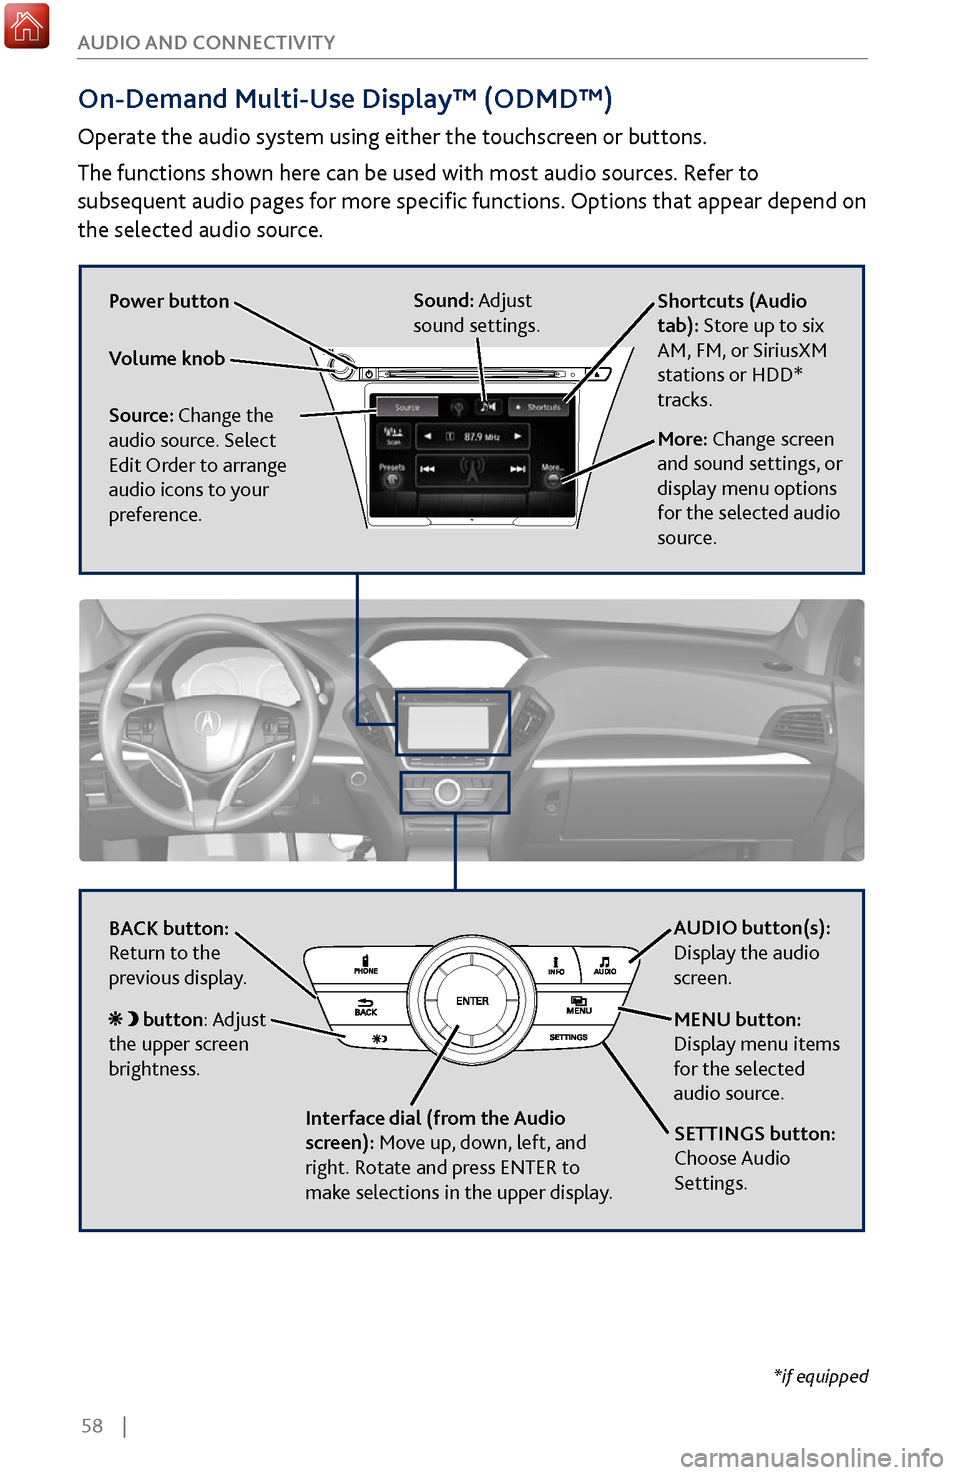
On-Demand Multi-Use Display™ (ODMD™)
Operate the audio system using either the touchscreen or buttons.
The functions shown here can be used with most audio sources. Refer to
subsequent audio pages for more specific functions. Options that appear depend on
the selected audio source.
Power button
Shortcuts (Audio
tab): Store up to six
AM, FM, or SiriusXM
stations or HDD*
tracks.
More: Change screen
and sound settings, or
display menu options
for the selected audio
source.
Sound: Adjust
sound settings.
Volume knob
Source: Change the
audio source. Select
Edit Order to arrange
audio icons to your
preference.
BACK button:
Return to the
previous display. AUDIO button(s):
Display the audio
screen.
MENU button:
Display menu items
for the selected
audio source.
Interface dial (from the Audio
screen): Move up, down, left, and
right. Rotate and press ENTER to
make selections in the upper display.
button: Adjust
the upper screen
brightness.
SETTINGS button:
Choose Audio
Settings.
*if equipped