Page 9 of 170
2 |
V
ISUAL INDEX
Dashboard and Ceiling Controls
1 Color information display
2 On-Demand Multi-Use DisplayTM
(ODMD) p. 58
3 Hazard warning button
4 Climate control buttons p. 51
5 Moonroof switch p. 36
Map lights p. 40
HomeLink® buttons p. 50
AcuraLink® buttons* p. 79
6 Power window switches p. 35
Door lock switches p. 34
Door mirror controls
p. 46
Power folding mirr
or button* p. 46
7 Power tailgate button p. 33
Fuel fill door r
elease button p. 119
8 Hood release handle p. 139
9 Driving Position Memory System
buttons p. 47
10 Integrated Dynamics System
(D
YNAMIC MODE) button p. 101
Electronic gear selector p. 98
Auto idle stop OFF button* p. 100
11 Audio/phone/navigation/
Surround View Camera*
buttons
p. 50, 65, 75, 105
12 Rear entertainment system* p. 67
13 (inside center console)
USB ports p. 57
Auxiliary input jack p. 57
Accessory power socket
p. 57
1
2834
5
67
9
101112
*if equipped
13
Page 59 of 170
52 |
V
EHICLE CONTROLS
Rear Operation
Use the On-Demand Multi-Use Display (ODMD) touchscreen to operate the
system.
Rear Lock: Disable
operation from the
rear.
Rear temperature
up/down
On-Demand Multi-Use Display (ODMD)
Close the menu Rear ON/OFF
Rear AUTO
Fan speed Airflow control
mode
If Rear Lock is turned on in the front, rear controls
cannot be operated.
ODMD screen
Select the REAR icon to
enter the rear climate
control screen.
Rear Climate Control ButtonsUse the buttons on the back of the center console to operate the rear system.
Temperature
controlRear
AUTO ON/OFF
button
Airflow
control
mode Fan speed
buttons
Page 61 of 170

54 |
V
EHICLE CONTROLS
Seat Heaters and Ventilation*
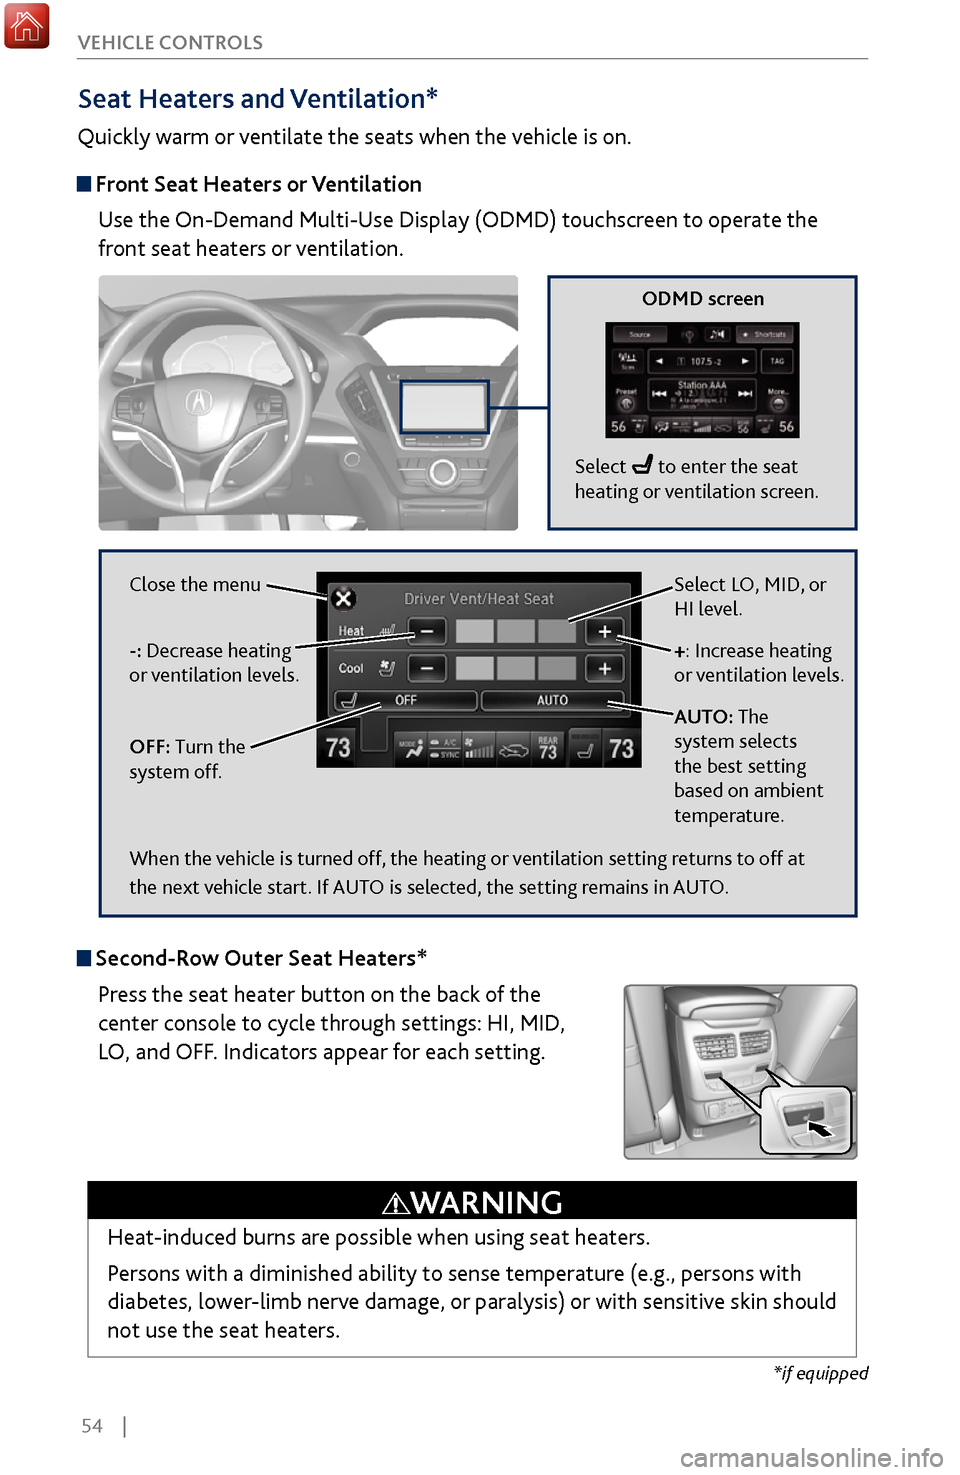
Quickly warm or ventilate the seats when the vehicle is on.
Front Seat Heaters or Ventilation
Use the On-Demand Multi-Use Display (ODMD) touchscreen to operate the
front seat heaters or ventilation.
Select LO, MID, or
HI level.
+: Increase heating
or ventilation levels.
AUTO: The
system selects
the best setting
based on ambient
temperature.
OFF: Turn the
system off. -: Decrease heating
or ventilation levels. Close the menu
ODMD screen
Select to enter the seat
heating or ventilation screen.
*if equipped
Second-Row Outer Seat Heaters*
Press the seat heater button on the back of the
center console to cycle through settings: HI, MID,
LO, and OFF. Indicators appear for each setting.
Heat-induced burns are possible when using seat heaters.
Persons with a diminished ability to sense temperature (e.g., persons with
diabetes, lower-limb nerve damage, or paralysis) or with sensitive skin should
not use the seat heaters.
WARNING
When the vehicle is turned off, the heating or ventilation setting returns to off at
the next vehicle start. If AUTO is selected, the setting remains in AUTO.
Page 63 of 170
56 |
AUDIO AND CONNECTIVITY
Learn how to operate the vehicle’s audio system.
Basic
Audio Operation
Connect audio devices and operate buttons and displays for the audio system.
USB Ports
The center console has three USB ports. All of them can charge a device. Connect
an audio device to the right-hand port for audio playback..
1.
Slide back the center console cov
er. Open a
USB port cover.
2.
Install the device to charge or
for playback.
The back of the second-row console* has two USB
ports. They are for charging devices.
Auxiliary Input Jack
Connect standard audio devices with a 1/8-inch (3.5 mm) stereo miniplug.
1.
Slide back the center console cov
er. Open the
AUX cover.
2.
Connect the device to the input
jack.
3.
Use the device to control the
audio.
*if equipped. Applicable laws may prohibit the operation of handheld electronic devices while operating a vehicle.
AUDIO AND CONNECTIVITY
for chargingfor audio
AUX jack
for charging
Page 64 of 170

| 57
AUDIO AND CONNECTIVITY
Do not insert an automotive type cigarette lighter element. This can overheat the
power socket.
NOTICE
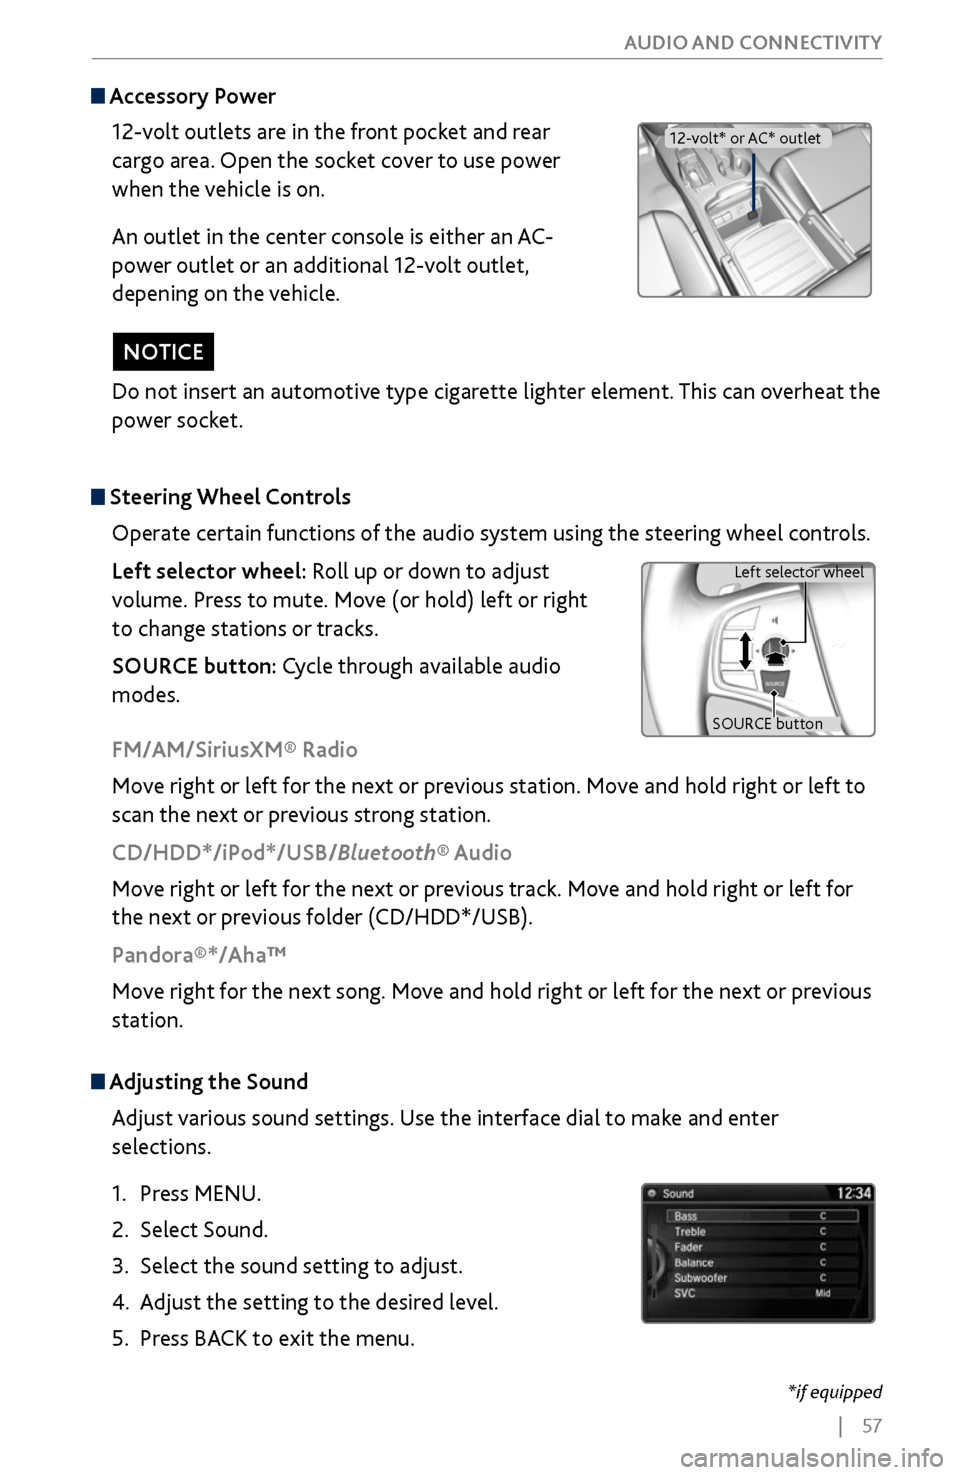
Adjusting the
Sound
Adjust various sound settings. Use the interface dial to make and enter
selections.
1.
Press MENU.
2.
Select Sound.
3.
Select the sound setting to adjust
.
4.
Adjust the setting to the desir
ed level.
5.
Press BACK
to exit the menu.
Steering Wheel Controls
Operate certain functions of the audio system using the steering wheel controls.
Left selector wheel: Roll up or down to adjust
volume. Press to mute. Move (or hold) left or right
to change stations or tracks.
SOURCE button: Cycle through available audio
modes.
SOURCE button Left selector wheel
FM/AM/SiriusXM® Radio
Move right or left for the next or previous station. Move and hold right or left to
scan the next or previous strong station.
CD/HDD*/iPod*/USB/Bluetooth® Audio
Move right or left for the next or previous track. Move and hold right or left for
the next or previous folder (CD/HDD*/USB).
Pandora®*/Aha™
Move right for the next song. Move and hold right or left for the next or previous
station.
Accessory Power
12-volt outlets are in the front pocket and rear
cargo area. Open the socket cover to use power
when the vehicle is on.
An outlet in the center console is either an AC-
power outlet or an additional 12-volt outlet,
depening on the vehicle.
12-volt* or AC* outlet
*if equipped