Page 25 of 112
, an")
Instrument and control functions
3-10
3
Stopwatch
To use the stopwatch, push the “SE-
LECT” button to change the display to
the stopwatch (the digits will flash
when the stopwatch is selected), and
then push the “SELECT” button for a
few seconds until the digits stop flash-
ing. The stopwatch can now be used
as follows:
Standard measurement
1. Push the “RESET” button to start
the stopwatch.
2. Push the “SELECT” button to stop the stopwatch.
3. Push the “SELECT” button again to reset the stopwatch.
Split-time measurement1. Push the “RESET” button to start the stopwatch.
2. Push the “RESET” button or start switch “ ” to measure split-
times. (The colon “:” will start
flashing.) 3. Push the “RESET” button or start
switch “ ” to display the final
split-time or push the “SELECT”
button to stop the stopwatch and
display total elapsed time.
4. Push the “SELECT” button to re- set the stopwatch.
TIPTo exit the stopwatch, push the “SE-
LECT” button for a few seconds until
the digits start flashing.Coolant temperature display
The coolant temperature display indi-
cates the temperature of the coolant.
See page 3-6 for a full explanation.
TIPWhen the coolant temperature display
is selected, “C” is displayed for one se-
cond, and then the coolant tempera-
ture is displayed.NOTICE
ECA10022
Do not continue to operate the en-
g ine if it is overheatin g.Air intake temperature display
The air intake temperature display indi-
cates the temperature of the air drawn
into the air intake duct. Push the “RE-
SET” button to switch the display be-
tween the coolant temperature and the
air intake temperature.
1. Coolant temperature display
TRIP A
˚C
1
1. Air intake temperature display
TRIP A
˚C
1
U2CXE2E0.book Page 10 Tuesday, June 9, 2015 5:04 PM
Page 26 of 112

Instrument and control functions
3-11
3
TIP When the air intake temperature is
below –9 °C, “LO” will be dis-
played.
Even when the air intake tempera-
ture is displayed, the coolant tem-
perature warning light comes on if
the engine overheats.
When the key is turned to “ON”,
the coolant temperature is auto-
matically displayed, even if the air
intake temperature was displayed
prior to turning the key to “OFF”.
When the air intake temperature
display is selected, “A” is dis-
played for one second, and then
“A” and the air intake temperature
are displayed.
Self- dia gnosis device
This model is equipped with a self-di-
agnosis device for various electrical
circuits. If a problem is detected in any
of those circuits, the engine trouble
warning light will come on and the dis-
play will indicate an error code. If the
display indicates any error codes, note
the code number and have a Yamaha
dealer check the vehicle.
The self-diagnosis device also detects
problems in the immobilizer system
circuits. If a problem is detected in the
immobilizer system circuits, the immo- bilizer system indicator light will flash
and the display will indicate an error
code.
TIPIf the display indicates error code 52,
this could be caused by transponder
interference. If this error code appears,
try the following:1. Use the code re-registering key to
start the engine.TIPMake sure there are no other immobi-
lizer keys close to the main switch, and
do not keep more than one immobilizer
key on the same key ring! Immobilizer
system keys may cause signal interfer-
ence, which may prevent the engine
from starting.2. If the engine starts, turn it off andtry starting the engine with the
standard keys.
3. If one or both of the standard keys do not start the engine, take the
vehicle, the code re-registering
key and both standard keys to a
Yamaha dealer and have the stan-
dard keys re-registered.
1. Immobilizer system indicator light
2. Engine trouble warning light “ ”
3. Error code display
321
U2CXE2E0.book Page 11 Tuesday, June 9, 2015 5:04 PM
Page 27 of 112

Instrument and control functions
3-12
3
NOTICE
ECA11591
If the display in dicates an error co-
d e, the vehicle shoul d b e checked as
soon as possi ble in or der to avoi d
en gine damag e.Display bri ghtness and shift timing
in dicator li ght control mo de
This mode cycles through five control
functions, allowing you to make the fol-
lowing settings in the order listed be-
low.
Display brightness:
This function allows you to adjust
the brightness of the displays and
tachometer.
Shift timing indicator light activity
function:
This function allows you to set the
indicator light to on, flash, or off.
Shift timing indicator light activa-
tion:
This function allows you to select
the engine speed at which the in-
dicator light will be activated.
Shift timing indicator light deacti-
vation:
This function allows you to select
the engine speed at which the in-
dicator light will be deactivated.
Shift timing indicator light bright-
ness:
This function allows you to adjust
the brightness of the shift timing
indicator light.
TIPThe brightness level display shows the
brightness level setting.
To adjust the brightness of the displaysand tachometer1. Turn the key to “OFF”.
2. Push and hold the “SELECT” but-
ton.
3. Turn the key to “ON”, and then re- lease the “SELECT” button after
five seconds.
4. Push the “RESET” button to select the desired brightness level.
5. Push the “SELECT” button to con- firm the selected brightness level.
The control mode changes to the
shift timing indicator light activity
function.
To set the shift timing indicator light ac-tivity function1. Push the “RESET” button to select one of the following indicator light
activity settings: On - the indicator light will
come on when activated.
(This setting is selected when
the indicator light stays on.)
1. Shift timing indicator light activation range
2. Brightness adjustable displays
3. Brightness level display
4. Shift timing indicator light
km/h
1
2
3
4
2
U2CXE2E0.book Page 12 Tuesday, June 9, 2015 5:04 PM
Page 28 of 112

Off - the indi")
Instrument and control functions
3-13
3
Flash - the indicator light will
flash when activated. (This
setting is selected when the
indicator light flashes four
times per second.)
Off - the indicator light is de-
activated; in other words, it
will not come on or flash. (This
setting is selected when the
indicator light flashes once
every two seconds.)
2. Push the “SELECT” button to con- firm the selected indicator light ac-
tivity. The control mode changes
to the shift timing indicator light
activation function.
To set the shift timing indicator light ac-
tivation functionTIPThe shift timing indicator light activa-
tion function can be set between
10000 r/min and 18000 r/min. From
10000 r/min to 13000 r/min, the indica-
tor light can be set in increments of 500
r/min. From 13000 r/min to 18000
r/min, the indicator light can be set in
increments of 200 r/min.
1. Push the “RESET” button to select the desired engine speed for acti-
vating the indicator light.
2. Push the “SELECT” button to con- firm the selected engine speed.
The control mode changes to the
shift timing indicator light deacti-
vation function.
To set the shift timing indicator lightdeactivation functionTIP The shift timing indicator light de-
activation function can be set be-
tween 10000 r/min and 18000
r/min. From 10000 r/min to 13000
r/min, the indicator light can be set
in increments of 500 r/min. From
13000 r/min to 18000 r/min, the in-
dicator light can be set in incre-
ments of 200 r/min.
Be sure to set the deactivation
function to a higher engine speed
than for the activation function,
otherwise the shift timing indicator
light will remain deactivated.
1. Push the “RESET” button to select
the desired engine speed for de-
activating the indicator light.
2. Push the “SELECT” button to con- firm the selected engine speed.
The control mode changes to the
shift timing indicator light bright-
ness function.
To adjust the shift timing indicator lightbrightness1. Push the “RESET” button to select the desired indicator light bright-
ness level.
2. Push the “SELECT” button to con- firm the selected indicator light
brightness level and exit the dis-
play brightness and shift timing in-
dicator light control mode.
U2CXE2E0.book Page 13 Tuesday, June 9, 2015 5:04 PM
Page 29 of 112

Instrument and control functions
3-14
3
EAU1234H
Han dle bar switchesLeft Ri
ght
EAU12351
Pass switch “ ”
Press this switch to flash the headlight.
EAU12401
Dimmer switch “ / ”
Set this switch to “ ” for the high
beam and to “ ” for the low beam.
EAU12461
Turn si gnal switch “ / ”
To signal a right-hand turn, push this
switch to “ ”. To signal a left-hand
turn, push this switch to “ ”. When
released, the switch returns to the cen- ter position. To cancel the turn signal
lights, push the switch in after it has re-
turned to the center position.
EAU12501
Horn switch “ ”
Press this switch to sound the horn.
EAU12661
En
gine stop switch “ / ”
Set this switch to “ ” before starting
the engine. Set this switch to “ ” to
stop the engine in case of an emergen-
cy, such as when the vehicle overturns
or when the throttle cable is stuck.
EAU12713
Start switch “ ”
Push this switch to crank the engine
with the starter. See page 5-1 for start-
ing instructions prior to starting the en-
gine.
EAU41701
The engine trouble warning light will
come on when the key is turned to
“ON” and the start switch is pushed,
but this does not indicate a malfunc-
tion.
1. Pass switch “ ”
2. Dimmer switch “ / ”
3. Turn signal switch “ / ”
4. Horn switch “ ”
5. Hazard switch “ ”
1. Engine stop switch “ / ”
2. Start switch “ ”
U2CXE2E0.book Page 14 Tuesday, June 9, 2015 5:04 PM
Page 30 of 112

Instrument and control functions
3-15
3
EAU12735
Hazar d switch “ ”
With the key in the “ON” or “ ” posi-
tion, use this switch to turn on the haz-
ard lights (simultaneous flashing of all
turn signal lights).
The hazard lights are used in case of an
emergency or to warn other drivers
when your vehicle is stopped where it
might be a traffic hazard.NOTICE
ECA10062
Do not use the hazard lights for an
exten ded len gth of time with the en-
g ine not runnin g, otherwise the bat-
tery may dischar ge.
EAU12822
Clutch leverThe clutch lever is located on the left
side of the handlebar. To disengage
the clutch, pull the lever toward the
handlebar grip. To engage the clutch,
release the lever. The lever should be
pulled rapidly and released slowly for
smooth clutch operation.
The clutch lever is equipped with a
clutch switch, which is part of the igni-
tion circuit cut-off system. (See page
3-28.)
EAU12872
Shift pe dalThe shift pedal is located on the left
side of the motorcycle and is used in
combination with the clutch lever when
shifting the gears of the 6-speed con-
stant-mesh transmission equipped on
this motorcycle.
1. Clutch lever
1. Shift pedal
U2CXE2E0.book Page 15 Tuesday, June 9, 2015 5:04 PM
Page 31 of 112
Instrument and control functions
3-16
3
EAU33854
Brake leverThe brake lever is located on the right
side of the handlebar. To apply the
front brake, pull the lever toward the
throttle grip.
The brake lever is equipped with a
brake lever position adjusting knob. To
adjust the distance between the brake
lever and the throttle grip, turn the ad-
justing knob while holding the lever
pushed away from the throttle grip.
When the desired position is obtained, be sure to set it by aligning a groove on
the adjusting knob with the “ ” mark
on the brake lever.
EAU12944
Brake pe
dalThe brake pedal is located on the right
side of the motorcycle. To apply the
rear brake, press down on the brake
pedal.
1. Brake lever
2. Distance between brake lever and throttle
grip
3. “ ” mark
4. Brake lever position adjusting knob
2 1
3
4
1. Brake pedal
U2CXE2E0.book Page 16 Tuesday, June 9, 2015 5:04 PM
Page 32 of 112

Instrument and control functions
3-17
3
EAU13075
Fuel tank capTo open the fuel tank cap
Open the fuel tank cap lock cover, in-
sert the key into the lock, and then turn
it 1/4 turn clockwise. The lock will be
released and the fuel tank cap can be
opened.
To close the fuel tank cap
1. Push the fuel tank cap into posi- tion with the key inserted in the
lock.
2. Turn the key counterclockwise to the original position, remove it,
and then close the lock cover.
TIPThe fuel tank cap cannot be closed un-
less the key is in the lock. In addition,
the key cannot be removed if the cap is
not properly closed and locked.
WARNING
EWA11092
Make sure that the fuel tank cap is
properly close d after fillin g fuel.
Leakin g fuel is a fire hazar d.
EAU13222
FuelMake sure there is sufficient gasoline in
the tank.
WARNING
EWA10882
Gasoline an d g asoline vapors are
extremely flammab le. To avoid fires
an d explosions an d to re duce the
risk of injury when refuelin g, follow
these instructions.1. Before refueling, turn off the en- gine and be sure that no one is sit-
ting on the vehicle. Never refuel
while smoking, or while in the vi-
cinity of sparks, open flames, or
other sources of ignition such as
the pilot lights of water heaters
and clothes dryers.
2. Do not overfill the fuel tank. When refueling, be sure to insert the
pump nozzle into the fuel tank filler
hole. Stop filling when the fuel
reaches the bottom of the filler
tube. Because fuel expands when
it heats up, heat from the engine or
the sun can cause fuel to spill out
of the fuel tank.
1. Fuel tank cap lock cover
2. Unlock.
1 2
U2CXE2E0.book Page 17 Tuesday, June 9, 2015 5:04 PM
 1
1 2
2 3
3 4
4 5
5 6
6 7
7 8
8 9
9 10
10 11
11 12
12 13
13 14
14 15
15 16
16 17
17 18
18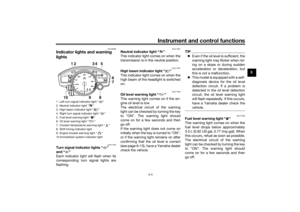 19
19 20
20 21
21 22
22 23
23 24
24 25
25 26
26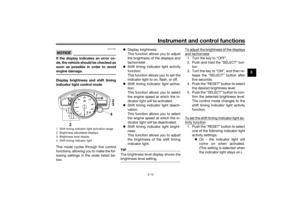 27
27 28
28 29
29 30
30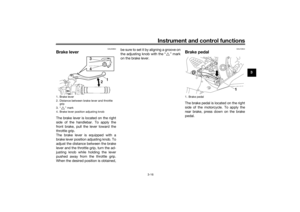 31
31 32
32 33
33 34
34 35
35 36
36 37
37 38
38 39
39 40
40 41
41 42
42 43
43 44
44 45
45 46
46 47
47 48
48 49
49 50
50 51
51 52
52 53
53 54
54 55
55 56
56 57
57 58
58 59
59 60
60 61
61 62
62 63
63 64
64 65
65 66
66 67
67 68
68 69
69 70
70 71
71 72
72 73
73 74
74 75
75 76
76 77
77 78
78 79
79 80
80 81
81 82
82 83
83 84
84 85
85 86
86 87
87 88
88 89
89 90
90 91
91 92
92 93
93 94
94 95
95 96
96 97
97 98
98 99
99 100
100 101
101 102
102 103
103 104
104 105
105 106
106 107
107 108
108 109
109 110
110 111
111