2016 VOLVO XC90 T8 tow
[x] Cancel search: towPage 325 of 546
DRIVER SUPPORT
}}
* Option/accessory, for more information, see Introduction.323
Adjustable steering force*
Steering force increases with the speed of the vehicle to give the driver an enhanced sense ofcontrol and stability. At low speed the vehicle iseasier to steer in order to facilitate parking, etc.
Changing the steering force levelTo change the level of steering force, see theinformation under the heading "individual" in arti-cle "Drive modes" for additional information.
NOTE
•This steering force level menu function cannot be accessed when the vehicle isin motion.
• In certain situations, the power steeringfunction may become too hot and mustbe temporarily cooled. During cooling,power steering effect will be reduced andmore force may be necessary to turn thesteering wheel and a message will bedisplayed in the instrument panel.
Related information
• Driver support systems (p. 252)
• Drive modes (p. 390)
Electronic Stability Control (ESC)
Electronic Stability Control (ESC) helps reduce wheel spin, counteract skidding and to generallyhelp improve directional stability.
A pulsating sound will be audi- ble when the system is activelyoperating and is normal. Accel-eration may also be slightlyslower than normal.
WARNING
ESC is a supplementary aid and cannot deal with all situations or road conditions. The driver is always responsible for operating the vehicle in a safe manner in accordancewith current traffic regulations.
ESC consists of the following functions: • Traction control
• Spin control
• Active Yaw Control
• Engine Drag Control
• Trailer Stability Assist
Traction controlThis function is designed to help reduce wheel spin by transferring power from a drive wheel that begins to lose traction to the wheel on the oppo-site side of the vehicle (on the same axle).
Spin controlThis function is designed to help prevent thedrive wheels from spinning while the vehicle isaccelerating.
Active Yaw ControlAt low speeds, this function helps maintain direc-tional stability by braking one or more of thewheels if the vehicle shows a tendency to skid orslide laterally.
Engine Drag Control EDCEDC helps keep the engine running if the wheelsshow a tendency to lock, e.g., when shifting downin the manual shifting mode or while using theengine's braking function on a slippery surface. Ifthe wheels were to lock, the vehicle wouldbecome more difficult to steer.
Trailer Stability Assist
*4TSA helps stabilize a vehicle that is towing atrailer when the vehicle and trailer have begun tosway. This system is automatically deactivated if the driver selects
Sport mode.
Related information
•Detachable trailer hitch (p. 368)
• Driving with a trailer (p. 367)
4
This function is included if the vehicle is equipped with a Volvo original trailer hitch.
Page 331 of 546
DRIVER SUPPORT
}}
* Option/accessory, for more information, see Introduction.329
Distance Alert*
Distance Alert is a function that alerts the driver if the time interval to the vehicle ahead is too short.
Distance Alert is active at speeds above approxi- mately 18 mph (30 km/h) and only reacts to avehicle ahead that is driving in the same direc-tion. No information is provided for vehicles driv-ing toward you, moving very slowly, or at a stand-still.
Warning light
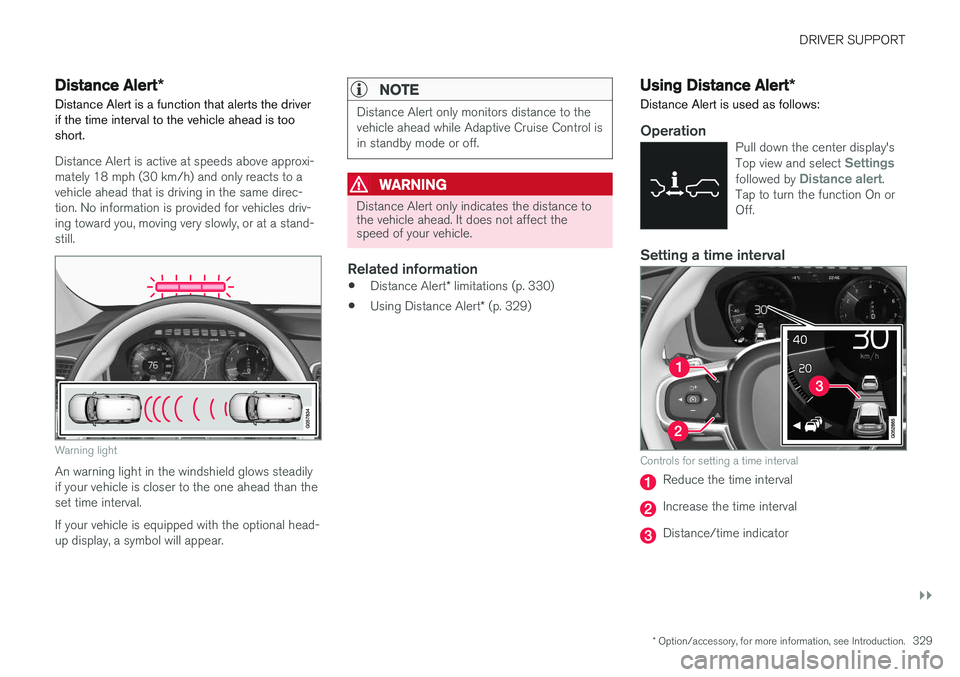
An warning light in the windshield glows steadily if your vehicle is closer to the one ahead than theset time interval. If your vehicle is equipped with the optional head- up display, a symbol will appear.
NOTE
Distance Alert only monitors distance to the vehicle ahead while Adaptive Cruise Control isin standby mode or off.
WARNING
Distance Alert only indicates the distance to the vehicle ahead. It does not affect thespeed of your vehicle.
Related information
• Distance Alert
* limitations (p. 330)
• Using Distance Alert
* (p. 329)
Using Distance Alert *
Distance Alert is used as follows:
OperationPull down the center display's Top view and select Settingsfollowed by Distance alert.
Tap to turn the function On or Off.
Setting a time interval
Controls for setting a time interval
Reduce the time interval
Increase the time interval
Distance/time indicator
Page 350 of 546

||
STARTING AND DRIVING
* Option/accessory, for more information, see Introduction.
348
Instrument panel symbols
SymbolExplanation
A
B
Red symbol: Check the brake fluid
level. If the level is low, top up and have the system inspected todetermine the cause of the loss offluid. Yellow symbol: there is a fault in
the brake pedal sensor.
A
B
Steady glow for more than 2 seconds: there is a fault in theABS system. The normal brakesystem will still function but with-out ABS brake modulation.
If Brake pedalCharacteristics
changed Service required is
displayed, the Brake-by-Wire sys- tem is not functioning properly.The brake pedal must be pressedfarther down and with more pres-sure for braking effect.
A US models
B Canadian models
WARNING
If both symbols illuminate at the same time and the brake level is below the MIN mark in
the reservoir or if a brake system-related mes-sage is shown in the instrument panel: DO
NOT DRIVE . Have the vehicle towed to a
trained and qualified Volvo service technician and have the brake system inspected. If both symbols illuminate at the same time and the brake level is normal (not below the
MIN mark in the reservoir) or if a brake sys-
tem-related message is shown in the instru- ment panel: drive the vehicle carefully to anauthorized Volvo workshop and have thebrake system inspected by a trained andqualified Volvo service technician.
Related information
• Brake functions (p. 348)
• Brake assist system (p. 349)
• Emergency brake lights (p. 350)
• General information about the XC90 T8 Twin Engine Plug-in Hybrid (p. 16)
Brake functions
The vehicle's standard braking features are aug- mented by a number of auxiliary help functions.
In addition to the wheel brakes and the parking brake, the vehicle is equipped with several auto-matic brake assist functions. These systems helpthe driver by e.g., keeping the vehicle stationarywhen the brake pedal is not depressed (at a traf-fic light or intersection), when starting up a hill orwhen driving down a hill. These systems include: • Auto-hold brakes
• Hill Start Assist
• Braking assist after a collision
• Hill Descent Control
*
Related information
•Brakes (p. 346)
• Parking brake (p. 352)
• Hill Descent Control (HDC) (p. 350)
• Auto-hold brake function (p. 349)
Page 355 of 546
STARTING AND DRIVING
}}
353
Symbol in the instrument panel
SymbolExplanation
A
B
The symbol flashes while the park- ing brake is being applied. If the symbol flashes at any other time, this indicates a fault. See themessage in the instrument panel.
AUS models
B Canadian models
Automatic function
The parking brake is applied automatically:
• If the Auto Hold function is activated and the vehicle has been stationary for approx.5 minutes.
• If the gear selector is moved to
P on a steep
hill.
• When the engine is turned off (this functioncan be selected, see "Parking brake set-tings" below).
Emergency braking
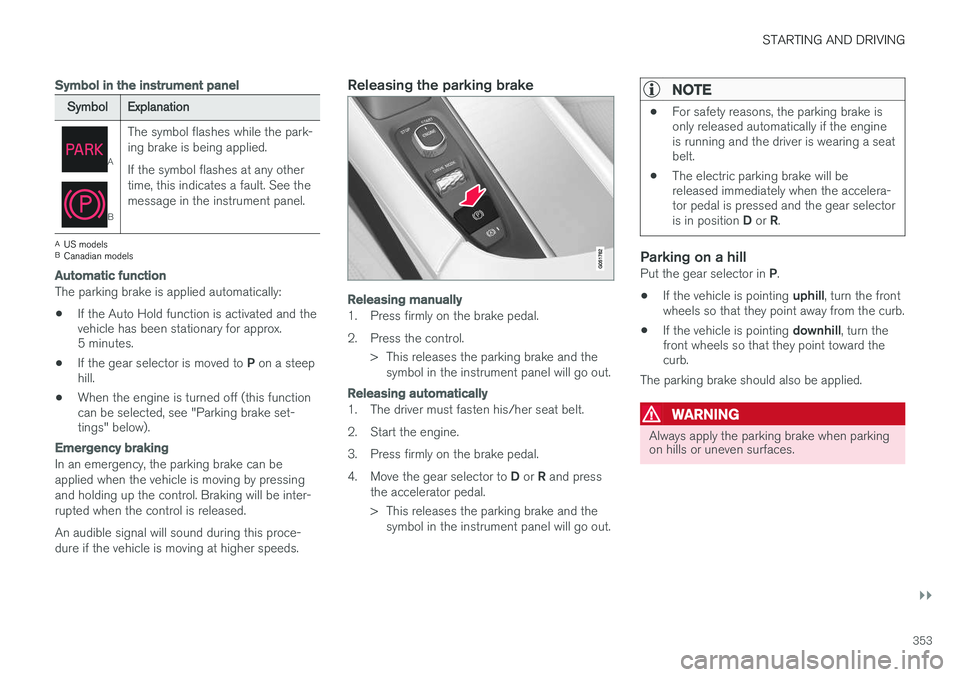
In an emergency, the parking brake can be applied when the vehicle is moving by pressingand holding up the control. Braking will be inter-rupted when the control is released. An audible signal will sound during this proce- dure if the vehicle is moving at higher speeds.
Releasing the parking brake
Releasing manually
1. Press firmly on the brake pedal.
2. Press the control.
> This releases the parking brake and thesymbol in the instrument panel will go out.
Releasing automatically
1. The driver must fasten his/her seat belt.
2. Start the engine.
3. Press firmly on the brake pedal.4. Move the gear selector to D or R and press
the accelerator pedal.
> This releases the parking brake and the symbol in the instrument panel will go out.
NOTE
• For safety reasons, the parking brake is only released automatically if the engineis running and the driver is wearing a seatbelt.
• The electric parking brake will bereleased immediately when the accelera-tor pedal is pressed and the gear selector is in position
D or R.
Parking on a hillPut the gear selector in P.
• If the vehicle is pointing
uphill, turn the front
wheels so that they point away from the curb.
• If the vehicle is pointing
downhill, turn the
front wheels so that they point toward the curb.
The parking brake should also be applied.
WARNING
Always apply the parking brake when parking on hills or uneven surfaces.
Page 356 of 546
||
STARTING AND DRIVING
354
Heavy load uphill
A heavy load, such as a trailer, can cause the vehicle to roll backward when the parking brakeis released automatically on a steep incline. Tohelp avoid this:
1. Keep the electric parking brake controlpushed in.
2. While pressing the accelerator pedal to pull away, release the parking brake control only after the vehicle begins to move.
Parking brake settingsAutomatically setting the parking brake can beturned on or off in the center display's Top view. 1.Tap
Settings in Top view.
2. Tap
My CarElectric Parking Brake and
deselect Auto Activate Parking Brake.
Related information
• Parking brake (p. 352)
• Parking brake malfunctions (p. 354)
• Auto-hold brake function (p. 349)
Parking brake malfunctions
If it has not been possible to apply or release the parking brake after several attempts, consult atrained and authorized Volvo service technicianor retailer.
An audible signal will sound if the parking brake is applied when the vehicle is being driven. If thevehicle must be parked while the parking brake isnot functioning properly: • Put the gear selector in
P.
• If the vehicle is pointing
uphill, turn the front
wheels so that they point away from the curb.
• If the vehicle is pointing
downhill, turn the
front wheels so that they point toward the curb.
• Put the gear selector in
P.
Low battery charge levelIf the battery is discharged, the parking brake cannot be operated. Connect an auxiliary batteryto the vehicle.
Replacing brake padsThe rear brake pads have to be replaced by atrained and authorized Volvo service techniciandue to the design of the electric parking brake.
Symbols in the instrument panel
SymbolExplanation
A
B
If the symbol flashes, a parking brake fault has been detected.See the message in the instru-ment panel.
A
B
Fault in the brake system.
A
US models
B Canadian models
Related information
• Using the parking brake (p. 352)
• Using the parking brake (p. 352)
• Brake functions (p. 348)
• Jump starting (p. 365)
Page 359 of 546

STARTING AND DRIVING
}}
357
Driving through standing water
The vehicle should be driven with extreme cau- tion if it is necessary to drive through standingwater.
The vehicle can be driven through water up to a depth approximately level with the floor at walk-ing speed to help prevent water from enteringthe differential and/or the transmission or dam-aging electrical components. • If possible, check the depth of the water before driving through it. Take particular carewhen driving through flowing water.
• Before driving through water, always select the
Off Road drive mode to ensure that the
gasoline engine is running and to maximize ground clearance.
• After driving through water, apply the brakesand check that they are functioning correctly.
• Clean the electrical connections for trailerwiring after driving in mud or water.
• When driving through water, maintain lowspeed and do not stop in the water.
CAUTION
• Damage may occur to the engine, trans- mission, electrical components, etc. if thevehicle is driven through water higherthan its floor level. Be aware that wavescreated by other vehicles could cause thelevel to temporarily be above the vehicle'sfloor level.
• Damage to any components due to waterabove the floor level, vapor lock or insuffi-cient oil is not covered under warranty.
• If the engine has been stopped while thevehicle is in water, do not attempt torestart it. Have the vehicle towed out ofthe water and inspected by a trained andqualified Volvo service technician.
WARNING
• Avoid driving through standing or rushing water. Doing so can be dangerous and itmay also be difficult to determine theactual depth of the water.
• If water cannot be avoided, after drivingthrough the water, press lightly on thebrake pedal to ensure that the brakes arefunctioning normally. Water or mud canmake the brake linings slippery, resultingin delayed braking effect.
Related information
•
Towing recommendations (p. 360)
Overheating the engine and transmission
In demanding driving conditions, such as when transporting heavy loads, driving in mountainousareas or in very hot weather there is a risk ofoverheating the engine or transmission.
• The engine's output may be slightly limited if there is a risk of overheating.
• Remove e.g., auxiliary lights mounted in frontof the grille in hot weather.
• If the temperature of the engine coolantbecomes too high, the warning symbol will illuminate and the message
Engine
temperature/Stop safely will be displayed.
Stop the vehicle as soon as possible in a safe place and let the engine idle for severalminutes.
• If the message
Engine temperature/High
temperature Turn off engine or Engine
coolant/Stop safely is displayed, stop
safely and turn off the engine.
• If the transmission begins to overheat, an alternative gear shifting program will beselected. An integrated protective functionwill also by activated, the warning symbol will illuminate and the message
Transmission
warmHigh temperature Reduce speed
or Transmission warmStop safely, wait
for cooling will be displayed in the instru-
ment panel.
Page 361 of 546
STARTING AND DRIVING
359
Towing eyelet
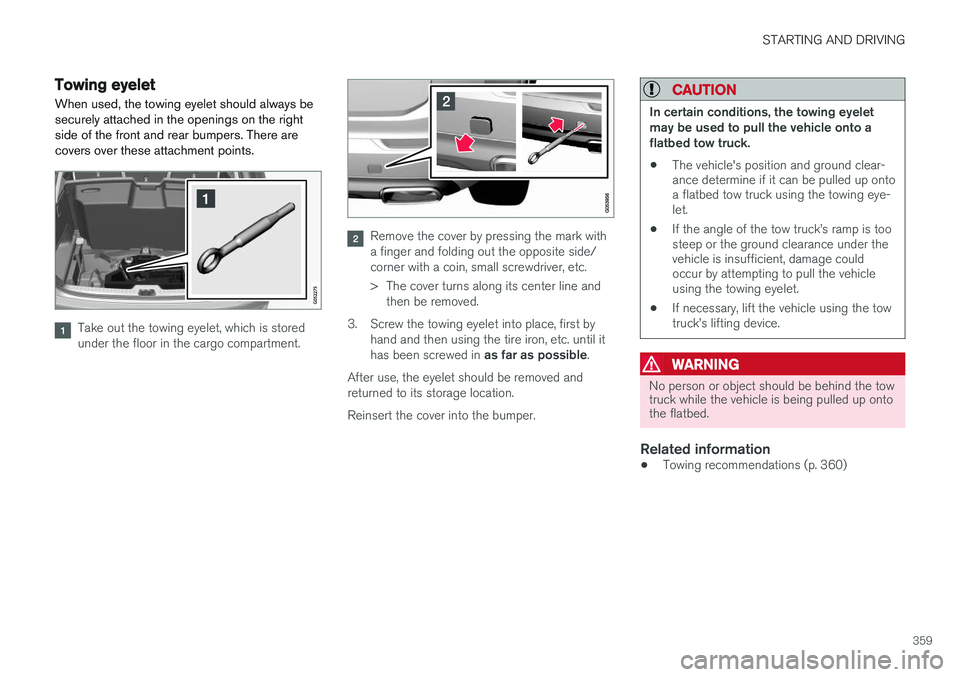
When used, the towing eyelet should always be securely attached in the openings on the rightside of the front and rear bumpers. There arecovers over these attachment points.
Take out the towing eyelet, which is stored under the floor in the cargo compartment.
Remove the cover by pressing the mark with a finger and folding out the opposite side/corner with a coin, small screwdriver, etc.
> The cover turns along its center line and then be removed.
3. Screw the towing eyelet into place, first by hand and then using the tire iron, etc. until it has been screwed in as far as possible.
After use, the eyelet should be removed and returned to its storage location. Reinsert the cover into the bumper.
CAUTION
In certain conditions, the towing eyelet may be used to pull the vehicle onto aflatbed tow truck.
• The vehicle's position and ground clear- ance determine if it can be pulled up ontoa flatbed tow truck using the towing eye-let.
• If the angle of the tow truck
Page 362 of 546

STARTING AND DRIVING
* Option/accessory, for more information, see Introduction.
360
Towing recommendations
Always check with state and local authorities before attempting to tow another vehiclebecause this type of towing is subject to regula-tions regarding maximum towing speed, lengthand type of towing device, lighting, etc.
Towing your vehicle behind another vehicle
The XC90 T8 Twin Engine Plug-in Hybrid may not be towed behind another vehicle. Doing sowould damage the electric motor and the three-way catalytic converter. If the vehicle cannot bedriven and must be moved, it must be lifted ontoa flat-bed tow truck. If the XC90 T8 Twin Engine Plug-in Hybrid is to tow (pull) another vehicle, select the
AWD drive
mode. This helps charge the hybrid battery and improves the vehicle's road holding characteris-tics.
Tow trucks
CAUTION
In certain conditions, the towing eyelet may be used to pull the vehicle onto aflatbed tow truck.
• The vehicle's position and ground clear- ance determine if it can be pulled up ontoa flatbed tow truck using the towing eye-let.
• If the angle of the tow truck