2016 VOLVO XC90 T8 tow
[x] Cancel search: towPage 377 of 546

STARTING AND DRIVING
}}
375
The gasoline engine and electric motor both gen- erate power directly to the wheels. The gasolineengine can also charge the hybrid battery using aspecial high-voltage generator.
Related information
•
Drive modes (p. 390)
• Charging the hybrid battery (p. 383)
• General information about the XC90 T8 Twin Engine Plug-in Hybrid (p. 16)
• Parking climate (preconditioning) (p. 179)
Hybrid battery charging cable
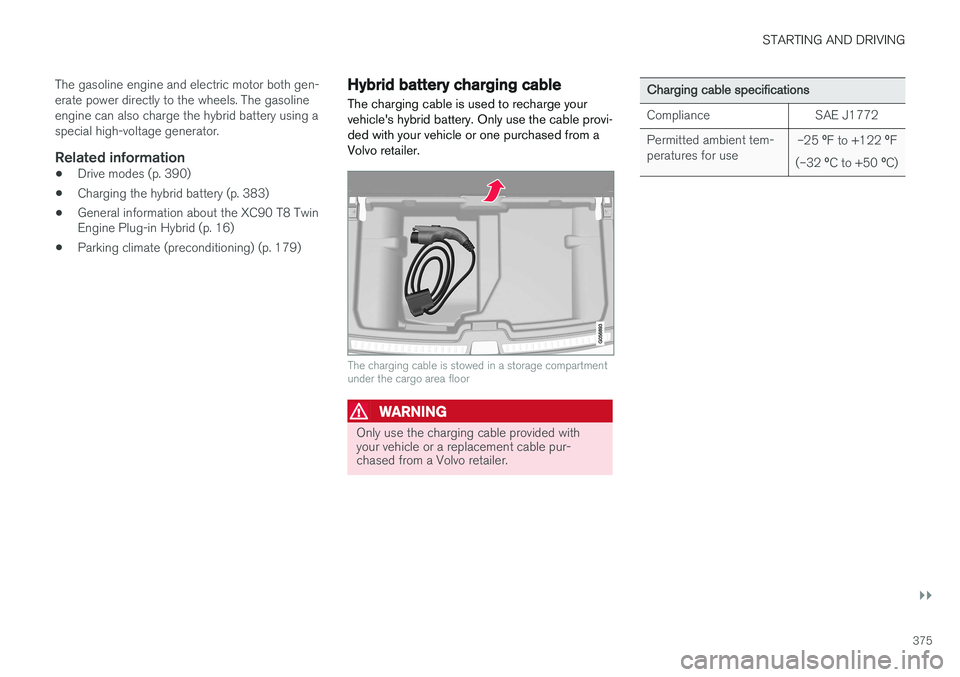
The charging cable is used to recharge your vehicle's hybrid battery. Only use the cable provi-ded with your vehicle or one purchased from aVolvo retailer.
The charging cable is stowed in a storage compartment under the cargo area floor
WARNING
Only use the charging cable provided with your vehicle or a replacement cable pur-chased from a Volvo retailer.
Charging cable specifications
ComplianceSAE J1772
Permitted ambient tem- peratures for use–25 ºF to +122 ºF
(–32 ºC to +50 ºC)
Page 383 of 546

STARTING AND DRIVING
}}
381
Press in the rear section of the door and release it.
Open the door.
Pull off the charging socket's protective cover and place it in the holder on the insideof the door. Be sure that the protective cov-er's rubber plug faces down to help keep thecover from falling out of the holder.
Put the cover back in position and close the doorin reverse order.
Stopping hybrid battery charging
Stop hybrid battery charging by unlocking the vehicle, disconnecting the charging cable fromthe vehicle's charging socket and then unplug-ging the cable from the 120-/240-volt socket.
NOTE
Always unlock the vehicle to stop the charg- ing process before disconnecting the charg-ing cable from the vehicle's charging socketand then unplugging it from the120-/240-volt socket. The cable must be disconnected from the vehicle's charging socket before it isunplugged from the 120-/240-volt socketto help prevent damage to the chargingsystem.
Unlock the vehicle with the remote key.
Press the release button on the charge cou- pler to release it and disconnect the couplerfrom the vehicle's charging socket. Removethe cable from the vehicle. Put the socket'scover back in place and close the chargerdoor.
Disconnect the cable from the 120-/240-volt socket. Stow the cable in the storage compartment under the cargo area floor.
Page 394 of 546

||
STARTING AND DRIVING
392
SAVE
This mode makes it possible to save electrical energy (hybrid battery charge) for times whenusing the electric motor is more suitable (e.g., citydriving). Using the electric motor only saves more fuel at low speeds than at high ones. Therefore, use theSAVE mode primarily when the hybrid battery'scharge level is high and driving will initially be athighway speeds but will end with city drivingwhen electric driving is preferable. If the hybrid battery's charge level is low when this mode is selected, the gasoline engine willstart and charge the hybrid battery up to approx.33%. If the battery's charge level is already above33%, this level will be maintained by the enginemanagement system, which will start/stop the gasoline engine in the same way as in
Hybriddrive mode. This mode increases fuel consumption because the gasoline engine is used to conserve batterycharge for later use.
OFF ROAD
This mode helps maximize the vehicle's capacity to traverse difficult terrain or poor roads. In OFF ROAD, ground clearance is maximized, the steering is light, All Wheel Drive and HillDescent Control are activated and a compassand altimeter will be displayed in the instrumentpanel.This drive mode can only be activated at lowspeeds (the permissible speed range will beshown on the speedometer). At higher speeds,OFF ROAD mode will be cancelled and AWD willbe activated. This mode is not intended for normal street driv- ing.
CAUTION
OFF ROAD drive mode may not be used if the vehicle is towing a trailer without an elec-trical connection. This could result in damageto the pneumatic suspension system's bel-lows.
Due to the increased ground clearance, if the OFF ROAD mode was selected when the enginewas switched off, it will also restart in this mode.
AWD
This mode offers improved traction using four- wheel drive and is intended primarily for low-speed driving on slippery surfaces. However, italso helps increase directional stability at higherspeeds. In this mode, both the electric motor and the gas- oline engine are used continuously, which resultsin higher fuel consumption.
POWER
Power mode is intended for sportier, more active
driving. This mode maximizes the combined effects of the electric motor and the gasoline engine andprovides power to all four wheels. Response topressure on the accelerator pedal is more imme-diate and the transmission shifts up at higherspeeds. Steering response is also more immedi-ate, the suspension is stiffer and lower groundclearance reduces body roll when cornering. In this mode, both the electric motor and the gas- oline engine are used continuously, which resultsin higher fuel consumption.
Page 400 of 546

||
STARTING AND DRIVING
* Option/accessory, for more information, see Introduction.
398
Brake – B
B can be selected at any time during a drive. In
this mode, the engine braking function is acti- vated when the accelerator pedal is released,which helps charge the hybrid battery. Thismeans that the hybrid battery is charged even ifthe brake pedal is not depressed.
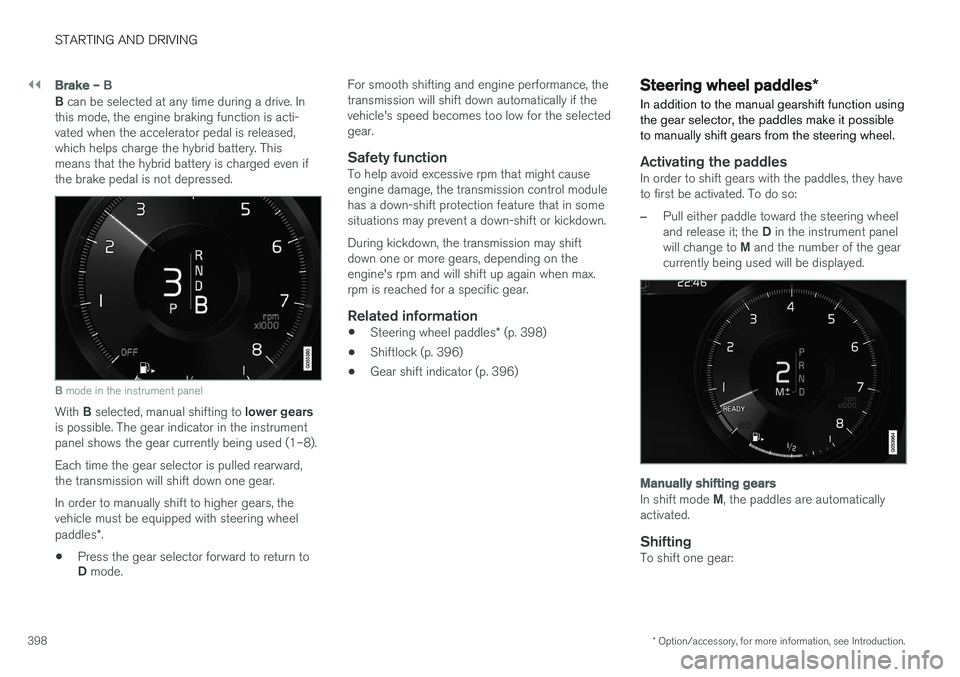
B mode in the instrument panel
With B selected, manual shifting to lower gears
is possible. The gear indicator in the instrument panel shows the gear currently being used (1–8). Each time the gear selector is pulled rearward, the transmission will shift down one gear. In order to manually shift to higher gears, the vehicle must be equipped with steering wheel paddles *.
• Press the gear selector forward to return to D
mode. For smooth shifting and engine performance, the transmission will shift down automatically if thevehicle's speed becomes too low for the selectedgear.
Safety functionTo help avoid excessive rpm that might causeengine damage, the transmission control modulehas a down-shift protection feature that in somesituations may prevent a down-shift or kickdown. During kickdown, the transmission may shift down one or more gears, depending on theengine's rpm and will shift up again when max.rpm is reached for a specific gear.
Related information
•
Steering wheel paddles
* (p. 398)
• Shiftlock (p. 396)
• Gear shift indicator (p. 396)
Steering wheel paddles
*
In addition to the manual gearshift function using the gear selector, the paddles make it possibleto manually shift gears from the steering wheel.
Activating the paddlesIn order to shift gears with the paddles, they have to first be activated. To do so:
–Pull either paddle toward the steering wheel and release it; the D in the instrument panel
will change to M and the number of the gear
currently being used will be displayed.
Manually shifting gears
In shift mode M, the paddles are automatically
activated.
ShiftingTo shift one gear:
Page 401 of 546

STARTING AND DRIVING
}}
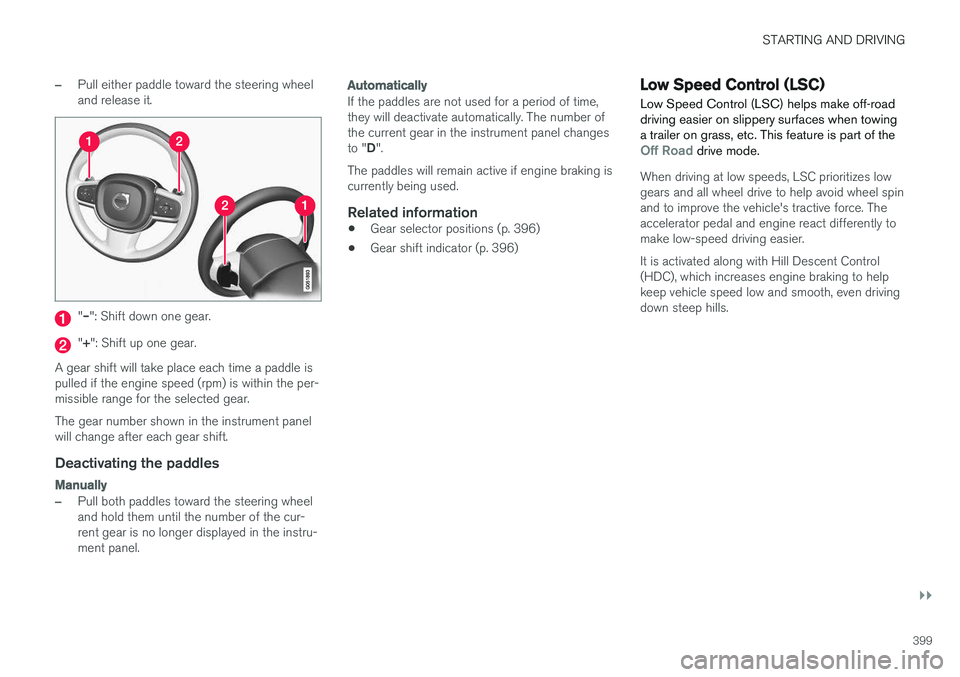
399
–Pull either paddle toward the steering wheel and release it.
"– ": Shift down one gear.
"+ ": Shift up one gear.
A gear shift will take place each time a paddle is pulled if the engine speed (rpm) is within the per-missible range for the selected gear. The gear number shown in the instrument panel will change after each gear shift.
Deactivating the paddles
Manually
–Pull both paddles toward the steering wheel and hold them until the number of the cur-rent gear is no longer displayed in the instru-ment panel.
Automatically
If the paddles are not used for a period of time, they will deactivate automatically. The number ofthe current gear in the instrument panel changes to " D".
The paddles will remain active if engine braking is currently being used.
Related information
• Gear selector positions (p. 396)
• Gear shift indicator (p. 396)
Low Speed Control (LSC) Low Speed Control (LSC) helps make off-road driving easier on slippery surfaces when towinga trailer on grass, etc. This feature is part of the
Off Road drive mode.
When driving at low speeds, LSC prioritizes low gears and all wheel drive to help avoid wheel spinand to improve the vehicle's tractive force. Theaccelerator pedal and engine react differently tomake low-speed driving easier. It is activated along with Hill Descent Control (HDC), which increases engine braking to helpkeep vehicle speed low and smooth, even drivingdown steep hills.
Page 403 of 546

STARTING AND DRIVING
401
Suspension leveling settings
Easy entry
The vehicle can be lowered to entering and exit- ing easier. Select
SettingsVehicleEasy Entry/Exit
Control via the center display's Top view to lower
the vehicle when getting in or out. When the vehicle is parked and the engine is turned off, the level is lowered (if a side door isopened, the level adjustment will stop). When theengine is started and the vehicle begins to move,the level will be raised to the height set by theselected drive mode.
Turning off suspension and leveling control
In certain situations, this function has to be turned off, for example when lifting the vehicle ona jack or garage hoist. 1. Tap
Settings in the center display's Top
view.
2. Tap
My CarSuspension .
3. Select
Deactivate Suspension & Leveling
Control.
Changing suspension control
Three different levels of suspension control can be selected from the center display: 1. Tap
Settings in the center display's Top
view. 2.
Tap
My CarDrive Mode.
3. Under
Suspension Control, select Eco,Comfort or Dynamic.
Loading mode
Use the buttons in the cargo compartment to raise or lower the vehicle to make loading orunloading easier or when attaching a trailer.
Parking the vehicleWhen parking, be sure that there is adequatespace above and below the vehicle since itsground clearance may vary, e.g., depending onthe ambient temperature, how the vehicle is loa-ded, if loading mode is being used or the drivemode selected after the engine is started. The level may also be adjusted for a certain time after the vehicle has been parked to compensatefor possible height adjustments due to tempera-ture changes in the pneumatic suspension whenthe vehicle has cooled.
TransportWhen transporting the vehicle on a ferry, train ora tow truck, it may only be secured (lashed)around the tires, not using any other chassiscomponents. Changes in the pneumatic suspen-sion may occur during transport that could nega-tively affect the lashing and result in damage.
Related information
• Drive modes (p. 390)
• Driving with a trailer (p. 367)
• Loading (p. 215)
8
Standard equipment on certain models.
Page 418 of 546

||
INFOTAINMENT
4166. To connect the vehicle to the Internet via the
phone's Bluetooth function, activate the phone's function for tethering/personal hot-spot, etc.
Alternative 2: searching for the vehicle from the phone
1. Open the center display's Phone view.
•If no phones have been paired to the vehi- cle, tap
Add phoneMake vehicle
discoverable.
• If a phone has previously been paired to the vehicle, tap
Change and tap Add
phone
Make vehicle discoverable in
the pop-up window.
2. Activate the phone's Bluetooth function.
3. Search in the phone for Bluetooth devices. > A list of Bluetooth devices will be dis-played.
4. Select the vehicle's name in the list.
5. Check that the code displayed in the phone is the same as the one in the vehicle. Con- firm in both places.
6. For the phone selected, accept or cancel the alternatives for the phone book (list of con-tacts), text messages, etc. Full functionalitymay not be available in all cell phones. 7. To connect the vehicle to the Internet via the
phone's Bluetooth function, activate thephone's function for tethering/personal hot-spot, etc.
NOTE
If your cell phone's operating system is upda- ted, this may break the connection betweenthe phone and the vehicle. If this happens,delete the phone from the list of pairedphones and repeat the pairing proceduredescribed in this article.
Compatible cell phonesMany of the cell phones available today have Bluetooth functionality but not all of them arefully compatible with the vehicle. Go towww.volvocars.com for a list of compatiblephones or contact your Volvo retailer.
Related information
• Connecting/disconnecting a cell phone (p. 416)
• Handling phone calls (p. 417)
• Handling text messages (p. 418)
• Phone settings (p. 419)
• Bluetooth settings (p. 433)
Connecting/disconnecting a cell phone
Once a cell phone or other Bluetooth device has been paired to the infotainment system, it can beconnected, disconnected or removed from thelist of available devices.
Connecting automatically1. Before switching on the vehicle's ignition, be sure that the phone's Bluetooth and personal hotspot (tethering) functions are activated.
2. Switch on the ignition. > The phone (or other device) will be con-nected to the system and can be usedwirelessly.
Connecting manually1. Be sure that the phone's Bluetooth and per- sonal hotspot (tethering) functions are acti-vated.
2. In the center display, open Phone view and tap
Change phone.
> A list of available Bluetooth devices (ones that have already been paired to the info- tainment system) will be displayed.
3. Tap the name of the phone or other device to be connected.
> The phone (or other device) will be con-nected.
Page 421 of 546

INFOTAINMENT
* Option/accessory, for more information, see Introduction.419
1.
From App view, tap Messages to open.
2. Tap the name of the contact who sent the message.
3. Tap
Read out to have the message read
aloud or tap the message to be displayed.
Reading new text messages in the instrument panel
Text messages are only displayed in the instru- ment panel if this has been selected. See thearticle "Text message settings" for more informa-tion.
–Press the "down" arrow in the right-side steering wheel keypad to display the mes-sage. To have the message read aloud, select
Read out using the keypad.
Sending text messages
1. From App view, tap Messages to open.
2. •To reply to a message: tap the name of the contact who sent the message and then tap
Answer.
• To create a new message: tap
Create
new
+. Select the contact who will
receive the message or enter a phone number.
3. Write the message. 4. Tap
Send.
Message notificationSee the article "Text message settings" for a list of possible settings.
Related information
• Text message settings (p. 420)
Phone settings
The following settings can be made for a paired and connected cell phone.
Cell phones
–Pull down the center display's Top view and tap
SettingsCommunicationPhoneand choose among the following settings: •
Ringtones: select a ring tone (tones from
the cell phone or the vehicle can be used). Not all cell phones are fully com-patible and it may not be possible to usetheir ring tones in the vehicle. Go towww.volvocars.com for additional informa-tion.
•
Sort order for contacts: select sort cri-
teria for the phone book (list of contacts).
To show call notifications in the head-up dis- play *, see the article "Head-up display."
Related information
• Text message settings (p. 420)
• Bluetooth settings (p. 433)
• Phone (p. 414)
• Handling phone calls (p. 417)
• Head-up display (HUD)
* (p. 117)