2016 VOLVO XC90 T8 tow
[x] Cancel search: towPage 4 of 546

2
INTRODUCTION
Contacting Volvo14
Volvo On Call Roadside Assistance 14
Additional information about your vehicle 14
General information about the XC90 T8 Twin Engine Plug-in Hybrid 16
Volvo and the environment 20
Owner's manual and the environment 21
IntelliSafe —driver support
21
Sensus 22
Owner's manual in mobile devices 25
Options, accessories and the On-board Diagnostic (OBDII) socket 26
Owner's information 27
Driver distraction 28
Volvo Structural Parts Statement 29
Crash event data 30
Volvo ID 31
Center display overview 32
Changing center display settings 34
Using the center display keyboard 35
Function view buttons 40
Navigating in the center display's views 42
Symbols in the center display status bar 47
Changing settings in different typesof apps 48
Using the center display
49
Using the owner's manual 53
On-board digital owner's manual 55
Navigating in the digital owner's manual 56
Glass 57
Technician certification 57
SAFETY
General safety information60
Occupant safety 60
Reporting safety defects 61
Recall information 62
Safety during pregnancy 62
Whiplash protection system 63
Seat belts 64
Seat belt pretensioners 65
Buckling and unbuckling seat belts 65
Door and seat belt reminders 67
Child safety 68
Child restraints 70
Infant seats 72
Convertible seats 74
Booster cushions 77
ISOFIX/LATCH lower anchors 78
Lower child seat attachment points 79
Top tether anchors 80
Integrated booster cushion *
81
Raising the integrated booster cushion *
82
Stowing the integrated booster cushion *
83
Occupant weight sensor 84
Safety mode 87
CONTENTS
Page 9 of 546

7
Electronic Stability Control (ESC) sport mode324
Electronic Stability Control (ESC)symbols and messages 325
Roll stability control (RSC) 327
Driver Alert Control (DAC) 327
Driver Alert Control limitations 328
Using Driver Alert Control (DAC) 328
Distance Alert *
329
Using Distance Alert *
329
Distance Alert * limitations
330
Blind Spot Information (BLIS) *
330
Blind Spot Information (BLIS) * On/Off
332
Blind Spot Information (BLIS) * limitations
332
Cross Traffic Alert (CTA) *
333
Activating/deactivating Cross Traffic Alert (CTA) * 334
Cross Traffic Alert (CTA) * limitations
335
Blind Spot Information (BLIS) * with
Cross Traffic Alert (CTA) * symbols
and messages 337
Driving lane assistance 338
Activating/deactivating Lane Departure Warning (LDW) 340
Activating/deactivating Lane Keeping Aid (LKA) * 340
Driving lane assistance symbols and messages
342
STARTING AND DRIVING
Starting and driving
346
Brakes 346
Brake functions 348
Auto-hold brake function 349
Brake assist system 349
Braking effect after a collision 350
Emergency brake lights 350
Hill Descent Control (HDC) 350
Hill Start Assist 351
Parking brake 352
Using the parking brake 352
Parking brake malfunctions 354
Before a long distance trip 355
Driving economically 355
Driving through standing water 357
Overheating the engine and transmission 357
Winter driving 358
Towing eyelet 359
Towing recommendations 360
Fuel 361
Octane rating 362
Opening/closing the fuel filler door 363
Emission controls 364
Jump starting 365
Page 69 of 546

SAFETY
}}
67
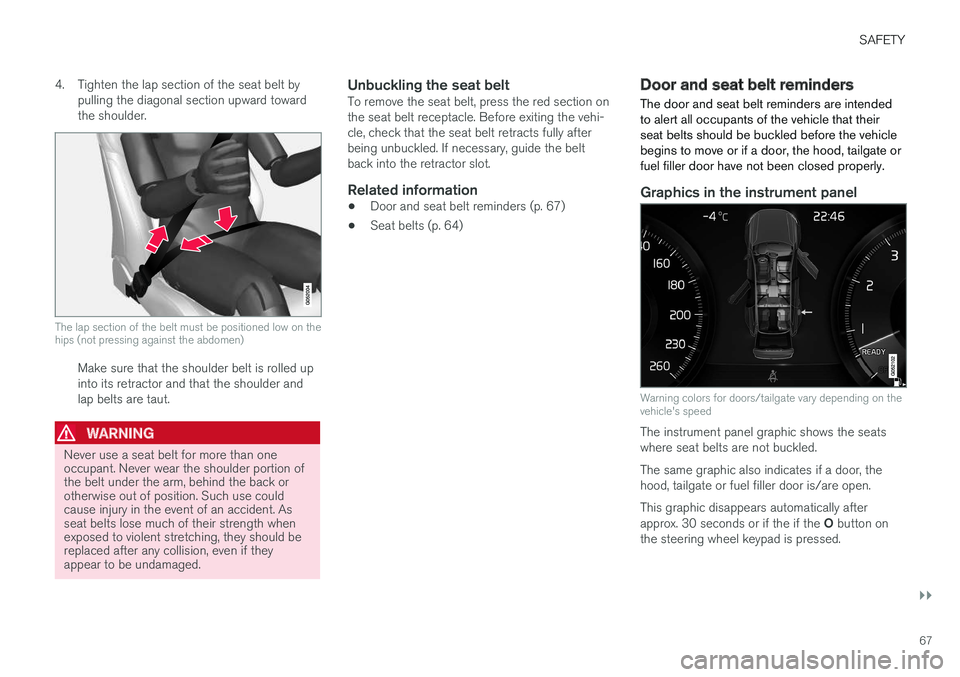
4. Tighten the lap section of the seat belt by
pulling the diagonal section upward toward the shoulder.
The lap section of the belt must be positioned low on the hips (not pressing against the abdomen)
Make sure that the shoulder belt is rolled up into its retractor and that the shoulder andlap belts are taut.
WARNING
Never use a seat belt for more than one occupant. Never wear the shoulder portion ofthe belt under the arm, behind the back orotherwise out of position. Such use couldcause injury in the event of an accident. Asseat belts lose much of their strength whenexposed to violent stretching, they should bereplaced after any collision, even if theyappear to be undamaged.
Unbuckling the seat beltTo remove the seat belt, press the red section on the seat belt receptacle. Before exiting the vehi-cle, check that the seat belt retracts fully afterbeing unbuckled. If necessary, guide the beltback into the retractor slot.
Related information
• Door and seat belt reminders (p. 67)
• Seat belts (p. 64)
Door and seat belt reminders
The door and seat belt reminders are intended to alert all occupants of the vehicle that theirseat belts should be buckled before the vehiclebegins to move or if a door, the hood, tailgate orfuel filler door have not been closed properly.
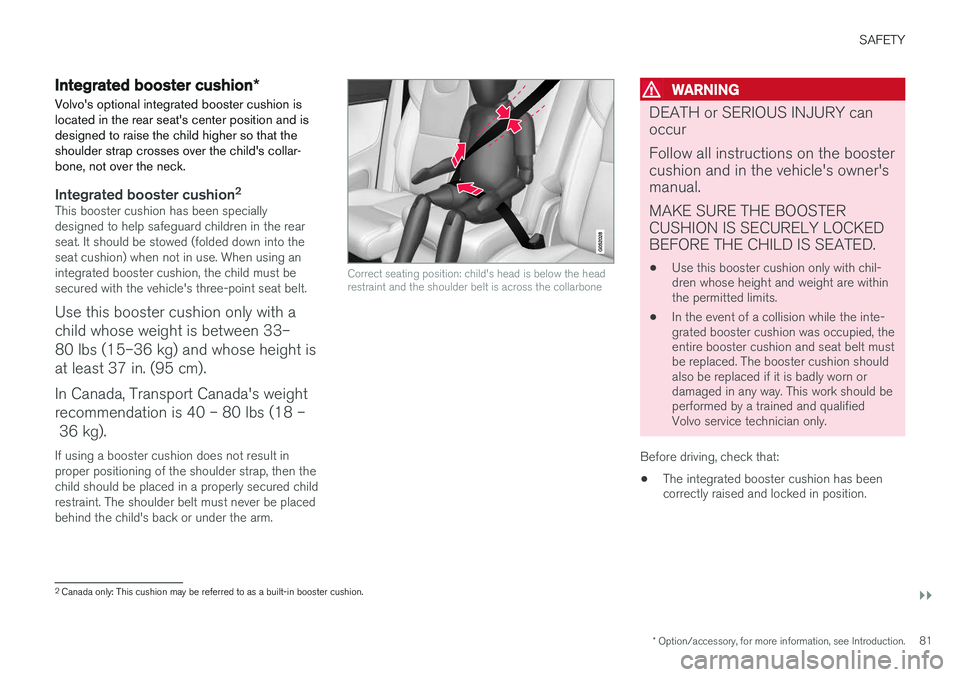
Graphics in the instrument panel
Warning colors for doors/tailgate vary depending on the vehicle's speed
The instrument panel graphic shows the seats where seat belts are not buckled. The same graphic also indicates if a door, the hood, tailgate or fuel filler door is/are open. This graphic disappears automatically after approx. 30 seconds or if the if the O button on
the steering wheel keypad is pressed.
Page 83 of 546

SAFETY
}}
* Option/accessory, for more information, see Introduction.81
Integrated booster cushion*
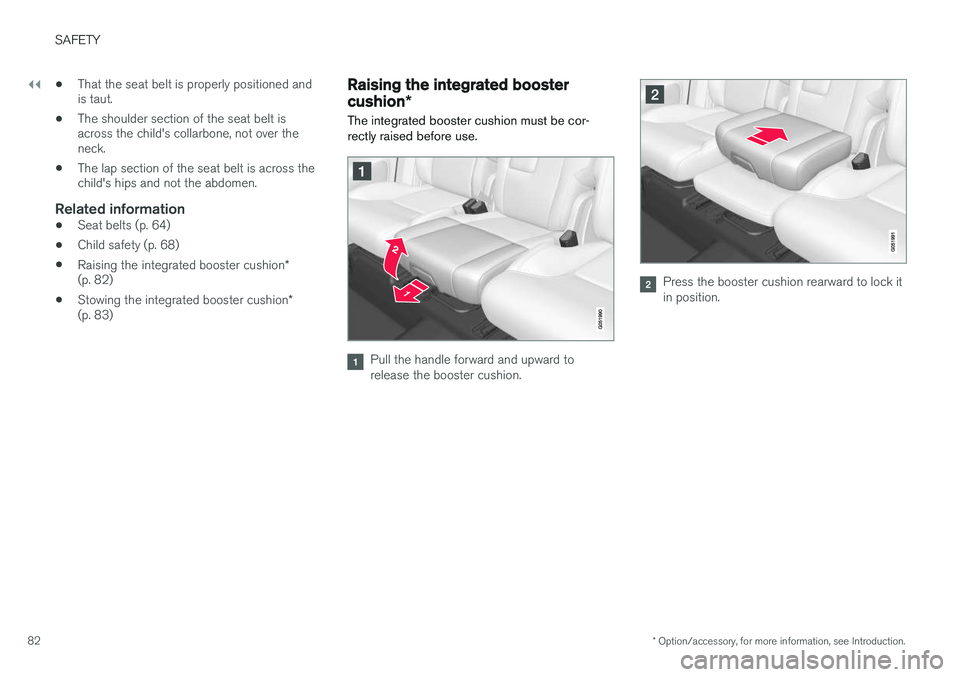
Volvo's optional integrated booster cushion is located in the rear seat's center position and isdesigned to raise the child higher so that theshoulder strap crosses over the child's collar-bone, not over the neck.
Integrated booster cushion 2This booster cushion has been specially designed to help safeguard children in the rearseat. It should be stowed (folded down into theseat cushion) when not in use. When using anintegrated booster cushion, the child must besecured with the vehicle's three-point seat belt.
Use this booster cushion only with a child whose weight is between 33–80 lbs (15–36 kg) and whose height isat least 37 in. (95 cm). In Canada, Transport Canada's weight recommendation is 40 – 80 lbs (18 – 36 kg). If using a booster cushion does not result in proper positioning of the shoulder strap, then thechild should be placed in a properly secured childrestraint. The shoulder belt must never be placedbehind the child's back or under the arm.
Correct seating position: child's head is below the head restraint and the shoulder belt is across the collarbone
WARNING
DEATH or SERIOUS INJURY can occur Follow all instructions on the booster cushion and in the vehicle's owner'smanual. MAKE SURE THE BOOSTER CUSHION IS SECURELY LOCKEDBEFORE THE CHILD IS SEATED. • Use this booster cushion only with chil- dren whose height and weight are withinthe permitted limits.
• In the event of a collision while the inte-grated booster cushion was occupied, theentire booster cushion and seat belt mustbe replaced. The booster cushion shouldalso be replaced if it is badly worn ordamaged in any way. This work should beperformed by a trained and qualifiedVolvo service technician only.
Before driving, check that:
• The integrated booster cushion has beencorrectly raised and locked in position.
2
Canada only: This cushion may be referred to as a built-in booster cushion.
Page 84 of 546

||
SAFETY
* Option/accessory, for more information, see Introduction.
82 •
That the seat belt is properly positioned and is taut.
• The shoulder section of the seat belt isacross the child's collarbone, not over theneck.
• The lap section of the seat belt is across thechild's hips and not the abdomen.
Related information
•
Seat belts (p. 64)
• Child safety (p. 68)
• Raising the integrated booster cushion
*
(p. 82)
• Stowing the integrated booster cushion
*
(p. 83)
Raising the integrated booster cushion *
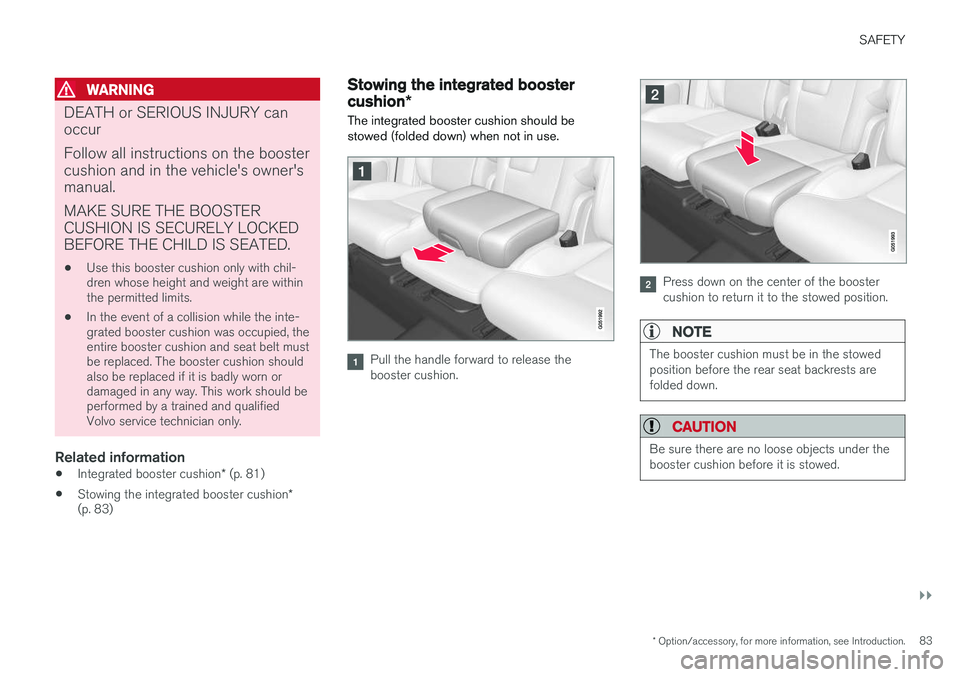
The integrated booster cushion must be cor- rectly raised before use.
Pull the handle forward and upward to release the booster cushion.
Press the booster cushion rearward to lock it in position.
Page 85 of 546

SAFETY
}}
* Option/accessory, for more information, see Introduction.83
WARNING
DEATH or SERIOUS INJURY can occur Follow all instructions on the booster cushion and in the vehicle's owner'smanual. MAKE SURE THE BOOSTER CUSHION IS SECURELY LOCKEDBEFORE THE CHILD IS SEATED. •Use this booster cushion only with chil- dren whose height and weight are withinthe permitted limits.
• In the event of a collision while the inte-grated booster cushion was occupied, theentire booster cushion and seat belt mustbe replaced. The booster cushion shouldalso be replaced if it is badly worn ordamaged in any way. This work should beperformed by a trained and qualifiedVolvo service technician only.
Related information
•
Integrated booster cushion
* (p. 81)
• Stowing the integrated booster cushion
*
(p. 83)
Stowing the integrated booster cushion *
The integrated booster cushion should be stowed (folded down) when not in use.
Pull the handle forward to release the booster cushion.
Press down on the center of the booster cushion to return it to the stowed position.
NOTE
The booster cushion must be in the stowed position before the rear seat backrests arefolded down.
CAUTION
Be sure there are no loose objects under the booster cushion before it is stowed.
Page 87 of 546

SAFETY
}}
85
NOTE
When the ignition is switched on, the OWS indicator light will illuminate for several sec-onds while the system performs a self-diag-nostic test.
However, if a fault is detected in the system:
• The OWS indicator light will stay on
• The SRS warning light will come on and stay on and a text message will be displayed.
WARNING
If a fault in the system is detected and indi- cated as described, be aware that the pas-senger's side front airbag will not deploy inthe event of a collision. In this case, the SRSsystem and Occupant Weight Sensor shouldbe inspected by a trained and qualified Volvoservice technician as soon as possible.
WARNING
•
Never try to open, remove, or repair any components in the OWS system. Thiscould result in system malfunction. Main-tenance or repairs should only be carriedout by an a trained and qualified Volvoservice technician.
• The front passenger's seat should not bemodified in any way. This could reducepressure on the seat cushion, whichmight interfere with the OWS system'sfunction.
Passenger's seat occu-pancy statusOWS indi- cator lightstatusPassenger's side front air-bag status
Seat unoccu- piedOWS indi- cator lightlights up.Passenger's side front air-bag disabled
Seat occu- pied by lowweight occu- pant/object AOWS indi- cator lightlights upPassenger's side front air-bag disabled
Seat occu- pied by heavyoccupant/objectOWS indi- cator light is not
litPassenger's side front air-bag enabled
A
Volvo recommends that children always be properly restrained in appropriate child restraints in the rear seats. Do not assume that the passenger's side front airbag is disabled unless thePASSENGER AIRBAG OFF indicator lamp is lit. Make sure thechild restraint is properly installed. If there is any doubt as to thestatus of the passenger's side front airbag, move the childrestraint to the rear seat.
The OWS is designed to enable (may inflate) the passenger's side front airbag in the event of acollision anytime the system senses that a per-son of adult size is sitting properly in the frontpassenger's seat. The PASSENGER AIRBAGOFF indicator lamp will be off and remain off. If a person of adult size is sitting in the front pas- senger's seat, but the PASSENGER AIRBAGOFF indicator lamp is on, it is possible that theperson isn't sitting properly in the seat. If thishappens:
• Turn the vehicle off and ask the person to place the seatback in an upright position.
• Have the person sit upright in the seat, cen-tered on the seat cushion, with the person'slegs comfortably extended.
• Restart the vehicle and have the personremain in this position for about two minutes.This will allow the system to detect that per-son and enable the passenger's frontal air-bag.
• If the PASSENGER AIRBAG OFF indicatorlamp remains on even after this, the personshould be advised to ride in the rear seat.
This condition reflects limitations of the OWS classification capability. It does not indicate OWSmalfunction.
Page 90 of 546

SAFETY
88
Starting or moving a vehicle in safety mode
If
Safety mode has been set, it may be possible
to start and move the vehicle, for example, if it is blocking traffic.
Starting the vehicle in safety mode1. Check the vehicle for damage, particularly for fuel leakage or the smell of gasoline fumes. If the damage to the vehicle is minor and there is no fuel leakage/fumes, you mayattempt to start the engine and move thevehicle.
WARNING
If you smell gasoline fumes or detect fuel leakage while Safety mode See Owner's
manual is displayed in the instrument panel,
do not attempt to start the vehicle . Leave
the vehicle immediately.
2. Turn the start knob to STOP and release it.
3. Try to start the vehicle. >
Vehicle start System check, wait will
be displayed in the instrument panel while the vehicle's electrical system attempts toreset to normal mode. This may take up toa minute. 4.
When
Vehicle start System check, wait is
no longer displayed, try to start the vehicle again.
WARNING
If the message Safety mode See Owner's
manual is still displayed, the vehicle should
not be driven and must be towed (lifted onto a flatbed tow truck. The vehicle may never betowed with the wheels on the ground). Con-cealed faults may make the vehicle difficult tocontrol.
Moving the vehicle after safety mode has been set
If the message Normal mode The vehicle is
now in normal mode is displayed, the vehicle
may be moved carefully from its present position if, for example, it is blocking traffic. It should, however, not be moved farther than is absolutely necessary.
WARNING
After Safety mode has been set, the vehicle
should not be driven or towed (pulled on the ground by another vehicle). It must be trans-ported on a flatbed tow truck to a trained andqualified Volvo service technician for inspec-tion/repairs.
Related information
• Safety mode (p. 87)
• Towing recommendations (p. 360)