2016 VOLVO XC90 T8 tow
[x] Cancel search: towPage 91 of 546

SAFETY
}}
89
Airbag system As an enhancement to the three-point seat belts, your vehicle is equipped with an airbag system.
WARNING
•If the airbag warning light stays on after the engine has started or if it illuminateswhile you are driving, have the vehicleinspected by a trained and qualified Volvoservice technician as soon as possible.
• Never try to repair any component or partof the airbag systems yourself. Any inter-ference in the system could cause mal-function and serious injury. All work onthese systems should be performed by atrained and qualified Volvo service techni-cian.
WARNING
If your vehicle has become flood-damaged in any way (e.g., soaked carpeting/standingwater on the floor of the vehicle), do notattempt to start the vehicle. This may causeairbag deployment which could result in seri-ous injury. Have the vehicle towed to a trainedand qualified Volvo service technician forrepairs. Before attempting to tow the vehicle:
1. Switch off the ignition for at least
10 minutes and disconnect the battery.
2. Follow the instructions for manually over- riding the shiftlock system.
Deployed airbags
WARNING
If any of the airbags have deployed:
• Do not attempt to drive the vehicle. Have it towed to a qualified repair facility.
• If necessary seek medical attentIon.
Driver/passenger side airbags
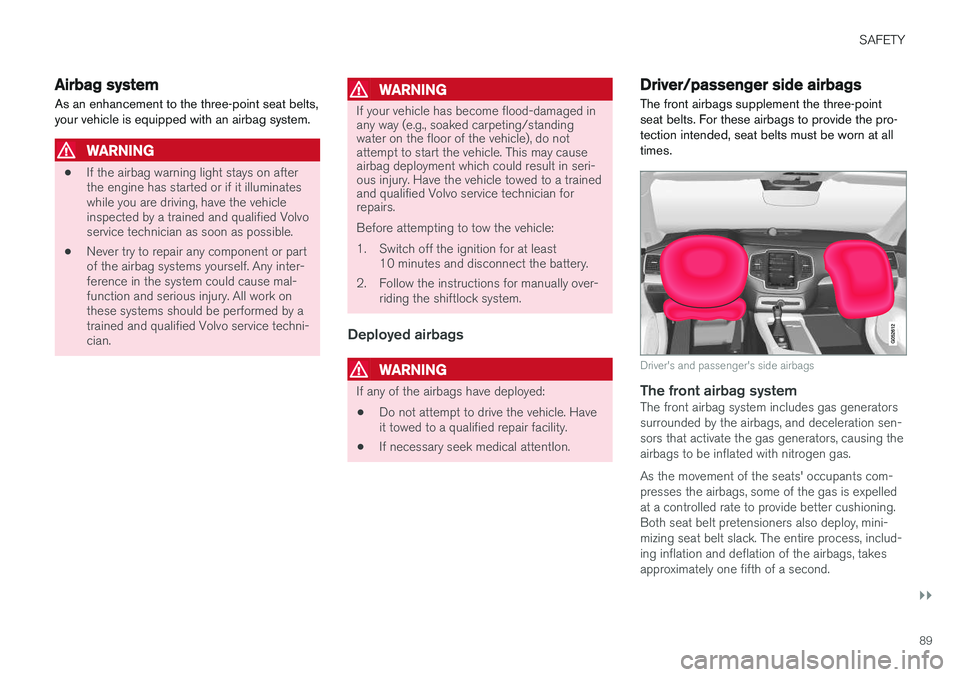
The front airbags supplement the three-point seat belts. For these airbags to provide the pro-tection intended, seat belts must be worn at alltimes.
Driver's and passenger's side airbags
The front airbag systemThe front airbag system includes gas generators surrounded by the airbags, and deceleration sen-sors that activate the gas generators, causing theairbags to be inflated with nitrogen gas. As the movement of the seats' occupants com- presses the airbags, some of the gas is expelledat a controlled rate to provide better cushioning.Both seat belt pretensioners also deploy, mini-mizing seat belt slack. The entire process, includ-ing inflation and deflation of the airbags, takesapproximately one fifth of a second.
Page 94 of 546

||
SAFETY
92
Passenger's side airbag decal
WARNING
•Children must never be allowed in the front passenger's seat.
• Occupants in the front passenger's seatmust never sit on the edge of the seat, sitleaning toward the instrument panel orotherwise sit out of position.
• The occupant's back must be as uprightas comfort allows and be against the seatback with the seat belt properly fastened.
• Feet must be on the floor, e.g., not on thedash, seat or out of the window.
WARNING
•
No objects or accessory equipment, e.g. dashboard covers, may be placed on,attached to, or installed near the air baghatch (the area above the glove compart-ment) or the area affected by airbagdeployment.
• There should be no loose articles, suchas coffee cups on the floor, seat, or dash-board area.
• Never try to open the airbag cover on thesteering wheel or the passenger's sidedashboard. This should only be done by atrained and qualified Volvo service techni-cian.
• Failure to follow these instructions canresult in injury to the vehicle occupants.
Related information
• Seat belts (p. 64)
• Occupant weight sensor (p. 84)
Inflatable curtains
The inflatable curtain is designed to help protect the heads of the occupants of the front seatsand the occupant of the outboard rear seatingpositions in certain side impact collisions.
This system consists of inflatable curtains located along the sides of the roof liners, stretching fromthe center of both front side windows to the rearedge of the rear side door windows. In certain side impacts, both the Inflatable Cur-
tain (IC) and the side Impact Airbag System (SIPS airbag) will deploy. The IC and the SIPSairbag deploy simultaneously.
Page 102 of 546

||
INSTRUMENTS AND CONTROLS
* Option/accessory, for more information, see Introduction.
100 systems, even home lighting. Additional informa- tion can be found on the Internet at,www.homelink.com/www.youtube.com/HomeLinkGentex or by phoning the hotline at 1–800–355–3515.
WARNING
•
If you use HomeLink ®
to open a garage
door or gate, be sure no one is near the gate or door while it is in motion.
• When programming a garage dooropener, it is advised to park outside of thegarage.
• Do not use HomeLink ®
with any garage
door opener that lacks safety stop andreverse features as required by U.S. fed-eral safety standards (this includes anygarage door opener model manufacturedbefore April 1, 1982). A garage door thatcannot detect an object - signaling thedoor to stop and reverse - does not meetcurrent U.S. federal safety standards. Formore information, contact HomeLink at:www.homelink.com.
Retain the original transmitter of the RF device you are programming for use in other vehicles aswell as for future HomeLink programming. It isalso suggested that upon the sale of the vehicle,the programmed HomeLink buttons be erasedfor security purposes. See the article "Program-ming HomeLink."
Related information
• Programming the HomeLink ®
Wireless Con-
trol System * (p. 100)Programming the HomeLink ®
Wireless Control System *
NOTE
Some vehicles may require the ignition to be switched on or be in the “accessories” posi-tion for programming and/or operation ofHomeLink. It is also recommended that a newbattery be placed in the hand-held transmitterof the device being programmed to Home-Link for quicker training and accurate trans-mission of the radio-frequency signal. TheHomeLink buttons must be reset first. Whenthis has been completed, Homelink is inlearning mode so that you can perform pro-gramming.
To program HomeLink®
1. Press the HomeLink ®
button to be pro-
grammed. The HomeLink ®
indicator will
begin flashing yellow once a second. You do not need to continue holding the button.
2. Point the hand-held transmitter toward the HomeLink ®
button to be programmed and
hold it approx. 6–12 inches (15–30 cm) away from the HomeLink ®
button. Do not
obstruct the HomeLink ®
indicator light.
Page 109 of 546

INSTRUMENTS AND CONTROLS
}}
* Option/accessory, for more information, see Introduction.107
CAUTION
•Remove ice and snow before opening the laminated panoramic roof.
• Do not operate the laminated panoramicroof if it is frozen closed.
• Never place heavy objects on the lamina-ted panoramic roof.
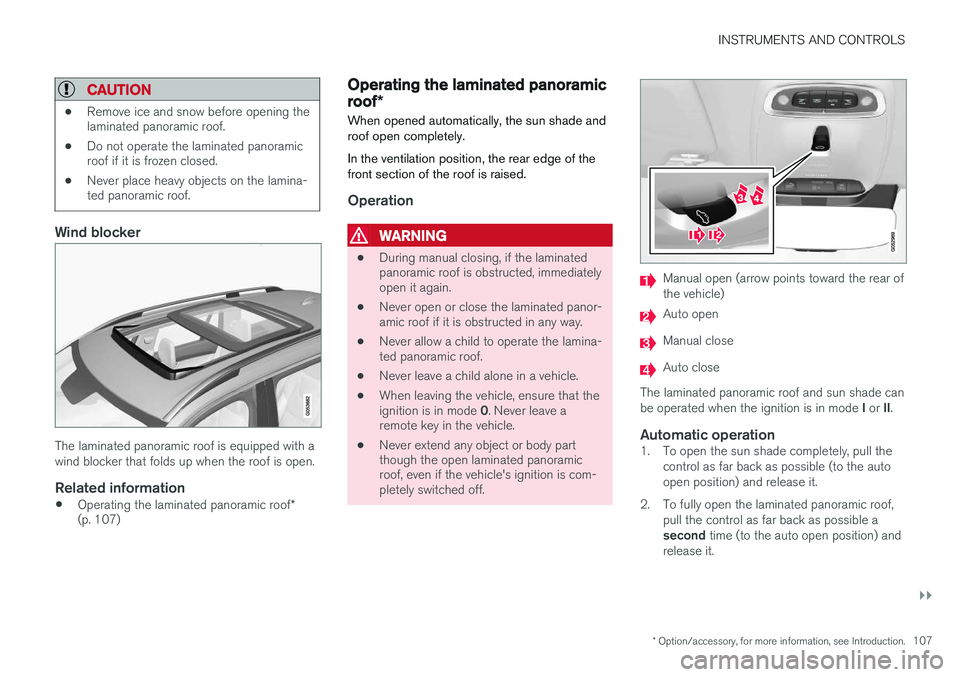
Wind blocker
The laminated panoramic roof is equipped with a wind blocker that folds up when the roof is open.
Related information
•
Operating the laminated panoramic roof
*
(p. 107)
Operating the laminated panoramic roof *
When opened automatically, the sun shade and roof open completely. In the ventilation position, the rear edge of the front section of the roof is raised.
Operation
WARNING
• During manual closing, if the laminated panoramic roof is obstructed, immediatelyopen it again.
• Never open or close the laminated panor-amic roof if it is obstructed in any way.
• Never allow a child to operate the lamina-ted panoramic roof.
• Never leave a child alone in a vehicle.
• When leaving the vehicle, ensure that the ignition is in mode
0. Never leave a
remote key in the vehicle.
• Never extend any object or body part though the open laminated panoramicroof, even if the vehicle's ignition is com-pletely switched off.
Manual open (arrow points toward the rear of the vehicle)
Auto open
Manual close
Auto close
The laminated panoramic roof and sun shade can be operated when the ignition is in mode I or II.
Automatic operation1. To open the sun shade completely, pull the
control as far back as possible (to the auto open position) and release it.
2. To fully open the laminated panoramic roof, pull the control as far back as possible a second time (to the auto open position) and
release it.
Page 140 of 546

||
INSTRUMENTS AND CONTROLS
138
SymbolMeaning
A
B
Parking brake This symbol flashes while the parking brake is being applied andthen glows steadily when theparking brake has been set. If the symbol flashes in any other situation, this indicates a fault. Seethe text message in the instru-ment panel.
SymbolMeaning
Oil pressure If the symbol illuminates during driving, stop the vehicle, theengine oil level is too low. Stop theengine immediately and check theengine oil level. Add oil if neces-sary. If the oil level is normal andthe symbol remains illuminated,have the vehicle towed to thenearest authorized Volvo work-shop or trained and qualified Volvoservice technician.
Generator not charging This symbol illuminates during driving if a fault has occurred inthe electrical system. Contact anauthorized Volvo workshop ortrained and qualified Volvo servicetechnician.
AUS models
B Canadian models
WARNING
• If the fluid level is below the
MIN mark in
the brake fluid reservoir or if a warning message is displayed in the text window: DO NOT DRIVE . Have the vehicle towed
to a trained and qualified Volvo service technician and have the brake systeminspected.
• If the
BRAKE and ABS symbols illumi-
nate at the same time, there is a risk ofreduced vehicle stability.
Door/hood/tailgate/fuel filler door reminder
It a door, tailgate, the hood or the fuel filler door are not closed properly, the information or warn-ing symbol will illuminate and a graphic will bedisplayed in the instrument panel.
Related information
• Instrument panel (p. 127)
• Indicator symbols in the instrument panel (p. 125)
Page 145 of 546

INSTRUMENTS AND CONTROLS
}}
143
With the headlight ring in the
9
position
and the ignition in mode II or if the engine is running :
• In the
US: DRL will be off
• In
Canada : DRL will be on
With the headlight ring in the
position:
• DRL will be
on (the low beam headlights will
automatically switch on in dark conditions)
US models only : DRL can be deactivated in the
center display's Settings view. With
selected, a tunnel detection function
activates the low beams when the vehicle enters a tunnel. With the headlight ring in the
position:
• DRL will be
off and the low beam headlights
will be on
High and low beam headlights
When the engine is started, the low beams are activated automatically if the headlight control is in position
.
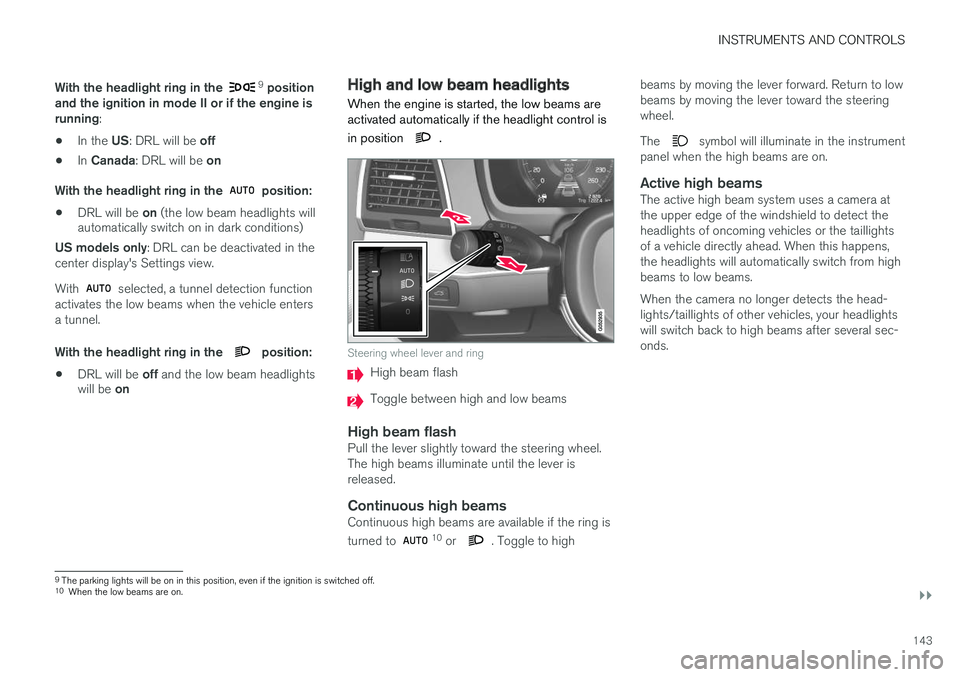
Steering wheel lever and ring
High beam flash
Toggle between high and low beams
High beam flashPull the lever slightly toward the steering wheel. The high beams illuminate until the lever isreleased.
Continuous high beamsContinuous high beams are available if the ring is turned to 10 or . Toggle to high beams by moving the lever forward. Return to low beams by moving the lever toward the steeringwheel. The
symbol will illuminate in the instrument
panel when the high beams are on.
Active high beamsThe active high beam system uses a camera at the upper edge of the windshield to detect theheadlights of oncoming vehicles or the taillightsof a vehicle directly ahead. When this happens,the headlights will automatically switch from highbeams to low beams. When the camera no longer detects the head- lights/taillights of other vehicles, your headlightswill switch back to high beams after several sec-onds.
9 The parking lights will be on in this position, even if the ignition is switched off.
10 When the low beams are on.
Page 150 of 546

INSTRUMENTS AND CONTROLS
* Option/accessory, for more information, see Introduction.
148
Approach lighting
Approach lighting activates the parking lights, outer door handle lights *, license plate lighting,
courtesy lighting and footwell lighting when you approach the vehicle.
This function is activated by unlocking the car. The time interval for this lighting can be set on the center display. The function can be deactivated/activated in the center display: 1. Tap
Settings in Top view.
2. Tap
My CarLightsExterior Lights.
3. Deselect/select
Welcome Light.
Related information
• Settings view (p. 111)
• Home safe lighting (p. 148)
• Remote key (p. 235)
Home safe lighting
The home safe lighting function illuminates the area in front of the vehicle in dark conditions.
This function turns on the headlights, parking lights, outer door handle lights *, license plate
lights, front ceiling lighting and footwell lighting for a set amount of time. The length of time that these lights remain illumi- nated can be set in the center display: 1. Tap
Settings in Top view.
2. Tap
My CarLightsExterior LightsHome Safety Lights.
3. Select
Off, 30 sec, 60 sec or 90 sec.
To activate home safe lighting: 1. Switch off the ignition (mode 0).
2. Push the turn signal lever as far as possible towards the dashboard and release it.
3. Exit the vehicle and lock the doors.
Related information
• Using the center display (p. 49)
• Settings view (p. 111)
Passenger compartment lighting
The passenger compartment lighting is con- trolled using the buttons in the ceiling above thefront and rear seats.
All passenger compartment lighting can be turned on and off manually within 30 minutesafter:
• the vehicle is unlocked but the engine has not been started
• the engine is switched off and the ignition is in mode
0.
Front interior lighting
Controls in the ceiling console for front reading lights and courtesy lighting
Driver's side reading light
Courtesy lighting
Page 160 of 546

||
INSTRUMENTS AND CONTROLS
* Option/accessory, for more information, see Introduction.
158
Activating/deactivating the memory function
The rain sensor's memory function can be set to activate the rain sensor each time the engine isstarted: 1.
In the center display, select
SettingsMy
Car
Wipers
2. Activate by selecting the Rain Sensor
Memory box.
Deactivate by deselecting the
Rain Sensor
Memory box.
Related information
• Using the windshield wipers (p. 156)
• Windshield wipers in the service position (p. 508)
• Tailgate window wiper and washer (p. 159)
Windshield and headlight washers
Use the windshield/headlight washers to help improve visibility.
Starting the windshield and headlight washers
Washing function
–Move the right-side steering wheel lever toward the wheel to start the windshield andheadlight washers.
> After the lever is released the wipers make several extra sweeps.
CAUTION
• Use ample washer fluid when washing the windshield. The windshield should bethoroughly wet when the wipers are inoperation.
• Avoid using the washers if the fluid reser-voir is frozen or empty to help avoid dam-age to the pump.
When the washing system is used, the length of time that the windshield washers operatedepends on the ambient temperature. In coldweather, the amount of washer fluid used willalso be increased automatically to help improvecleaning.
Heated washer nozzles
*The washer nozzles are heated automatically incold weather to help prevent the washer fluidfrom freezing.
High-pressure headlight washing *High-pressure headlight washing consumes alarge quantity of washer fluid. To save fluid, theheadlights are washed once for every five timesthe windshield is washed.
Reduced washingWhen approx. 1 US quart (1 liter) of washer fluidremains in the reservoir, the headlights will nolonger be washed to conserve fluid.