2016 VOLVO XC90 T8 cooling
[x] Cancel search: coolingPage 196 of 546
||
CLIMATE
194
From the rear seat
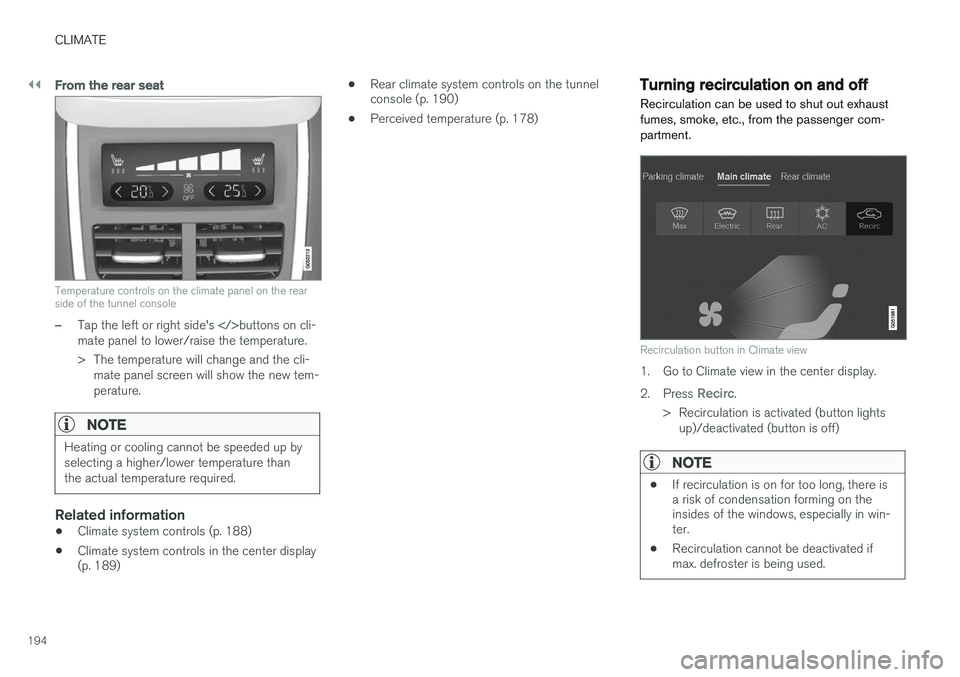
Temperature controls on the climate panel on the rear side of the tunnel console
–Tap the left or right side's buttons on cli-
mate panel to lower/raise the temperature.
> The temperature will change and the cli- mate panel screen will show the new tem- perature.
NOTE
Heating or cooling cannot be speeded up by selecting a higher/lower temperature thanthe actual temperature required.
Related information
• Climate system controls (p. 188)
• Climate system controls in the center display (p. 189) •
Rear climate system controls on the tunnelconsole (p. 190)
• Perceived temperature (p. 178)
Turning recirculation on and off
Recirculation can be used to shut out exhaust fumes, smoke, etc., from the passenger com-partment.
Recirculation button in Climate view
1. Go to Climate view in the center display. 2. Press
Recirc.
> Recirculation is activated (button lights up)/deactivated (button is off)
NOTE
• If recirculation is on for too long, there is a risk of condensation forming on theinsides of the windows, especially in win-ter.
• Recirculation cannot be deactivated ifmax. defroster is being used.
Page 202 of 546
||
CLIMATE
* Option/accessory, for more information, see Introduction.
200
Automatically activating/deactivating the seat heating function when theengine is started
The seat heating * can be set to start automati-
cally when the engine is started. The automatic function starts heating the seats when the ambient temperature is sufficiently cold. 1. Tap
Settings in the center display's Top
view.
2. Tap
Climate.
3. Under
Auto Driver Seat Heating Level andAuto Passenger Seat Heating Level,
select Off, Low, Middle or High to activate/
deactivate the automatic function and select a level for the driver's and passenger's seats.
Related information
• Climate system controls (p. 188)
• Climate system controls in the center display (p. 189)
• Rear climate system controls on the tunnelconsole (p. 190)
Turning front seat ventilation
* on
and off
Seat ventilation can be used e.g., to help remove dampness from the seat occupant's clothing.
The ventilation system consists of fans in the seats and backrests that draw air through theseat upholstery. The cooling effect increases asthe air in the passenger compartment becomescooler. This feature can be activated when theengine is running and it monitors the seat's tem-perature, sunlight in the passenger compartmentand the ambient temperature.
Activating/deactivating front seat ventilation
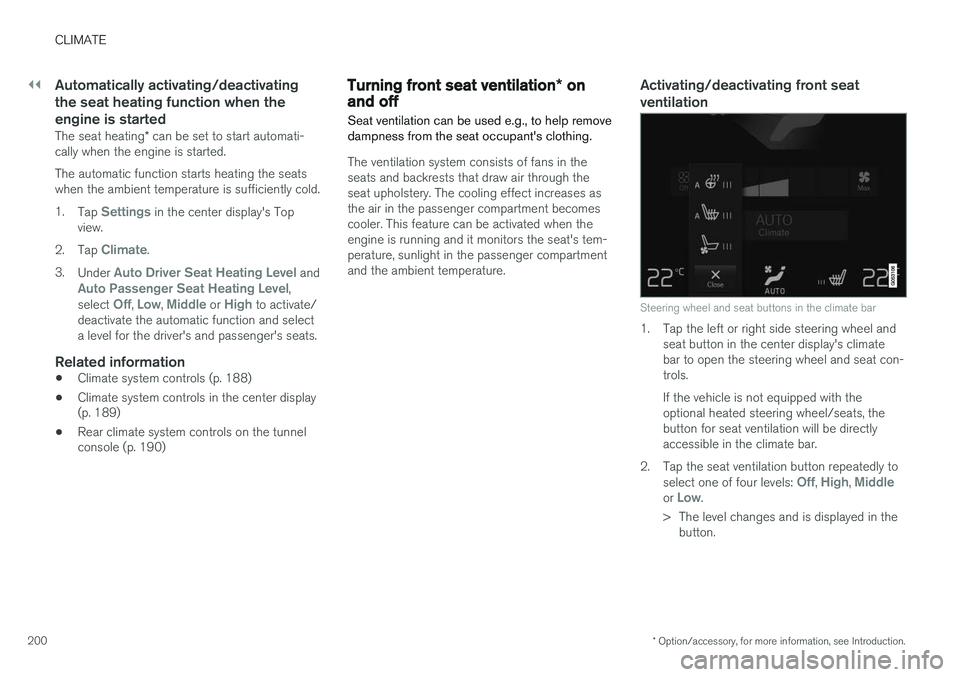
Steering wheel and seat buttons in the climate bar
1. Tap the left or right side steering wheel and seat button in the center display's climate bar to open the steering wheel and seat con-trols. If the vehicle is not equipped with the optional heated steering wheel/seats, thebutton for seat ventilation will be directlyaccessible in the climate bar.
2. Tap the seat ventilation button repeatedly to select one of four levels:
Off, High, Middleor Low.
> The level changes and is displayed in the button.
Page 206 of 546
CLIMATE
204
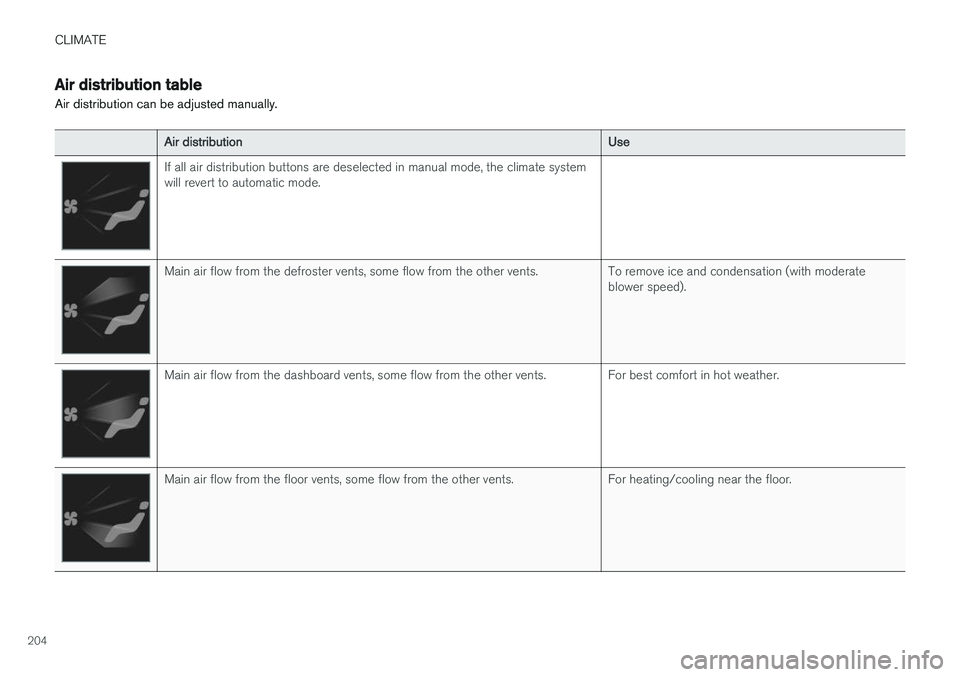
Air distribution table
Air distribution can be adjusted manually.
Air distributionUse
If all air distribution buttons are deselected in manual mode, the climate system will revert to automatic mode.
Main air flow from the defroster vents, some flow from the other vents.To remove ice and condensation (with moderate blower speed).
Main air flow from the dashboard vents, some flow from the other vents.For best comfort in hot weather.
Main air flow from the floor vents, some flow from the other vents.For heating/cooling near the floor.
Page 207 of 546
CLIMATE
205
Air distributionUse
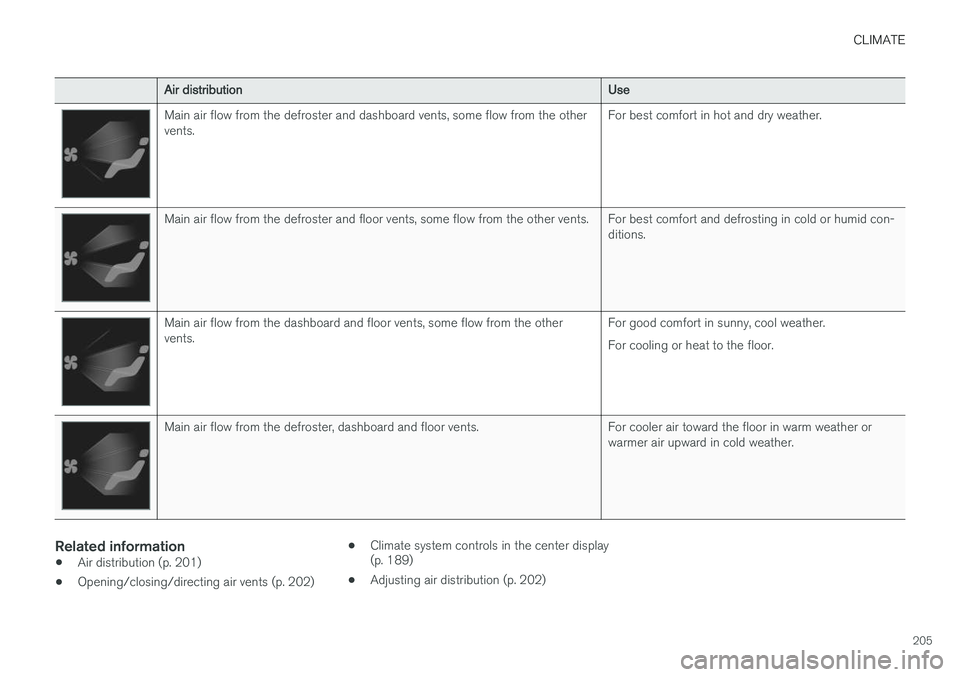
Main air flow from the defroster and dashboard vents, some flow from the other vents.For best comfort in hot and dry weather.
Main air flow from the defroster and floor vents, some flow from the other vents.For best comfort and defrosting in cold or humid con- ditions.
Main air flow from the dashboard and floor vents, some flow from the other vents.For good comfort in sunny, cool weather. For cooling or heat to the floor.
Main air flow from the defroster, dashboard and floor vents.For cooler air toward the floor in warm weather or warmer air upward in cold weather.
Related information
•Air distribution (p. 201)
• Opening/closing/directing air vents (p. 202) •
Climate system controls in the center display (p. 189)
• Adjusting air distribution (p. 202)
Page 212 of 546

||
LOADING AND STORAGE
* Option/accessory, for more information, see Introduction.
210 Unlocking the glove compartment
1. This function can be deactivated from the
center display's Function or Settings view:
• Go to Function view and tap
Private
locking locked.
• Go to settings and select
My CarLocking and Unlocking Feedback.
Deselect the Private Locking box.
> A pop-up window will appear.
2. Specify the code to be used to lock the glove compartment and tap
Confirm.
> The glove compartment will be unlocked.
Using the glove compartment as a cooler *
The glove compartment can be used to cool drinks or food and the cooling feature functionswhen the climate system is active (i.e., when the ignition is in mode II or when the engine is run-
ning).
Cooling activated
Cooling deactivated
–Activate/deactivate cooling by moving the control as far as possible toward the passen-ger compartment/glove compartment.
Related information
• Passenger compartment storage spaces (p. 208)
• Locking/unlocking the tailgate (p. 244)
Tunnel console The tunnel console, located between the front seats, contains a 12-volt electrical socket, cupholders and storage spaces, etc.
Storage space
Storage space with cup holders for the driver and passenger and a 12-volt socket
Storage space and USB/AUX sockets under the armrest
Climate control panel for the rear seats
*
NOTE
One of the alarm sensors, which is sensitive to metallic objects, is located under the tunnelconsole cup holders. Avoid leaving coins,keys, etc., in the cup holders because theymay inadvertently trigger the alarm.
Page 325 of 546
DRIVER SUPPORT
}}
* Option/accessory, for more information, see Introduction.323
Adjustable steering force*
Steering force increases with the speed of the vehicle to give the driver an enhanced sense ofcontrol and stability. At low speed the vehicle iseasier to steer in order to facilitate parking, etc.
Changing the steering force levelTo change the level of steering force, see theinformation under the heading "individual" in arti-cle "Drive modes" for additional information.
NOTE
•This steering force level menu function cannot be accessed when the vehicle isin motion.
• In certain situations, the power steeringfunction may become too hot and mustbe temporarily cooled. During cooling,power steering effect will be reduced andmore force may be necessary to turn thesteering wheel and a message will bedisplayed in the instrument panel.
Related information
• Driver support systems (p. 252)
• Drive modes (p. 390)
Electronic Stability Control (ESC)
Electronic Stability Control (ESC) helps reduce wheel spin, counteract skidding and to generallyhelp improve directional stability.
A pulsating sound will be audi- ble when the system is activelyoperating and is normal. Accel-eration may also be slightlyslower than normal.
WARNING
ESC is a supplementary aid and cannot deal with all situations or road conditions. The driver is always responsible for operating the vehicle in a safe manner in accordancewith current traffic regulations.
ESC consists of the following functions: • Traction control
• Spin control
• Active Yaw Control
• Engine Drag Control
• Trailer Stability Assist
Traction controlThis function is designed to help reduce wheel spin by transferring power from a drive wheel that begins to lose traction to the wheel on the oppo-site side of the vehicle (on the same axle).
Spin controlThis function is designed to help prevent thedrive wheels from spinning while the vehicle isaccelerating.
Active Yaw ControlAt low speeds, this function helps maintain direc-tional stability by braking one or more of thewheels if the vehicle shows a tendency to skid orslide laterally.
Engine Drag Control EDCEDC helps keep the engine running if the wheelsshow a tendency to lock, e.g., when shifting downin the manual shifting mode or while using theengine's braking function on a slippery surface. Ifthe wheels were to lock, the vehicle wouldbecome more difficult to steer.
Trailer Stability Assist
*4TSA helps stabilize a vehicle that is towing atrailer when the vehicle and trailer have begun tosway. This system is automatically deactivated if the driver selects
Sport mode.
Related information
•Detachable trailer hitch (p. 368)
• Driving with a trailer (p. 367)
4
This function is included if the vehicle is equipped with a Volvo original trailer hitch.
Page 359 of 546

STARTING AND DRIVING
}}
357
Driving through standing water
The vehicle should be driven with extreme cau- tion if it is necessary to drive through standingwater.
The vehicle can be driven through water up to a depth approximately level with the floor at walk-ing speed to help prevent water from enteringthe differential and/or the transmission or dam-aging electrical components. • If possible, check the depth of the water before driving through it. Take particular carewhen driving through flowing water.
• Before driving through water, always select the
Off Road drive mode to ensure that the
gasoline engine is running and to maximize ground clearance.
• After driving through water, apply the brakesand check that they are functioning correctly.
• Clean the electrical connections for trailerwiring after driving in mud or water.
• When driving through water, maintain lowspeed and do not stop in the water.
CAUTION
• Damage may occur to the engine, trans- mission, electrical components, etc. if thevehicle is driven through water higherthan its floor level. Be aware that wavescreated by other vehicles could cause thelevel to temporarily be above the vehicle'sfloor level.
• Damage to any components due to waterabove the floor level, vapor lock or insuffi-cient oil is not covered under warranty.
• If the engine has been stopped while thevehicle is in water, do not attempt torestart it. Have the vehicle towed out ofthe water and inspected by a trained andqualified Volvo service technician.
WARNING
• Avoid driving through standing or rushing water. Doing so can be dangerous and itmay also be difficult to determine theactual depth of the water.
• If water cannot be avoided, after drivingthrough the water, press lightly on thebrake pedal to ensure that the brakes arefunctioning normally. Water or mud canmake the brake linings slippery, resultingin delayed braking effect.
Related information
•
Towing recommendations (p. 360)
Overheating the engine and transmission
In demanding driving conditions, such as when transporting heavy loads, driving in mountainousareas or in very hot weather there is a risk ofoverheating the engine or transmission.
• The engine's output may be slightly limited if there is a risk of overheating.
• Remove e.g., auxiliary lights mounted in frontof the grille in hot weather.
• If the temperature of the engine coolantbecomes too high, the warning symbol will illuminate and the message
Engine
temperature/Stop safely will be displayed.
Stop the vehicle as soon as possible in a safe place and let the engine idle for severalminutes.
• If the message
Engine temperature/High
temperature Turn off engine or Engine
coolant/Stop safely is displayed, stop
safely and turn off the engine.
• If the transmission begins to overheat, an alternative gear shifting program will beselected. An integrated protective functionwill also by activated, the warning symbol will illuminate and the message
Transmission
warmHigh temperature Reduce speed
or Transmission warmStop safely, wait
for cooling will be displayed in the instru-
ment panel.
Page 360 of 546

||
STARTING AND DRIVING
358•
The air conditioning may be switched off temporarily.
• After a prolonged period of driving, do notturn off the engine immediately after stop-ping.
• The engine cooling fan commonly continuesto run for several minutes after the enginehas been turned off.
WARNING
The cooling fan (located at the front of the engine compartment, behind the radiator) maystart or continue to operate (for up to6 minutes) after the engine has beenswitched off.
Related information
•
Driving with a trailer (p. 367)
• Before a long distance trip (p. 355)
Winter driving
Check your vehicle before the approach of cold weather.
The following advice is worth noting:
• Make sure that the engine coolant contains 50 percent antifreeze. Any other mixture willreduce freeze protection. This gives protec-tion against freezing down to –31 °F(–35 °C). The use of "recycled" antifreeze isnot approved by Volvo. Different types ofantifreeze must not be mixed.
• Volvo recommends using only genuine Volvoantifreeze in your vehicle's radiator.
• Try to keep the fuel tank well filled – thishelps prevent the formation of condensationin the tank. In addition, in extremely coldweather conditions it is worthwhile to addfuel line de-icer before refueling.
• The viscosity of the engine oil is important.Oil with low viscosity (thinner oil) improvescold-weather starting as well as decreasingfuel consumption while the engine is warm-ing up. Full synthetic 0W-30 oil is recom-mended for driving in areas with sustainedlow temperatures.
• The load placed on the battery is greater dur-ing the winter since the windshield wipers,lighting, etc., are used more often. Moreover,the capacity of the battery decreases as thetemperature drops. In very cold weather, apoorly charged battery can freeze and bedamaged. It is therefore advisable to check the state of charge more frequently andspray an anti-rust oil on the battery posts.
• Volvo recommends the use of snow tires onall four wheels for winter driving.
• To prevent the washer fluid reservoir fromfreezing, add washer solvents containingantifreeze. This is important since dirt is oftensplashed on the windshield during winterdriving, requiring the frequent use of thewashers and wipers. Volvo Washer Solventshould be diluted as follows: Down to 14 °F(–10 °C): 1 part washer solvent and 4 partswater Down to 5 °F (–15 °C): 1 part washersolvent and 3 parts water Down to 0 °F(–18 °C): 1 part washer solvent and 2 partswater Down to –18 °F (–28 °C): 1 partwasher solvent and 1 part water.
• Use Volvo Teflon Lock Spray in the locks.
• Avoid using de-icing sprays as they cancause damage to the locks.
Related information
• Snow tires and chains (p. 451)