2016 VOLVO XC90 T8 checking
[x] Cancel search: checkingPage 11 of 546

9
Apple CarPlay422
Apple CarPlay settings 423
CD (media) player *
424
Playing media 424
Media searches 426
Playing media through the AUX/USB sockets 427
Streaming media through a Blue-tooth connection 427
Media sound settings 428
Gracenote 428
Video 429
Media player technical data 429
Internet connected vehicle 431
Connecting to the Internet 431
Apps (applications) 433
Bluetooth settings 433
Downloading, updating and uninstal-ling apps 434
Internet connection troubleshooting 435
Tethering (Wi-Fi sharing) 435
Deleting Wi-Fi networks 436
Wi-Fi technology and security 436
Vehicle modem settings 437
Infotainment system license information 437
Terms, conditions and confidentiality441
WHEELS AND TIRES
Tires444
Tire sidewall designations 445
Wheel (rim) designations 447
Tire terminology 447
Tire direction of rotation 448
Tread wear indicator 449
Loading specifications 449
Uniform Tire Quality Grading 450
Snow tires and chains 451
Checking tire inflation pressure 451
Changing tires 453
Tools in the cargo compartment 453
Jack 453
Wheel bolts 454
Removing a wheel 454
Installing a wheel 456
Tire Pressure Monitoring System (TPMS) 457
Checking inflation pressure 458
Reinflating tires equipped with the Tire Pressure Monitoring System (TPMS) 459
Calibrating the Tire PressureMonitoring System (TPMS) 460
Tire Pressure Monitoring Systemtype approval 461
Tire sealing system 461
Page 12 of 546

10
Using the tire sealing system463
Inflating a tire with the tire sealing system compressor 467
Refilling coolant 468
MAINTENANCE AND SERVICING
Volvo's service program472
System updates 474
Remote updates 475
Vehicle status 475
Booking service and repairs 475
Wi-Fi connection to a workshop 478
Climate system service 479
Start battery 479
Hybrid battery 481
Battery symbols 482
Fuses 483
Replacing fuses 483
Fuses in the engine compartment 484
Fuses in the passenger compartment 489
Fuses in the cargo compartment 493
Replacing bulbs 496
Removing the rectangular headlight cover 498
Replacing low beam headlight bulbs 498
Replacing High Beam headlight bulbs 499
Replacing parking light bulbs 500
Replacing front turn signal bulbs 500
Bulb specifications 501
Hoisting the vehicle 502
Opening and closing the hood 504
Engine compartment overview505
Engine oil 506
Checking and refilling engine oil 507
Windshield wipers in the service position 508
Replacing wiper blades 509
Refilling the windshield washer fluid reservoir 511
Cleaning the exterior 511
Cleaning the interior 513
Cleaning the center display 515
Corrosion protection 516
Paint damage 516
Touching up paint damage 517
Polishing and waxing 518
Page 186 of 546

CLIMATE
* Option/accessory, for more information, see Introduction.
184
Starting and stopping preconditioning
Preconditioning heats/cools the passenger com- partment prior to driving. Please note that thecharging cable must be connected.
Starting/stopping from the centerdisplay
The preconditioning button in the Parking climate tab
in Climate view.
1. Open Climate view in the center display. 2. Tap
Parking climate .
The window for seat/steering wheel heating in Climate view's Parking climate tab
3. Tap the boxes to select if seat/steering
wheel heating is to be activated/deactivated when preconditioning starts.
4. Tap
Preconditioning.
> Preconditioning starts/stops and the indi- cator lights in the buttons will be on/off.
NOTE
Full preconditioning is only possible when the vehicle's charging cable is connected. In other cases, the passenger compartment can be cooled for 3 minutes in warm weather. This function is started from the
Parking
climate tab in the center display's Climate
view.
The vehicle's doors and windows should be closed during preconditioning.
Starting from a cell phone *Starting preconditioning and checking the cur-rent settings can be done from a cell phone withthe Volvo On Call mobile app. Preconditioningheats the passenger compartment to a comforta-ble temperature or cools the compartment to thecurrent ambient temperature. If the vehicle is equipped with the optional Engine Remote Start (ERS), the air conditioningcan be used to pre-cool the passenger compart-ment to a comfortable temperature.
Related information
•Setting the parking climate (preconditioning) timer (p. 182)
• Activating/deactivating the parking climatetimer (p. 181)
• Hybrid battery charging cable (p. 375)
Page 447 of 546

WHEELS AND TIRES
}}
445
to reduce the chance of oversteer during hard braking.
• Hitting curbs or potholes can damage thetires and/or wheels permanently.
Tire rotationYour vehicle has no required tire rotation. Tire wear is affected by a number of factors such astire inflation, ambient temperature, driving style,etc.
NOTE
• If the tires are rotated, they should only be moved from front to rear or vice versa.They should never be rotated left toright/right to left.
• Ideally, tire rotation should be done thefirst time after approximately 3,000 miles(5,000 km) and thereafter at 6,000-mile(10,000-km) intervals. Some customersfind that tire rotation may help to getextra mileage from tire life.
• Tire rotation should only be performed iffront/rear tire wear is fairly even andtread height is above 1/16" (1.6 mm).
Storing wheels and tiresWhen storing complete wheels (tires mounted on rims), they should be suspended off the floor orplaced on their sides on the floor. Tires not mounted on rims should be stored ontheir sides or standing upright, but should not besuspended.
CAUTION
Tires should preferably be stored in a cool, dry, dark place, and should never be stored inclose proximity to solvents, gasoline, oils, etc.
WARNING
•
The wheel and tire sizes for your Volvo are specified to meet stringent stabilityand handling requirements. Unapprovedwheel/tire size combinations can nega-tively affect your vehicle's stability andhandling.
• Any damage caused by installation ofunapproved wheel/tire size combinationswill not be covered by your new vehiclewarranty. Volvo assumes no responsibilityfor death, injury, or expenses that mayresult from such installations.
Related information
•
Checking tire inflation pressure (p. 451)
• Tread wear indicator (p. 449)
Tire sidewall designations
The following information can be found on a tire's sidewall.
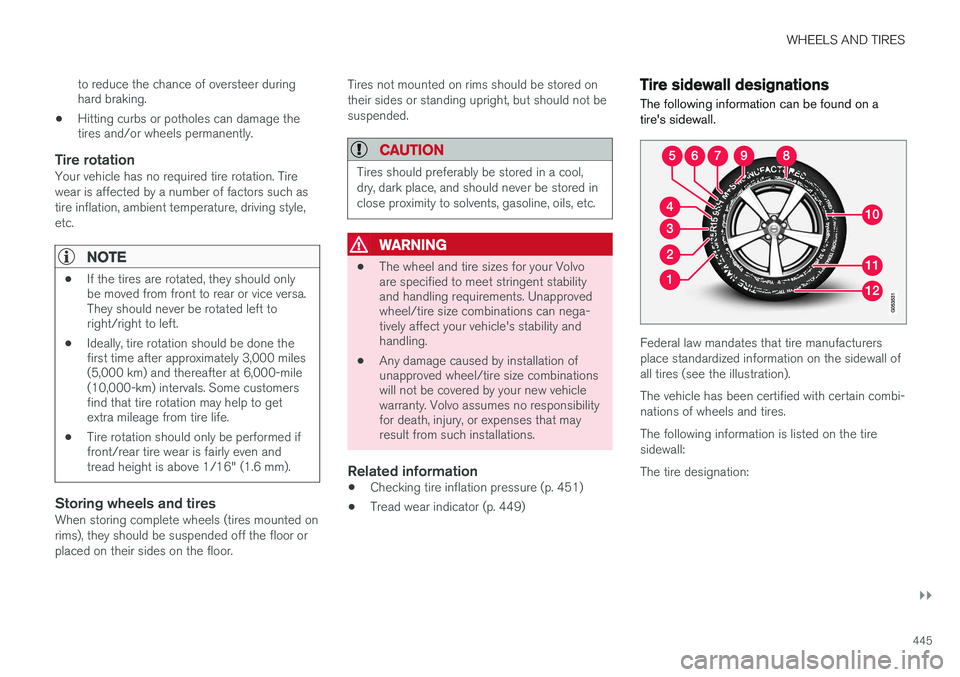
Federal law mandates that tire manufacturers place standardized information on the sidewall ofall tires (see the illustration). The vehicle has been certified with certain combi- nations of wheels and tires. The following information is listed on the tire sidewall: The tire designation:
Page 451 of 546

WHEELS AND TIRES
}}
449
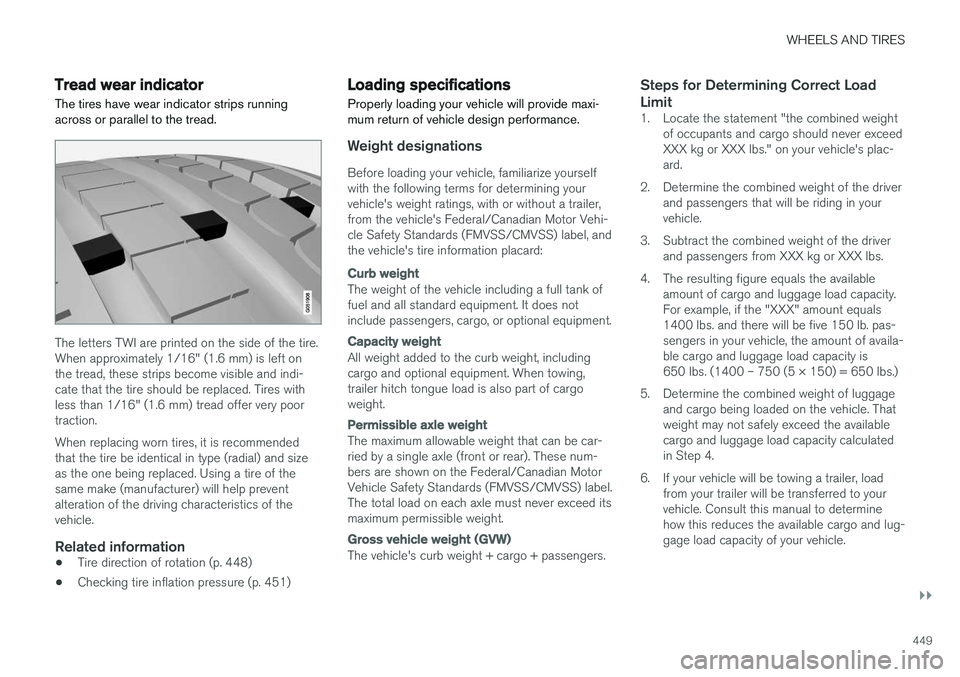
Tread wear indicatorThe tires have wear indicator strips running across or parallel to the tread.
The letters TWI are printed on the side of the tire. When approximately 1/16" (1.6 mm) is left onthe tread, these strips become visible and indi-cate that the tire should be replaced. Tires withless than 1/16" (1.6 mm) tread offer very poortraction. When replacing worn tires, it is recommended that the tire be identical in type (radial) and sizeas the one being replaced. Using a tire of thesame make (manufacturer) will help preventalteration of the driving characteristics of thevehicle.
Related information
• Tire direction of rotation (p. 448)
• Checking tire inflation pressure (p. 451)
Loading specifications Properly loading your vehicle will provide maxi- mum return of vehicle design performance.
Weight designations
Before loading your vehicle, familiarize yourself with the following terms for determining yourvehicle's weight ratings, with or without a trailer,from the vehicle's Federal/Canadian Motor Vehi-cle Safety Standards (FMVSS/CMVSS) label, andthe vehicle's tire information placard:
Curb weight
The weight of the vehicle including a full tank of fuel and all standard equipment. It does notinclude passengers, cargo, or optional equipment.
Capacity weight
All weight added to the curb weight, including cargo and optional equipment. When towing,trailer hitch tongue load is also part of cargoweight.
Permissible axle weight
The maximum allowable weight that can be car- ried by a single axle (front or rear). These num-bers are shown on the Federal/Canadian MotorVehicle Safety Standards (FMVSS/CMVSS) label.The total load on each axle must never exceed itsmaximum permissible weight.
Gross vehicle weight (GVW)
The vehicle's curb weight + cargo + passengers.
Steps for Determining Correct Load Limit
1. Locate the statement "the combined weight
of occupants and cargo should never exceed XXX kg or XXX lbs." on your vehicle's plac-ard.
2. Determine the combined weight of the driver and passengers that will be riding in yourvehicle.
3. Subtract the combined weight of the driver and passengers from XXX kg or XXX lbs.
4. The resulting figure equals the available amount of cargo and luggage load capacity.For example, if the "XXX" amount equals1400 lbs. and there will be five 150 lb. pas-sengers in your vehicle, the amount of availa-ble cargo and luggage load capacity is650 lbs. (1400 – 750 (5 × 150) = 650 lbs.)
5. Determine the combined weight of luggage and cargo being loaded on the vehicle. Thatweight may not safely exceed the availablecargo and luggage load capacity calculatedin Step 4.
6. If your vehicle will be towing a trailer, load from your trailer will be transferred to yourvehicle. Consult this manual to determinehow this reduces the available cargo and lug-gage load capacity of your vehicle.
Page 453 of 546

WHEELS AND TIRES
}}
451
Snow tires and chains
The use of snow chains and/or winter tires can help improve traction in winter driving conditions.
Snow chains can be used on your Volvo with the following restrictions:
• Snow chains should be installed on front wheels only. Use only Volvo approved snowchains.
• If accessory, aftermarket or "custom" tiresand wheels are installed and are of a size dif-ferent than the original tires and wheels,chains in some cases CANNOT be used.Sufficient clearances between chains andbrakes, suspension and body componentsmust be maintained.
• Some strap-on type chains will interfere withbrake components and therefore CANNOTbe used.
• All Wheel Drive models
: Snow chains
should only be installed on the front wheels.
• Certain size tires may not allow the assemblyof snow chains/traction devices.
Consult your Volvo retailer for additional snow chain information.
CAUTION
• Snow chains should not be used on wheels larger than 19".
• Always follow the chain manufacturer'sinstallation instructions carefully. Installchains as tightly as possible andretighten periodically.
• Check local regulations regarding the useof snow chains before installing.
• Use single-sided snow chains only.
• Never exceed the chain manufacturer'sspecified maximum speed limit. (Underno circumstances should you exceed31 mph (50 km/h).
• Avoid bumps, holes or sharp turns whendriving with snow chains.
• The handling of the vehicle can beadversely affected when driving withchains. Avoid fast or sharp turns as wellas locked wheel braking.
Checking tire inflation pressure
Correct tire inflation pressure helps improve driv- ing stability, save fuel and increase the servicelife of the tires.
WARNING
• Under-inflation is the most common cause of tire failure and may result insevere tire cracking, tread separation, or"blow-out," with unexpected loss of vehi-cle control and increased risk of injury.
• Under-inflated tires reduce the load car-rying capacity of your vehicle.
Cold tiresInflation pressure should be checked when the tires are cold. The tires are considered to be cold when they have the same temperature as the sur-rounding (ambient) air. This temperature is normally reached after the vehicle has been parked for at least 3 hours. After driving a distance of approximately 1 mile (1.6 km), the tires are considered to be hot. If youhave to drive farther than this distance to pumpyour tire(s), check and record the tire pressurefirst and add the appropriate air pressure whenyou get to the pump. When weather temperature changes occur, tire inflation pressures also change. A 10-degree
Page 454 of 546

||
WHEELS AND TIRES
452temperature drop causes a corresponding drop of 1 psi (7 kPa) in inflation pressure. Check yourtire pressures frequently and adjust them to theproper pressure, which can be found on the vehi-cle's tire information placard or certification label. If checking tire pressure when the tire is hot, never "bleed" or reduce air pressure. The tiresare hot from driving and it is normal for pressuresto increase above recommended cold pressures.A hot tire at or below recommended cold inflationpressure could be significantly under-inflated.
Recommended inflation pressures
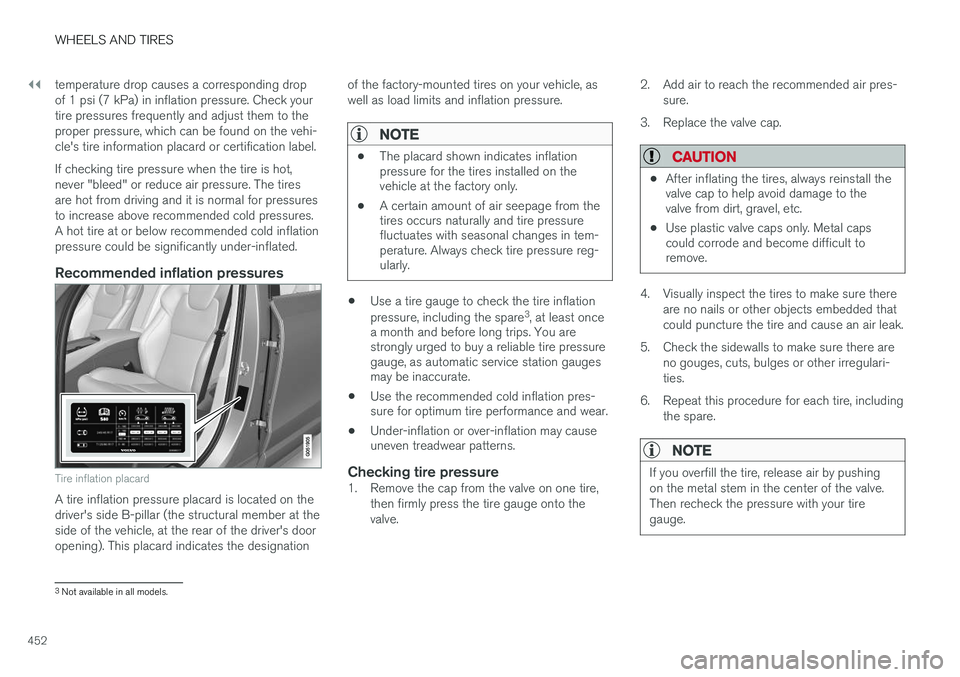
Tire inflation placard
A tire inflation pressure placard is located on the driver's side B-pillar (the structural member at theside of the vehicle, at the rear of the driver's dooropening). This placard indicates the designation
of the factory-mounted tires on your vehicle, aswell as load limits and inflation pressure.
NOTE
•
The placard shown indicates inflation pressure for the tires installed on thevehicle at the factory only.
• A certain amount of air seepage from thetires occurs naturally and tire pressurefluctuates with seasonal changes in tem-perature. Always check tire pressure reg-ularly.
•Use a tire gauge to check the tire inflation pressure, including the spare 3
, at least once
a month and before long trips. You are strongly urged to buy a reliable tire pressuregauge, as automatic service station gaugesmay be inaccurate.
• Use the recommended cold inflation pres-sure for optimum tire performance and wear.
• Under-inflation or over-inflation may causeuneven treadwear patterns.
Checking tire pressure1. Remove the cap from the valve on one tire,
then firmly press the tire gauge onto the valve. 2. Add air to reach the recommended air pres-
sure.
3. Replace the valve cap.
CAUTION
• After inflating the tires, always reinstall the valve cap to help avoid damage to thevalve from dirt, gravel, etc.
• Use plastic valve caps only. Metal capscould corrode and become difficult toremove.
4. Visually inspect the tires to make sure there
are no nails or other objects embedded that could puncture the tire and cause an air leak.
5. Check the sidewalls to make sure there are no gouges, cuts, bulges or other irregulari-ties.
6. Repeat this procedure for each tire, including the spare.
NOTE
If you overfill the tire, release air by pushing on the metal stem in the center of the valve.Then recheck the pressure with your tiregauge.
3Not available in all models.
Page 460 of 546

||
WHEELS AND TIRES
458If a spare wheel or other wheel without a TPMS sensor is used, a fault message will appear in theinstrument panel after driving for a few minutes. After changing wheels, always check that the new wheels have TPMS sensors to avoid a sys-tem malfunction warning. TPMS does not replace the need for regular tire inspection and maintenance.
RecommendationsTPMS sensors should be mounted on all wheelsused with the vehicle, including winter wheels.
NOTE
•
If you change to tires with a different dimension than the factory-installed ones,the TPMS system must be reconfiguredfor these tires. This must be done by atrained and qualified Volvo service techni-cian.
• If a tire is changed, or if the TPMS sensoris moved to another wheel, the rubbervalve and valve core should be replaced.
• When installing TPMS sensors, the vehi-cle must be parked for at least15 minutes with the ignition off. If thevehicle is driven within 15 minutes, aTPMS error message will be displayed.
WARNING
Incorrect inflation pressure could lead to tire failure, resulting in a loss of control of thevehicle.
Turning TPMS off 4TPMS can be turned off in the center display's Top view.
1. Park the vehicle and turn off the engine.2.
Activate ignition mode I.
3. Select
SettingsMy CarIntelliSafe
Tire Pressure Monitor in the Top view
and deselect (tap) the button.
> The function will remain off until it is reac- tivated.
Related information
• Checking inflation pressure (p. 458)
• Reinflating tires equipped with the Tire Pressure Monitoring System (TPMS)(p. 459)
• Tire Pressure Monitoring System type appro-val (p. 461)
• Ignition modes (p. 370)
Checking inflation pressure The Tire Pressure Monitoring System makes it possible to view the current inflation pressure ofall four tires.
Checking inflation pressureOpen the Car status app in
the center display's Application view. Tap
Status to see the
current inflation pressure of all four tires.
The on-screen graphic displays the inflation pres- sure.
The illustration is generic and may vary from model to model or after a software update
4 Certain markets only.