2016 VOLVO XC90 T8 ignition
[x] Cancel search: ignitionPage 216 of 546

||
LOADING AND STORAGE
214
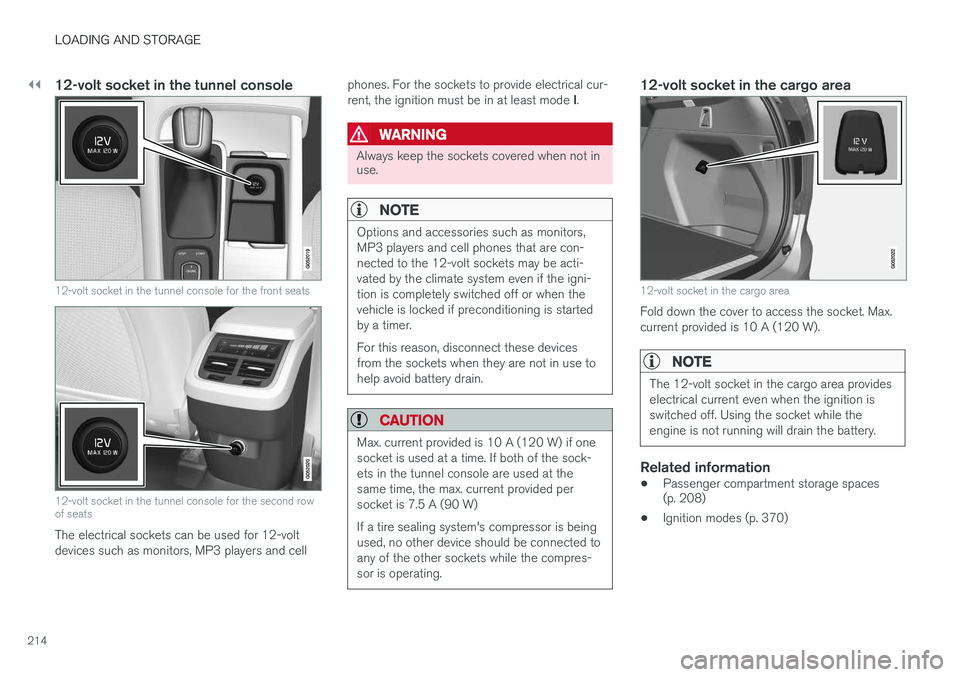
12-volt socket in the tunnel console
12-volt socket in the tunnel console for the front seats
12-volt socket in the tunnel console for the second row of seats
The electrical sockets can be used for 12-volt devices such as monitors, MP3 players and cellphones. For the sockets to provide electrical cur- rent, the ignition must be in at least mode
I.
WARNING
Always keep the sockets covered when not in use.
NOTE
Options and accessories such as monitors, MP3 players and cell phones that are con-nected to the 12-volt sockets may be acti-vated by the climate system even if the igni-tion is completely switched off or when thevehicle is locked if preconditioning is startedby a timer. For this reason, disconnect these devices from the sockets when they are not in use tohelp avoid battery drain.
CAUTION
Max. current provided is 10 A (120 W) if one socket is used at a time. If both of the sock-ets in the tunnel console are used at thesame time, the max. current provided persocket is 7.5 A (90 W) If a tire sealing system's compressor is being used, no other device should be connected toany of the other sockets while the compres-sor is operating.
12-volt socket in the cargo area
12-volt socket in the cargo area
Fold down the cover to access the socket. Max. current provided is 10 A (120 W).
NOTE
The 12-volt socket in the cargo area provides electrical current even when the ignition isswitched off. Using the socket while theengine is not running will drain the battery.
Related information
• Passenger compartment storage spaces (p. 208)
• Ignition modes (p. 370)
Page 229 of 546

LOCKS AND ALARM
* Option/accessory, for more information, see Introduction.227
Arming the alarm
–Lock the vehicle by pressing the remote key's lock button, pressing the outer indenta- tion for locking on one of the door handles1
or by pressing the tailgate's rubberized pres-sure plate 1
.
If the vehicle is equipped with a power tail- gate *, the button on the lower edge of the
tailgate can also be used to lock the vehicle and arm the alarm.
Disarming the alarm
–Unlock the vehicle by pressing the remote key's unlock button, pressing the pressure-sensitive area on the inside of one of the door handles 1
or by pressing the tailgate's
rubberized pressure plate 1
.
Turning off a triggered (sounding) alarm
–Press the remote key's unlock button or put the ignition in mode I by turning the start
knob to START and releasing it.
Alarm signalsThe following occurs if the alarm has been trig- gered:
• A siren will sound for 30 seconds or until the alarm is turned off
• All turn signals flash for 5 minutes or untilthe alarm is turned off If the door that triggered the alarm is left open,
the alarm cycle will be repeated 10 times.
Alarm indicatorA red indicator light on the upper side of the dashboard shows the alarm's status:
• Indicator off: the alarm is disarmed
• Indicator flashes once every two seconds: the alarm is armed
• Indicator flashes quickly after the alarm hasbeen disarmed until the ignition has been put in mode
I (turn the start knob to START and
release it): the alarm has been triggered
Related information
• Automatically arming/disarming the alarm (p. 228)
• Deactivating the alarm without a functioningremote key (p. 228)
1
Models withe the optional Passive Entry only.
Page 230 of 546

LOCKS AND ALARM
* Option/accessory, for more information, see Introduction.
228
Automatically arming/disarming the alarm
Automatically arming the alarm helps prevent inadvertently leaving the vehicle without alarmprotection.
If the vehicle has been unlocked with the remote key (and the alarm has been disarmed) but nodoor or the tailgate has been opened within2 minutes, the vehicle will automatically relockand the alarm will re-arm. In certain markets, the alarm will be re-armed automatically after a slight delay after the driver'sdoor has been opened and closed without beinglocked.
Related information
• Alarm (p. 226)
• Deactivating the alarm without a functioning remote key (p. 228)
Deactivating the alarm without a functioning remote key
If the remote key is not functioning properly, the alarm can be turned off and the vehicle can bestarted as follows:
1. Unlock and open the driver's door with the detachable key blade.
> This will trigger the alarm.
Location of the back-up key reader in the cup holder
2. Place the remote key on the back-up keyreader in the tunnel console's cup holder.
3. Turn the start knob to START and release it.
> The alarm will turn off.
Related information
• Alarm (p. 226)
• Detachable key blade (p. 237)
• Starting the engine (p. 372)
• Automatically arming/disarming the alarm (p. 228)
Child safety locks
Child safety locks help prevent children from inadvertently opening one of the rear doors frominside the vehicle.
Electronic * activation/deactivationThe electronic child safety locks can be acti- vated/deactivated as long as the ignition is notcompletely switched off and this can be done forup to two minutes after the engine has beenswitched off if no door has been opened. To activate:
Child safety lock button on the driver door control panel
1. Switch on the ignition or start the engine.
Page 231 of 546

LOCKS AND ALARM
229
2. Press the button on the driver's door control
panel. >
Rear child lock Activated will be dis-
played in the instrument panel and the indicator light in the button will illuminateto show that the child safety locking func-tion is activated.
While the child safety locks are activated:
• the rear door windows can only be opened from the driver door control panel
• the rear doors cannot be opened from theinside
To deactivate:
–Press the button in the driver door control panel. >
Rear child lock Deactivated will be dis-
played in the instrument panel and the indicator light in the button will go out toshow that the child safety locking functionis deactivated.
When the ignition is switched off, the current set-ting for the child safety locks will be stored. If thelocks were activated at that time, they will con-tinue to be activated when the ignition isswitched on again.
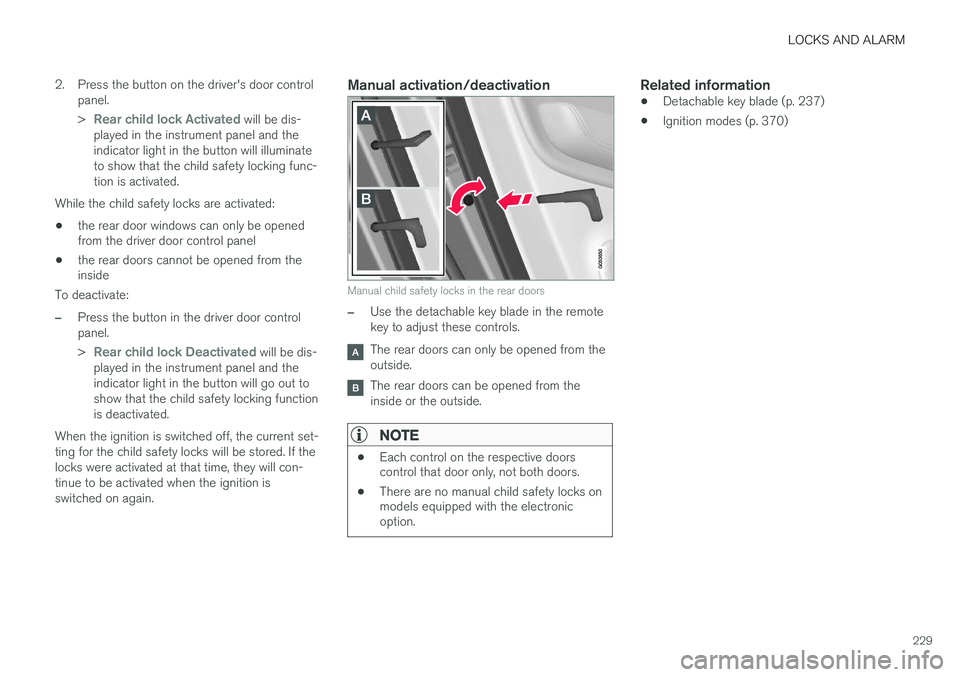
Manual activation/deactivation
Manual child safety locks in the rear doors
–Use the detachable key blade in the remote key to adjust these controls.
The rear doors can only be opened from the outside.
The rear doors can be opened from the inside or the outside.
NOTE
• Each control on the respective doors control that door only, not both doors.
• There are no manual child safety locks onmodels equipped with the electronicoption.
Related information
• Detachable key blade (p. 237)
• Ignition modes (p. 370)
Page 238 of 546

||
LOCKS AND ALARM
* Option/accessory, for more information, see Introduction.
236
NOTE
Avoid placing the remote key closer than approx. (4-6 in.) (10-15 cm) to any metallicobjects or electronic devices such as cellphones, tablets, laptops or chargers.
If interference persists, unlock the vehicle with the detachable key blade and place the remotekey in the backup key reader in the tunnel con-sole cup holder to disarm the alarm.
WARNING
Always remove the remote key from the pas- senger compartment when leaving the vehicle and ensure that the ignition in mode 0, espe-
cially if there are children in the vehicle.
Ordering new keysTwo remote keys are provided with the vehicle (a Key Tag 6
is also included for vehicles equipped
with the optional Passive Entry system). Addi- tional keys (a total of 12) can be ordered andused with the vehicle.
Loss of a remote keyIf a remote key is lost, the others should be takenwith the vehicle to a Volvo retailer. As an anti-theft measure, the code of the lost remote keymust be erased from the system. The number of registered keys for the vehicle can be found inthe center display's Top view.
NOTE
Additional or duplicate remote control keys can be obtained from any authorized Volvoretailer. You can also obtain additional or duplicate remote control keys from certain independentrepair facilities and locksmiths that are quali-fied to make remote control keys. Each keymust be programmed to work with your vehi-cle. A list of independent repair facilities and/or locksmiths known to Volvo that can cut andcode replacement keys can be found: •
on the Volvo website, www.volvocars.com/us
• by calling Volvo Customer Care at1-800-458-1552.
Key TagIn addition to the two remote keys provided, a smaller third key, called a Key Tag, is also provi-ded for vehicles equipped with the optionalPassive Entry system. This key functions in the same way as a standard remote key but does not have a detachable key blade and its battery cannot be replaced; a newKey Tag has to be ordered.
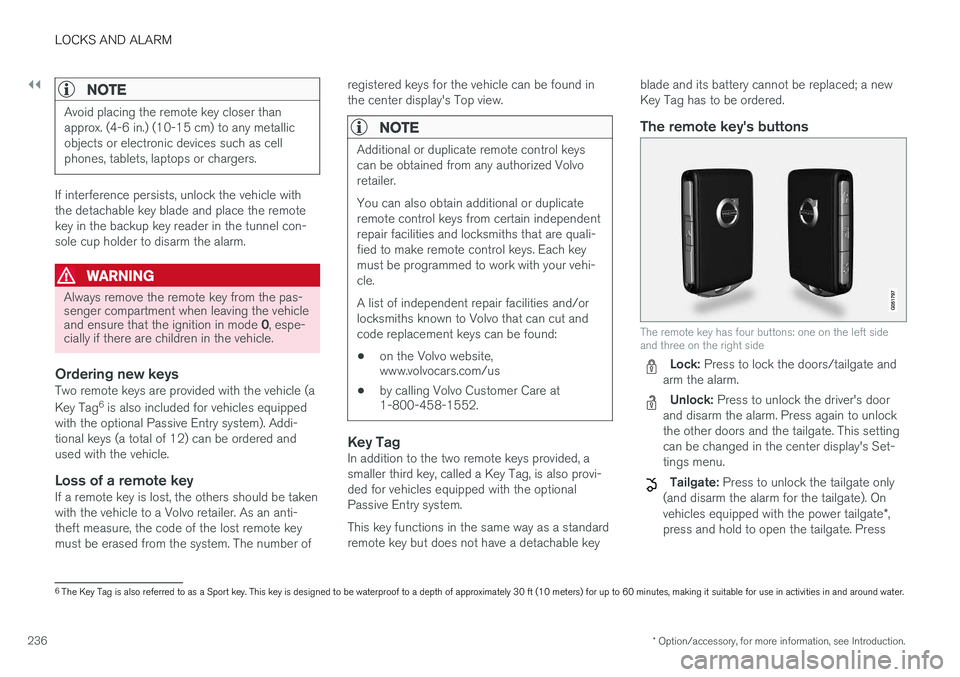
The remote key's buttons
The remote key has four buttons: one on the left side and three on the right side
Lock: Press to lock the doors/tailgate and
arm the alarm.
Unlock: Press to unlock the driver's door
and disarm the alarm. Press again to unlock the other doors and the tailgate. This settingcan be changed in the center display's Set-tings menu.
Tailgate: Press to unlock the tailgate only
(and disarm the alarm for the tailgate). On vehicles equipped with the power tailgate *,
press and hold to open the tailgate. Press
6 The Key Tag is also referred to as a Sport key. This key is designed to be waterproof to a depth of approximately 30 ft (10 meters) for up to 60 minutes, making it suitable for use in activities in and around water.
Page 317 of 546

DRIVER SUPPORT
* Option/accessory, for more information, see Introduction.315
Starting the Park Assist Camera (PAC)*
PAC starts automatically when the gear selector is moved to R or can be started manually from
the center display.
Starting the cameraPAC can be started manually in the center display's Functionview if it is turned off.
–Tap the Camera button.
> The camera will start.
Starting the camera in different situations
When the button is tapped, the vehicle's speed and direction determine if the camera starts intop view or front view:
• Top view: if the vehicle is stationary or is moving forward at speeds up to 9 mph(15 km/h)
• Top view: if the vehicle is stationary or isreversing, regardless of speed
• Front view: if the vehicle is moving forward atspeeds between 9–14 mph (15–22 km/h)
Activating/deactivating automatic start of PAC
PAC can be started automatically when reverse gear is selected. 1.
Tap
Settings in the center display's Top
view.
2. Tap
My CarPark Assist.
3. Select
Auto Camera Reverse Activationto activate/deactivate automatic start.
Automatically deactivating the cameraFront view switches off at a speed of approx. 16 mph (25 km/h) to help avoid distracting the driver. If the setting
Auto Camera Reverse
Activation has been selected, the camera's front
view will reactivate if the vehicle's speed drops below 14 mph (22 km/h) within 60 seconds. Ifthe vehicle's speed has exceeded 31 mph (50km/h), front view will not automatically reactivate. Other camera views switch off at 9 mph (15 km/h) and will not reactivate automatically.
Selecting the camera's basic view when
reversing
With Auto Camera Reverse Activationselected, the driver can also choose the camera view to be used when reversing: the rear view or 360° view *.
1. Tap
Settings in the center display's Top
view. 2.
Tap
My CarPark Assist.
3. Select
Rear View Instead of 360° to set
the rear view as default.
Related information
• Park Assist Camera (PAC)
* trajectory lines
and fields (p. 313)
• Park Assist Camera (PAC)
* limitations
(p. 316)
• Ignition modes (p. 370)
Page 348 of 546

STARTING AND DRIVING
* Option/accessory, for more information, see Introduction.
346
Starting and driving
The vehicle is equipped with an automatic trans- mission that also makes it possible to shift gearsmanually. Certain functions can also be used when the engine is not running, depending on the ignitionmode being used.
Related information
• Starting the engine (p. 372)
• Ignition modes (p. 370)
• Automatic transmission (p. 395)
• Opening/closing the fuel filler door (p. 363)
• Parking brake (p. 352)
Brakes The brake system is a hydraulic system consist- ing of two separate brake circuits. If a problemshould occur in one of these circuits, it is stillpossible to stop the vehicle with the other brakecircuit.
Brake systemIf one of the brake circuits is not functioning, more pressure will be needed on the brake pedal(and the pedal will go down farther) for normalbraking effect. If the brake pedal must be depressed farther than normal and requires greater foot pressure,the stopping distance will be longer. Pressure on the brake pedal is enhanced by the power braking function.
WARNING
If vehicle does not have electrical current and both the electric motor and gasoline engineare switched off, the brakes cannot be usedto stop the vehicle.
When the Hill Start Assist function is being used, it will take slightly longer for the brake pedal toreturn to its normal position if the vehicle isparked on an incline or uneven surface. When driving in very hilly areas or if the vehicle is carrying a heavy load, using brake mode B to augment the brakes or the
Off Road* drive mode can also be used to increase the engine braking effect at low speeds.
Anti-lock Braking System
ABS
The ABS system helps to improve vehicle control (stopping and steering) during severe brakingconditions by limiting brake lockup. When ABS is operating, there may be some vibration in the brake pedal, which is normal. The system performs a brief self-diagnostic test when the engine has been started and driverreleases the brake pedal. Another automatic testmay be performed when the vehicle first reachesa speed of approximately 6 mph (10 km/h). Thebrake pedal will pulsate several times and asound may be audible from the ABS controlmodule, which is normal.
Function check when the engine is
started
A Plug-in Hybrid is equipped with a "brake bywire" brake system. A function check is per-formed each time the engine is started and thedriver depresses the brake pedal to move the gear selector from P.
In certain cases, a message may appear in the instrument panel saying that pressure on thebrake pedal is too low. Press harder on the pedal.
Light braking charges the hybrid batteryWhen the brakes are applied lightly, the electricmotor's braking function is used, which converts
Page 363 of 546

STARTING AND DRIVING
}}
361
WARNING
•Do not connect the jumper cable to any part of the fuel system or to any movingparts. Avoid touching hot manifolds.
• Batteries generate hydrogen gas, whichis flammable and explosive.
• Battery fluid contains sulfuric acid. Do notallow battery fluid to contact eyes, skin,fabrics or painted surfaces. If contactoccurs, flush the affected area immedi-ately with water. Obtain medical helpimmediately if eyes are affected.
• Never expose the battery to open flameor electric spark.
• Do not smoke near the battery.
• Failure to follow the instructions for jumpstarting can lead to injury.
Related information
• Towing eyelet (p. 359)
• Jump starting (p. 365)
• Parking brake (p. 352)
• Ignition modes (p. 370)
Fuel Volvo recommends the use of detergent gaso- line to control engine deposits.
Deposit control gasoline (detergent
additives)
Detergent gasoline is effective in keeping injec- tors and intake valves clean. Consistent use ofdeposit control gasolines will help ensure gooddrivability and fuel economy. If you are not surewhether the gasoline contains deposit controladditives, check with the service station operator.
NOTE
Volvo does not recommend the use of exter- nal fuel injector cleaning systems.
Unleaded fuelEach Volvo has a three-way catalytic converter and must use only unleaded gasoline. U.S. andCanadian regulations require that pumps deliver-ing unleaded gasoline be labeled "UNLEADED".Only these pumps have nozzles which fit yourvehicle's filler inlet. It is unlawful to dispense lea-ded fuel into a vehicle labeled "unleaded gaso-line only". Leaded gasoline damages the three-way catalytic converter and the heated oxygensensor system. Repeated use of leaded gasolinewill lessen the effectiveness of the emission con-trol system and could result in loss of emissionwarranty coverage. State and local vehicle inspection programs will make detection of mis-fueling easier, possibly resulting in emission testfailure for misfueled vehicles.
NOTE
Some U.S. and Canadian gasolines contain an octane enhancing additive called methyl-cyclopentadienyl manganese tricarbonyl(MMT). If such fuels are used, your EmissionControl System performance may be affected,and the Check Engine Light (malfunctionindicator light) located on your instrumentpanel may light. If this occurs, please returnyour vehicle to a trained and qualified Volvoservice technician for service.
Gasoline containing alcohol and ethers, "Oxygenated fuels"
Some fuel suppliers sell gasoline containing "oxygenates" which are usually alcohols orethers. In some areas, state or local laws requirethat the service pump be marked indicating useof alcohols or ethers. However, there are areas inwhich the pumps are unmarked. If you are notsure whether there is alcohol or ethers in thegasoline you buy, check with the service stationoperator. To meet seasonal air quality standards,some areas require the use of "oxygenated" fuel. Volvo allows the use of the following "oxygen- ated" fuels; however, the octane ratings listedmust still be met.