2016 VOLVO XC90 T8 seat adjustment
[x] Cancel search: seat adjustmentPage 42 of 546

INTRODUCTION
40
Function view buttons
The Function view, which is one of the center display's basic views, contains all of the vehicle's on-screen function buttons. From the Homeview, swipe from left to right on the screen tocome to the Function view.Different types of buttonsThere are three different types of vehicle function buttons as listed in the following table.
Type of buttonFunctionsVehicle function affected
Function buttonsHave On/Off modes. An LED indicator light to the left of the button's icon will illuminate when a function is active. Press the button to turn the function on or off.Most of the buttons in the function view are function buttons.
Start buttonsDo not have On/Off modes. Pressing a start button opens a function's window, e.g., a window for adjusting the driver's seat.•Camera.
•
Headrest fold.
• Functions for folding down a seat.
•
Head-up display adjustments.
Parking buttonsHave On/Off and scanning modes. Similar to function buttons but have an additional parking scanning mode.•Park In.
•
Park Out.
Button modes
A function is activated (on) when the LED indicator is green
A function is deactivated (off) when the LED indicator is off
When a function or parking button's LED indica- tor is green, the function is activated. When afunction is initially activated, an additional text willbe displayed (certain functions only) in the buttonfor approx. 5 seconds, after which the button willbe displayed with the LED indicator illuminated. Press the button briefly to deactivate the func- tion.
Page 121 of 546

INSTRUMENTS AND CONTROLS
}}
* Option/accessory, for more information, see Introduction.119
Via settings
1.
Tap Settings in Top view.
2. Tap
My CarDisplays.
3. Select/deselect
Head-Up Display.
Selecting display alternatives1.Tap Settings in Top view.
2. Tap
My CarDisplaysHead-Up
Display Options.
Tap Go to the center display's Settings view and select
Driver Display & Head-up
Display.
3. Select :
Show Navigation In Head-Up
Display, Road Sign Information In Head-
Up Display, Show Driver Support In
Head-Up Display or Show Phone In
Head-Up Display.
Adjusting HUD brightness and height position
1. Tap Head-up display adjustments in the
center display's Function view. 2. Use the right-side steering wheel keypad to
adjust the HUD's brightness and height posi- tion on the windshield in the driver's field ofvision.
Reduce brightness
Increase brightness
Higher position
Lower position
Confirm
Adapting brightness
The brightness of the graphics displayed in the HUD are also automatically adjusted according toambient lighting conditions. HUD brightness isalso affected by adjustments to the brightness ofthe other displays in the vehicle.
Power front seat * memory function
The position of the HUD can be stored in the power seat's memory function.
Replacing the windshieldVehicles with a head-up display have a specialtype of windshield meeting the requirements fordisplaying projected information. If the windshield has to be replaced, contact a trained and qualified Volvo service technician orauthorized workshop. The correct type of replace-ment windshield must be used for a head-up dis-play.
Calibrating the horizontal positionIf the windshield has been replaced, it may benecessary to calibrate the HUD's horizontal posi-tion. This means that the projected image willhave to be rotated clockwise or counterclockwise.To do so:
1. Pull down the center display's Top view and
tap
Settings.
2. Select
My CarDisplaysHead-Up
Display Calibration.
3. Use the buttons on the right-side steering wheel keypad to calibrate the horizontal posi- tion.
Page 163 of 546

INSTRUMENTS AND CONTROLS
}}
* Option/accessory, for more information, see Introduction.161
Adjusting the steering wheel
The steering wheel can be adjusted to various positions.
Adjusting the steering wheel
Lever for releasing/locking the steering wheel
Possible positions
The steering wheel's height and reach can be adjusted. To do so:
1. Push the lever down to release the steering wheel.
2. Adjust the steering wheel to a suitable posi- tion.
3. Pull back the lever to lock the steering wheel in place. If the lever is difficult to pull into place, press the steering wheel lightly at thesame time as you pull the lever.
WARNING
Never adjust the steering wheel while driving.
If the vehicle is equipped with the optional speed-dependent power steering, the level ofsteering force can be adjusted. The force level isadjusted according to the vehicle's speed.
Related information
• Steering wheel (p. 160)
• Adjustable steering force
* (p. 323)
Seats
The vehicle is equipped with 7 seats. The front seats can be adjusted electroncially or manually.The second and third row seats are adjusted pri-marily manually.
The adjustment settings for the power front seats *, door mirrors and the head-up display can
be stored in memory buttons. Using the multi-function control *, comfort in the
front seats can be further enhance by e.g., adjust- ing the lumbar support or extending the length ofthe front seat cushion. The rear seats can be folded down and their head restraints can be adjusted. The second rowseats can be moved forward/rearward and theirbackrest tilt can also be changed.
Related information
• Adjusting power front seats
* (p. 163)
• Adjusting function settings in the multifunc- tional front seats
* (p. 166)
• Manually operated front seats (p. 162)
• Using the power seat memory function
*
(p. 164)
• Folding the second row backrests (p. 172)
• Getting into and out of the third row of seats (p. 174)
Page 166 of 546
INSTRUMENTS AND CONTROLS
* Option/accessory, for more information, see Introduction.
164
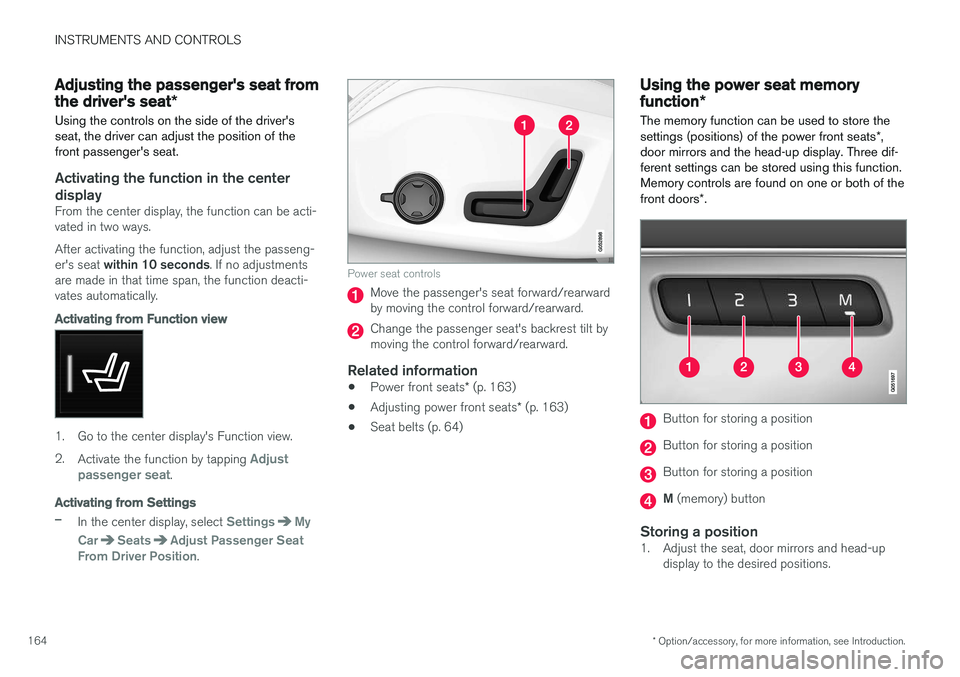
Adjusting the passenger's seat from the driver's seat *
Using the controls on the side of the driver's seat, the driver can adjust the position of thefront passenger's seat.
Activating the function in the center
display
From the center display, the function can be acti- vated in two ways. After activating the function, adjust the passeng- er's seat within 10 seconds . If no adjustments
are made in that time span, the function deacti- vates automatically.
Activating from Function view
1. Go to the center display's Function view. 2. Activate the function by tapping
Adjust
passenger seat.
Activating from Settings
–In the center display, select SettingsMy
Car
SeatsAdjust Passenger Seat
From Driver Position.
Power seat controls
Move the passenger's seat forward/rearward by moving the control forward/rearward.
Change the passenger seat's backrest tilt by moving the control forward/rearward.
Related information
• Power front seats
* (p. 163)
• Adjusting power front seats
* (p. 163)
• Seat belts (p. 64)
Using the power seat memory function
*
The memory function can be used to store the settings (positions) of the power front seats *,
door mirrors and the head-up display. Three dif- ferent settings can be stored using this function.Memory controls are found on one or both of the front doors *.
Button for storing a position
Button for storing a position
Button for storing a position
M (memory) button
Storing a position1. Adjust the seat, door mirrors and head-up
display to the desired positions.
Page 167 of 546

INSTRUMENTS AND CONTROLS
}}
* Option/accessory, for more information, see Introduction.165
2.
Press and release the M button. The indica-
tor light in the button will illuminate.
3. Press button 1, 2 or 3 within 3 seconds to
store the current position of the seat/ mirrors/head-up display in the selected but-ton.
> When the position has been stored in the selected button, an audible signal will sound and the indicator light in the M but-
ton will go out.
If none of the buttons (1, 2 or 3) is pressedwithin 3 seconds, the indicator light in the M but-
ton will go out and the position will not be stored.
The seat/mirrors/head-up display must be moved before a new position can be stored.
Using a stored positionA stored position can be used when one of thefront doors is opened or closed:
Front door open
–Press one of the bottons ( 1–3 ) briefly. The
seat, door mirrors and head-up display will move to the positions stored in that button.
Front door closed
–Press and hold one of the buttons ( 1–3 ) until
the seat, door mirrors and head-up display have moved to the positions stored in thatbutton. The seat, door mirrors and head-up display willstop automatically if the button is released beforethe they have reached the stored positions.
WARNING
•
Because the driver's seat can be adjusted with the ignition off, children should neverbe left unattended in the vehicle.
• Movement of the seat can be STOPPEDat any time by pressing any button on thepower seat control panel.
• Do not adjust the seat while driving. Theseat should be adjusted so that the brakepedal can be depressed fully. In addition,position the seat as far rearward as com-fort and control allow.
• The seat rails on the floor must not beobstructed in any way when the seat is inmotion.
Related information
•
Adjusting power front seats
* (p. 163)
• Power front seats
* (p. 163)
Multifunctional front seats *
In addition to the adjustment settings offered by the power seat controls, the multifunction controlprovides additional possibilities for convenienceand comfort.
Multifunction control on the side of the seat
The multifunction control can be used to adjust lumbar support *, the backrest's side bolsters *, the
length of the seat cushion and the massagefunction *. The adjustment settings made with the
control are shown in the center display * and cer-
tain settings can be made directly from the cen- ter display.
Center displayThe adjustment settings for the driver and pas-senger seats made using the multifunction con-trol are shown in the center display. If only oneseat is adjusted, the settings are shown in the
Page 168 of 546

||
INSTRUMENTS AND CONTROLS
* Option/accessory, for more information, see Introduction.
166 center of the display. If both seats are adjusted, the settings for the driver seat are shown on theupper half of the screen and the ones made forthe passenger seat are on the lower half. Press the Home button on the center console to exit the seat adjustment setting view.
Related information
•
Power front seats
* (p. 163)
• Adjusting function settings in the multifunc- tional front seats
* (p. 166)
• Turning seat heating
* on and off (p. 199)
Adjusting function settings in the multifunctional front seats *
The multifunction controls on the side of the seat as well as the center display can be used tomake seat adjustments. The adjustment settings are shown in the center display *.
Multifunction control on the side of the seat
Turn the control up or down to activate.
Front seat massage settings *The front seat backrests have a massage func- tion. Air-filled cushions provide the massagingaction and a number of settings are available. The massage function can only be used when the engine is running.
Massage view in the center display
1. Activate the multifunction control by turning
it up or down. Seat settings will be displayed in the center display.
2. Tap
Massage in the seat settings view.
Page 540 of 546
 338, 342
Lane Keeping Aid 338, 340, 342 settings 340
L")
INDEX
538
L
Labelslist of 522
location of 521
Laminated panoramic roof 106, 107 Lane Departure Warning settings 340
Lane Departure Warning (LDW) 338, 342
Lane Keeping Aid 338, 340, 342 settings 340
LATCH anchors 78
Leather care 513
Lighting panel 140
Load anchoring eyelets 220
Loading the vehicle 208, 215, 449
Locking 242, 243
Locks and alarm 226
Low beam bulb, replacing 498
Low beams 142, 143
Low Speed Control 399
M
Maintenance 472 hoisting the vehicle 502
performed by the owner 472
Malfunction indicator light 125
Manual front seat adjustment 162
Media player 420, 421 compatible file formats 429
Media player (infotainment system) 424Menus instrument panel 151, 153, 154, 156
Mirrors defroster 195
power door 105
retractable 105
Mirrors, rearview mirror 110
Modem 437Motor oil checking 506, 507
MP3 files 429
Multifunctional front seats 165, 166
MY CAR 111, 112
N
Navigation system voice commands 124
Net cargo 217
O
Occupant safety 60
Occupant weight sensor 84
Octane recommendations 362
Odometer 96Oilchecking 506, 507
Oil quality 530
On-board diagnostics 472
On-board Diagnostic socket 26
On Call Roadside Assistance 14
Opening the hood 504
Options 26
Outside temperature sensor 116
Overhead courtesy lighting 148
Overheating, engine 357