2016 VOLVO XC90 T8 ignition
[x] Cancel search: ignitionPage 385 of 546

STARTING AND DRIVING
}}
383
4. The charging cable's coupler will lock onto
the charging socket and charging will begin within approx. 10 seconds. The approximateremaining charging time and charging statuswill be displayed in the instrument panel. Seealso the article "Hybrid battery charge sta-tus." Charging will be temporarily interrupted if the vehicle is unlocked: •If a door is opened, charging will restart within 2 minutes.
• if no door is opened, the vehicle will auto-matically relock and charging will restartafter 1 minute.
NOTE
Charging status is shown in the instrument panel, which goes dark after a period of time.Reactivate the instrument panel by: •pressing the brake pedal
• opening one of the doors
• putting the ignition in mode
I ( without
pressing the brake pedal , turn the start
knob to START and release it).
CAUTION
Never disconnect the charging cable from the 120-/240-volt socket while charging is inprogress. This could damage the socket. Always stop the charging process (by unlock- ing the vehicle) and disconnect the chargingcable from the vehicle's charging socket before disconnecting the other end from the
120-/240-volt socket being used.
During the charging process, condensation may form under the vehicle, which is normal and iscaused by cooling the hybrid battery.
Related information
• Hybrid battery charge status (p. 385)
• Charging the hybrid battery (p. 383)
• Hybrid battery charging cable (p. 375)
• Stopping hybrid battery charging (p. 381)
Charging the hybrid battery In addition to the conventional fuel tank, the XC90 T8 Twin Engine Plug-in Hybrid is alsoequipped with a rechargeable lithium-ion hybridbattery.
The hybrid battery is recharged using a charging cable located in a storage compartment underthe floor of the cargo area. See also the article"Charging cable."
WARNING
The hybrid electrical system in your vehicle uses high voltage electrical current. Any dam-age to this system or to the hybrid batterymay result in the danger of overheating, fire,or serious injury. If the vehicle is involved in acollision or is subjected to flooding, fires, etc.,have it inspected by a trained and qualifiedVolvo service technician. Prior to this inspec-tion, the vehicle should be parked outdoors ata safe distance from any building or poten-tially flammable materials.
The hybrid battery's charging time depends on the charging current used.
Page 387 of 546

STARTING AND DRIVING
}}
385
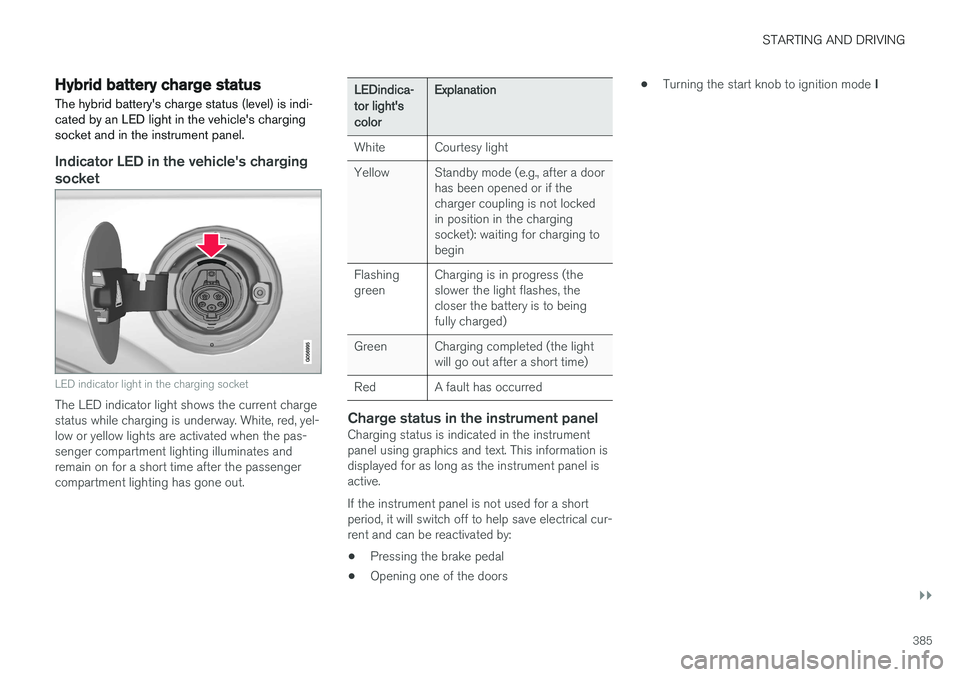
Hybrid battery charge status The hybrid battery's charge status (level) is indi- cated by an LED light in the vehicle's chargingsocket and in the instrument panel.
Indicator LED in the vehicle's charging socket
LED indicator light in the charging socket
The LED indicator light shows the current charge status while charging is underway. White, red, yel-low or yellow lights are activated when the pas-senger compartment lighting illuminates andremain on for a short time after the passengercompartment lighting has gone out.
LEDindica- tor light'scolorExplanation
WhiteCourtesy light
YellowStandby mode (e.g., after a door has been opened or if thecharger coupling is not lockedin position in the chargingsocket): waiting for charging tobegin
Flashing greenCharging is in progress (the slower the light flashes, thecloser the battery is to beingfully charged)
GreenCharging completed (the light will go out after a short time)
RedA fault has occurred
Charge status in the instrument panelCharging status is indicated in the instrument panel using graphics and text. This information isdisplayed for as long as the instrument panel isactive. If the instrument panel is not used for a short period, it will switch off to help save electrical cur-rent and can be reactivated by:
• Pressing the brake pedal
• Opening one of the doors •
Turning the start knob to ignition mode
I
Page 398 of 546

STARTING AND DRIVING
* Option/accessory, for more information, see Introduction.
396
Shiftlock The automatic transmission's shiftlock feature helps prevent inadvertently moving the gearselector between different positions.
Automatic shiftlock
From Park – P
In order to move the gear selector from the P
position, the brake pedal must be depressed and the ignition must be in mode II.
From neutral – N
If the gear selector is in N and the vehicle has
been stationary for more than 3 seconds (regard- less of whether or not the engine is running), theshiftlock feature will lock the gear selector in thisposition. In order to move the gear selector from the N
position, the brake pedal must be depressed and the ignition must be in mode II.
Messages in the instrument panelIf the gear selector is locked in position, a mes- sage such as: Gear lever Press brake pedal
to activate gear lever will be displayed.
There is no mechanical shiftlock function.
Related information
• Gear selector positions (p. 396)
• Automatic transmission (p. 395)
Gear shift indicator
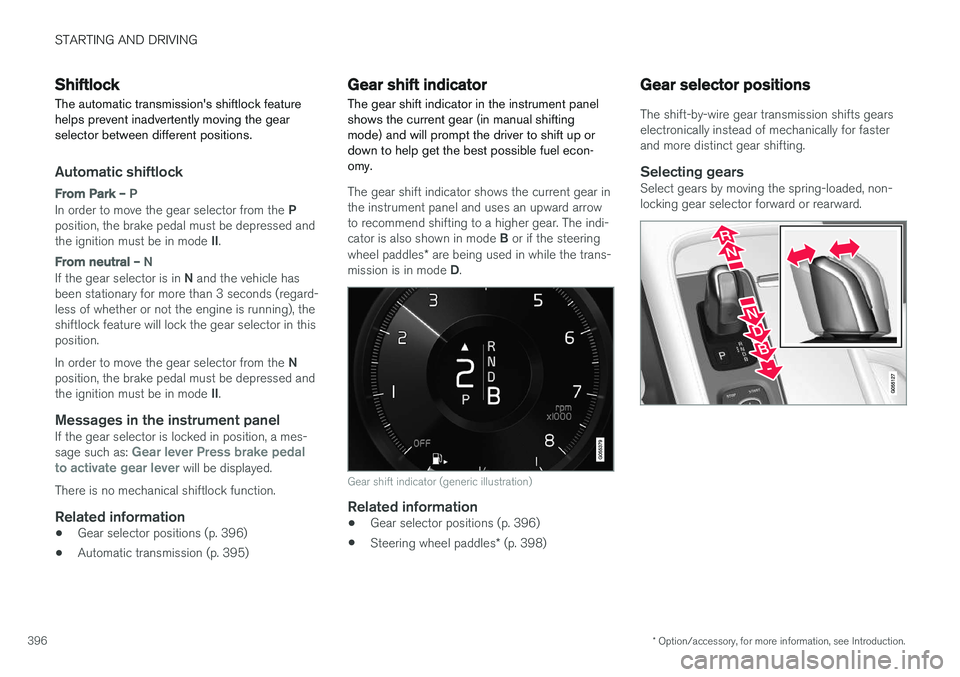
The gear shift indicator in the instrument panel shows the current gear (in manual shiftingmode) and will prompt the driver to shift up ordown to help get the best possible fuel econ-omy.
The gear shift indicator shows the current gear in the instrument panel and uses an upward arrowto recommend shifting to a higher gear. The indi- cator is also shown in mode B or if the steering
wheel paddles * are being used in while the trans-
mission is in mode D.
Gear shift indicator (generic illustration)
Related information
• Gear selector positions (p. 396)
• Steering wheel paddles
* (p. 398)
Gear selector positions
The shift-by-wire gear transmission shifts gears electronically instead of mechanically for fasterand more distinct gear shifting.
Selecting gearsSelect gears by moving the spring-loaded, non-locking gear selector forward or rearward.
Page 399 of 546

STARTING AND DRIVING
}}
397
Gear selector positions
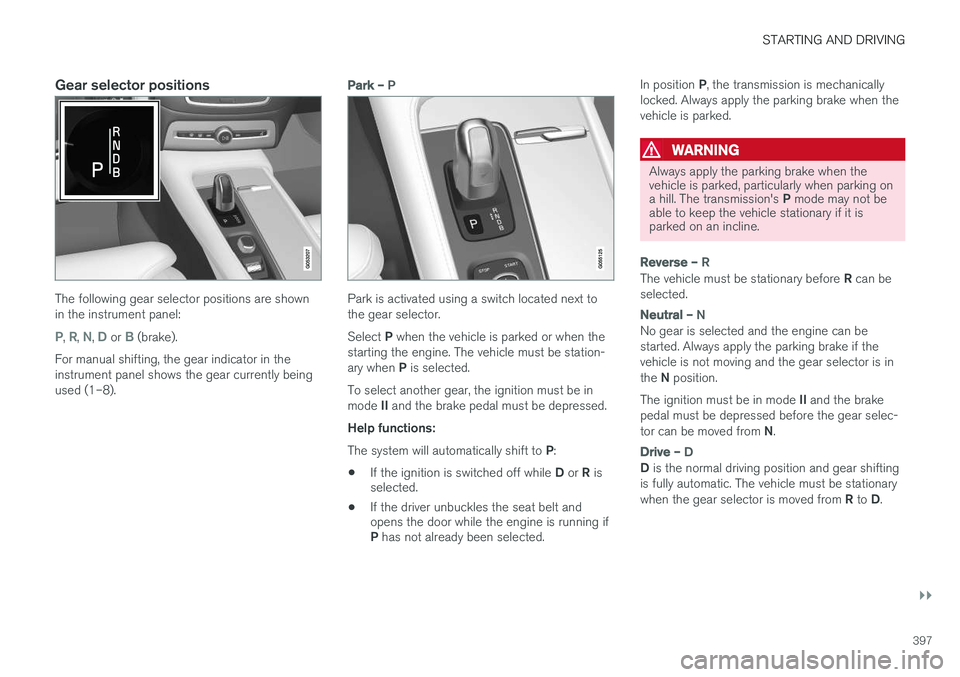
The following gear selector positions are shown in the instrument panel:
P, R, N, D or B (brake).
For manual shifting, the gear indicator in the instrument panel shows the gear currently beingused (1–8).
Park – P
Park is activated using a switch located next to the gear selector. Select P when the vehicle is parked or when the
starting the engine. The vehicle must be station- ary when P is selected.
To select another gear, the ignition must be inmode II and the brake pedal must be depressed.
Help functions: The system will automatically shift to P:
• If the ignition is switched off while
D or R is
selected.
• If the driver unbuckles the seat belt and opens the door while the engine is running if P
has not already been selected. In position
P, the transmission is mechanically
locked. Always apply the parking brake when the vehicle is parked.
WARNING
Always apply the parking brake when the vehicle is parked, particularly when parking on a hill. The transmission's P mode may not be
able to keep the vehicle stationary if it is parked on an incline.
Reverse – R
The vehicle must be stationary before R can be
selected.
Neutral – N
No gear is selected and the engine can be started. Always apply the parking brake if thevehicle is not moving and the gear selector is in the N position.
The ignition must be in mode II and the brake
pedal must be depressed before the gear selec-tor can be moved from N.
Drive – D
D is the normal driving position and gear shifting
is fully automatic. The vehicle must be stationary when the gear selector is moved from R to D.
Page 406 of 546

INFOTAINMENT
404
The infotainment system
The infotainment system consists of a radio, media player and has the capacity to communi-cate with a Bluetooth-connected cell phone. It isalso possible to connect to the Internet to e.g.,stream audio content via apps. The system's functions can be controlled from the right-side steering wheel keypad, the centerdisplay or by using voice commands.
Infotainment overview
System updates
The infotainment system is constantly being developed and improved. For optimal functional-ity, updates can be downloaded. See the article"System updates" and the support sitesupport.volvocars.com.
Related information
• Media player (p. 421)
• Radio (p. 405)
• Phone (p. 414)
• Internet connected vehicle (p. 431)
• Apps (applications) (p. 433)
• Ignition modes (p. 370)
• Symbols in the center display status bar (p. 47)
• Voice control (p. 120)
• Infotainment system license information(p. 437)
• System updates (p. 474)
Sound settings
The infotainment system is precalibrated for opti- mal sound reproduction but these settings canbe changed to suit your personal preferences.
The system's volume is normally adjusted using the right-side steering wheel keypad or the vol-ume control below the center display.
Optimal sound reproduction settingsThe audio system is precalibrated for optimalsound reproduction using digital signal process-ing. This calibration takes into account the speak-ers, amplifier, cabin acoustics, listener position,etc., for each combination of vehicle and infotain-ment system. Dynamic calibration is also available, which moni- tors the setting of the volume control, radioreception and the vehicle's speed. Specific sound settings are described in the respective articles/sections of this owner's infor-mation. To change a setting, pull down the center dis- play's Top view and tap
SettingsSound.
Active noise suppression 1The vehicle can be equipped with an active noise suppression function that reduces engine noisein the passenger compartment by utilizing theinfotainment system. The microphone(s) in the
1
Certain models only.
Page 418 of 546

||
INFOTAINMENT
4166. To connect the vehicle to the Internet via the
phone's Bluetooth function, activate the phone's function for tethering/personal hot-spot, etc.
Alternative 2: searching for the vehicle from the phone
1. Open the center display's Phone view.
•If no phones have been paired to the vehi- cle, tap
Add phoneMake vehicle
discoverable.
• If a phone has previously been paired to the vehicle, tap
Change and tap Add
phone
Make vehicle discoverable in
the pop-up window.
2. Activate the phone's Bluetooth function.
3. Search in the phone for Bluetooth devices. > A list of Bluetooth devices will be dis-played.
4. Select the vehicle's name in the list.
5. Check that the code displayed in the phone is the same as the one in the vehicle. Con- firm in both places.
6. For the phone selected, accept or cancel the alternatives for the phone book (list of con-tacts), text messages, etc. Full functionalitymay not be available in all cell phones. 7. To connect the vehicle to the Internet via the
phone's Bluetooth function, activate thephone's function for tethering/personal hot-spot, etc.
NOTE
If your cell phone's operating system is upda- ted, this may break the connection betweenthe phone and the vehicle. If this happens,delete the phone from the list of pairedphones and repeat the pairing proceduredescribed in this article.
Compatible cell phonesMany of the cell phones available today have Bluetooth functionality but not all of them arefully compatible with the vehicle. Go towww.volvocars.com for a list of compatiblephones or contact your Volvo retailer.
Related information
• Connecting/disconnecting a cell phone (p. 416)
• Handling phone calls (p. 417)
• Handling text messages (p. 418)
• Phone settings (p. 419)
• Bluetooth settings (p. 433)
Connecting/disconnecting a cell phone
Once a cell phone or other Bluetooth device has been paired to the infotainment system, it can beconnected, disconnected or removed from thelist of available devices.
Connecting automatically1. Before switching on the vehicle's ignition, be sure that the phone's Bluetooth and personal hotspot (tethering) functions are activated.
2. Switch on the ignition. > The phone (or other device) will be con-nected to the system and can be usedwirelessly.
Connecting manually1. Be sure that the phone's Bluetooth and per- sonal hotspot (tethering) functions are acti-vated.
2. In the center display, open Phone view and tap
Change phone.
> A list of available Bluetooth devices (ones that have already been paired to the info- tainment system) will be displayed.
3. Tap the name of the phone or other device to be connected.
> The phone (or other device) will be con-nected.
Page 429 of 546

INFOTAINMENT
427
3.
Tap
Search.
> The infotainment system will search through all connected devices and any results will be displayed by category.
Related information
• Media player (p. 421)
• Playing media (p. 424)
• Using the center display keyboard (p. 35)
Playing media through the AUX/USB sockets
An external media device, such as an iPod or an mp-3 player can be connected to the infotain-ment system.
A device with rechargeable batteries can be recharged when it is connected to the USBsocket (if the ignition is on or the engine is run-ning). To simplify the use of a USB flash drive, it is advisable to only store files with compatible fileformats on it. It will take considerably longer forthe system to index the files on the drive if it con-tains anything other than compatible files. In addition to audio, the vehicle's media player also supports video playback when the externaldevice is connected to the USB socket. Certain mp-3 players have proprietary file formats that are not supported by the infotainment sys-tem.
Related information
• Connecting a device via the AUX/USB socket (p. 420)
Streaming media through a Bluetooth connection The media player is equipped with Bluetooth ®
for streaming audio files from external Bluetooth ®
-enabled devices.
Related information
• Connecting a Bluetooth ®
device (p. 420)
• Playing media (p. 424)
• Voice control for radio and media (p. 122)
• Media player (p. 421)
• Ignition modes (p. 370)
• Media player technical data (p. 429)
Page 460 of 546

||
WHEELS AND TIRES
458If a spare wheel or other wheel without a TPMS sensor is used, a fault message will appear in theinstrument panel after driving for a few minutes. After changing wheels, always check that the new wheels have TPMS sensors to avoid a sys-tem malfunction warning. TPMS does not replace the need for regular tire inspection and maintenance.
RecommendationsTPMS sensors should be mounted on all wheelsused with the vehicle, including winter wheels.
NOTE
•
If you change to tires with a different dimension than the factory-installed ones,the TPMS system must be reconfiguredfor these tires. This must be done by atrained and qualified Volvo service techni-cian.
• If a tire is changed, or if the TPMS sensoris moved to another wheel, the rubbervalve and valve core should be replaced.
• When installing TPMS sensors, the vehi-cle must be parked for at least15 minutes with the ignition off. If thevehicle is driven within 15 minutes, aTPMS error message will be displayed.
WARNING
Incorrect inflation pressure could lead to tire failure, resulting in a loss of control of thevehicle.
Turning TPMS off 4TPMS can be turned off in the center display's Top view.
1. Park the vehicle and turn off the engine.2.
Activate ignition mode I.
3. Select
SettingsMy CarIntelliSafe
Tire Pressure Monitor in the Top view
and deselect (tap) the button.
> The function will remain off until it is reac- tivated.
Related information
• Checking inflation pressure (p. 458)
• Reinflating tires equipped with the Tire Pressure Monitoring System (TPMS)(p. 459)
• Tire Pressure Monitoring System type appro-val (p. 461)
• Ignition modes (p. 370)
Checking inflation pressure The Tire Pressure Monitoring System makes it possible to view the current inflation pressure ofall four tires.
Checking inflation pressureOpen the Car status app in
the center display's Application view. Tap
Status to see the
current inflation pressure of all four tires.
The on-screen graphic displays the inflation pres- sure.
The illustration is generic and may vary from model to model or after a software update
4 Certain markets only.